Centru de ajutor
Odoo Helpdesk integrates with the Forum, eLearning, and Knowledge apps to create the help center.
The help center is a centralized location where teams and customers can search for and share detailed information about products and services.
Notă
In order to activate any of these features on a Helpdesk team, (Forums, eLearning, or Knowledge), the Visibility of the team has to be set to Invited portal users and all internal users. See Getting Started for more information on Helpdesk team settings and configuration.
Atenționare
Since all of the help center features require integration with other applications, enabling any of them may result in the installation of additional modules or applications.
Installing a new application on a One-App-Free database will trigger a 15-day trial. At the end of the trial, if a paid subscription has not been added to the database, it will no longer be active or accessible.
Cunoștințe
Odoo’s Knowledge application is a collaborative library where users can store, edit, and share information. The Knowledge app is represented throughout the database by a book icon.
Activați Knowledge într-o echipă de Helpdesk
To enable the Knowledge feature on a Helpdesk team, go to and select a team, or create a new one.
Când o echipă a fost selectată sau creată, Odoo afișează formularul cu detaliile acelei echipe.
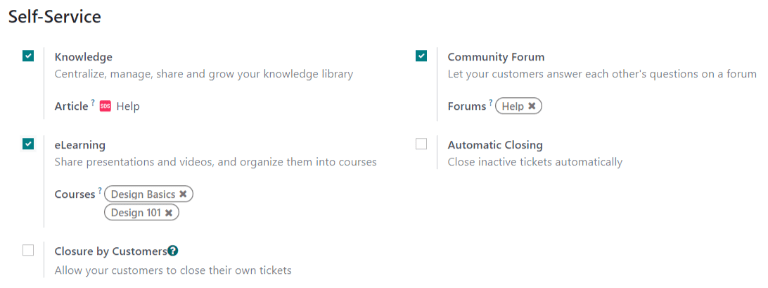
On the team’s detail form, scroll down to the Self-Service section. Click the box next to Knowledge to activate the Knowledge feature. When clicked, a new field labeled Article appears.
Făcând clic pe câmpul Articol, apare un meniu derulant. La început, există o singură opțiune în meniul derulant intitulat Help, pe care Odoo o oferă implicit. Selectați Ajutor din meniul derulant pentru a alege acest articol.
Sfat
Pentru a crea un articol nou, accesați , apoi plasați cursorul lângă titlul secțiunii Workspace, situat în bara laterală din stânga. Mutarea cursorului acolo dezvăluie o pictogramă ascunsă ➕ (semnul plus).
Click the ➕ (plus sign) to create a new article in the Workspace. In the upper right corner of the page, click the Share button, and slide the Share to Web toggle switch until it reads Article Published. It can then be added to a Helpdesk team.
Odată ce un articol a fost creat și alocat unei echipe Helpdesk, conținutul poate fi adăugat și organizat prin aplicația Knowledge.
Vedeți și
Căutați articole dintr-un bilet Helpdesk
Atunci când membrii unei echipe Helpdesk încearcă să rezolve un bilet, pot căuta prin conținut în aplicația Knowledge pentru mai multe informații despre problemă.
To search Knowledge articles, open a ticket — either from the Helpdesk app dashboard, or by going to , and selecting a Ticket from the list.
When a Ticket is selected, Odoo reveals that ticket’s detail form.
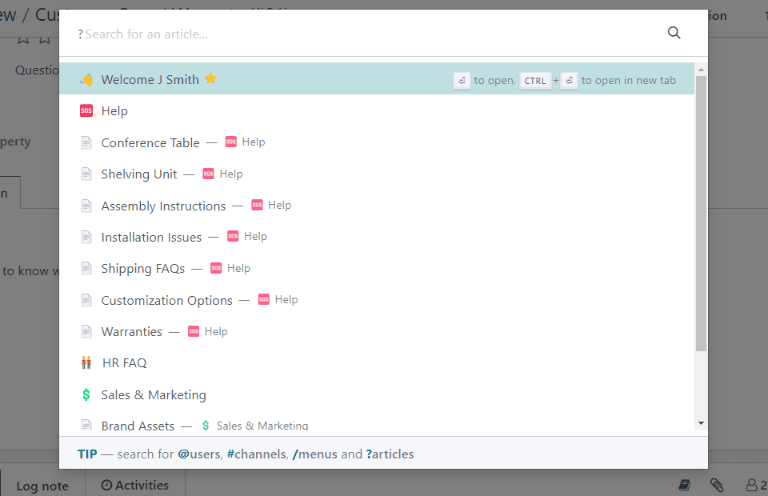
Click the Knowledge (book) icon, located above the chatter to open a search window.
Sfat
Knowledge articles can also be searched by pressing Ctrl + K to open the command palette, then typing ?, followed by the name of the desired article.
Când Odoo dezvăluie articolul dorit, faceți clic pe el sau evidențiați titlul Articol și apăsați Enter. Acest lucru va deschide articolul în aplicația Knowledge.
Pentru a deschide articolul într-o filă nouă, apăsați Ctrl + Enter.
Sfat
If a more in-depth search is required, press Alt + B. That will reveal a separate page, in which a more detailed search can occur.
Solve tickets with templates
Template boxes can be added to Knowledge articles to allow content to be reused, copied, sent as messages, or added to the description on a ticket. This allows teams to maintain consistency when answering customer tickets, and minimize the amount of time spent on responding to repeat questions.
Add templates to articles
To create a template, go to . Click on an existing nested article or create a new one by clicking the ➕ (plus sign) icon next to Help.
Type / to open the Powerbox and view a list of commands. Select or type template. A gray template
block will be added to the page. Add any necessary content to this block.
Notă
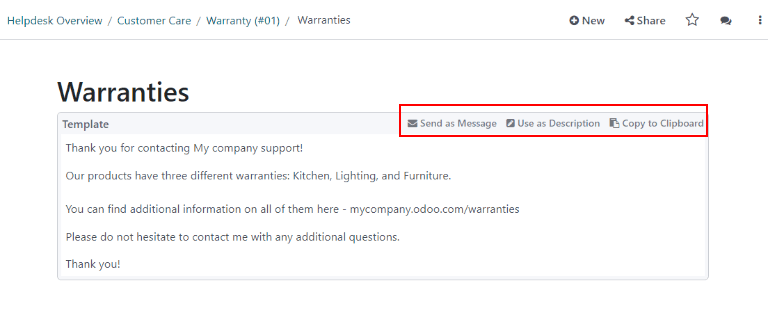
Templates will only display the Use as description or Send as Message options if they are accessed directly from Helpdesk.
Use templates in tickets
Templates can be used to respond directly to a Helpdesk ticket as a message, or to add information to the ticket’s description.
To use templates in a Helpdesk ticket, first, open a ticket, either from the Helpdesk dashboard or by going to and selecting a Ticket from the list.
Click on the Knowledge (book) icon above the chatter for the ticket. This opens a search window. In this search window, select, or search for the desired article. Doing so reveals that article page in the Odoo Knowledge application.
To use a template to respond to a ticket, click Send as message in the upper right corner of the template box, located in the body of the article.
Doing so opens a Compose email pop-up window. In this window, select the recipients, make any necessary additions or edits to the template, then click Send.
Sfat
To use a template to add information to a ticket’s description, click Use as description in the upper right corner of the template box, located in the body of the article. Doing so will not replace the existing text in a ticket’s description. The template will be added as additional text.
Forum comunitate
Un Forum comunitar oferă clienților un spațiu pentru a răspunde reciproc la întrebările și a împărtăși informații. Prin integrarea unui forum cu o echipă Helpdesk, biletele trimise de clienți pot fi convertite în postări și partajate.
Activați forumuri într-o echipă de Helpdesk
To enable Community Forums on a Helpdesk team, start by navigating to and select a team, or create a new one.
Selecting or creating a team reveals that team’s detail form. Scroll down to the Self-Service section of features, and enable Community Forum, by checking the box beside it.
Când este activat, un câmp nou etichetat Forumuri apare dedesubt.
Faceți clic pe câmpul gol Forums pentru a afișa un meniu drop-down. În mod implicit, există o singură opțiune pentru început, etichetată Ajutor. Aceasta este opțiunea creată automat de Odoo atunci când funcția Forumuri comunitare a fost activată. Selectați Ajutor din meniul derulant pentru a activa acel forum.
Pentru a crea un forum nou, introduceți un nume în câmpul necompletat Forumuri, apoi faceți clic pe opțiunea Creați și editați. În acest câmp pot fi selectate mai multe forumuri.
Vedeți și
Check out the Forum documentation to learn how to configure, use, and moderate a forum.
Creați o postare pe forum dintr-un bilet Helpdesk
Când o echipă Helpdesk are un Forum activat, biletele trimise acelei echipe pot fi convertite în postări pe forum.
Pentru a face acest lucru, selectați un bilet, fie din conducta unei echipe, fie din în aplicația Helpdesk.
În partea de sus a formularului de detalii ale biletului, faceți clic pe butonul Partajați pe forum.
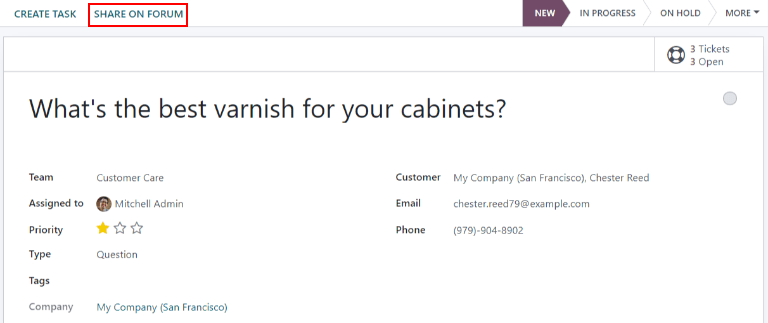
When clicked, a pop-up appears. Here, the post and title can be edited to correct any typos, or modified to remove any proprietary or client information. Tags can also be added to help organize the post in the forum, making it easier for users to locate during a search. When all adjustments have been made, click Create and View Post.
eLearning
Cursurile eLearning Odoo oferă clienților instruire și conținut suplimentar sub formă de videoclipuri, prezentări și certificări/chestionare. Oferirea de formare suplimentară permite clienților să rezolve problemele și să găsească singuri soluții. De asemenea, ei pot dezvolta o înțelegere mai profundă a serviciilor și produselor pe care le folosesc.
Activați cursurile de eLearning într-o echipă de Helpdesk
To enable eLearning courses on a Helpdesk team, go to and select a team, or create a new one.
On the team’s settings page, scroll to the Self-Service section, and check the box next to eLearning. A new field will appear below, labeled Courses.
Faceți clic pe câmpul gol de lângă Cursuri de sub caracteristica eLearning pentru a afișa un meniu derulant. Selectați un curs disponibil din meniul derulant sau introduceți un titlu în câmp și faceți clic pe Creați și editați pentru a crea un nou curs de pe această pagină. Mai multe cursuri pot fi atribuite unei singure echipe.
Creați un curs de eLearning
Un nou curs eLearning poate fi creat din pagina de setări a echipei Helpdesk, ca în pasul de mai sus, sau din aplicația eLearning.
Pentru a crea un curs direct prin aplicația eLearning, navigați la . Acest lucru dezvăluie un șablon de curs gol care poate fi personalizat și modificat după cum este necesar.
Pe pagina șablonului de curs, adăugați un Titlul cursului, iar sub acesta, Etichete.
Click on the Options tab. Under Access Rights, choose the Enroll Policy. This determines which users will be allowed to take the course. Under Display, choose the course Type and Visibility. The Visibility setting determines whether the course will be available to public site visitors or members.
Adăugați conținut la un curs de eLearning
Pentru a adăuga conținut la un curs, faceți clic pe fila Conținut și selectați Adăugați conținut. Alegeți Tipul de conținut din meniul derulant și încărcați fișierul sau inserați linkul, acolo unde este indicat. Faceți clic pe Salvați când ați terminat. Faceți clic pe Add Section pentru a organiza cursul pe secțiuni.
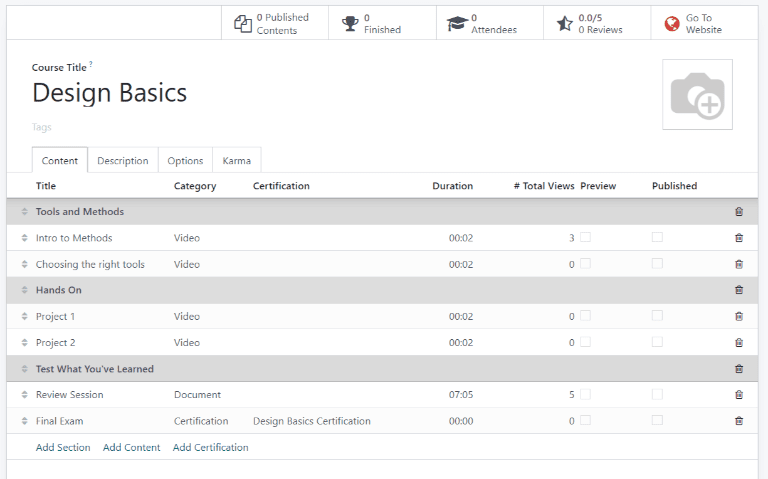
Notă
Pentru a adăuga o certificare la un curs, accesați , bifați caseta etichetată Certificări și Salvați pentru a activa setarea.
Vedeți și
Publicați un curs de eLearning
To allow customers to enroll in a course, both the course and the contents need to be published.
If the course is published, but the contents of the course are not published, customers can enroll in the course on the website, but they won’t be able to view any of the course content. Knowing this, it may be beneficial to publish the course first if the course contents are intended to be released over time, such as classes with a weekly schedule.
Pentru ca întregul curs să fie disponibil simultan, fiecare parte din conținutul cursului trebuie publicată mai întâi, apoi cursul poate fi publicat.
Pentru a publica un curs, alegeți un curs din tabloul de bord eLearning. Pe pagina șablonului de curs, faceți clic pe butonul inteligent Accesați site-ul.
Aceasta va dezvălui partea frontală a paginii web a cursului. În partea de sus a paginii web a cursului, mutați comutatorul de comutare Nepublicat la Publicat.
Publicați conținutul cursului eLearning din back-end
Pentru a publica conținutul cursului eLearning din back-end, alegeți un curs din tabloul de bord eLearning. Pe pagina șablonului de curs, faceți clic pe butonul inteligent Published Contents.
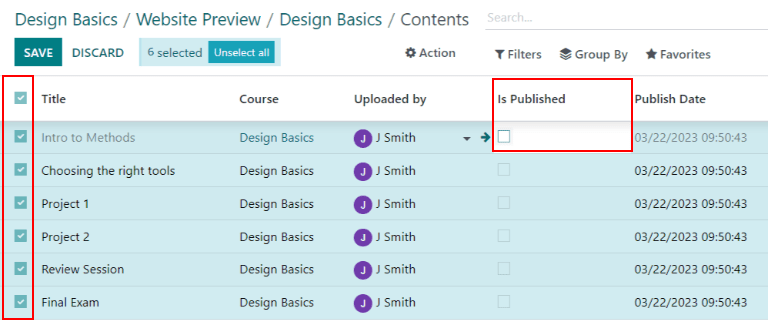
Procedând astfel, dezvăluie o pagină separată care afișează tot conținutul publicat legat de cursul respectiv. Eliminați filtrul implicit Published din bara de căutare din colțul din dreapta sus, pentru a dezvălui tot conținutul legat de curs - chiar și conținutul nepublicat.
Click the ≣ (List View) icon in the upper-right corner, directly beneath the search bar to switch to list view.
While in List View, there is a checkbox on the far left of the screen, above the listed courses, to the left of the Title column. When that checkbox is clicked, all the course contents are selected at once.
With all the course content selected, double click any of the boxes in the Is Published column. This reveals a pop-up window, asking for confirmation that all selected records are intended to be published. Click OK to automatically publish all course content.
