Trimiteți și primiți e-mailuri în Odoo cu un server de e-mail
Utilizatori Odoo Online sau Odoo.sh
Deoarece Odoo își configurează propriile servere de e-mail pentru baza de date, e-mailurile primite și trimise funcționează deja imediat. Deci, pentru clienții Odoo Online și Odoo.sh, nimic nu trebuie configurat!
Cu excepția cazului în care este necesar un server de e-mail extern pentru a trimite loturi mari de e-mailuri în masă, pur și simplu utilizați baza de date standard Odoo online, deoarece a fost deja preconfigurată pentru a trimite e-mailuri.
Important
Serverul Odoo este supus unei limite de emailuri zilnice pentru a preveni abuzurile. Limita implicită este de 200 de emailuri trimise pe zi pentru bazele de date cu o subscripție Enterprise. Această limită poate fi crește sub anumite condiții. Consultați FAQ sau contactați suportul pentru mai multe informații.
Scopul acestei documentații
Acest document este dedicat în principal bazelor de date Odoo on-premise care nu beneficiază de o soluție de tip out-of-the-box pentru a trimite și primi e-mailuri în Odoo, spre deosebire de Odoo Online și Odoo.sh. Serverele de intrare și de ieșire trebuie configurate pentru bazele de date locale.
Secțiunile de mai jos conțin informații despre cum să integrați un server de e-mail extern cu Odoo.
Atenționare
Dacă nimeni din companie nu este angajat să gestioneze serverele de e-mail, sunt recomandate Odoo Online și Odoo.sh. În aceste tipuri de găzduire Odoo, trimiterea și primirea e-mailurilor funcționează instantaneu și este monitorizată de profesioniști. Cu toate acestea, o companie își poate folosi propriul server de e-mail dacă dorește să gestioneze ea însăși reputația serverului de e-mail. Pentru mai multe informații, consultați Configurați înregistrările DNS pentru a trimite e-mailuri în Odoo
Sistem de notificări implicit
Documentele din Odoo (precum o oportunitate CRM, o comandă de vânzări, o factură, etc.) au un fir de discuții, numit chatter.
Atunci când un utilizator al bazei de date postează un mesaj în chatter, acest mesaj este trimis prin e-mail către adepții documentului ca notificare (cu excepția expeditorului). Dacă un abonat răspunde la mesaj, răspunsul actualizează conversația, iar Odoo transmite un alt răspuns adepților ca notificare. Mesajele trimise înapoi la chat de la utilizatori sau utilizatori externi vor apărea în chatter din e-mailul respectiv sau ca numele listat în înregistrarea Contacts.
Aceste notificări sunt trimise folosind o adresă implicită de la. Pentru mai multe informații, consultați Utilizați o adresă de e-mail implicită.
Gestionați mesajele de ieșire
Ca administrator de sistem, accesați în Odoo și activați opțiunea Servere de e-mail personalizate. Apoi, faceți clic pe Salvați. Apoi, faceți clic pe Servere de e-mail de ieșire și faceți clic pe Creare pentru a crea o nouă înregistrare a serverului de e-mail de ieșire în Odoo. Faceți referire la datele SMTP ale serverului de e-mail extern. Odată ce toate informațiile au fost completate, faceți clic pe Test Connection.
Vedeți și
Notă
Asigurarea că domeniul de ieșire are SPF, DKIM și DMARC configurat pe DNS va îmbunătăți capacitatea de livrare. Pentru mai multe informații, consultați Configurați înregistrările DNS pentru a trimite e-mailuri în Odoo.
Restricție portuară
Rețineți că portul 25 este blocat din motive de securitate pe platformele Odoo Online și Odoo.sh. Încercați să utilizați porturile 465, 587 sau 2525.
Utilizați o adresă de e-mail implicită „From”
Câteodată, o adresă de e-mail „From” (de ieșire) poate aparține unui domeniu diferit, și asta poate fi un problemă.
De exemplu, dacă un client cu adresa de e-mail „mary@customer.example.com” răspunde la un mesaj, Odoo va încerca să redistribuie același e-mail celorlalți abonați din fir. Cu toate acestea, dacă domeniul „customer.example.com” interzice acest tip de utilizare pentru securitate, e-mailul pe care Odoo încearcă să îl redistribuie ar fi respins de serverele de e-mail ale unor destinatari.
Pentru a evita această problemă, Odoo trimite toate e-mailurile folosind o adresă „De la” din același domeniu autorizat.
Aceasta se poate face prin accesarea Parametrii de sistem prin activarea modului de dezvoltator și accesarea meniului .
Pentru a forța adresa de email de la care sunt trimise e-mailurile, o combinație a următoarelor chei trebuie să fie setată în parametrii de sistem al bazei de date:
mail.default.from: acceptă partea locală sau o adresă completă de email ca valoaremail.default.from_filter: acceptă un nume de domeniu sau o adresă completă de email ca valoare
Notă
mail.default.from_filter funcționează numai pentru configurațiile odoo-bin sau pentru serverul de e-mail Odoo implicit, altfel acest parametru poate fi setat folosind câmpul from_filter de pe ir.mail_server.
Câmpul poate fi un nume de domeniu sau o adresă de e-mail întreagă sau poate rămâne gol. Dacă adresa de e-mail a expeditorului nu se potrivește cu acest filtru setat, atunci e-mailul va fi încapsulat folosind o combinație a celor doi parametri de sistem: mail.default.from și mail.catchall.domain.
Example
In the following example, the from email address is replaced with the combination of the the two
system parameters (mail.default.from and mail.catchall.domain). This is the defaultnotifications configuration in Odoo: “Admin” <admin@example.com> => “Admin”
<notifications@mycompany.com>.
Cu alte cuvinte, dacă adresa de e-mail a autorului nu se potrivește cu mail.default.from_filter, adresa de e-mail este înlocuită cu mail.default.from (dacă conține o adresă de e-mail completă) sau o combinație de mail. default.from și mail.catchall.domain.
Dacă from_filter conține o adresă completă de email, și dacă mail.default.from este aceeași ca această adresă, atunci toate adresele de email care sunt diferite de mail.default.from vor fi încapsulate în mail.default.from.
Folosind filtrul „De la” pe un server de e-mail de ieșire
Câmpul FROM Filtering permite utilizarea unui anumit server de e-mail de ieșire, în funcție de adresa de e-mail sau de domeniul From pe care Odoo o trimite în numele. Această setare poate fi utilizată pentru a îmbunătăți capacitatea de livrare sau rata de succes a trimiterii e-mailurilor trimise din baza de date. Setarea câmpului FROM Filtering poate fi folosită și pentru a trimite din diferite domenii într-un mediu cu mai multe companii. Accesați acest câmp în Odoo navigând la .
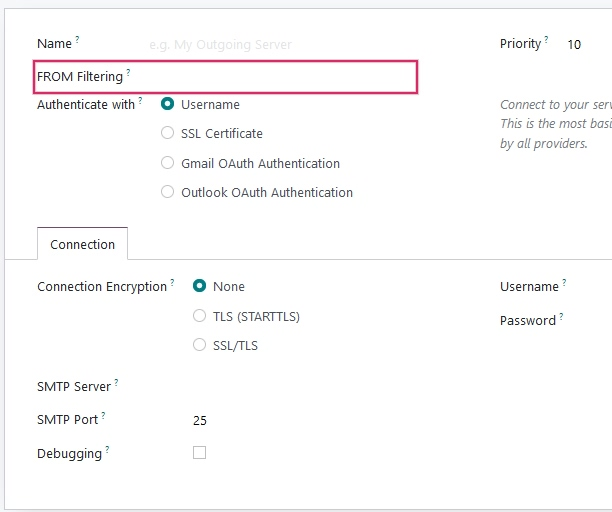
Când un e-mail este trimis din Odoo în timp ce câmpul Filtrare DE LA este setat, un server de e-mail este ales în următoarea secvență:
În primul rând, Odoo caută un server de e-mail care are aceeași valoare Filtrare DE LA ca și valoarea De la (adresa de e-mail) definită în e-mailul de ieșire. De exemplu, dacă valoarea De la (adresa de e-mail) este
test@example.com, numai serverele de e-mail care au valoarea Filtrare DE LA egală cutest@example.comsunt returnate.Cu toate acestea, dacă nu sunt găsite servere de e-mail care utilizează valoarea De la, atunci Odoo caută un server de e-mail care are aceeași domeniu ca și valoarea De la (adresa de e-mail) definită în e-mailul de ieșire. De exemplu, dacă adresa de e-mail De la este
test@example.com, numai serverele de e-mail care au valoarea Filtrare DE LA egală cuexample.comsunt returnate.
Dacă nu sunt găsite servere de e-mail după verificarea domeniului, atunci Odoo returnează toate serverele de e-mail care nu au nicio valoare Filtrare DE LA setată.
Dacă această interogare nu returnează rezultate, atunci Odoo efectuează o căutare pentru un server de e-mail utilizând parametrul de sistem: mail.default.from. În primul rând, adresa de e-mail încearcă să se potrivească cu un server de e-mail, iar apoi domeniul încearcă să găsească o potrivire. Dacă nu este găsit niciun server de e-mail, Odoo returnează primul server de e-mail de ieșire (sortat după prioritate).
Notă
Dacă sunt găsite mai multe servere de e-mail, atunci Odoo utilizează primul unul în funcție de prioritatea sa. De exemplu, dacă există două servere de e-mail, unul cu o prioritate de 10 și celălalt cu o prioritate de 20, atunci serverul de e-mail cu o prioritate de 10 este utilizat în primul rând.
Configurați diferite servere dedicate pentru e-mailuri tranzacționale și de masă
În Odoo, un server de e-mail separat poate fi folosit pentru e-mail-uri tranzacționale și e-mailuri în masă. Exemplu: Utilizați Postmark sau SendinBlue pentru e-mailurile tranzacționale și Amazon SES, Mailgun, Sendgrid sau Mailjet pentru e-mailuri în masă.
Important
Un server de e-mail de ieșire implicit este deja configurat. Nu creați unul alternativ decât dacă este necesar un server de e-mail de ieșire extern specific din motive tehnice.
Pentru a face acest lucru, mai întâi activați developer mode, apoi accesați servere de e-mail. Acolo, creați două setări de server de e-mail de ieșire; unul pentru e-mailurile tranzacționale și unul pentru serverul de corespondență în masă. Asigurați-vă că acordați prioritate serverului tranzacțional față de serverul de corespondență în masă, oferind un număr cu prioritate mai mică pentru serverul de e-mail tranzacțional.
Acum, accesați și activați Server dedicat. Alegeți serverul de e-mail corespunzător. Cu aceste setări, Odoo utilizează serverul cu prioritate mai mică pentru e-mailurile tranzacționale, iar serverul selectat aici pentru e-mailurile în masă. Rețineți că, în acest caz, înregistrările Sender Policy Framework (SPF) ale domeniului trebuie setate să includă atât servere de e-mail tranzacționale, cât și de masă.
Vedeți și
domeniu de e-mail
Gestionați mesajele de intrare
Odoo se bazează pe aliasuri de e-mail generice pentru a prelua mesajele de intrare.
Mesajele de răspuns ale mesajelor trimise de la Odoo sunt direcționate către firul lor de discuții inițial (și către căsuța de e-mail a tuturor adepților săi) prin alias-ul modelului, dacă există, sau prin alias-ul catchall (catchall@ ). Răspunsurile la mesajele modelelor care nu au un alias personalizat vor folosi aliasul catchall (
catchall@mycompany.odoo.com). Cu toate acestea, adresa catchall nu are o altă acțiune atașată la fel ca alte aliasuri, este folosită doar pentru a colecta răspunsuri.Mesajele respinse sunt folosite ca cale de întoarcere. Un exemplu pentru care este util în special este în „Odoo Email Marketing <https://www.odoo.com/page/email-marketing>`__. În acest caz, renunțările sunt renunțate în funcție de situația în care e-mailul a renunțat de prea multe ori (5) în ultima lună și renunțările sunt separate de o săptămână. Acest lucru se face pentru a evita includerea pe lista neagră a unei persoane din cauza unei erori de server de e-mail. Dacă aceste circumstanțe sunt îndeplinite, atunci e-mailul este considerat nevalid și este inclus pe lista neagră. O notă de jurnal este adăugată la contact sub Adrese de e-mail pe lista neagră din Meniul de configurare a marketingului prin e-mail.
Mesajele care răsună în discuții (în afara Marketingului prin e-mail) vor popula un plic roșu care indică livrarea eșuată. Acest lucru poate fi util să știți că o comandă de vânzare sau o factură nu a ajuns la destinația finală.
Mesaje originale: mai multe obiecte de afaceri au propriul alias pentru a crea înregistrări noi în Odoo din e-mailurile primite:
Canal de vânzări (pentru a crea Leads sau Oportunities în Odoo CRM)
Canal de asistență (pentru a crea Bilete în Odoo Helpdesk)
Proiecte (pentru a crea noi sarcini în Odoo Project)
Posturi de muncă (pentru a crea Solicitanți în Odoo Recruitment)
În funcție de serverul de e-mail, ar putea exista mai multe metode pentru a prelua e-mailuri. Cel mai ușor și cel mai recomandat mod este să gestionați o adresă de e-mail pe alias Odoo în serverul de e-mail.
Creați adresele de e-mail corespunzătoare în serverul de e-mail (catchall@, bounce@, sales@ etc.).
Setați numele Alias Domain în . Schimbarea Domeniul Alias va schimba domeniul catchall pentru baza de date.
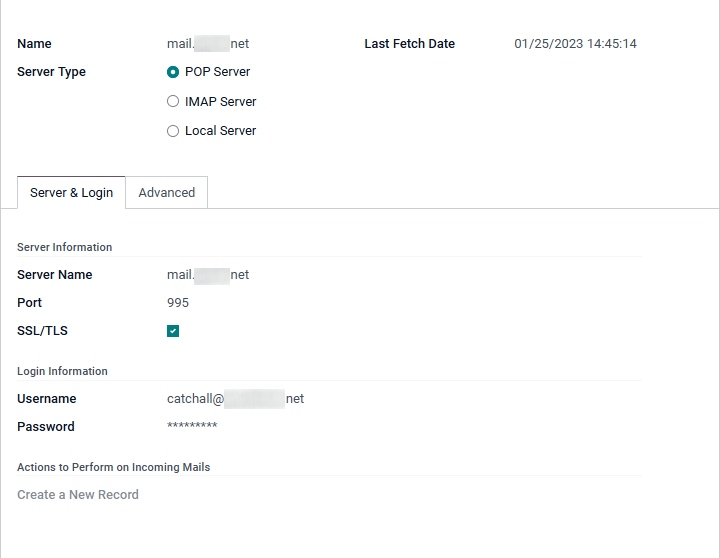
Dacă tipul de găzduire al bazei de date este Odoo on-premise, creați un Incoming Mail Server în Odoo pentru fiecare alias. Pentru a crea un nou server de intrare accesați: Completați formularul conform setărilor furnizorului de e-mail. Lăsați câmpul Acțiuni de efectuat la e-mailurile primite necompletat. Odată ce toate informațiile au fost completate, faceți clic pe TESTĂ & CONFIRMĂ.
Dacă tipul de găzduire al bazei de date este Odoo Online sau Odoo.sh, se recomandă redirecționarea sau redirecționarea mesajelor primite către numele de domeniu Odoo în loc de serverul de e-mail extern. În acest fel, mesajele primite pot fi primite fără întârziere. Redirecționările pentru toate adresele de e-mail ar trebui să fie setate la numele domeniului Odoo în serverul de e-mail (de exemplu,
catchall@mydomain.extlacatchall@mycompany.odoo.com).
Toate pseudonimele sunt personalizabile în Odoo. Aliasurile obiectelor pot fi editate din vizualizarea de configurare respectivă navigând la .
Pentru a edita aliasurile catchall și bounce, mai întâi activați developer mode. Apoi, mergeți la pentru a personaliza aliasurile (mail.catchall.alias și mail.bounce.alias). Aceste tipuri de modificări ar trebui să fie finalizate înainte ca baza de date să intre în vigoare. Dacă un client răspunde după o modificare, atunci sistemul nu va recunoaște vechiul alias și răspunsul nu va fi primit.
În mod implicit, mesajele de intrare sunt preluate la fiecare 5 minute pentru bazele de date locale.
Notă
Această valoare poate fi modificată în modul de dezvoltare. Mergeți la și căutați Mail: Serviciul Fetchmail.
Parametrii sistemului care previn buclele de feedback
Există doi parametri de sistem care ajută la prevenirea buclelor de e-mail să apară în Odoo. Acești parametri au fost introduși în Odoo 16 pentru a împiedica aliasurile să creeze prea multe înregistrări și pentru a preveni buclele de feedback pe adresa de e-mail de răspuns. Ele sunt prezente în baza de date, dar nu în Parametrii sistemului. Pentru a înlocui următoarele valori implicite, acestea trebuie adăugate.
Cei doi parametri de sistem sunt după cum urmează:
mail.gateway.loop.minutes(120 de minute în mod implicit)mail.gateway.loop.threshold(20 implicit)
Adăugați aceste câmpuri în Odoo activând mai întâi modul dezvoltator, apoi navigând la . Modificați valoarea acestor parametri, după cum este necesar.
Atunci când un e-mail este primit în baza de date Odoo pe adresa de e-mail catchall sau pe orice alias, Odoo se uită la e-mail-ul primit pentru perioada de timp dată definită în parametrul de sistem mail.gateway.loop.minutes. Dacă e-mailul primit a fost trimis la un alias, atunci Odoo va face referire la parametrul de sistem mail.gateway.loop.threshold și va determina valoarea ca număr de înregistrări pe care acest alias este permis să le creeze în perioada de timp dată (valoarea ` mail.gateway.loop.minutes`).
În plus, atunci când e-mail-ul este primit la adresa de e-mail catchall, Odoo va face referire la e-mailurile primite în baza de date în perioada de timp stabilită (așa cum este indicată de valoarea din parametrul de sistem: mail.gateway.loop.minutes). Odoo va determina apoi dacă vreunul dintre e-mailurile primite se potrivește cu e-mail-urile primite în intervalul de timp specificat și va preveni apariția unei bucle de feedback dacă este detectat un e-mail duplicat.
Permite parametrul de sistem al domeniului alias
Aliasurile primite sunt setate în baza de date Odoo pentru a crea înregistrări prin primirea de e-mailuri. Pentru a vedea aliasurile setate în baza de date Odoo, mai întâi activați modul dezvoltatorului. Apoi, accesați .
Următorul parametru de sistem, mail.catchall.domain.allowed, setat cu valori permise de domeniul alias, separate prin virgule, filtrează e-mailurile adresate corect la aliasuri. Setarea domeniului (domeniilor) pentru care aliasul poate crea un bilet, un client potențial, o oportunitate etc., elimină falsele pozitive acolo unde sunt prezente adrese de e-mail cu alias-ul de prefix (nu domeniul).
În unele cazuri, potrivirile au fost făcute în baza de date Odoo atunci când se primește un e-mail cu același prefix de alias și un domeniu diferit pe adresa de e-mail primită. Acest lucru este valabil în adresele de e-mail ale expeditorului, destinatarului și CC ale unui e-mail primit.
Example
Când Odoo primește e-mailuri care au numele „comercial” alias prefix în expeditor, destinatar sau CC adresă(e) de e-mail (de exemplu, commercial@gmail.com, commercial@odoo.net), baza de date tratează în mod fals e-mailul ca alias „comercial” complet (cu un domeniu diferit) și, prin urmare, creează un bilet/lead/oportunitate/etc.
Pentru a adăuga parametrul de sistem mail.catchall.domain.allowed, mai întâi, activați developer mode. Apoi, accesați . Faceți clic pe Creați. Apoi, tastați mail.catchall.domain.allowed pentru câmpul Key.
Apoi, pentru câmpul Valoare, adăugați domeniul (domeniile) separat(e) prin virgulă (dacă domeniile plural). Manual Salvați, iar parametrul de sistem are efect imediat.
