Chile
Sfat
Urmăriți cele două înregistrări webinare de mai jos pentru o prezentare generală a localizării și căutați în lista de redare tutoriale pentru a descoperi fluxuri de lucru practice în timp ce utilizați Odoo în Chile.
Module
Instalați următoarele module pentru a utiliza toate caracteristicile localizării chiliane.
Nume |
Nume tehnic |
Descriere |
|---|---|---|
Chile - Contabilitate |
|
Adaugă caracteristicile contabile minime necesare pentru ca o companie să opereze în Chile în conformitate cu reglementările și ghidurile SII. |
Chile - Rapoarte contabile |
|
Adaugă rapoartele Propuesta F29 și Balance Tributario (8 coloane). |
Chile - Facturare electronică |
|
Include toate cerințele tehnice și funcționale pentru generarea și primirea facturilor electronice online, pe baza reglementărilor SII. |
Chile - Chitanță electronică |
|
Include toate cerințele tehnice și funcționale pentru generarea și primirea digitală a facturilor electronice pe baza reglementărilor SII. |
Exporturi electronice de mărfuri pentru Chile |
|
Include cerințe tehnice și funcționale pentru generarea de facturi electronice pentru exportul de mărfuri pe baza SII și reglementările vamale. |
Chile - Ghid de livrare pentru facturarea electronică |
|
Include toate cerințele tehnice și funcționale pentru a genera ghiduri de livrare prin intermediul serviciului web pe baza reglementărilor SII. |
Notă
Odoo instalează automat pachetul corespunzător companiei în funcție de țara selectată la crearea bazei de date.
Modulul Chile - Ghid de livrare pentru facturarea electronică depinde de aplicația Inventar.
Important
Toate funcțiile sunt disponibile numai dacă compania a finalizat deja procesul de certificare „SII Sistema de Facturación de Mercado <https://www.sii.cl/factura_electronica/factura_mercado/proceso_certificacion.htm>`_.
Informațiile Companiei
Navigați la și asigurați-vă că următoarele informații despre companie sunt actualizate și completate corect:
Numele companiei
Adresa:
Strada
Oras
Stat
Cod Poștal
Țară
Tax ID: introduceți numărul de identificare pentru Taxpayer Type.
Nume activități: selectați până la patru coduri de activitate.
Descrierea activității companiei: introduceți o scurtă descriere a activității companiei.
Setări contabile
Apoi, navigați la și urmați instrucțiunile pentru a configura:
Certificate de semnătură
Informații fiscale
Configurați următoarele Informații despre plătitor de impozite:
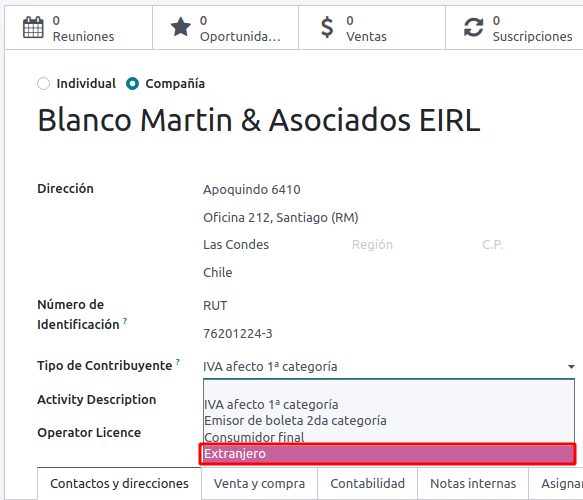
Tip de contribuabil selectând tipul de contribuabil care se aplică:
TVA afectat (prima categorie): pentru facturile care percep taxe clienților
Emitent de chitanță de taxe (categoria a 2-a): pentru furnizorii care eliberează chitanță de taxe (Boleta)
Consumator final: emite doar chitanțe
Străin
Biroul SII: selectați biroul regional al companiei dvs. SII
Datele facturii electronice
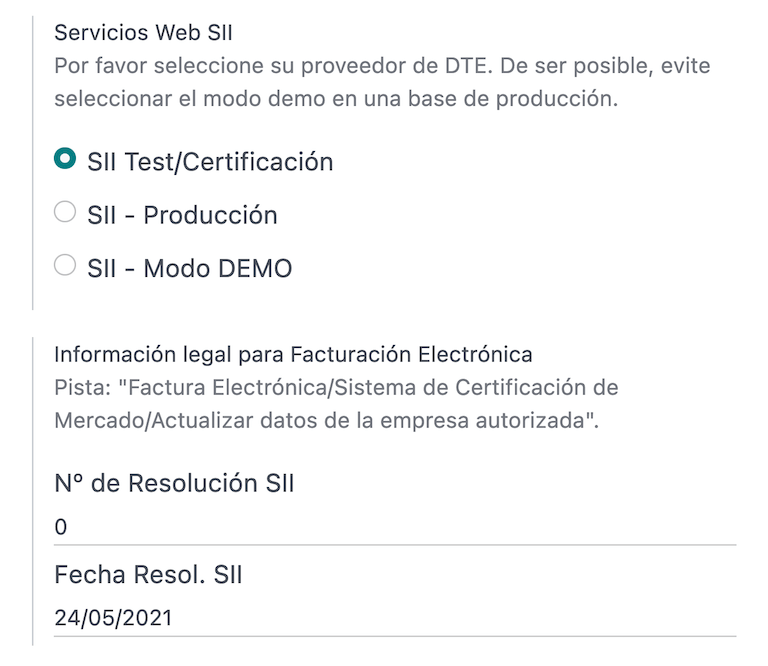
Selectați mediul dvs. SII Web Services:
SII - Test: pentru bazele de date de testare care utilizează testul CAF-uri obținut de la SII. În acest mod, pot fi testate fluxurile de conexiune directă, fișierele fiind trimise către SII.
SII - Production: pentru baze de date de producție.
SII - Modul Demo: fișierele sunt create și acceptate automat în modul demo, dar nu sunt trimise către SII. Din acest motiv, erorile de respingere sau Acceptat cu obiecții nu vor apărea în acest mod. Fiecare validare internă poate fi testată în modul demo. Evitați să selectați această opțiune într-o bază de date de producție.
Apoi, introduceți Datele legale de facturare electronică:
SII Resolution N°
SII Resolution Date
Server de e-mail de intrare DTE
DTE Facturarea electronică a casetei de e-mail poate fi definită pentru a primi e-mailurile de revendicare și acceptare ale clienților dumneavoastră. Activarea acestei opțiuni din este necesară dacă doriți să utilizați Email Box Electronic Invoicing ca DTE server de e-mail.
Important
Pentru a primi documentele SII, este necesar să vă configurați propriul server de e-mail. Mai multe informații despre cum să faceți acest lucru pot fi găsite în această documentație: Trimiteți și primiți e-mailuri în Odoo cu un server de e-mail
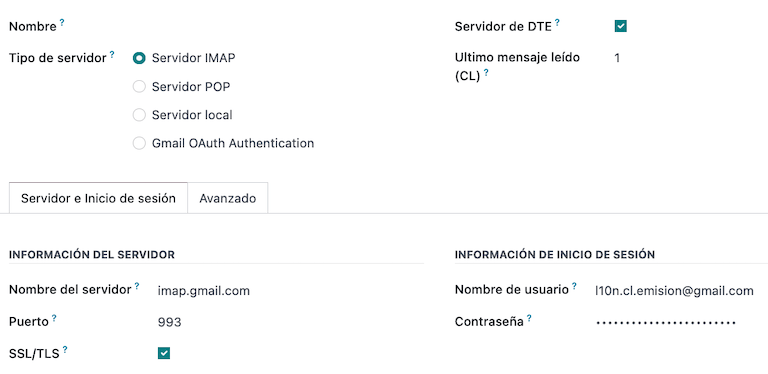
Începeți prin a face clic pe Configurare e-mail de intrare DTE, apoi faceți clic pe Nou pentru a adăuga un server și completați următoarele câmpuri:
Nume: dați un nume serverului.
Tip server: selectați tipul de server folosit.
IMAP Server
POP Server
Server local: folosește un script local pentru a prelua e-mailuri și pentru a crea înregistrări noi. Scriptul poate fi găsit în secțiunea Configuration cu această opțiune selectată.
Gmail OAuth Authentication: necesită configurarea acreditărilor tale Gmail API în setările generale. O legătură directă către configurație poate fi găsită în secțiunea Informații de conectare.
Server DTE: activați această opțiune. Prin bifarea acestei optiuni, acest cont de email va fi folosit pentru a primi facturile electronice de la furnizori, si comunicatii de la SII cu privire la facturile electronice emise. În acest caz, acest e-mail ar trebui să se potrivească cu ambele e-mailuri declarate pe site-ul SII în secțiunea: ACTUALIZACION DE DATOS DEL CONTRIBUYENTE, Mail Contacto SII și Mail Contacto Empresas.
În fila Server și autentificare (pentru serverele IMAP și POP):
Nume server: introduceți numele de gazdă sau IP-ul serverului.
Port: introduceți portul serverului.
SSL/TLS: activați această opțiune dacă conexiunile sunt criptate folosind protocolul SSL/TLS.
Nume de utilizator: introduceți numele de utilizator de conectare la server.
Parola: introduceți parola de conectare la server.
Sfat
Înainte de a intra în direct, se recomandă să arhivați sau să eliminați toate e-mailurile legate de facturile furnizorilor care nu trebuie să fie procesate în Odoo din căsuța dvs. de e-mail.
Certificate
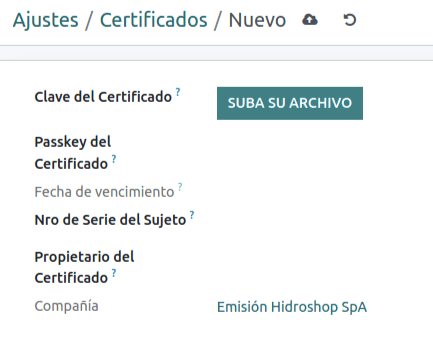
Este necesar un certificat digital în format .pfx pentru a genera semnătura electronică a facturii. Pentru a adăuga unul, faceți clic pe Configurați certificate de semnătură în secțiunea Certificate de semnătură. Apoi, faceți clic pe Nou pentru a configura certificatul:
Cheie de certificat: faceți clic pe Încărcați fișierul și selectați fișierul
.pfx.Cheie de acces pentru certificat: introduceți fraza de acces a fișierului.
Numărul de serie al subiectului: în funcție de formatul certificatului, este posibil ca câmpul să nu fie completat automat. În acest caz, introduceți reprezentantul legal al certificatului RUT.
Proprietar certificat: selectați unul dacă trebuie să restricționați certificatul pentru un anumit utilizator. Lăsați câmpul gol pentru a-l partaja tuturor utilizatorilor de facturare.
Atenționare
If the Certificate Owner field is set to a specific user, and there are no certificates shared with users, then the automatic sending of electronic documents and receipt acknowledgments is disabled.
Valută multiplă
Cursul oficial al monedei este furnizat de Chilean mindicador.cl. Navigați la pentru a seta un Interval pentru când rata este actualizată automat sau pentru a selecta un alt serviciu :guilabel:` `.
Informații despre parteneri
Configurarea contactelor partenerilor este, de asemenea, necesară pentru a trimite SII facturi electronice. Deschideți aplicația pentru a face acest lucru și completați următoarele câmpuri într-un formular de contact nou sau existent.
Nume
E-mail
Număr de identificare
Tipul de contribuabil
Descrierea activității
În fila Facturare electronică:
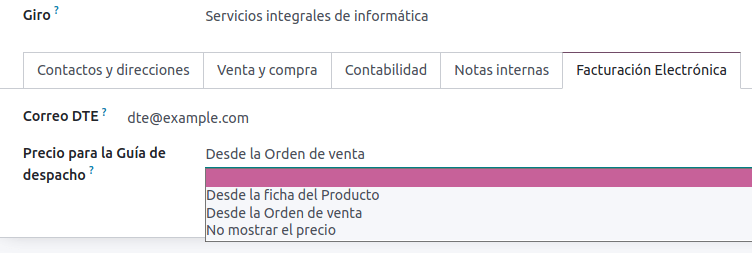
DTE Email: introduceți adresa de e-mail a expeditorului pentru partener.
Prețul ghidului de livrare: selectați ce preț afișează ghidul de livrare, dacă există.
Notă
DTE Email este email-ul folosit pentru trimiterea documentelor electronice și trebuie setat în contactul care va face parte dintr-un document electronic.
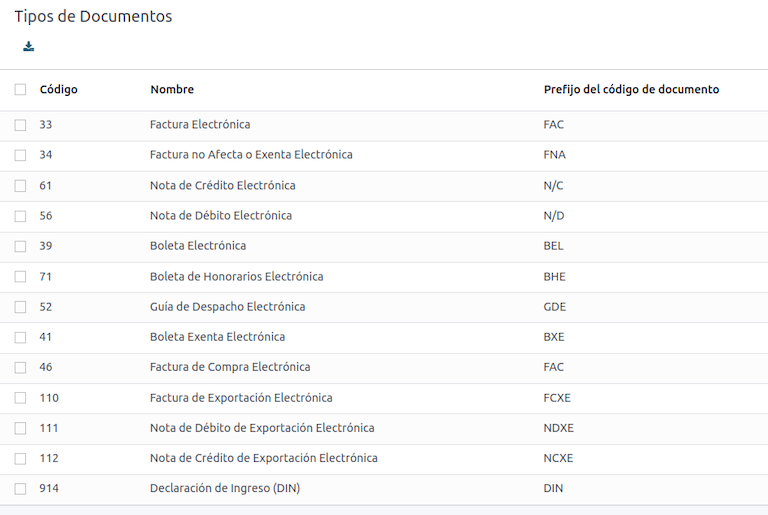
Tipuri de documente
Documentele contabile sunt clasificate după tipurile de documente definite de :abbr:`SII (Servicio de Impuestos Internos).
Tipurile de documente sunt create automat la instalarea modulului de localizare și pot fi gestionate navigând la .
Notă
Mai multe tipuri de documente sunt inactive în mod implicit, dar pot fi activate prin comutarea opțiunii Active.
Utilizare pe facturi
Tipul de document pentru fiecare tranzacție este determinat de:
Jurnalul aferent facturii, identificând dacă jurnalul utilizează documente.
Condiția aplicată în funcție de tipul de emitent și destinatar (de exemplu, regimul fiscal al cumpărătorului sau vânzătorului).
Jurnale
Jurnalele de vânzări în Odoo reprezintă de obicei o unitate de afaceri sau o locație.
Example
Vânzări Santiago.
Vânzări Valparaiso.
Pentru magazinele de vânzare cu amănuntul este obișnuit să existe un jurnal per POS.
Example
Casa 1.
Casa 2.
Tranzacțiile de cumpărare pot fi gestionate cu un singur jurnal, dar uneori companiile folosesc mai mult de un jurnal pentru a gestiona unele tranzacții contabile care nu sunt legate de facturile furnizorilor. Această configurație poate fi setată cu ușurință folosind următorul model.
Example
Plata impozitelor către guvern.
Plata angajaților.
Creați un jurnal de vânzări
Pentru a crea un jurnal de vânzări, navigați la . Apoi, faceți clic pe butonul Nou și completați următoarele informații necesare:
Tip: selectați Vânzare din meniul derulant pentru jurnalele de facturi ale clienților.
Tipul punct de vânzare: dacă jurnalul de vânzări va fi folosit pentru documente electronice, trebuie selectată opțiunea Online. În caz contrar, dacă jurnalul este utilizat pentru facturi importate dintr-un sistem anterior sau dacă utilizați portalul SII Facturación MiPyme, puteți utiliza opțiunea Manual.
Utilizați documente: verificați acest câmp dacă jurnalul va folosi tipuri de documente. Acest câmp este aplicabil numai jurnalelor de cumpărare și vânzări care pot fi legate de diferitele seturi de tipuri de documente disponibile în Chile. În mod implicit, toate jurnalele de vânzări create vor folosi documente.
Apoi, din fila Înregistrări judiciare, definiți Contul de venit implicit și Scvență de note de credit dedicată în secțiunea Informații contabile. Configurarea acestor câmpuri este necesară pentru una dintre notele de debit use cases.
CAF
Pentru fiecare tip de document care va fi emis electronic, este necesar un cod de autorizare de folio (CAF). CAF este un fișier pe care SII îl pune la dispoziție emitentului cu foliile/secvențele autorizate pentru documentele de factura electronică.
Compania dvs. poate solicita mai multe folii și poate obține mai multe CAF-uri legate de diferite intervale de folio. Aceste CAF sunt partajate în toate jurnalele, așa că aveți nevoie de un singur CAF activ pentru fiecare tip de document și va fi aplicat tuturor jurnalelor.
Vă rugăm să consultați documentația SII pentru a verifica detaliile despre cum să achiziționați fișierele CAF.
Important
CAF-urile cerute de SII sunt diferite de la producție la testare (modul de certificare). Asigurați-vă că aveți setarea corectă CAF, în funcție de mediul dvs.
Încărcați fișiere CAF
Odată ce fișierele CAF au fost achiziționate de pe portalul SII, acestea trebuie să fie încărcate în baza de date navigând la . Apoi, faceți clic pe Nou, începe configurarea. În formularul CAF, încărcați fișierul dvs. CAF făcând clic pe butonul Încărcați fișierul și apoi faceți clic pe Salvați .
Odată încărcat, starea se schimbă în În uz. În acest moment, când se utilizează o tranzacție pentru acest tip de document, numărul facturii ia primul folio din succesiune.
Important
Tipurile de documente trebuie să fie active înainte de a încărca fișierele CAF. În cazul în care unele folii au fost utilizate în sistemul anterior, următorul folio valid trebuie setat la crearea primei tranzacții.
Planul de conturi
Planul de conturi este instalat implicit ca parte a setului de date inclus în modulul de localizare. Conturile sunt mapate automat în:
Taxe
Cont prestabilit de plătit
Cont implicit de încasat
Conturi de transfer
Rată conversie
Vedeți și
../contabilitate/get_started/plan_de_conturi
Taxe
Ca parte a modulului de localizare, taxele sunt create automat cu contul financiar și configurația aferente. Aceste taxe pot fi gestionate din .
Chile are mai multe tipuri de taxe, cele mai comune sunt:
TVA: TVA-ul obișnuit poate avea mai multe rate.
ILA: taxa pentru băuturile alcoolice.
Vedeți și
Utilizare și testare
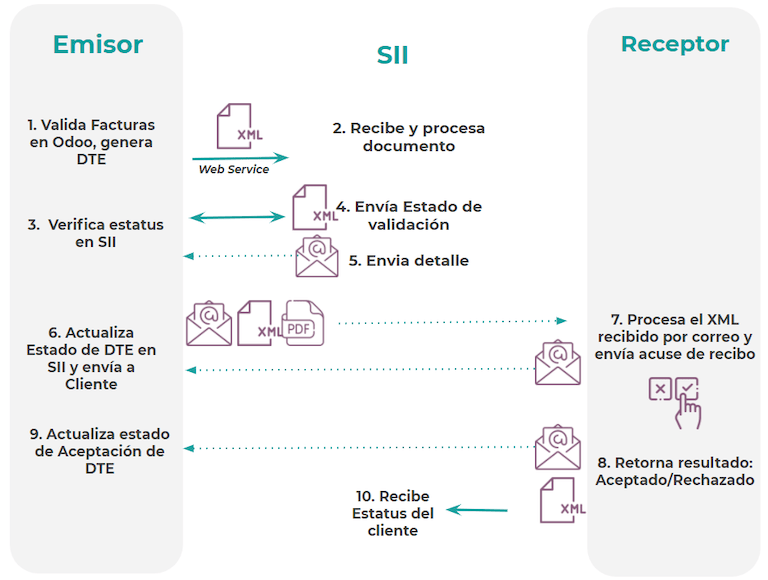
Fluxul de lucru al facturii electronice
În localizarea chiliană, fluxul de lucru al facturii electronice include emiterea facturii clienților și primirea facturilor de la furnizor. Următoarea diagramă explică modul în care informațiile sunt partajate către SII, clienți și furnizori.
Emitere facturi client
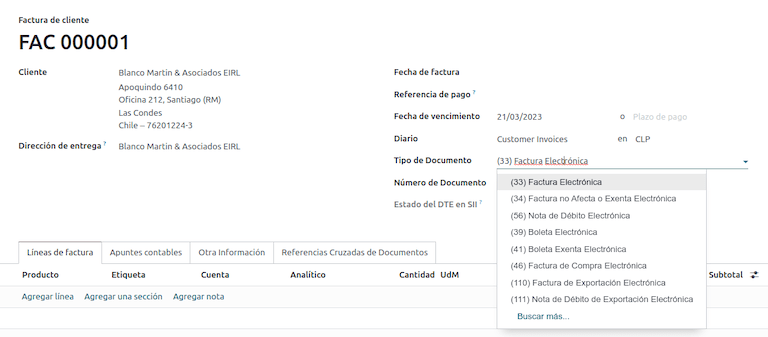
După ce partenerii și jurnalele sunt create și configurate, facturile sunt create în mod standard. Pentru Chile, una dintre diferențe este tipul de document care este selectat automat în funcție de contribuabil. Tipul de document poate fi modificat manual dacă este necesar pe factură, navigând la .
Important
Documentele tip 33 factura electronica trebuie sa aiba cel putin un articol cu taxa, in caz contrar SII respinge validarea documentului.
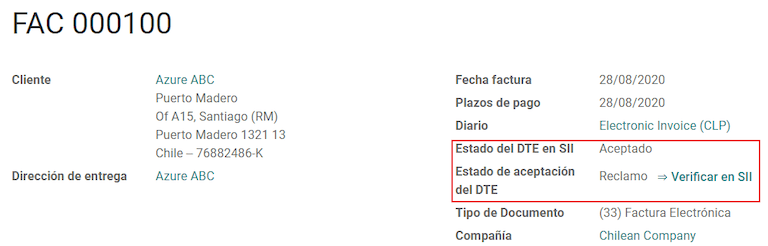
Validare și stare DTE
Odată ce toate informațiile despre factură sunt completate, fie manual, fie automat atunci când sunt generate dintr-o comandă de vânzare, validați factura. După afișarea facturii:
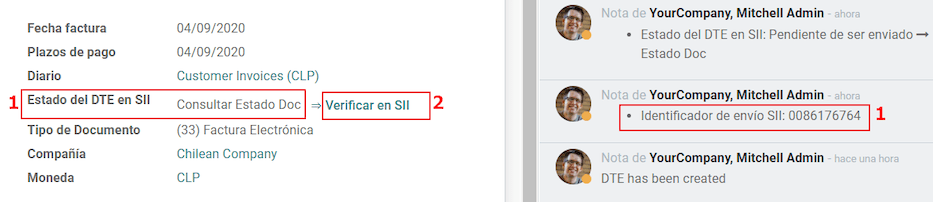
Fișierul DTE este creat automat și înregistrat în chatter.
Starea DTE SII este setată ca În așteptare pentru a fi trimisă.

Starea DTE este actualizată automat de Odoo cu o acțiune programată care rulează în fiecare zi pe timp de noapte, dacă răspunsul de la SII este necesar imediat, o puteți face și manual, urmând fluxul de lucru de stare DTE:
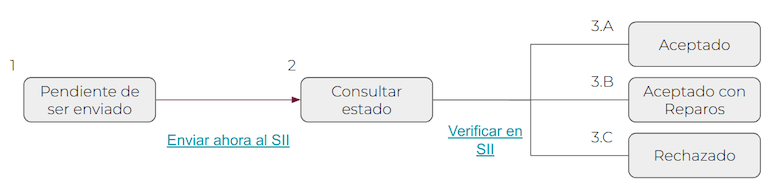
Primul pas este să trimiteți DTE către SII. Aceasta poate fi trimisă manual făcând clic pe butonul Enviar Ahora. Acest lucru generează un SII Tack number pentru factură, care este utilizat pentru a verifica detaliile trimise de SII prin e-mail. Apoi, Starea DTE este actualizată la Ask for Status.
Odată ce răspunsul SII este primit, Odoo actualizează starea DTE. Pentru a face acest lucru manual, faceți clic pe butonul Verify on SII. Rezultatul poate fi fie Acceptat, Acceptat cu obiecție sau Respins.
Important
Există stări intermediare în SII înainte de acceptare sau respingere. Se recomandă NU să faceți clic continuu pe Verifică în SII pentru o procesare fără probleme.

Răspunsul final de la SII poate lua una dintre aceste valori:
Acceptat: indică faptul că informațiile despre factură sunt corecte, documentul nostru este acum valabil fiscal și este trimis automat clientului.
Acceptat cu obiecții: indică faptul că informațiile despre factură sunt corecte, dar a fost identificată o problemă minoră, cu toate acestea documentul este acum valabil fiscal și este trimis automat clientului.
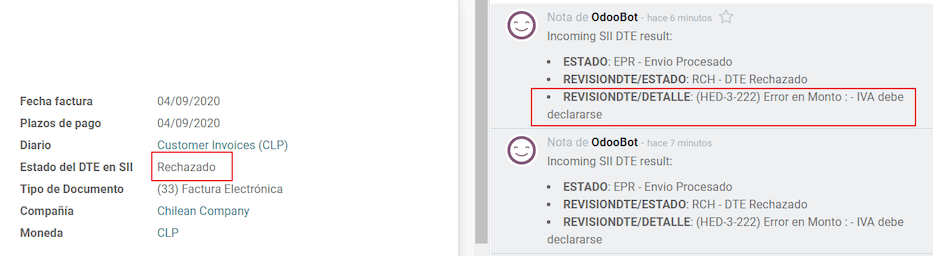
Respins: indică faptul că informațiile despre factură sunt incorecte și trebuie corectate. Detaliile sunt trimise către e-mailurile pe care le-ați înregistrat în SII. Dacă este configurat corect în Odoo, detaliile sunt preluate și în chatter odată ce serverul de e-mail este procesat.
Dacă factura este respinsă, urmați acești pași:
Schimbați documentul în Draft.
Faceți corecțiile necesare pe baza mesajului primit de la SII în chatter.
Postati factura din nou.
Referinte incrucisate
La crearea facturii, ca urmare a unui alt document fiscal, informațiile aferente documentului inițiator trebuie înregistrate în fila Cross-Reference. Această filă este folosită în mod obișnuit pentru notele de credit sau de debit, totuși, în unele cazuri, poate fi folosită și pentru facturile clienților. În cazul notelor de credit și debit, acestea sunt setate automat de Odoo.
Raport PDF factură
Odată ce factura este acceptată și validată de către SII și PDF-ul este tipărit, acesta include elementele fiscale care indică faptul că documentul este valabil fiscal.

Important
Dacă sunteți găzduit în Odoo SH sau On-Premise, ar trebui să instalați manual biblioteca pdf417gen. Utilizați următoarea comandă pentru ao instala: pip install pdf417gen.
Validare comercială
Odata ce factura a fost trimisa catre client:
Starea partenerului DTE se schimbă în Trimis.
Clientul trebuie sa trimita un email de confirmare de receptie.
Ulterior, dacă termenii comerciali și datele facturii sunt corecte, se trimite o confirmare de acceptare; în caz contrar, se trimite o revendicare.
Câmpul DTE Acceptance Status este actualizat automat.

Procesat pentru facturile revendicate
Odată ce factura a fost acceptată de către SII, nu poate fi anulată în Odoo. În cazul în care primiți o reclamație pentru clientul dvs., modalitatea corectă de a proceda este cu o notă de credit pentru a anula factura sau a o corecta. Vă rugăm să consultați secțiunea Note de credit pentru mai multe detalii.
Erori comune
Există mai multe motive pentru respingerea SII, dar acestea sunt câteva dintre erorile comune pe care le puteți avea și cum să le rezolvați:
- Error:
RECHAZO- DTE Sin Comuna OrigenSugestie: asigurați-vă că adresa companiei este completată corect, inclusiv statul și orașul. - Error:
en Monto - IVA debe declararseSugestie: liniile de factură ar trebui să includă o taxă TVA, asigurați-vă că adăugați una pe fiecare linie de factură. - Error:
Rut No Autorizado a FirmarHint: the RUT entered is not allowed to invoice electronically, make sure the company RUT is correct and is valid in the SII to invoice electronically. - Error:
Fecha/Número Resolucion Invalido RECHAZO- CAF Vencido : (Firma_DTE[AAAA-MM-DD] -
CAF[AAAA-MM-DD]) > 6 meses
Hint: try to add a new CAF related to this document as the one you’re using is expired. - Eroare:
Element '{http://www.sii.cl/SiiDte%7DRutReceptor': Acest element nu este așteptat. Se așteaptă ( {http://www.sii.cl/SiiDte%7DRutEnvia ).Sugestie: Asigurați-vă că câmpurile Tip document și TVA sunt setate în client și în compania principală. - Eroare:
Utilizator fără permisiune de trimitere.Sugestie: această eroare indică faptul că, cel mai probabil, compania dvs. nu a trecut Procesul de certificare în SII - Sistemul de facturare pe piață. Dacă acesta este cazul, vă rugăm să contactați managerul de cont sau asistența pentru clienți, deoarece această certificare nu face parte din serviciile Odoo, dar vă putem oferi câteva alternative. Dacă ați trecut deja procesul de certificare, această eroare apare atunci când un utilizator diferit de proprietarul certificatului încearcă să trimită fișiere DTE către :abbr:`SII (Serviciul de venituri interne) `. - Error:
CARATULASugestie: există doar cinci motive pentru care această eroare ar putea apărea și toate sunt legate de secțiunea Caratula din XML:Numărul RUT al companiei este incorect sau lipsește.
Numărul proprietarului certificatului RUT este incorect sau lipsește.
Numărul SII RUT (acest lucru ar trebui să fie corect în mod implicit) este incorect sau lipsește.
Data rezoluției este incorectă sau lipsește.
Numărul de rezoluție este incorect sau lipsește.
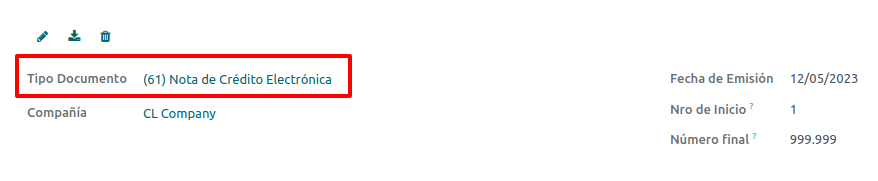
Note de credit
Când este necesară o anulare sau o corectare a unei facturi validate, trebuie generată o notă de credit. Este important de luat în considerare că pentru nota de credit este necesar un fișier CAF, care este identificat ca Tipul document 61 în SII. Vă rugăm să consultați secțiunea CAF pentru mai multe informații despre procesul de încărcare a CAF pe fiecare tip de document.
Cazuri de utilizare
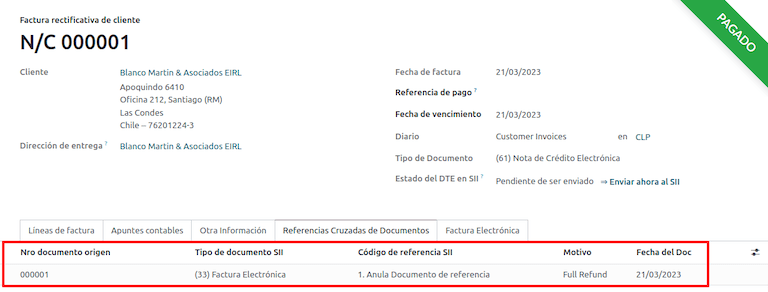
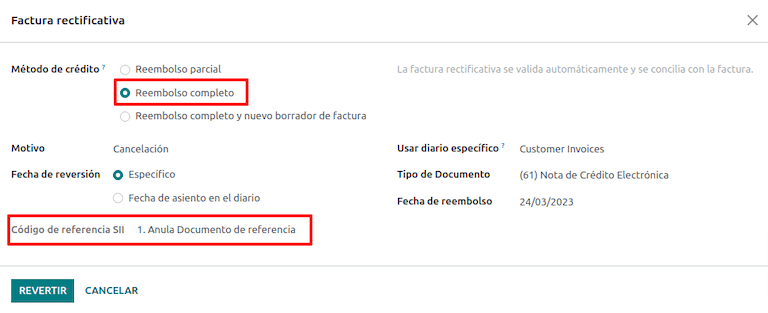
Anulați documentul de referință
În cazul în care trebuie să anulați sau să invalidați o factură, navigați la și selectați factura dorită. Apoi, utilizați butonul Add Credit Note și selectați Full Refund, în acest caz codul de referință SII este setat automat la Anula Documento de referencia.
Document de referință corect
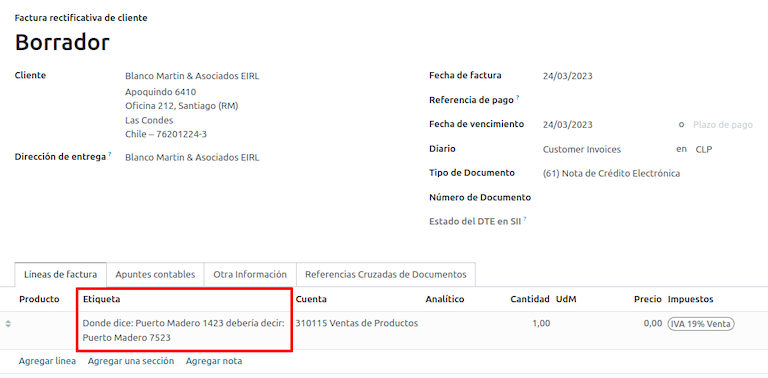
Dacă este necesară o corecție a informațiilor despre factură, de exemplu, numele străzii de pe factura originală este greșit, atunci utilizați butonul Adăugați nota de credit, selectați Rambursare parțială și selectați opțiunea :guilabel: Numai corectarea textului. În acest caz, câmpul Cod de referință SII este setat automat la Corectează textul documentului de referință.
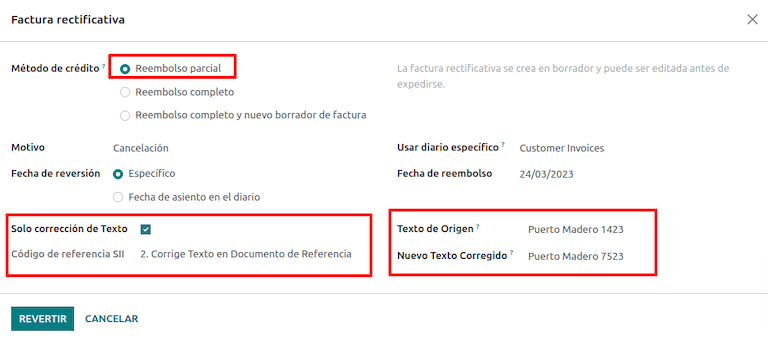
Odoo creează o notă de credit cu textul corectat într-o factură și Preț 0.00.
Important
Asigurați-vă că definiți Contul de credit implicit în jurnalul de vânzări special pentru acest caz de utilizare.
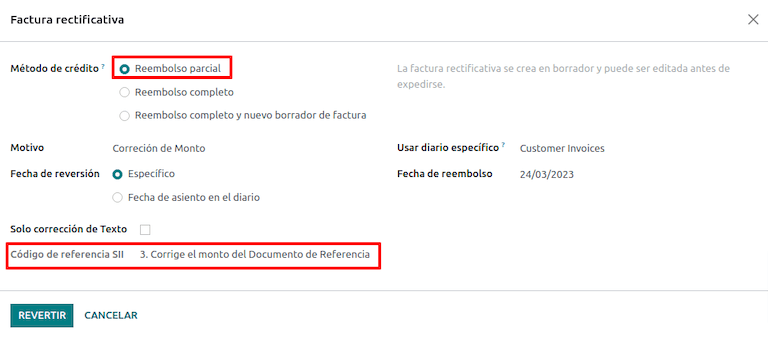
Corectează suma documentului de referință
Când este necesară o corecție a sumelor, utilizați butonul Adăugați nota de credit și selectați Rambursare parțială. În acest caz, Codul de referință SII este setat automat la Corrige el monto del Documento de Referencia.
Note de debit
În localizarea chiliană, notele de debit, pe lângă notele de credit, pot fi create folosind butonul Adăugați notă de debit, cu două cazuri principale de utilizare.
Cazuri de utilizare
Adăugați datorii pe facturi
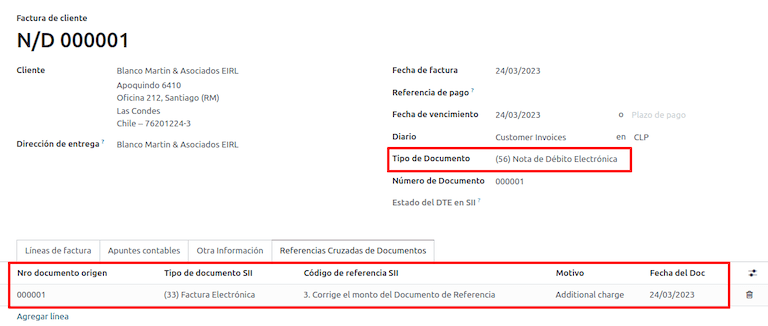
Cazul de utilizare principal pentru notele de debit este creșterea valorii unei facturi existente. Pentru a face acest lucru, selectați opțiunea 3. Corrige el monto del Documento de Referencia pentru câmpul Cod de referință SII.
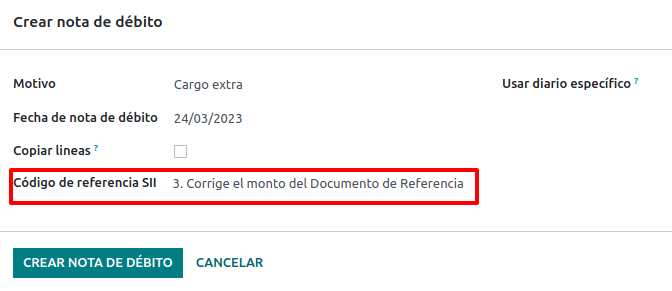
În acest caz, Odoo include automat Factura sursă în fila Referință încrucișată.
Sfat
Puteți adăuga doar note de debit la o factură deja acceptată de SII.
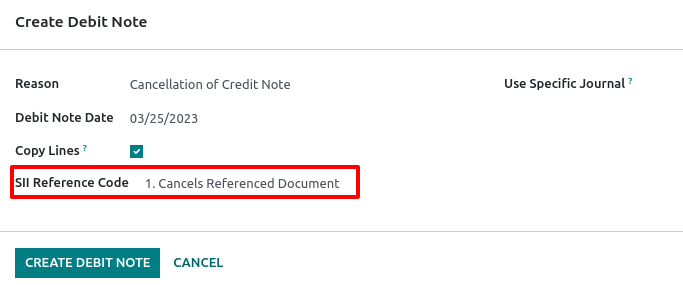
Anulați notele de credit
În Chile, notele de debit sunt folosite pentru a anula o notă de credit valabilă. Pentru a face acest lucru, faceți clic pe butonul Adăugați notă de debit și selectați opțiunea 1: Anula Documentos de referencia pentru câmpul Cod de referință SII.
Facturi vânzător
Ca parte a localizării chiliane, puteți configura serverul dvs. de e-mail de intrare pentru a se potrivi cu cel pe care l-ați înregistrat în SII pentru a:
Primiți automat facturile furnizorului DTE și creați factura furnizorului pe baza acestor informații.
Trimiteți automat confirmarea de primire vânzătorului dvs.
Acceptați sau revendicați documentul și trimiteți această stare vânzătorului dvs.
Receptie
De îndată ce e-mailul furnizorului cu DTE atașat este primit:
Factura furnizorului mapează toate informațiile incluse în XML.
Vânzătorului i se trimite un e-mail cu confirmarea recepției.
The DTE Status is set as Acuse de Recibido Enviado.
Acceptare
Dacă toate informațiile comerciale sunt corecte pe factura dvs. de furnizor, atunci puteți accepta documentul folosind butonul Acceptați documentul. Odată ce se face acest lucru, DTE Acceptance Status se schimbă în Accepted și un e-mail de acceptare este trimis vânzătorului.

Revendicare
În cazul în care există o problemă comercială sau informațiile nu sunt corecte pe factura dvs. de furnizor, puteți solicita documentul înainte de a-l valida, folosind butonul Revendicare. Odată ce se face acest lucru, Starea de acceptare DTE se schimbă în Claim și un e-mail de respingere este trimis furnizorului.

Dacă revendicați o factură de furnizor, starea se schimbă automat de la Ciornă la Anulați. Considerând acest lucru ca fiind cea mai bună practică, toate documentele revendicate ar trebui să fie anulate, deoarece nu vor fi valabile pentru evidențele dvs. contabile.
Factura electronica de achizitie
Factura de achiziție electronică este o caracteristică inclusă în modulul l10n_cl_edi.
Odată ce au fost făcute toate configurațiile pentru facturile electronice (de exemplu, încărcarea unui certificat de companie valabil, configurarea datelor de bază etc.), facturile electronice de achiziție au nevoie de propriile :abbr:` CAF-uri (Codul de Autorizare Folio)`. Vă rugăm să consultați documentația CAF pentru a verifica detaliile despre cum să achiziționați CAF-urile pentru facturile electronice de achiziție.
Facturile electronice de achiziție sunt utile atunci când vânzătorii nu sunt obligați să accelereze o factură electronică de furnizor pentru achiziția dvs. Totuși, obligațiile dvs. necesită ca un document să fie trimis la SII ca dovadă de cumpărare.
Configurare
Pentru a genera o factură electronică de achiziție dintr-o factură de furnizor, factura trebuie creată într-un jurnal de achiziții cu funcția Utilizați documente activată. Este posibil să modificați un jurnal de achiziții existent sau să creați unul nou în următorul proces.
Pentru a modifica jurnalul de achiziții existent sau pentru a crea un nou jurnal de achiziții, navigați la . Apoi, faceți clic pe butonul Nou și completați următoarele informații necesare:
Tip: selectați Cumpărare din meniul derulant pentru jurnalele de facturi ale furnizorilor.
Utilizați documente: bifați acest câmp pentru ca jurnalul să poată genera documente electronice (în acest caz, factura electronică de achiziție).
Generați o factură electronică de achiziție
Pentru a genera acest tip de document, este necesar să creați o factură de furnizor în Odoo. Pentru a face acest lucru, navigați la și faceți clic pe butonul Nou.
Când toate informațiile despre factura electronică de achiziție sunt completate, selectați opțiunea (46) Factură electronică de achiziție în câmpul Tip document:
După ce factura furnizorului este publicată:
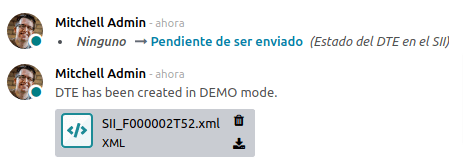
Fișierul DTE (Document electronic fiscal) este creat automat și adăugat la chatter.
DTE SII Status este setat ca În așteptarea trimiterii.
Odoo actualizează automat Starea DTE în fiecare noapte folosind o acțiune programată. Pentru a primi imediat un răspuns de la SII, faceți clic pe butonul Trimite acum la SII.
Ghid de livrare
Pentru a instala modulul Delivery Guide, accesați și căutați Chile (l10n_cl). Apoi faceți clic pe Instalare pe modulul Chile - Ghid de livrare pentru facturarea electronică.
Notă
Chile - E-Invoicing Delivery Guide are o dependență de Chile - Facturación Electrónica. Odoo va instala automat dependența atunci când modulul Ghid de livrare este instalat.
Modulul Ghid de livrare include posibilitatea de a trimite DTE către SII și ștampila în rapoartele PDF pentru livrări.
Odată ce au fost făcute toate configurațiile pentru facturile electronice (de exemplu, încărcarea unui certificat de companie valid, configurarea datelor de bază etc.), ghidurile de livrare au nevoie de propriile CAF-uri. Consultați documentația CAF pentru a verifica detaliile despre cum să achiziționați CAF pentru Ghidurile de livrare electronice.
Verificați următoarele informații importante în configurația Preț pentru ghidul de livrare:
From Sales Order: ghidul de livrare preia prețul produsului din comanda de vânzare și îl arată pe document.
From Product Template: Odoo ia pretul configurat in sablonul produsului si il arata pe document.
No show price: niciun preț nu este afișat în ghidul de livrare.
Trimiteți ghidul de livrare electronic pentru a muta stocul de la un loc la altul miscari care pot fi din vânzări, eșantioane, consignație, transferuri interne și în esență orice mutare a produsului.
Ghid de livrare dintr-un proces de vânzare
Atenționare
Un ghid de livrare nu trebuie să depășească o pagină sau să conțină mai mult de 60 de linii de produse.
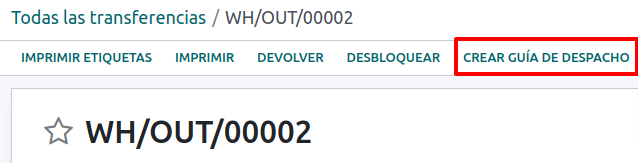
Când o comandă de vânzare este creată și confirmată, este generată o comandă de livrare. După validarea comenzii de livrare este activată opțiunea de creare a unui ghid de livrare.
Atenționare
Când faceți clic pe Create Delivery Guide pentru prima dată, apare un mesaj de avertizare, care indică următoarele:
„Nu a fost găsită nicio secvență pentru ghidul de expediere. Vă rugăm să setați primul număr în câmpul de număr pentru ghidul de expediere

Acest mesaj de avertizare înseamnă că utilizatorul trebuie să indice următorul număr de secvență pe care Odoo trebuie să-l ia pentru a genera ghidul de livrare (de exemplu, următorul număr disponibil CAF) și apare doar prima dată când un ghid de livrare este creat în Odoo. După ce primul document a fost generat corect, Odoo preia următorul număr disponibil din fișierul CAF pentru a genera următorul ghid de livrare.
După crearea ghidului de livrare:
Fișierul DTE (document fiscal electronic) este creat automat și adăugat la chatter.
DTE SII Status este setat ca În așteptarea trimiterii.
DTE Status este actualizat automat de Odoo cu o acțiune programată care rulează în fiecare noapte. Pentru a primi imediat un răspuns de la SII, apăsați butonul Trimite acum la SII.
Odată ce ghidul de livrare este trimis, acesta poate fi apoi tipărit făcând clic pe butonul Print Delivery Guide.

Ghidul de livrare va avea elemente fiscale care indică faptul că documentul este valabil fiscal atunci când este tipărit (dacă este găzduit în Odoo SH sau pe On-premise nu uitați să adăugați manual biblioteca pdf417gen menționată în :ref:` Secțiunea raport Factură PDF <chile/electronic-invoice-pdf-report>`).
Chitanță electronică
Pentru a instala modulul Chitanță electronică, accesați și căutați Chile (l10n_cl). Apoi faceți clic pe Instalare pe modulul Chile - Chitanță electronică.
Notă
Chile - E-Invoicing Delivery Guide are o dependență de Chile - Facturación Electrónica. Odoo va instala automat dependența atunci când modulul Ghid de livrare este instalat.
Odată ce au fost făcute toate configurațiile pentru facturile electronice (de exemplu, încărcarea unui certificat de companie valabil, configurarea datelor de bază etc.), chitanțele electronice au nevoie de propriile CAF-uri. Vă rugăm să consultați documentația CAF pentru a verifica detaliile despre cum să achiziționați CAF-urile pentru chitanțele electronice.
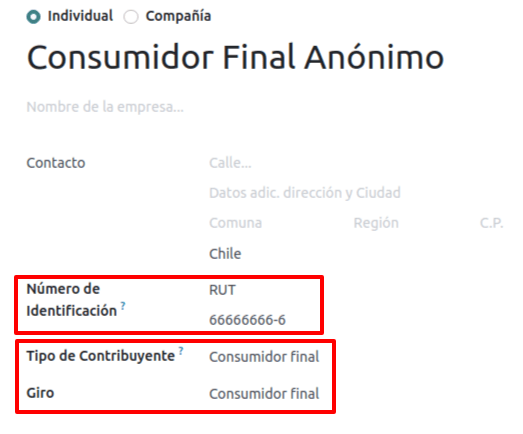
Chitantele electronice sunt utile atunci când clienții nu au nevoie de o factură electronică. În mod implicit, în baza de date există un partener numit Consumator final anonim cu un generic RUT 66666666-6 și tipul de contribuabil Consumator final. Acest partener poate fi folosit pentru chitanțe electronice sau poate fi creată o nouă înregistrare în același scop.
Deși chitanțele electronice ar trebui folosite pentru consumatorii finali cu un RUT generic, ele pot fi folosite și pentru anumiți parteneri. După ce partenerii și jurnalele sunt creați și configurați, chitanțele electronice sunt create în mod standard ca factură electronică, dar tipul de document (39) Chitanță electronică trebuie selectat în formularul de factură:
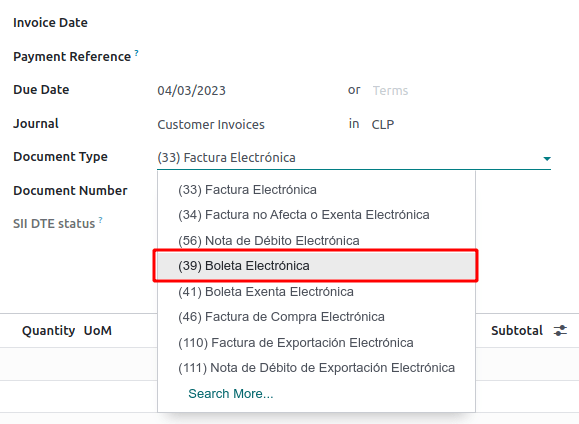
Validare și stare DTE
Când toate informațiile de primire electronică sunt completate, manual (sau automat) procedați la validarea chitanței din comanda de vânzare. În mod implicit, Factura electronică este selectată ca Tip de document, cu toate acestea, pentru a valida chitanța corect, asigurați-vă că ați editat Tipul de document și schimbați în :guilabel:` Chitanța electronică`.
După ce recipisa este postata:
Fișierul DTE (document fiscal electronic) este creat automat și adăugat la chatter.
DTE SII Status este setat ca În așteptarea trimiterii.

DTE Status este actualizat automat de Odoo cu o acțiune programată care rulează în fiecare zi, noaptea. Pentru a primi imediat un răspuns de la SII, apăsați butonul Trimite acum la SII.
Vă rugăm să consultați Fluxul de lucru DTE pentru facturi electronice, deoarece fluxul de lucru pentru primirea electronică urmează același proces.
Export electronic de mărfuri
Pentru a instala modulul Exporturi electronice de mărfuri, accesați și căutați Chile (l10n_cl). Apoi faceți clic pe Instalare pe modulul Exporturi electronice de mărfuri pentru Chile.
Notă
Chile - Electronic Exports of Goods for Chile has a dependency with Chile - Facturación Electrónica.
Odată ce au fost făcute toate configurațiile pentru facturile electronice (de exemplu, încărcarea unui certificat de companie valabil, configurarea datelor de bază etc.), exporturile electronice de mărfuri au nevoie de propria :abbr:` CAF-uri (Codul de Autorizare Folio)`. Vă rugăm să consultați documentația CAF pentru a verifica detaliile despre cum să achiziționați CAF-urile pentru chitanțele electronice.
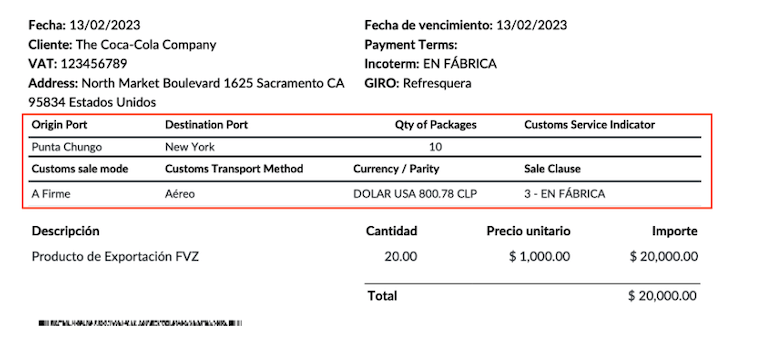
Facturile electronice pentru exportul de mărfuri sunt documente fiscale care sunt folosite nu numai pentru SII, ci sunt folosite și la vamă și conțin informațiile solicitate de aceasta.
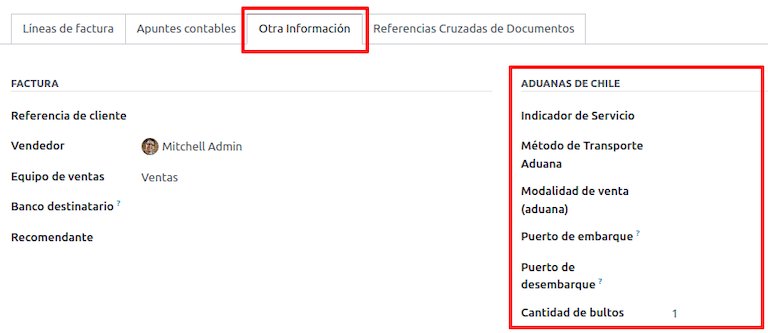
Configurații de contact
Obiceiuri chiliene
Atunci când creați o factură electronică de export de mărfuri, aceste câmpuri noi din fila Alte informații sunt necesare pentru a respecta reglementările chiliene.
Raport PDF
Odată ce factura este acceptată și validată de către SII și PDF-ul este tipărit, acesta include elementele fiscale care indică faptul că documentul este valabil fiscal și o nouă secțiune necesară pentru vamă.
Rapoarte financiare
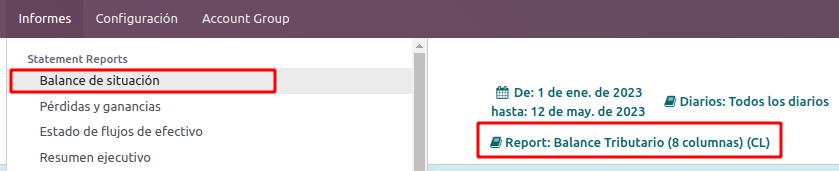
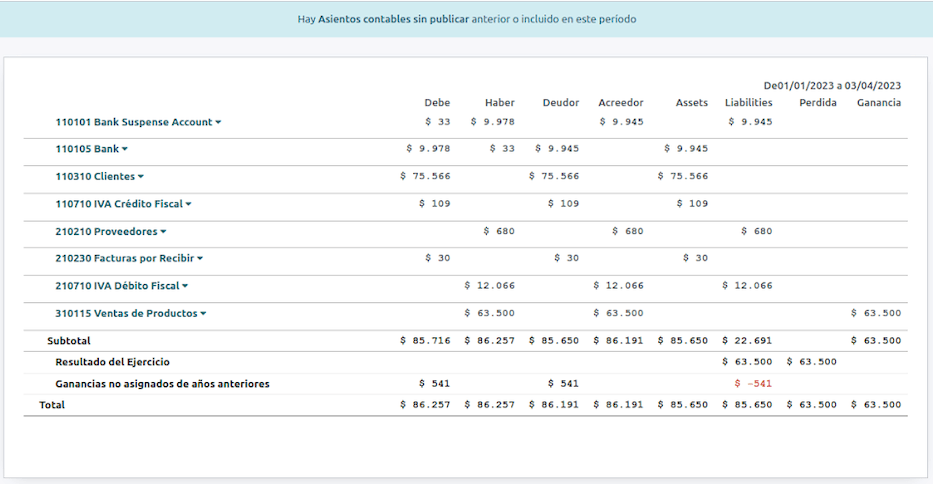
Sold fiscal pe 8 coloane
Acest raport prezintă în detaliu conturile (cu bilanţurile lor respective), clasificându-le în funcţie de provenienţa lor şi determinând nivelul profitului sau pierderii pe care afacerea l-a avut în perioada evaluată.
Puteți găsi acest raport în și selectând în câmpul Raport opțiunea Sold fiscal chilian (8 coloane) (CL).
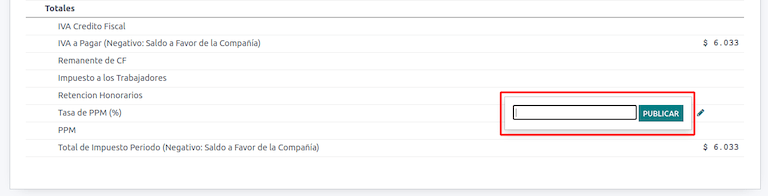
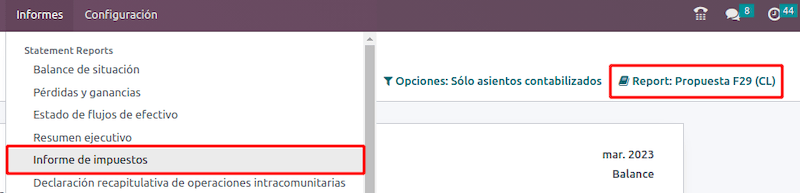
Formularul F29
Formularul F29 este un sistem nou pe care SII l-a activat pentru contribuabili și care înlocuiește Cartele de cumpărare și vânzări. Acest raport este integrat de Registrul de achiziții (CR) și Registrul de vânzări (RV). Scopul său este de a sprijini tranzacțiile legate de TVA, îmbunătățind controlul și declararea acestuia.
Această înregistrare este furnizată de documentele fiscale electronice (DTE) care au fost primite de SII.
Puteți găsi acest raport în și selectând opțiunea Raport Propuesta F29 (CL).
Este posibil să setați PPM și Factorul proporțional pentru anul fiscal din .

Sau manual în rapoarte făcând clic pe pictograma ✏️ (creion).