Efectuați, primiți, transferați și redirecționați apeluri
Apelarea clienților potențiali, clienților sau colegilor este o parte esențială a oricărei afaceri. De asemenea, o companie trebuie să fie disponibilă atunci când clienții sună, pentru a construi încredere și a face conexiuni.
Acest document acoperă cum să efectuați, să primiți, să transferați și să redirecționați apeluri cu Odoo VoIP.
Efectuați apeluri
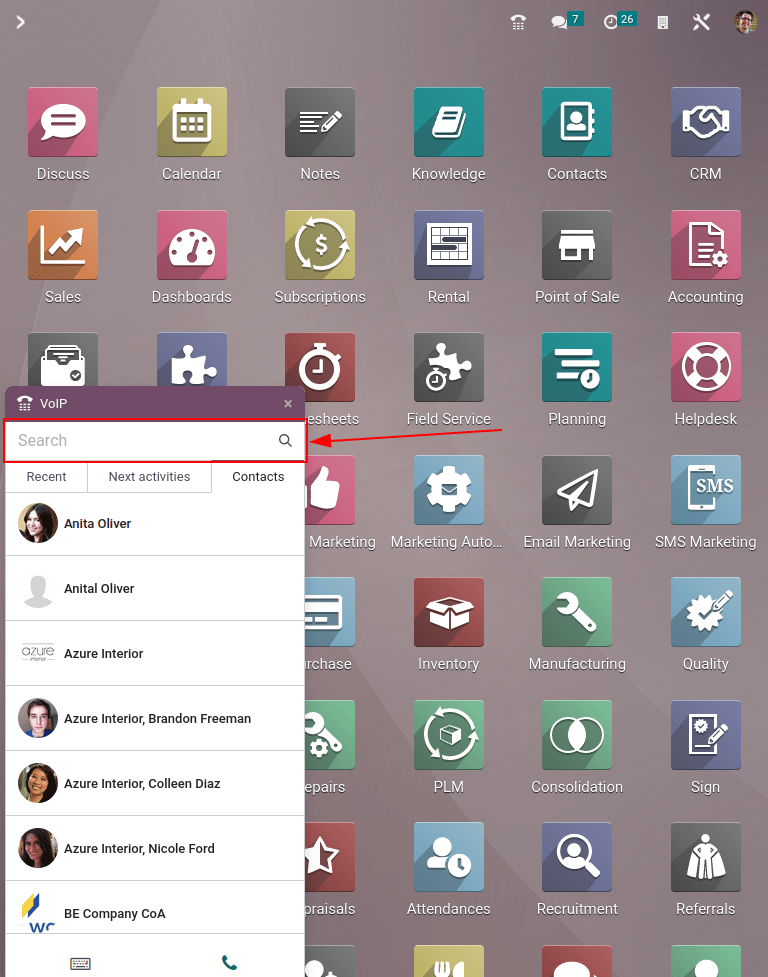
Începând din tabloul de bord Odoo, un apel poate fi efectuat prin deschiderea widget-ului telefonului în colțul din dreapta sus, care este reprezentat de o pictogramă ☎️ (telefon).
Apoi, un utilizator poate face clic pe fila Contacts și poate face clic pe orice contact din baza de date pentru a efectua un apel.
În plus, se poate folosi și Bara de căutare din fereastra pop-up VOIP pentru a găsi orice contact dorit.
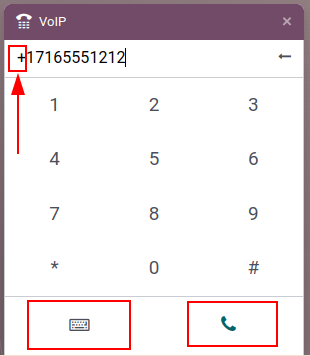
Pentru a efectua un apel manual, faceți clic pe pictograma ⌨️ (tastatură) și procedați la introducerea manuală a numărului dorit. Nu uitați să conduceți cu pictograma + (plus), urmată de codul internațional al țării.
Example
Pentru Statele Unite ale Americii, codul țării și pictograma + (plus) ar arăta astfel: +1. Dacă cineva ar forma Belgia, numărul ar fi prefixat de +32, iar pentru Marea Britanie ar fi +44.
După ce ați introdus numărul complet, cu prefixul de pictogramă + (plus) și codul țării, faceți clic pe pictograma verde 📞 (telefon) pentru a începe apelul. Când ați terminat, faceți clic pe pictograma roșie 📞 (telefon) pentru a încheia apelul.
Primiți apeluri
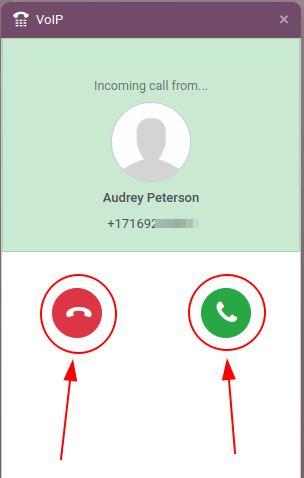
Un apel primit deschide automat widgetul VoIP, atunci când un utilizator utilizează baza de date Odoo. În cazul în care baza de date este deschisă într-o altă filă, se redă un sunet (sunetul trebuie să fie activat pe dispozitiv).
Odată revenit la filă, apare ecranul de apelare al widget-ului telefonului VoIP.
Faceți clic pe pictograma verde 📞 (telefon) pentru a prelua apelul sau pe pictograma roșie 📞 (telefon) pentru a respinge apelul.
Adăugare la coada de apeluri
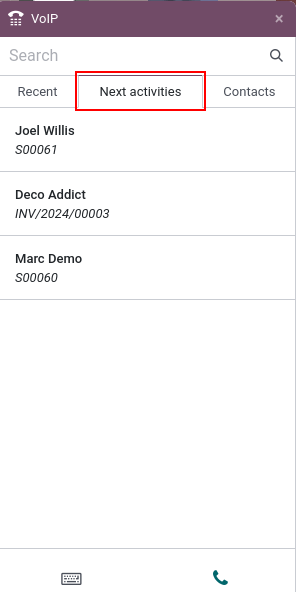
Toate contactele și clienții care trebuie apelați pot fi văzute într-un singur loc cu widget-ul telefonului Odoo VoIP, sub fila Activitățile următoare.
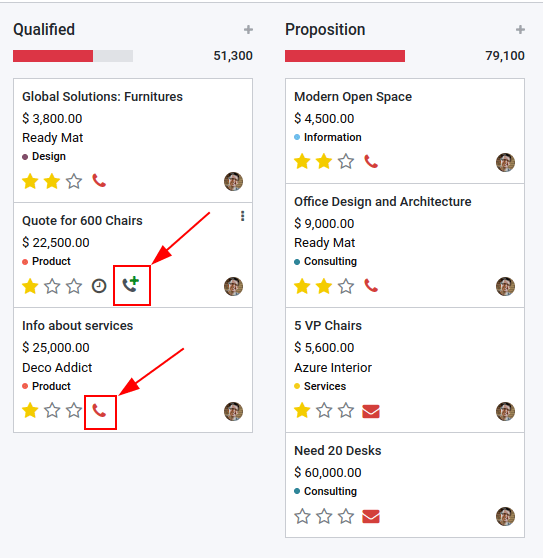
Pentru a adăuga un apel la fila Activitățile următoare, faceți clic pe pictograma verde 📞 (telefon), în vizualizarea kanban a aplicației CRM.
Pentru a le elimina din coada de apeluri, plasați cursorul peste oportunitatea care are un apel programat și faceți clic pe pictograma roșie 📞 (telefon) care apare cu pictograma - (minus).
Când navigați înapoi la widget-ul telefonului VoIP, doar apelurile care sunt programate imediat pentru ziua respectivă apar în coadă sub fila Activități următoare a widgetului pop-up VoIP.
Fila Activități următoare a widget-ului telefonului VoIP este integrată cu următoarele aplicații Odoo: CRM, Proiect și Helpdesk.
Un apel poate fi adăugat în discuția de înregistrări din acele aplicații.
Pentru a adăuga manual un apel, prin chatter, faceți clic pe Activități (lângă pictograma 🕗 (ceas)). Sub Tipul de activitate, selectați Apel din meniul drop-down care apare.
Apoi, setați un Data scadență și adăugați un Rezumat.
În cele din urmă, modificați câmpul Assigned to la persoana care ar trebui să efectueze apelul. Oricine este setat în acest ultim câmp (Atribuit la) are acest apel afișat în coada de apeluri Activitățile următoare în widget-ul telefonului Odoo VoIP.
Important
Doar apelurile pentru ziua imediată (data de astăzi) apar în fila Activități următoare a widget-ului VoIP pentru utilizatorul respectiv.
Dacă este specificat, faceți clic pe Salvați sau Deschideți calendarul pentru a finaliza programarea apelului.
Transfera apeluri
Un apel poate fi transferat de la un utilizator la altul în widget-ul telefonului Odoo VoIP. Cu toate acestea, acest lucru se poate doar să apară după ce ați vorbit mai întâi cu apelantul. Fără a prelua apelul în widget-ul telefonului Odoo VoIP, singura modalitate de a transfera un apel este automat prin consola/portalul furnizorului.
Vedeți și
Pentru mai multe informații despre transferuri, vizitați Fila Redirecționări.
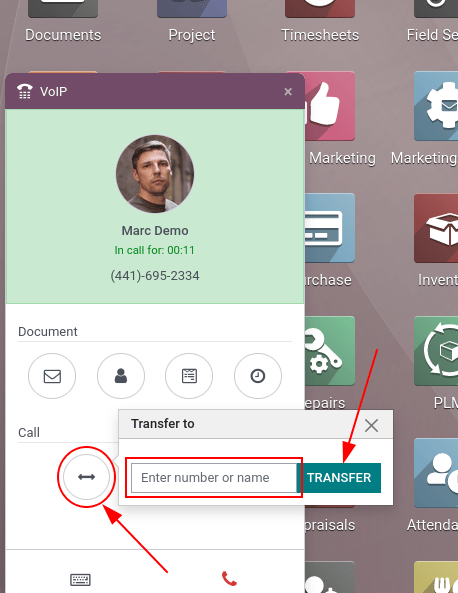
Pentru a transfera un apel în widget-ul telefonului Odoo VoIP, mai întâi, răspundeți la apel folosind pictograma verde 📞 (telefon).
Odată ce ați răspuns la apelul primit, faceți clic pe pictograma ↔ (săgeată stânga-dreapta). Apoi, introduceți extensia utilizatorului către care ar trebui să fie redirecționat apelul. În cele din urmă, faceți clic pe Transfer pentru a direcționa apelul către acel număr de telefon.
Sfat
Pentru a găsi extensia pentru un utilizator, consultați administratorul VoIP sau, dacă utilizatorul are drepturi de acces Setări la Administrare, navigați la .
Pentru mai multe informații despre drepturile de acces, vizitați: Drepturi de acces.
Redirecționați apelurile
Pentru a redirecționa un apel în widgetul telefonului Odoo VoIP, mai întâi, răspundeți la apel folosind pictograma verde 📞 (telefon). Odată ce ați răspuns la apelul primit, faceți clic pe pictograma ↔ (săgeată stânga-dreapta).
Apoi, introduceți numărul de telefon complet al utilizatorului către care ar trebui să fie redirecționat apelul. În cele din urmă, faceți clic pe Transfer pentru a direcționa apelul către acel număr de telefon.
Vedeți și
Pentru mai multe informații despre redirecționare, vizitați Fila Redirecționări.