
Planowanie
Odoo Planowanie umożliwia planowanie harmonogramu zespołu oraz zarządzanie zmianami i zasobami.
Zarządzanie planowaniem zespołu wiąże się z określonymi wymaganiami, które mogą się znacznie różnić w zależności od potrzeb biznesowych. W Odoo Planowanie wprowadzono następujące koncepcje, aby sprostać tym potrzebom:
Zmiany są przypisywane zasobom, które mogą być ludzkie (pracownicy) lub materialne (np. sprzęt). Zasoby mają przypisane role, co umożliwia organizację pracy w zespole.
Po zakończeniu wstępnej konfiguracji planowanie zmian można wykonać ręcznie lub zautomatyzować za pomocą funkcji Auto Plan.
Integracja między aplikacjami Planowanie i Sprzedaż umożliwia powiązanie sprzedanych usług z rolami i zmianami w Planowaniu. Dodatkowo integracja z Projekt pozwala na dedykowanie zmian, a tym samym czasu i zasobów, konkretnym projektom.
Zobacz także
Konfiguracja
Role
Aby zdefiniować role wykonywane przez zasoby (np. szef kuchni, barman, kelner), przejdź do , następnie kliknij Nowy i wypełnij pole Nazwa (np. asystent, recepcjonista, menedżer). Następnie wybierz Zasoby, które będą wykonywać tę rolę. Zasoby mogą być Pracownicy lub Materiały.
Informacja
Jeśli aplikacja Sprzedaż jest zainstalowana w bazie danych, pojawia się pole Usługi, umożliwiające określenie, które role są potrzebne do wykonania usług, aby zmiany były przypisywane właściwej osobie.
Role są brane pod uwagę podczas używania funkcji Automatyczne planowanie.
Pola właściwości i role
Pola właściwości pozwalają dodawać niestandardowe pola do formularzy w kilku aplikacjach Odoo. Planowanie obejmuje możliwość dodawania pól właściwości powiązanych z rolami do zmian.
Aby utworzyć pole właściwości, przełącz się na widok listy z dowolnego harmonogramu. Następnie kliknij Wyświetl na zmianie, którą chcesz edytować. Jeśli pole Rola jest puste, wypełnij je żądaną rolą, następnie kliknij ikonę koła zębatego i wybierz Dodaj właściwości. Skonfiguruj nowe pole zgodnie ze swoimi potrzebami.

Pole właściwości jest powiązane z rolą i jest uwzględnione w formularzu zmiany wszystkich zmian wykonywanych przez tę rolę.
Example
Niektóre z przypadków użycia pól właściwości roli obejmują:
Akredytacja: dla ról wymagających specjalnego zezwolenia (np. prawo jazdy)
Lokalizacja: w firmach działających w wielu lokalizacjach (np. sklepy lub restauracje)
Język: w środowisku wielojęzycznym (np. firma konsultingowa)
Pracownicy
Wszyscy pracownicy mogą być uwzględnieni w planowaniu i przypisani do zmian.
Aby dostosować ustawienia planowania pracownika, przejdź do i wybierz pracownika, dla którego chcesz edytować ustawienia. Następnie przejdź do zakładki Informacje o pracy.
Wskazówka
To samo można zrobić z aplikacji Pracownicy, która jest instalowana domyślnie wraz z modułem Planowanie.
Dwie sekcje zakładki Informacje o pracy pracownika mają wpływ na Planowanie: Harmonogram (a mianowicie pole Godziny pracy) oraz Planowanie.
Godziny pracy
Godziny pracy są brane pod uwagę podczas obliczania Przydzielonego czasu i jego procentu dla zmian. Jeśli pole Godziny pracy pozostanie puste, pracownik jest traktowany jako pracujący w elastycznych godzinach.
Aby utworzyć indywidualne Godziny pracy, na przykład dla pracowników pracujących w niepełnym wymiarze godzin, kliknij Wyszukaj więcej…, a następnie Nowy.
Informacja
Godziny pracy i Przydzielony czas w module Planowanie mogą wpływać na Listę płac, jeśli umowa pracownika jest skonfigurowana do generowania wpisów pracy na podstawie zmian.
Zobacz także
Role w module Planowanie
Gdy pracownik ma jedną lub więcej Ról:
Podczas tworzenia zmiany dla tego pracownika wyświetlane są tylko szablony zmian z ról wybranych w tym polu.
Gdy harmonogram jest publikowany, pracownik jest powiadamiany tylko o otwartych zmianach dla ról, które są mu przypisane.
Podczas automatycznego przypisywania otwartych zmian lub planowania zamówień sprzedaży pracownikowi są przypisywane tylko zmiany dla ról mu przypisanych.
Dodatkowo, gdy Domyślna rola jest zdefiniowana:
Podczas tworzenia zmiany dla pracownika domyślna rola jest automatycznie wybierana.
Ta rola ma również pierwszeństwo przed innymi rolami pracownika podczas automatycznego przypisywania otwartych zmian lub planowania zamówień sprzedaży.
Informacja
If the Planning roles fields are left empty, there are no restrictions in the shift templates and open shifts shared with the employee. However, it’s not possible to use the Auto Plan feature for employees with no roles.
Materiały
Materiały to zasoby, którym można przypisać zmiany i godziny pracy, ale nie są pracownikami. Na przykład firma budowlana może używać materiałów do tworzenia zmian dla współdzielonych maszyn (np. dźwigi, wózki widłowe).
Podobnie jak pracownikom, materiałom można przypisać role i czas pracy.
Szablony zmian
To create a shift template, click New on any schedule, then fill in the details of the shift, and click Save Template.
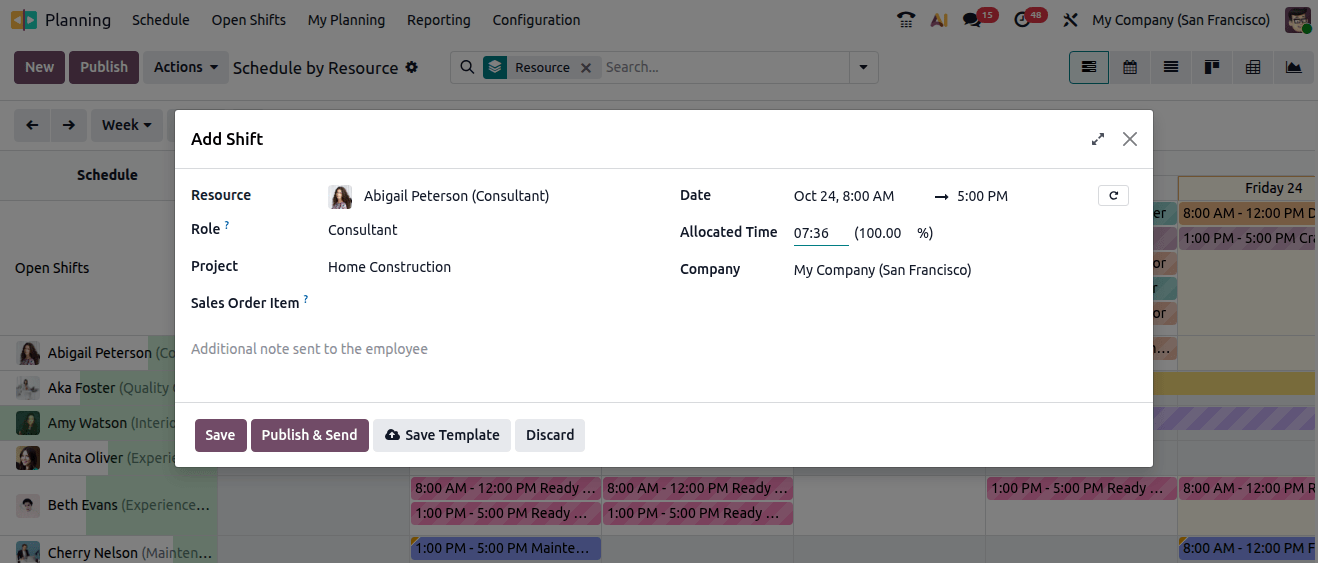
Alternatively, go to , then click New. Fill in the Start & End Hours and the shift’s Span, then assign a Role.
If the Project app is installed, a Project can also be selected.
Planowanie zmian
On opening the Planning app, the users see their own schedule. Users with administrator access rights can also see the schedule By Resource, By Role, By Project, and By Sales Order, as well as reporting and configuration menus.
Informacja
The schedule is displayed in the Gantt view, which allows you to reassign, reschedule, resize, split, and duplicate shifts without having to open them.
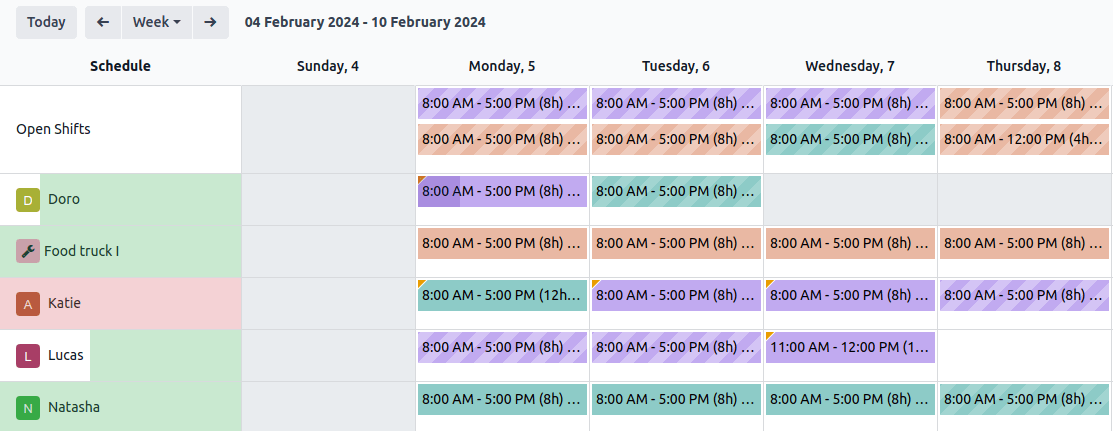
Następujące elementy wizualne są używane w zmianach w harmonogramach:
Full color: shifts that are planned and published.
Diagonal stripes: shifts that are planned but have yet to be published.
Grayed-out background: employees who are on time off.
Pasek postępu: obecnie trwające zmiany z powiązanymi kartami pracy.
Wyszarzona zmiana: podczas kopiowania zmian, skopiowane zmiany są wyświetlane w pełnym kolorze, podczas gdy wcześniej istniejące zmiany są tymczasowo wyszarzone. Kolor zmienia się z powrotem na pełny kolor lub ukośne paski po następnym odświeżeniu strony lub przez usunięcie filtra.
Create shifts
Aby utworzyć zmianę, przejdź do dowolnego harmonogramu, a następnie kliknij Nowy. W otwartym oknie dialogowym wypełnij następujące szczegóły:
Templates: If there is one or more shift templates existing in the database, they are displayed in the upper section of the pop-up window. Once selected, a template prefills the shift form accordingly.
Resources: Resources can be both employees or materials. If this field is left empty, the shift is considered an open shift.
Date: Choose the date and time of the shift. This is the only mandatory field when creating a shift.
Repeat: Click the (repeat) button and configure the Repeat every fields as needed. The following rules apply to recurring shifts:
Wszystkie pola (np. Zasób, Rola, Projekt) są kopiowane z oryginalnej zmiany z wyjątkiem daty, która jest dostosowywana zgodnie z polem Powtarzaj co.
Powtórzenia są zaplanowane, ale nie opublikowane.
By default, planned shifts are created six months in advance, after which they are created gradually. To change the time frame, activate the developer mode, then go to and edit the Recurring Shifts.
Allocated Time: Is calculated based on the shift’s date and time, and the employee’s Working Schedule.
Role: Select the role that the assigned resources will be performing. This field is especially useful when auto-planning shifts. Once you select a role, the shift templates associated with it are displayed in the upper section of the pop-up window.
Additionally, the following fields may also be available:
Project: If the Project planning setting is enabled in the Planning settings, select the relevant project to link to the shift. Shifts dedicated to the selected project are then planned and tracked accordingly.
Task: If a project is selected, optionally select a task within that project.
Sales Order: If the Sales app is installed, select the relevant sales order to link to the shift.
Customer: If the shift is an on-site intervention, select the relevant customer to link to the shift.
Worksheet: If field service worksheets are configured, optionally select the relevant worksheet template.
Click Save to create the shift, or Publish to create it and notify the assigned employee by email.
Create shifts from sales orders
Shifts are created automatically from sales orders containing products configured as follows:
Product Type: Set to Service.
Plan Services: Enable the checkbox, then select the relevant role.
Once the sales order is confirmed, schedule the shift:
Click the To Plan smart button on the sales order form.
Click the relevant day in the appropriate resource’s schedule.
Informacja
Only resources whose role matches the role configured for the product on the sales order are available for shift assignment.
Select the relevant shift from the list of open shifts for that role.
Publish the shift.
Wskazówka
To edit the shift before planning it, on the Schedule by Resource view:
either click New;
or click the relevant day in the appropriate resource’s schedule, then click Create New.
Then, edit the fields as needed and Save the shift or Publish it.
Once shifts have been planned for the sales order, click the Planned smart button on the sales order form to view them.
Edit and delete shifts
To edit a shift, click it in the calendar or schedule, then click Edit.
Shifts can also be adjusted directly on the schedule, without opening them:
Reassign or reschedule a shift by dragging and dropping it to the desired employee and day.
Extend a shift over several days by hovering over the right edge of the shift block. When the cursor changes into a resize pointer, click and drag the edge to the desired day.
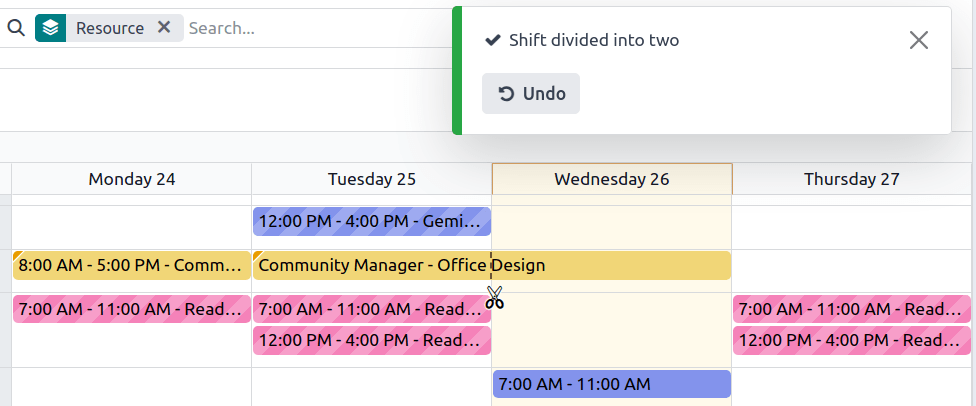
Split a shift spanning multiple consecutive days into two segments by hovering over the boundary between the two affected day columns, then clicking the (scissors) icon.
To delete a shift, click it in the schedule, then click Delete.
Wskazówka
Alternatively, the shift form can be accessed by switching to the list view and clicking View on the relevant shift’s line, or by switching to the Kanban view and clicking the relevant shift’s card.
Publish shifts
Publishing shifts notifies the assigned employees by email and makes the schedule visible to all users, including those without Administrator Planning access rights (via ).
Shifts can be published individually or in bulk.
To publish an individual shift:
either click Publish at the end of the shift creation process;
or click the shift in the schedule, click Edit, then click Publish on the shift form.
To publish all planned shifts:
From any schedule, click Publish.
In the pop-up, optionally edit the Period.
Disable Include Open Shifts to exclude open shifts from the publication.
Optionally edit the list of employees; removing an employee from the list excludes their shifts from this publication.
Click Publish & Send.
Employees are notified of their shifts once they are published:
Pracownicy bez kont użytkowników są przekierowywani do dedykowanego portalu planowania.
Employees with a user account are redirected to the My Planning view.
Informacja
If the email address of one or more employees in the list has not been configured, enter their Work Email in the pop-up that opens, then click Save & Send Schedule. If the missing email addresses are not added, the corresponding employees» schedules are not published.
Unpublished shifts are only visible on schedules for users with Administrator Planning access rights and are identified by diagonal lines.
Otwarte zmiany i automatyczne planowanie
The Auto Plan button allows you to assign Open shifts (shifts with no resource assigned) and create and assign shifts linked to sales orders or project tasks.
Następujące funkcje mają wpływ na automatyczne planowanie:
Roles: Open shifts are only assigned to resources (employees or materials) that have the corresponding role assigned. It is not possible to use the Auto Plan feature for employees with no role.
Role domyślne: Domyślna rola przypisana do zasobu ma pierwszeństwo przed innymi rolami, które ma przypisane.
Konflikty: Pracownicy lub materiały nie mogą mieć przypisanych wielu zmian w tym samym czasie.
Time off: The employees» time off is taken into account, as well as public holidays.
Godziny pracy: Są brane pod uwagę przy przypisywaniu zmian pracownikom lub materiałom. Nie można używać funkcji Zaplanuj automatycznie dla pracownika pracującego w elastycznych godzinach.
Umowy: Jeśli pracownik ma aktywną umowę, nie zostaną mu przypisane zmiany wykraczające poza okres obowiązywania umowy.
Kliknij Opublikuj, aby potwierdzić harmonogram i powiadomić pracowników o ich planowaniu.
Zamiana zmian i cofnięcie przypisania
Dostępne są dwie funkcje umożliwiające pracownikom wprowadzanie zmian w ich harmonogramie: zamiana zmian i cofnięcie przypisania.
Informacja
Funkcje te wykluczają się wzajemnie. Zamiana zmian jest domyślnie możliwa i nie można jej wyłączyć. Jednak po włączeniu funkcji Zezwalaj na cofnięcie przypisania zastępuje ona opcję zamiany zmian.
Zamiana zmiany
Po zaplanowaniu i opublikowaniu zmian pracownicy otrzymują powiadomienie e-mail. Jeśli pracownik chce zamienić się zmianą, może kliknąć niechcianą zmianę i kliknąć Poproś o zamianę.
Zmiana pozostaje przypisana do pierwotnego pracownika, ale w harmonogramie na zmianie widoczne jest powiadomienie informujące, że przypisany pracownik chciałby zamienić się zmianami.
Zmiana jest następnie wyświetlana innym pracownikom, którzy mają tę samą rolę, a jeśli chcą ją sobie przypisać, mogą kliknąć przycisk Biorę to.
Informacja
Obowiązują następujące zasady:
Tylko zmiany odpowiadające rolom pracownika są wyświetlane jako dostępne dla nich.
Zamienianie się zmianami nie jest dostępne dla zmian z przeszłości.
Wypisywanie
Aby umożliwić pracownikom wypisywanie się ze zmian, przejdź do , a następnie zaznacz pole wyboru Zezwalaj na wypisywanie. Następnie określ maksymalną liczbę dni, w ciągu których pracownicy mogą się wypisać przed zmianą.
Po zaplanowaniu i opublikowaniu zmian pracownicy otrzymują powiadomienie e-mail. Jeśli wypisywanie ze zmiany jest dozwolone, pracownicy mogą kliknąć przycisk Jestem niedostępny, a zmiana wraca do stanu otwartej zmiany.
Informacja
Obowiązują następujące zasady:
W harmonogramie wyświetlane są tylko zmiany odpowiadające rolom pracownika.
Wypisywanie się ze zmian nie jest dostępne dla zmian z przeszłości.