
การวางแผน
Odoo การวางแผน ช่วยให้คุณวางแผนตารางเวลาของทีมและจัดการกะและทรัพยากร
การจัดการการวางแผนทีมของคุณมีความต้องการเฉพาะที่อาจแตกต่างกันอย่างกว้างขวางขึ้นอยู่กับความต้องการทางธุรกิจของคุณ แนวคิดต่อไปนี้ได้ถูกนำมาใช้ใน Odoo การวางแผนเพื่อตอบสนองความต้องการเหล่านั้น:
กะ ถูกกำหนดให้กับ ทรัพยากร ซึ่งสามารถเป็นได้ทั้ง มนุษย์ (พนักงาน) หรือ วัสดุ (เช่น อุปกรณ์) ทรัพยากรได้รับมอบหมาย บทบาท ซึ่งช่วยในการจัดระเบียบงานภายในทีม
เมื่อการกำหนดค่าเริ่มต้นเสร็จสิ้น การ วางแผนกะ สามารถทำด้วยตนเองหรือทำโดยอัตโนมัติโดยใช้คุณสมบัติ Auto Plan
การผสานรวมระหว่างแอป การวางแผน และ การขาย ช่วยให้สามารถเชื่อมโยงบริการที่ขายกับบทบาทและกะใน การวางแผน นอกจากนี้ การผสานรวมกับ โปรเจกต์ ช่วยให้สามารถกำหนดกะ และดังนั้นเวลาและทรัพยากร ให้กับโครงการเฉพาะ
ดูเพิ่มเติม
การกำหนดค่า
บทบาท
ในการกำหนดบทบาทที่ทรัพยากรของคุณปฏิบัติ (เช่น พ่อครัว บาร์เทนเดอร์ พนักงานเสิร์ฟ) ให้ไปที่ จากนั้นคลิก New และกรอก Name (เช่น ผู้ช่วย พนักงานต้อนรับ ผู้จัดการ) จากนั้นเลือก Resources ที่จะปฏิบัติบทบาทนี้ ทรัพยากรสามารถเป็นได้ทั้ง พนักงาน หรือ วัสดุ
Note
หากแอป การขาย ติดตั้งในฐานข้อมูลของคุณ ฟิลด์ Services จะปรากฏขึ้น ช่วยให้คุณระบุบทบาทที่จำเป็นในการให้บริการเพื่อให้กะถูกกำหนดให้กับบุคคลที่เหมาะสม
บทบาทจะถูกนำมาพิจารณาเมื่อใช้ฟีเจอร์ วางแผนอัตโนมัติ
ฟิลด์คุณสมบัติและบทบาท
ฟิลด์คุณสมบัติ ช่วยให้คุณสามารถเพิ่มฟิลด์ที่กำหนดเองลงในฟอร์มได้ในแอปพลิเคชัน Odoo หลายตัว การวางแผนมีความเป็นไปได้ในการเพิ่มฟิลด์คุณสมบัติที่เชื่อมโยงกับบทบาทในกะการทำงาน
ในการสร้างฟิลด์คุณสมบัติ ให้สลับไปยังมมุองรายการจากตารางเวลาใดๆ จากนั้นคลิก ดู ในกะที่คุณต้องการแก้ไข หากฟิลด์ บทบาท ว่างเปล่า ให้กรอกบทบาทที่ต้องการ จากนั้นคลิกไอคอนเฟืองและเลือก เพิ่มคุณสมบัติ กำหนดค่า ฟิลด์ใหม่ตามความต้องการของคุณ

ฟิลด์คุณสมบัติเชื่อมโยงกับบทบาทและรวมอยู่ในฟอร์มกะของกะทั้งหมดที่ดำเนินการโดยบทบาทนี้
Example
กรณีการใช้งานบางส่วนของฟิลด์คุณสมบัติบทบาทได้แก่:
การรับรอง: สำหรับบทบาทที่ต้องการใบอนุญาตเฉพาะ (เช่น ใบขับขี่)
สถานที่: ในบริษัทที่ดำเนินงานในหลายสถานที่ (เช่น ร้านค้าหรือร้านอาหาร)
ภาษา: ในสภาพแวดล้อมหลายภาษา (เช่น บริษัทที่ปรึกษา)
พนักงาน
พนักงานทุกคนสามารถถูกรวมในการวางแผนและได้รับมอบหมายกะ
ในการปรับการตั้งค่าการวางแผนของพนักงาน ไปที่ และเลือกพนักงานที่คุณต้องการแก้ไขการตั้งค่า จากนั้นไปที่แท็บ ข้อมูลการทำงาน
Tip
คุณสามารถทำเช่นเดียวกันจากแอพ พนักงาน ซึ่งติดตั้งโดยค่าเริ่มต้นพร้อมกับการวางแผน
สองส่วนของแท็บ ข้อมูลการทำงาน ของพนักงานมีผลกระทบต่อการวางแผน: ตารางเวลา (คือ ฟิลด์ ชั่วโมงทำงาน) และ การวางแผน
ชั่วโมงทำงาน
ชั่วโมงทำงาน จะถูกนำมาพิจารณาเมื่อคำนวณ เวลาที่จัดสรร และเปอร์เซ็นต์สำหรับ กะ หากฟิลด์ ชั่วโมงทำงาน ว่างเปล่า พนักงานจะถูกพิจารณาว่าทำงานแบบยืดหยุ่น
ในการสร้าง ชั่วโมงทำงาน แต่ละรายการ เช่น สำหรับพนักงานที่ทำงานพาร์ทไทม์ ให้คลิก ค้นหาเพิ่มเติม... จากนั้น ใหม่
Note
ชั่วโมงทำงาน และ เวลาที่จัดสรร ในการวางแผนสามารถส่งผลกระทบต่อ บัญชีเงินเดือน หากสัญญาของพนักงานได้รับการกำหนดค่าให้สร้างรายการงานตามกะ
ดูเพิ่มเติม
บทบาทการวางแผน
เมื่อพนักงานมีหนึ่งหรือมากกว่าหนึ่ง บทบาท:
เมื่อสร้างกะสำหรับพนักงานนี้ จะแสดงเฉพาะเทมเพลตกะจากบทบาทที่เลือกในฟิลด์นี้เท่านั้น
เมื่อเผยแพร่ตารางเวลา พนักงานจะได้รับการแจ้งเตือนเฉพาะกะที่เปิดรับสำหรับบทบาทที่ได้รับมอบหมายให้กับพวกเขาเท่านั้น
เมื่อมอบหมายกะที่เปิดรับโดยอัตโนมัติหรือการวางแผนคำสั่งขาย พนักงานจะได้รับมอบหมายเฉพาะกะสำหรับบทบาทที่ได้รับมอบหมายให้กับพวกเขาเท่านั้น
นอกจากนี้ เมื่อกำหนด บทบาทเริ่มต้น:
เมื่อสร้างกะสำหรับพนักงาูนี้ บทบาทเริ่มต้นจะถูกเลือกโดยอัตโนมัติ
บทบาทนี้ยังมีลำดับความสำคัญเหนือบทบาทอื่นๆ ของพนักงานเมื่อมอบหมายกะที่เปิดรับโดยอัตโนมัติหรือการวางแผนคำสั่งขาย
Note
If the Planning roles fields are left empty, there are no restrictions in the shift templates and open shifts shared with the employee. However, it's not possible to use the Auto Plan feature for employees with no roles.
วัสดุ
วัสดุ คือทรัพยากรที่สามารถมอบหมายกะและชั่วโมงการทำงานได้ แต่ไม่ใช่พนักงาน ตัวอย่างเช่น บริษัทก่อสร้างอาจใช้วัสดุเพื่อสร้างกะสำหรับเครื่องจักรที่ใช้ร่วมกัน (เช่น รถเครน รถยก)
เช่นเดียวกับพนักงาน วัสดุสามารถกำหนดบทบาทและเวลาทำงานได้
เทมเพลตกะ
To create a shift template, click New on any schedule, then fill in the details of the shift, and click Save Template.
Alternatively, go to , then click New. Fill in the Start & End Hours and the shift's Span, then assign a Role.
If the Project app is installed, a Project can also be selected.
การวางแผนกะ
On opening the Planning app, the users see their own schedule. Users with administrator access rights can also see the schedule By Resource, By Role, By Project, and By Sales Order, as well as reporting and configuration menus.
Note
The schedule is displayed in the Gantt view, which allows you to reassign, reschedule, resize, split, and duplicate shifts without having to open them.

องค์ประกอบภาพต่อไปนี้ใช้ในกะการทำงานในตารางงาน:
Full color: shifts that are planned and published.
Diagonal stripes: shifts that are planned but have yet to be published.
Grayed-out background: employees who are on time off.
แถบความคืบหน้า: กะการทำงานที่กำลังดำเนินอยู่และมีระบบบันทึกเวลาเชื่อมโยงอยู่
กะการทำงานสีเทา: เมื่อคัดลอกกะการทำงาน กะที่คัดลอกจะแสดงเป็นสีเต็ม ในขณะที่กะที่มีอยู่ก่อนหน้าจะเป็นสีเทาชั่วคราว สีจะเปลี่ยนกลับเป็นสีเต็มหรือลายทแยงมุมเมื่อรีเฟรชหน้าครั้งถัดไปหรือลบตัวกรอง
Create shifts
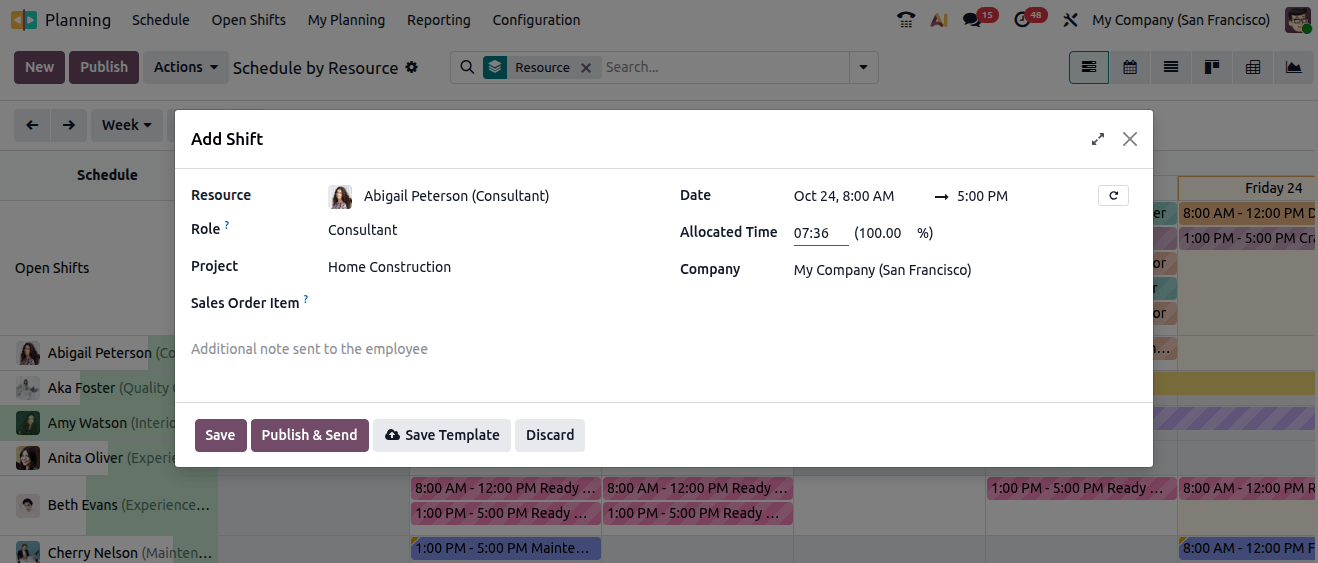
ในการสร้างกะการทำงาน ไปที่ตารางงานใดก็ได้ แล้วคลิก ใหม่ ในหน้าต่างป๊อปอัปที่เปิดขึ้น กรอกรายละเอียดต่อไปนี้:
Templates: If there is one or more shift templates existing in the database, they are displayed in the upper section of the pop-up window. Once selected, a template prefills the shift form accordingly.
Resources: Resources can be both employees or materials. If this field is left empty, the shift is considered an open shift.
Date: Choose the date and time of the shift. This is the only mandatory field when creating a shift.
Repeat: Click the (repeat) button and configure the Repeat every fields as needed. The following rules apply to recurring shifts:
ฟิลด์ทั้งหมด (เช่น ทรัพยากร, บทบาท, โปรเจกต์) จะคัดลอกมาจากกะการทำงานเดิม ยกเว้นวันที่ซึ่งจะปรับตามฟิลด์ ทำซ้ำทุก
การทำซ้ำจะวางแผนแล้วแต่ยังไม่ได้เผยแพร่
By default, planned shifts are created six months in advance, after which they are created gradually. To change the time frame, activate the developer mode, then go to and edit the Recurring Shifts.
Allocated Time: Is calculated based on the shift's date and time, and the employee's Working Schedule.
Role: Select the role that the assigned resources will be performing. This field is especially useful when auto-planning shifts. Once you select a role, the shift templates associated with it are displayed in the upper section of the pop-up window.
Additionally, the following fields may also be available:
Project: If the Project planning setting is enabled in the Planning settings, select the relevant project to link to the shift. Shifts dedicated to the selected project are then planned and tracked accordingly.
Task: If a project is selected, optionally select a task within that project.
Sales Order: If the Sales app is installed, select the relevant sales order to link to the shift.
Customer: If the shift is an on-site intervention, select the relevant customer to link to the shift.
Worksheet: If field service worksheets are configured, optionally select the relevant worksheet template.
Click Save to create the shift, or Publish to create it and notify the assigned employee by email.
Create shifts from sales orders
Shifts are created automatically from sales orders containing products configured as follows:
Product Type: Set to Service.
Plan Services: Enable the checkbox, then select the relevant role.
Once the sales order is confirmed, schedule the shift:
Click the To Plan smart button on the sales order form.
Click the relevant day in the appropriate resource's schedule.
Note
Only resources whose role matches the role configured for the product on the sales order are available for shift assignment.
Select the relevant shift from the list of open shifts for that role.
Publish the shift.
Tip
To edit the shift before planning it, on the Schedule by Resource view:
either click New;
or click the relevant day in the appropriate resource's schedule, then click Create New.
Then, edit the fields as needed and Save the shift or Publish it.
Once shifts have been planned for the sales order, click the Planned smart button on the sales order form to view them.
Edit and delete shifts
To edit a shift, click it in the calendar or schedule, then click Edit.
Shifts can also be adjusted directly on the schedule, without opening them:
Reassign or reschedule a shift by dragging and dropping it to the desired employee and day.
Extend a shift over several days by hovering over the right edge of the shift block. When the cursor changes into a resize pointer, click and drag the edge to the desired day.
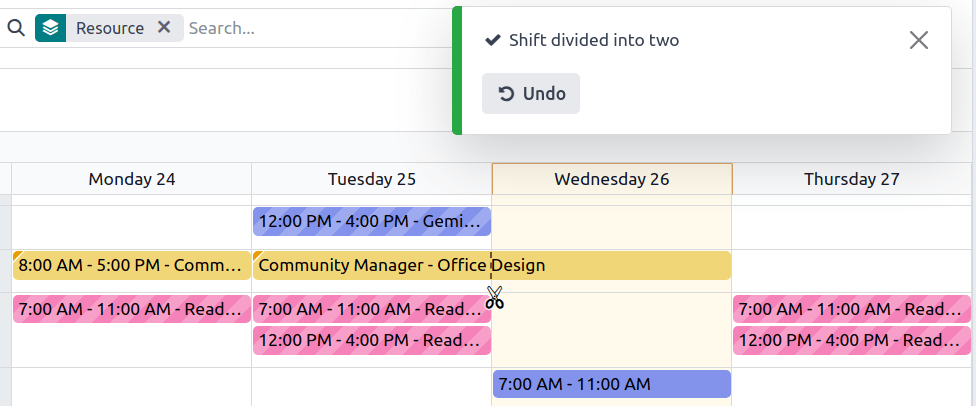
Split a shift spanning multiple consecutive days into two segments by hovering over the boundary between the two affected day columns, then clicking the (scissors) icon.
To delete a shift, click it in the schedule, then click Delete.
Tip
Alternatively, the shift form can be accessed by switching to the list view and clicking View on the relevant shift's line, or by switching to the Kanban view and clicking the relevant shift's card.
Publish shifts
Publishing shifts notifies the assigned employees by email and makes the schedule visible to all users, including those without Administrator Planning access rights (via ).
Shifts can be published individually or in bulk.
To publish an individual shift:
either click Publish at the end of the shift creation process;
or click the shift in the schedule, click Edit, then click Publish on the shift form.
To publish all planned shifts:
From any schedule, click Publish.
In the pop-up, optionally edit the Period.
Disable Include Open Shifts to exclude open shifts from the publication.
Optionally edit the list of employees; removing an employee from the list excludes their shifts from this publication.
Click Publish & Send.
Employees are notified of their shifts once they are published:
พนักงานที่ไม่มีบัญชีผู้ใช้จะถูกเปลี่ยนเส้นทางไปยัง พอร์ทัลการวางแผน โดยเฉพาะ
Employees with a user account are redirected to the My Planning view.
Note
If the email address of one or more employees in the list has not been configured, enter their Work Email in the pop-up that opens, then click Save & Send Schedule. If the missing email addresses are not added, the corresponding employees' schedules are not published.
Unpublished shifts are only visible on schedules for users with Administrator Planning access rights and are identified by diagonal lines.
กะงานเปิดและการวางแผนอัตโนมัติ
The Auto Plan button allows you to assign Open shifts (shifts with no resource assigned) and create and assign shifts linked to sales orders or project tasks.
คุณสมบัติต่อไปนี้มีผลกระทบต่อการวางแผนอัตโนมัติ:
Roles: Open shifts are only assigned to resources (employees or materials) that have the corresponding role assigned. It is not possible to use the Auto Plan feature for employees with no role.
บทบาทเริ่มต้น: บทบาทเริ่มต้นที่มอบหมายให้กับทรัพยากรจะได้รับลำดับความสำคัญสูงกว่าบทบาทอื่นๆ ที่พวกเขาได้รับมอบหมาย
ความขัดแย้ง: พนักงานหรือวัสดุไม่สามารถได้รับมอบหมายหลายกะงานในเวลาเดียวกัน
Time off: The employees' time off is taken into account, as well as public holidays.
ชั่วโมงทำงาน: จะถูกนำมาพิจารณาเมื่อมอบหมายกะงานให้กับพนักงานหรือวัสดุ ไม่สามารถใช้คุณสมบัติ วางแผนอัตโนมัติ สำหรับพนักงานที่ทำงาน ชั่วโมงยืดหยุ่น
สัญญา: หากพนักงานมีสัญญาที่เปิดใช้งานอยู่ พวกเขาจะไม่ถูกมอบหมายกะงานที่อยู่นอกช่วงระยะเวลาสัญญาของพวกเขา
คลิก เผยแพร่ เพื่อยืนยันตารางงานและแจ้งเตือนพนักงานเกี่ยวกับการวางแผนของพวกเขา
การสลับกะงานและการยกเลิกการมอบหมาย
มีคุณสมบัติสองอย่างที่ช่วยให้พนักงานสามารถเปลี่ยนแปลงตารางงานของพวกเขา: การสลับกะงาน และ การยกเลิกการมอบหมาย
Note
คุณสมบัติเหล่านี้ไม่สามารถใช้พร้อมกันได้ การสลับกะงานสามารถทำได้ตามค่าเริ่มต้นและไม่สามารถปิดใช้งานได้ อย่างไรก็ตาม เมื่อเปิดใช้งานคุณสมบัติ อนุญาตให้ยกเลิกการมอบหมาย จะแทนที่ตัวเลือกในการสลับกะงาน
การสลับกะงาน
เมื่อกะการทำงานได้รับการวางแผนและเผยแพร่แล้ว พนักงานจะได้รับการแจ้งเตือนทางอีเมล หากพนักงานต้องการสลับกะ พวกเขาสามารถคลิกที่กะที่ไม่ต้องการและคลิก ขอสลับ
กะจะยังคงถูกมอบหมายให้กับพนักงานเดิม แต่ในตารางการทำงาน จะมีการแจ้งเตือนที่แสดงว่าพนักงานที่ได้รับมอบหมายต้องการสลับกะปรากฏบนกะนั้น
กะจะถูกแสดงให้พนักงานคนอื่นๆ ที่มีบทบาทเดียวกันเห็น และหากพวกเขาต้องการมอบหมายให้ตัวเอง พวกเขาสามารถคลิกปุ่ม ฉันรับ
Note
กฎต่อไปนี้ใช้บังคับ:
มีเพียงกะที่ตรงกับบทบาทของพนักงานเท่านั้นที่จะแสดงว่ามีให้พวกเขา
การสลับกะไม่สามารถใช้ได้กับกะในอดีต
การยกเลิกการมอบหมาย
เพื่ออนุญาตให้พนักงานยกเลิกการมอบหมายตัวเองจากกะ ไปที่ จากนั้นทำเครื่องหมายที่ช่อง อนุญาตให้ยกเลิกการมอบหมาย จากนั้นระบุจำนวนวันสูงสุดที่พนักงานสามารถยกเลิกการมอบหมายตัวเองก่อนกะ
เมื่อกะการทำงานได้รับการวางแผนและเผยแพร่แล้ว พนักงานจะได้รับการแจ้งเตือนทางอีเมล หากอนุญาตให้ยกเลิกการมอบหมายกะ พนักงานสามารถคลิกปุ่ม ฉันไม่สะดวก และกะจะกลับเป็นกะว่าง
Note
กฎต่อไปนี้ใช้บังคับ:
มีเพียงกะที่ตรงกับบทบาทของพนักงานเท่านั้นที่จะแสดงในตารางการทำงานของพวกเขา
การยกเลิกการมอบหมายกะไม่สามารถใช้ได้กับกะในอดีต