
Utwórz wydarzenia
Dzięki aplikacji Wydarzenia organizatorzy mogą tworzyć i konfigurować wydarzenia osobiste lub online w Odoo. Każde nowe wydarzenie zawiera szereg opcji pozwalających dostosować określoną logistykę, taką jak sprzedaż biletów, biurko rejestracji, stoiska, ścieżki, sponsorzy, sale i wiele więcej.
Wydarzenia można tworzyć ręcznie od podstaw lub budować na podstawie wstępnie skonfigurowanych szablonów. Po uruchomieniu aplikacja Wydarzenia integruje się z innymi aplikacjami w celu rozszerzenia funkcjonalności, w tym promowania wydarzeń, sprzedaży biletów rejestracyjnych uczestnikom i generowania potencjalnych klientów za pomocą konfigurowalnych reguł.
Konsola
To create an event, navigate to the Events app to land on the dashboard. By default, the Events dashboard uses the (Kanban) view, which showcases all events in the database in their respective pipeline stages. Other views can be set using the buttons at the top.
Każda karta wydarzenia wyświetla nazwę wydarzenia, jego zaplanowaną datę, lokalizację, liczbę oczekiwanych Uczestników, wszelkie zaplanowane działania związane z wydarzeniem oraz odpowiedzialnego kierownika wydarzenia.
The default stages in the Kanban view are New, Booked, Announced, and Ended. The cards can be dragged and dropped into any stage in the pipeline.
Informacja
The Ended stage is folded by default and located at the end of the dashboard, next to the final stage.

To add a new stage, click the Add Stage button at the end of the dashboard. Enter a name for the stage, then click (Add) to add the stage or (Remove) to cancel.
Dodaj nowe wydarzenie
Events can be created by opening the and clicking New. This opens a new Events form.

At the top of the event form are a series of clickable smart buttons to view details about event metrics, including attendee registrations, booths, ticket sales, event tracks, and sponsors.
Pod inteligentnymi przyciskami znajduje się formularz wydarzenia, który zawiera różne pola i karty umożliwiające konfigurację niezbędnych szczegółów wydarzenia.
Na początek wprowadź podstawowe informacje o wydarzeniu w następujących polach:
Nazwa wydarzenia: Tytuł wydarzenia. To pole jest wymagane.
Data: Zaplanowana data lub zakres dat wydarzenia (wyrażona w lokalnej strefie czasowej). To pole jest wypełniane automatycznie, ale można je modyfikować i jest wymagane.
Wyświetlana strefa czasowa: Strefa czasowa, w której data wydarzenia jest wyświetlana na stronie internetowej. To pole jest wypełniane automatycznie, ale można je modyfikować i jest wymagane.
Język: Wybrany język dla wszystkich komunikatów dotyczących wydarzenia.
Informacja
To the right of the entered Event Name, there is a language tooltip, represented by an abbreviated language indicator (e.g.,
EN). When clicked, a Translate: name pop-up window appears, displaying various preconfigured language translation options available in the database.
Alternatively, to populate the event form from an event template, select an option in the Template drop-down menu.
Dodatkowo dodaj wszelkie odpowiednie tagi (np. Online, Konferencja) dla wydarzenia w polu Tagi. Do jednego wydarzenia można dodać wiele tagów.
Wskazówka
Tagi mogą być wyświetlane w wydarzeniach wymienionych na stronie internetowej poprzez zaznaczenie pola wyboru Pokaż na stronie internetowej w .
Kontynuuj, wprowadzając informacje takie jak punkty kontaktowe i lokalizacja miejsca w następujących polach:
Organizator: Organizator wydarzenia (firma, kontakt lub pracownik).
Odpowiedzialny: Konkretny użytkownik odpowiedzialny za zarządzanie wydarzeniem w bazie danych.
Firma: Konkretna firma w bazie danych, do której odnosi się wydarzenie. To pole pojawia się tylko podczas pracy w środowisku wielofirmowym. Pole to jest automatycznie wypełniane, ale można je modyfikować. Jest wymagane.
Website: The specific website in the database on which the event is published. If this field is left blank, the event can be published on all websites in the database.
Published: The toggle button to publish or un-publish the website for attendees.
Miejsce: Lokalizacja miejsca wydarzenia. To pole pobiera informacje z aplikacji Kontakty. Alternatywnie informacje można wprowadzić ręcznie.
To limit the number of registrations for the event, select Limit Registrations and enter the maximum number of attendees allowed in the resulting field.
Dodatkowe konfiguracje wydarzenia
Po wypełnieniu pól w formularzu wydarzenia przejdź do czterech zakładek na dole w celu dalszej personalizacji.
Zakładka bilety
In the Tickets tab of the event form, create custom registration tickets and ticket tiers for events.

To create a ticket, click Add a line in the Tickets tab. In the Product field, either select the preconfigured Event Registration product, or create a new one by typing in the name of the new event registration product and then selecting either Create or Create and edit… from the resulting drop-down menu.
Then, enter a name for the ticket (e.g. Basic Ticket or VIP) in the Name field.
Ważne
In order for an event registration product to be selectable in the Tickets tab, the event registration Product Type must be set to Service and the Create on Order field must be set to Event Registration.
Wskazówka
Existing event registration products can be modified directly from the Product field by clicking the (right arrow) icon next to the product. Doing so reveals that product’s form. If the Inventory application is installed, additional choices are available to customize for the product.
Następnie ustaw koszt rejestracji biletu w polu Cena.
Informacja
The Sales Price defined on the event registration product’s form sets the default cost of a ticket. Modifying the Price of the event ticket in the Tickets tab overrides the ticket’s default price with this new price.
Next, enter the Sales Start and Sales End dates in their respective fields. To do so, click into the blank field to reveal a calendar pop-over. Then, select the desired date and time and click Apply.
Optionally, designate a Maximum amount of the ticket that can be sold.
As attendees register, the Registration column automatically populates with the number of tickets sold.
To delete any tickets from the Tickets tab, click the (trash can) icon in the ticket’s corresponding line.
Wskazówka
To add an optional Description column to the Tickets tab, click the (additional options) drop-down menu at the end of the column titles.
Then, select the checkbox beside Description to add a brief description for each event ticket, informing registrants about ticket details.
Set up ticket combos
Optionally, users can combine the event registration ticket with separate products (e.g., food, beverages, or merchandise) to create a combo.
To do so, click the (additional options) drop-down menu and select the Additional Products checkbox. Then, in the resulting Additional Products column, select the products to combine with the registration ticket.
Attendees who register for the specific ticket from the website see the additional products included with their ticket on the Order summary page before confirming their order.
Example
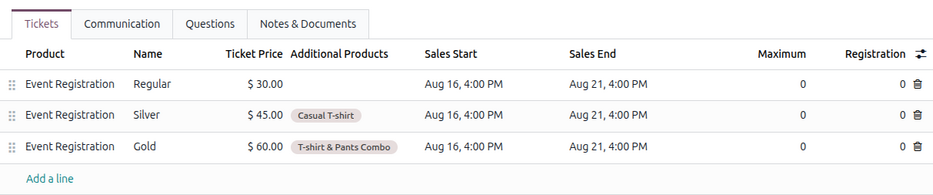
A company is hosting an event with three different ticket levels:
Basic: Only includes admission.
Silver: Includes admission and a casual T-shirt.
Gold: Includes admission, a T-shirt, and pants.
In the Tickets tab, three event registration products are added along with their names and the relevant Additional Products.
Zakładka komunikacja
In the Communication tab of an event form, create various marketing communications that can be scheduled to be sent at specific intervals leading up to and following the event.

Informacja
Domyślnie Odoo zapewnia trzy oddzielne wstępnie skonfigurowane komunikaty w każdym nowym formularzu wydarzenia. Jeden to e-mail wysyłany po każdej rejestracji w celu potwierdzenia zakupu z uczestnikiem. Pozostałe dwa to e-mailowe przypomnienia o wydarzeniu, które są zaplanowane do wysłania w różnych odstępach czasu przed wydarzeniem, aby przypomnieć odbiorcy o nadchodzącym wydarzeniu.
To add a communication in the Communication tab, click Add a line. Then, select the desired type of communication from the first drop-down menu in the Template column. The options are: Mail, SMS, Social Post, or WhatsApp.
Ważne
Opcja Post społecznościowy pojawia się tylko wtedy, gdy zainstalowana jest aplikacja Marketing społecznościowy. Opcja WhatsApp pojawia się tylko wtedy, gdy zainstalowany jest moduł WhatsApp.
Szablonów WhatsApp nie można edytować podczas aktywnej konfiguracji. Wymagana jest odrębna zgoda od Meta.
Następnie wybierz istniejący szablon e-mail z drugiego menu rozwijanego w polu Szablon.
Next, define the Interval and Unit from their respective drop-down fields to specify when the communication should be sent. The Unit options are: Immediately, Hours, Days, Weeks, and Months.
Then, select one of the following options from the Trigger drop-down menu:
After each registration
Before the event starts
After the event started
After the event ended
Before the event ends
The (#) Sent column populates with the number of sent communications, along with different icons indicating the status of the communication:
(Running): The communication is active and running.
(Sent): The communications were sent and are no longer active.
(Scheduled): The communication is scheduled but has not been deployed.
Any number of communications can be added in the Communication tab of an event form.
Example
To send a confirmation email an hour after an attendee registers for an event, configure the communication as follows:
Interwał:
1Jednostka: Godziny
Wyzwalacz: Po każdej rejestracji
Informacja
Existing email templates can be modified directly from the Template drop-down menu by clicking the (Internal link) icon next to the template name. Doing so reveals a separate page where users can edit the Content, Email Configuration, and Settings of that particular email template.
To view and manage all email templates, activate Tryb dewelopera (tryb debugowania) and navigate to . Modify with caution as email templates affect all communications where the template is used.
Zakładka Pytania
In the Questions tab of an event form, users can create questionnaires to gather information from attendees when registering for the event.

Informacja
By default, Odoo provides three questions in the Questions tab for every event form. The default questions require registrants to provide their Name, Email, and an optional Phone number.
The information gathered from the Questions tab can be found on the Attendees dashboard, accessible via the Attendees smart button. Odoo populates individual records that contain basic information about the registrants, as well as their preferences.
To add a question in the Questions tab, click Add a line. Doing so reveals an Add: Question pop-up window. From here, users can select previously configured questions or click Create New to create a new one. Doing so opens a new Create Question pop-up window.

First, enter the question in the field at the top of the form. Then, specify if the question requires a Mandatory Answer.
Następnie wybierz opcję Typ pytania:
Wybór: Udostępnij uczestnikom opcje odpowiedzi do wyboru. Wybieralnymi opcjami odpowiedzi można zarządzać w kolumnie Odpowiedzi na dole okna pop-up.
Pole tekstowe: Pozwala użytkownikom wprowadzić własną odpowiedź na pytanie w polu tekstowym.
Imię: Zapewnia uczestnikom pole, w którym mogą wpisać swoje imię.
E-mail: Zapewnia uczestnikom pole, w którym mogą wpisać swój adres e-mail.
Telefon: Zapewnia uczestnikom pole, w którym mogą wpisać swój numer telefonu.
Firma: Zapewnia uczestnikom pole, w którym mogą wpisać firmę, z którą są powiązani.
Additionally, select one or more of the following options to configure the question’s visibility and extendability:
Ask once per order: Ask this question only once for each registration, applying the answer to every attendee in the order (if multiple tickets are purchased at once).
Default question: Automatically add this question for all new events.
Is Reusable: Allow this question to be reusable for all new events. If Default question is selected, this option is automatically enabled.
If Selection was chosen as the Question Type, an Answers tab appears. Add any answers to the question under this tab by clicking Add a line.
Once all the desired configurations have been entered, click Save & Close to save the question and return to the Questions tab on the event form. Or, click Save & New to save the question and configure another. To cancel, click Discard.
Users can add as many questions in the Questions tab as needed.
Wskazówka
Dla typów Wybór i Wprowadzanie tekstu po prawej stronie wiersza pytania pojawia się przycisk Statystyki. Po kliknięciu Odoo wyświetla oddzielną stronę pokazującą wskaźniki odpowiedzi na to konkretne pytanie.
Notes & Documents tab
In the Notes & Documents tab of an event form, users can leave detailed internal notes and event-related instructions or information for attendees.
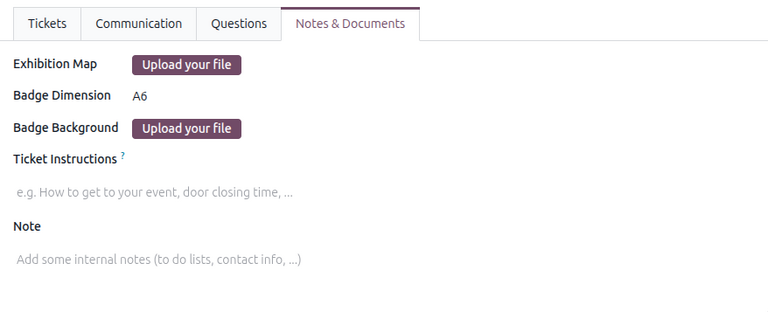
For in-person events, users can specify the venue map and attendee badge details in the following fields:
Exhibition Map: Upload an image of the event venue map. Do so by clicking Upload your file.
Badge Dimension: Select the desired paper format dimension for attendees» event badges. The options are A4 foldable, A6, 4 per sheet, and 96x82mm (Badge Printer).
Badge Background: Upload an image of the custom background image for the badge. Do so by clicking Upload your file.
In the Ticket Instructions field, users can leave specific instructions for attendees and display them on attendees» tickets.
In the Note field, users can leave internal notes for other event employees, such as „to-do” lists, contact information, instructions, and so on.
Publikowanie wydarzeń
Once all configurations and modifications are complete on the event form, the event can be published on the website. Doing so makes the event visible to website visitors and allows them to register for the event.
To publish an event, toggle the Published button on the event form.
Alternatively, click the Go to Website smart button to open the event webpage. Then, toggle the Unpublished button in the header menu, changing it to a Published switch. The event webpage is now published and accessible by all website visitors.
Zobacz także
Aby dowiedzieć się więcej o funkcjonalności i opcjach projektowania strony internetowej, zapoznaj się z dokumentacją Bloki konstrukcyjne.
Wysyłanie zaproszeń na wydarzenie
To send event invites to potential attendees, navigate to the desired event form via and click the desired event. On the event form, click the Invite button.
Doing so reveals a blank email form. Customize the message by specifying a mailing type, subject, recipients, and the mail body.
Wskazówka
Wysyłanie e-maili z Odoo podlega dziennemu limitowi, który domyślnie wynosi 200. Aby dowiedzieć się więcej o dziennych limitach, odwiedź dokumentację Osiągnięto dzienny limit.
Zobacz także