
التخطيط
يتيح لك Odoo التخطيط التخطيط لجدول فريقك وإدارة الورديات والموارد.
تأتي إدارة تخطيط فريقك مع متطلبات محددة قد تختلف بشكل كبير حسب احتياجات عملك. تم تقديم المفاهيم التالية في Odoo التخطيط لتلبية تلك الاحتياجات:
يتم توزيع الورديات على الموارد، والتي يمكن أن تكون إما بشرية (الموظفون) أو مادية (مثل المعدات). يتم تعيين أدوار للموارد، مما يسمح بتنظيم العمل داخل الفريق.
بمجرد الانتهاء من الإعداد الأولي، يمكن تخطيط الورديات يدوياً أو تلقائياً باستخدام ميزة التخطيط التلقائي.
يسمح التكامل بين تطبيقي التخطيط والمبيعات بربط الخدمات المباعة بالأدوار والورديات في التخطيط. بالإضافة إلى ذلك، يسمح التكامل مع المشروع بتخصيص الورديات، وبالتالي الوقت والموارد، لمشاريع محددة.
انظر أيضًا
التهيئة
الأدوار
لتحديد الأدوار التي تؤديها مواردك (مثل الطاهي، النادل، الساقي)، انتقل إلى ، ثم انقر فوق جديد، واملأ حقل الاسم (مثل مساعد، موظف استقبال، مدير). بعد ذلك، اختر الموارد التي ستؤدي هذا الدور. يمكن أن تكون الموارد إما الموظفون أو المواد.
ملاحظة
إذا كان تطبيق المبيعات مثبتًا في قاعدة بياناتك، فسيظهر حقل الخدمات، مما يتيح لك تحديد الأدوار المطلوبة لأداء الخدمات بحيث يتم توزيع المناوبات على الشخص المناسب.
يتم أخذ الأدوار في الاعتبار عند استخدام ميزة الجدولة التلقائية.
حقول الخصائص والأدوار
تتيح لك حقول الخصائص إضافة حقول مخصصة إلى النماذج عبر العديد من تطبيقات Odoo. يتضمن التخطيط إمكانية إضافة حقول خصائص مرتبطة بالأدوار إلى المناوبات.
لإنشاء حقل خاصية، انتقل إلى عرض القائمة من أي جدول. من هناك، انقر فوق عرض على المناوبة التي ترغب في تعديلها. إذا كان حقل الدور فارغًا، املأه بالدور المطلوب، ثم انقر فوق أيقونة الترس واختر إضافة خصائص. اضبط الحقل الجديد وفقًا لاحتياجاتك.

حقل الخاصية مرتبط بالدور ومُدرج في نموذج المناوبة لجميع المناوبات التي يؤديها هذا الدور.
Example
تتضمن بعض حالات استخدام حقول خصائص الأدوار ما يلي:
الاعتماد: للأدوار التي تتطلب تصريحًا معينًا (مثل رخصة القيادة)
الموقع: في الشركات التي تعمل في مواقع متعددة (مثل المتاجر أو المطاعم)
اللغة: في بيئة متعددة اللغات (مثل شركة استشارية)
الموظفون
يمكن تضمين جميع الموظفين في التخطيط وتعيين مناوبات لهم.
لتكييف إعدادات تخطيط الموظف، انتقل إلى ، واختر الموظف الذي تريد تعديل إعداداته. ثم انتقل إلى علامة التبويب معلومات العمل.
نصيحة
يمكنك القيام بنفس الشيء من تطبيق الموظفون، والذي يتم تثبيته افتراضيًا مع التخطيط.
يؤثر قسمان من علامة التبويب معلومات العمل الخاصة بالموظف على التخطيط: الجدول الزمني (وتحديدًا حقل ساعات العمل) و التخطيط.
ساعات العمل
يتم أخذ ساعات العمل في الاعتبار عند حساب الوقت المخصص ونسبته المئوية لـ المناوبات. إذا تُرك حقل ساعات العمل فارغًا، فيُعتبر الموظف يعمل بساعات مرنة.
لإنشاء ساعات العمل فردية، على سبيل المثال للموظفين الذين يعملون بدوام جزئي، انقر على البحث عن المزيد...، ثم جديد.
ملاحظة
يمكن أن تؤثر ساعات العمل و:guilabel:الوقت المخصص في التخطيط على كشوف المرتبات، إذا تم تكوين عقد الموظف لإنشاء إدخالات العمل بناءً على الورديات.
انظر أيضًا
أدوار التخطيط
بمجرد أن يكون للموظف واحد أو أكثر من الأدوار:
عند إنشاء وردية لهذا الموظف، يتم عرض قوالب الورديات فقط من الأدوار المختارة في هذا الحقل.
عند نشر جدول زمني، يتم إخطار الموظف فقط بالورديات المفتوحة للأدوار المعينة له.
عند التعيين التلقائي للورديات المفتوحة أو تخطيط أوامر المبيعات، يتم تعيين الموظف فقط للورديات الخاصة بالأدوار المعينة له.
بالإضافة إلى ذلك، عند تحديد الدور الافتراضي:
عند إنشاء وردية للموظف، يتم تحديد الدور الافتراضي تلقائيًا.
يكون لهذا الدور الأسبقية على الأدوار الأخرى للموظف عند التعيين التلقائي للورديات المفتوحة أو تخطيط أوامر المبيعات.
ملاحظة
If the Planning roles fields are left empty, there are no restrictions in the shift templates and open shifts shared with the employee. However, it's not possible to use the Auto Plan feature for employees with no roles.
المواد
المواد هي موارد يمكن تعيين ورديات وساعات عمل لها ولكنها ليست موظفين. على سبيل المثال، يمكن لشركة إنشاءات استخدام المواد لإنشاء ورديات للآلات المشتركة (مثل الرافعات ورافعات الشوكية).
بشكل مشابه للموظفين، يمكن تعيين أدوار ووقت عمل للمواد.
قوالب الورديات
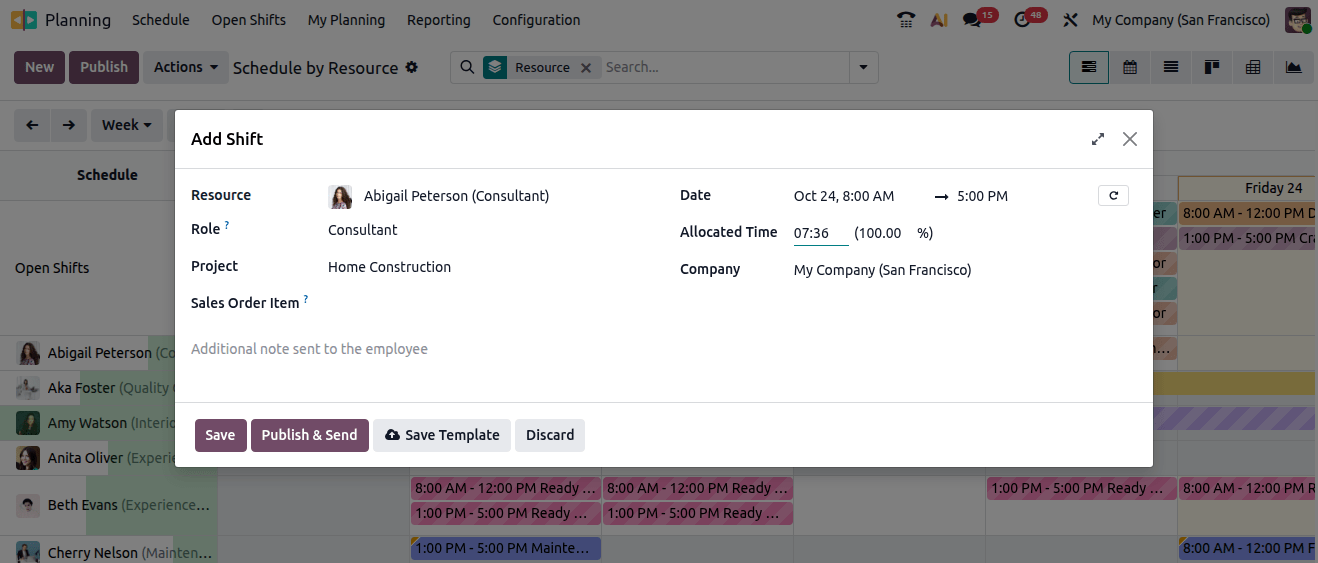
To create a shift template, click New on any schedule, then fill in the details of the shift, and click Save Template.
Alternatively, go to , then click New. Fill in the Start & End Hours and the shift's Span, then assign a Role.
If the Project app is installed, a Project can also be selected.
ورديات التخطيط
On opening the Planning app, the users see their own schedule. Users with administrator access rights can also see the schedule By Resource, By Role, By Project, and By Sales Order, as well as reporting and configuration menus.
ملاحظة
The schedule is displayed in the Gantt view, which allows you to reassign, reschedule, resize, split, and duplicate shifts without having to open them.
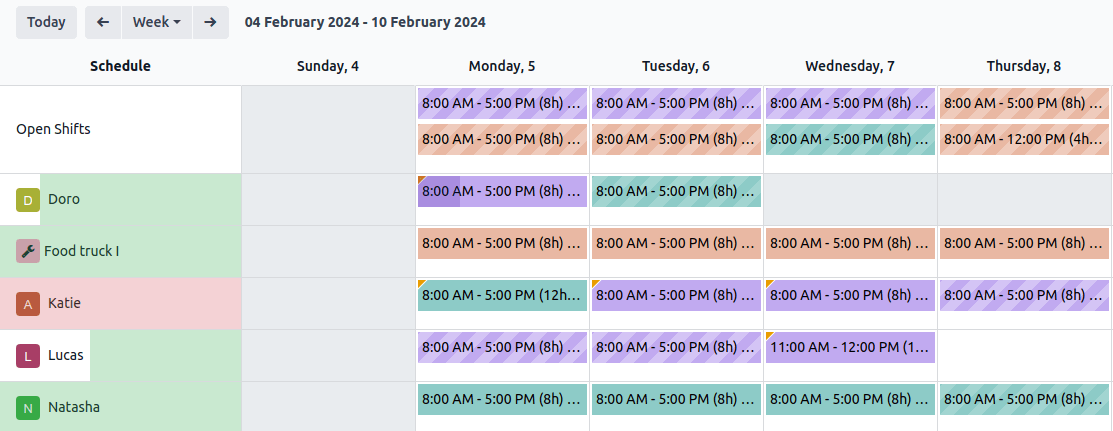
يتم استخدام العناصر البصرية التالية على الورديات في الجداول:
Full color: shifts that are planned and published.
Diagonal stripes: shifts that are planned but have yet to be published.
Grayed-out background: employees who are on time off.
شريط التقدم: الورديات الجارية حاليًا والمرتبطة بالجداول الزمنية.
وردية رمادية: عند نسخ الورديات، تظهر الورديات المنسوخة بلون كامل، بينما تظهر الورديات الموجودة مسبقًا باللون الرمادي مؤقتًا. يتغير اللون مرة أخرى إلى اللون الكامل أو الخطوط القطرية عند التحديث التالي للصفحة أو بإزالة عامل التصفية.
Create shifts
لإنشاء وردية، انتقل إلى أي جدول، ثم انقر فوق جديد. في النافذة المنبثقة التي تفتح، املأ التفاصيل التالية:
Templates: If there is one or more shift templates existing in the database, they are displayed in the upper section of the pop-up window. Once selected, a template prefills the shift form accordingly.
Resources: Resources can be both employees or materials. If this field is left empty, the shift is considered an open shift.
Date: Choose the date and time of the shift. This is the only mandatory field when creating a shift.
Repeat: Click the (repeat) button and configure the Repeat every fields as needed. The following rules apply to recurring shifts:
يتم نسخ جميع الحقول (مثل المورد، الدور، المشروع) من الوردية الأصلية باستثناء التاريخ، والذي يتم تعديله وفقًا لحقل التكرار كل.
يتم تخطيط التكرارات ولكن لا يتم نشرها.
By default, planned shifts are created six months in advance, after which they are created gradually. To change the time frame, activate the developer mode, then go to and edit the Recurring Shifts.
Allocated Time: Is calculated based on the shift's date and time, and the employee's Working Schedule.
Role: Select the role that the assigned resources will be performing. This field is especially useful when auto-planning shifts. Once you select a role, the shift templates associated with it are displayed in the upper section of the pop-up window.
Additionally, the following fields may also be available:
Project: If the Project planning setting is enabled in the Planning settings, select the relevant project to link to the shift. Shifts dedicated to the selected project are then planned and tracked accordingly.
Task: If a project is selected, optionally select a task within that project.
Sales Order: If the Sales app is installed, select the relevant sales order to link to the shift.
Customer: If the shift is an on-site intervention, select the relevant customer to link to the shift.
Worksheet: If field service worksheets are configured, optionally select the relevant worksheet template.
Click Save to create the shift, or Publish to create it and notify the assigned employee by email.
Create shifts from sales orders
Shifts are created automatically from sales orders containing products configured as follows:
Product Type: Set to Service.
Plan Services: Enable the checkbox, then select the relevant role.
Once the sales order is confirmed, schedule the shift:
Click the To Plan smart button on the sales order form.
Click the relevant day in the appropriate resource's schedule.
ملاحظة
Only resources whose role matches the role configured for the product on the sales order are available for shift assignment.
Select the relevant shift from the list of open shifts for that role.
Publish the shift.
نصيحة
To edit the shift before planning it, on the Schedule by Resource view:
either click New;
or click the relevant day in the appropriate resource's schedule, then click Create New.
Then, edit the fields as needed and Save the shift or Publish it.
Once shifts have been planned for the sales order, click the Planned smart button on the sales order form to view them.
Edit and delete shifts
To edit a shift, click it in the calendar or schedule, then click Edit.
Shifts can also be adjusted directly on the schedule, without opening them:
Reassign or reschedule a shift by dragging and dropping it to the desired employee and day.
Extend a shift over several days by hovering over the right edge of the shift block. When the cursor changes into a resize pointer, click and drag the edge to the desired day.
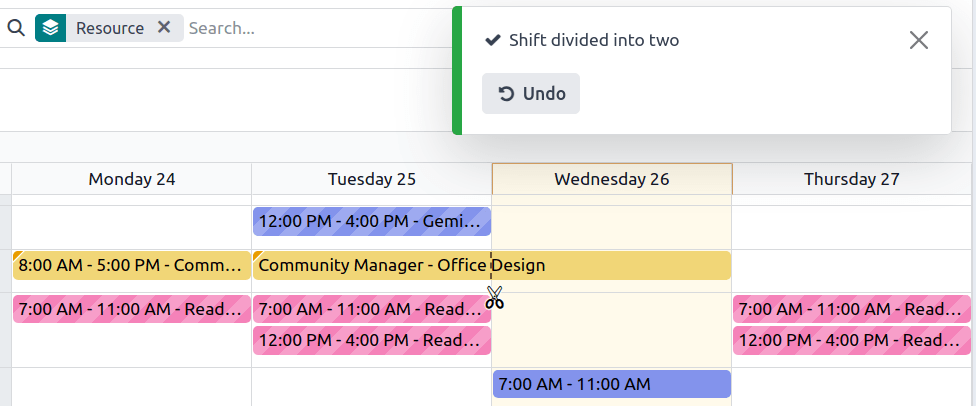
Split a shift spanning multiple consecutive days into two segments by hovering over the boundary between the two affected day columns, then clicking the (scissors) icon.
To delete a shift, click it in the schedule, then click Delete.
نصيحة
Alternatively, the shift form can be accessed by switching to the list view and clicking View on the relevant shift's line, or by switching to the Kanban view and clicking the relevant shift's card.
Publish shifts
Publishing shifts notifies the assigned employees by email and makes the schedule visible to all users, including those without Administrator Planning access rights (via ).
Shifts can be published individually or in bulk.
To publish an individual shift:
either click Publish at the end of the shift creation process;
or click the shift in the schedule, click Edit, then click Publish on the shift form.
To publish all planned shifts:
From any schedule, click Publish.
In the pop-up, optionally edit the Period.
Disable Include Open Shifts to exclude open shifts from the publication.
Optionally edit the list of employees; removing an employee from the list excludes their shifts from this publication.
Click Publish & Send.
Employees are notified of their shifts once they are published:
الموظفون الذين ليس لديهم حسابات مستخدم يتم إعادة توجيههم إلى بوابة التخطيط المخصصة.
Employees with a user account are redirected to the My Planning view.
ملاحظة
If the email address of one or more employees in the list has not been configured, enter their Work Email in the pop-up that opens, then click Save & Send Schedule. If the missing email addresses are not added, the corresponding employees' schedules are not published.
Unpublished shifts are only visible on schedules for users with Administrator Planning access rights and are identified by diagonal lines.
النوبات المفتوحة والتخطيط التلقائي
The Auto Plan button allows you to assign Open shifts (shifts with no resource assigned) and create and assign shifts linked to sales orders or project tasks.
الميزات التالية لها تأثير على التخطيط التلقائي:
Roles: Open shifts are only assigned to resources (employees or materials) that have the corresponding role assigned. It is not possible to use the Auto Plan feature for employees with no role.
الأدوار الافتراضية: يتم منح الأولوية للدور الافتراضي المعين للمورد على الأدوار الأخرى المعينة له.
التعارضات: لا يمكن تعيين نوبات متعددة للموظفين أو المواد في نفس الوقت.
Time off: The employees' time off is taken into account, as well as public holidays.
ساعات العمل: يتم أخذها في الاعتبار عند تعيين النوبات للموظفين أو المواد. لا يمكن استخدام ميزة التخطيط التلقائي للموظف الذي يعمل بـ:ref:
ساعات مرنة <planning/working-hours>.العقود: إذا كان لدى الموظف عقد نشط، فلن يتم تعيين نوبات له تقع خارج فترة عقده.
انقر على نشر لتأكيد الجدول وإخطار الموظفين بتخطيطهم.
تبديل المناوبات وإلغاء التعيين
تتوفر ميزتان للسماح للموظفين بإجراء تغييرات على جدولهم: تبديل المناوبات و**إلغاء التعيين**.
ملاحظة
هاتان الميزتان متنافيتان. تبديل المناوبات ممكن افتراضيًا ولا يمكن تعطيله. ومع ذلك، بمجرد تمكين ميزة السماح بإلغاء التعيين، فإنها تحل محل خيار تبديل المناوبات.
تبديل مناوبات العمل
بمجرد تخطيط المناوبات ونشرها، يتلقى الموظفون إشعارًا بالبريد الإلكتروني. إذا رغب موظف في تبديل مناوبة، يمكنه النقر على المناوبة غير المرغوب فيها والنقر على طلب التبديل.
تظل المناوبة معينة للموظف الأصلي، ولكن في الجدول، يكون إشعار يفيد بأن الموظف المعين يرغب في تبديل المناوبات مرئيًا على المناوبة.
يتم بعد ذلك عرض المناوبة على الموظفين الآخرين الذين يشاركون نفس الدور، وإذا رغبوا في تعيينها لأنفسهم، يمكنهم النقر على زر سآخذها.
ملاحظة
تنطبق القواعد التالية:
يتم عرض المناوبات التي تطابق أدوار الموظف فقط على أنها متاحة له.
تبديل المناوبات غير متاح للمناوبات في الماضي.
إلغاء التعيين
للسماح للموظفين بإلغاء تعيينهم من المناوبات، انتقل إلى ، ثم ضع علامة في خانة الاختيار السماح بإلغاء التعيين. بعد ذلك، حدد الحد الأقصى لعدد الأيام التي يمكن للموظفين فيها إلغاء تعيينهم قبل المناوبة.
بمجرد تخطيط المناوبات ونشرها، يتلقى الموظفون إشعارًا بالبريد الإلكتروني. إذا كان إلغاء تعيين المناوبة مسموحًا به، يمكن للموظفين النقر على زر أنا غير متاح، وتعود المناوبة إلى مناوبة مفتوحة.
ملاحظة
تنطبق القواعد التالية:
يتم عرض المناوبات التي تطابق أدوار الموظف فقط في جدوله.
إلغاء تعيين المناوبات غير متاح للمناوبات في الماضي.