POS營業點
有了 Odoo POS (銷售點管理)應用程式,你可輕鬆經營你的商店或餐廳。程式可在任何設有網頁瀏覽器的裝置上運行,即使你暫時離線,仍可如常運作。產品移動的去向,會自動記錄至庫存資料中,讓你獲取實時的統計數據,而且所有商店的所有數據,都能集中整合處理。
開始操作時段
在 POS Dashboard 中,按一下 新操作時段,然後在 開店現金控制 畫面上,按一下 開啟操作時段,以啟動 POS 操作時段。如果已有開啟的操作時段,請按一下 繼續銷售。
備註
系統容許 多名使用者 同時登入同一次操作時段。但是,操作時段在同一個瀏覽器上,只接受同一人登入操作。
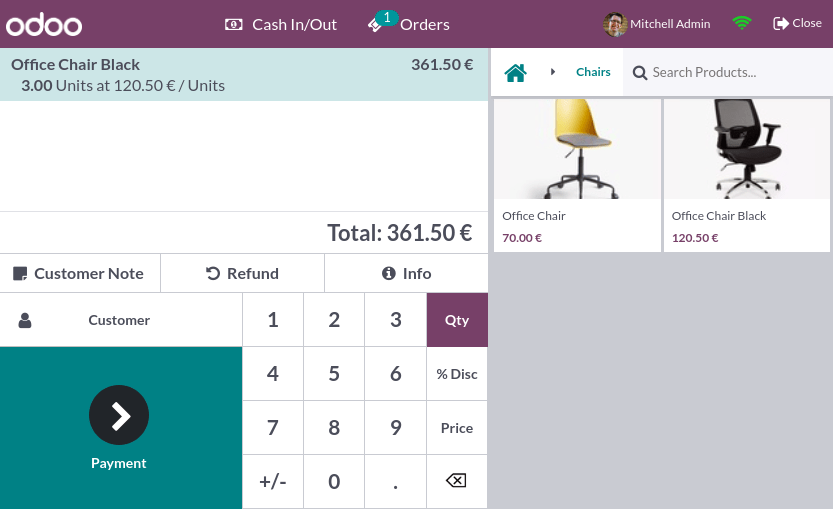
銷售產品
按一下產品,便可將它加入至購物車。若要變更 數量 ,請按一下 數量 並使用鍵盤輸入產品數量。若要新增 折扣 ,或修改產品的 價格 ,請分別點按 折扣率 % 或 價格,並輸入所需數值/金額。
完成訂單後,按一下 付款 即可結賬。請選擇 付款方式 ,輸入收到的金額,然後按 驗證。按一下 新訂單 便可處理下一位顧客的購物。
小訣竅
系統接受以鍵盤輸入
,或.作為小數點分隔符號。若只輸入金額但未有選擇付款方式,預設會選擇 現金 。
備註
為使開啟操作時段的過程有效率,系統一開始只能載入有限數目的產品資料。如果所需的產品未有自動載入,請按一下 搜尋更多。
設定客戶
以下功能必須要為客戶註冊,才可使用:計算客戶忠誠度積分及授予獎賞、自動套用 編配予客戶的價格表,以及 產生並列印發票。
你可在 已開啟的 POS 操作時段 中建立客戶,方法是按一下 並填寫聯絡 資訊;也可在後端介面建立客戶,方法是前往 並按一下 新增,然後填寫資訊並儲存。
若想在處理訂單期間設定客戶,你可按一下 POS 介面上的 客戶,存取客戶名單;也可在付款畫面按一下 客戶,以設立一名客戶。
客戶備註
你可直接在已開啟的 POS 操作時段 中,加入有關特定產品的 客戶備註 ,例如為客戶提供清潔及保養技巧。備註亦可用作追蹤客戶的個別要求,例如無需組裝服務。
要執行此操作,請選擇一項產品,然後按一下文件內的 客戶備註。系統會開啟一個彈出視窗,你可在該處加入或修改備註內容。
備註
匯入銷售訂單 內已有的產品備註,也會在購物車顯示。
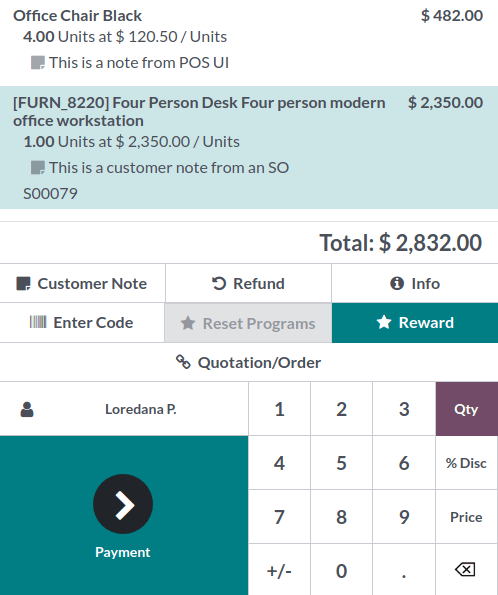
客戶備註會在客戶的收據及發票上顯示,顯示方式類似在購物車內,會在相關產品下方顯示。

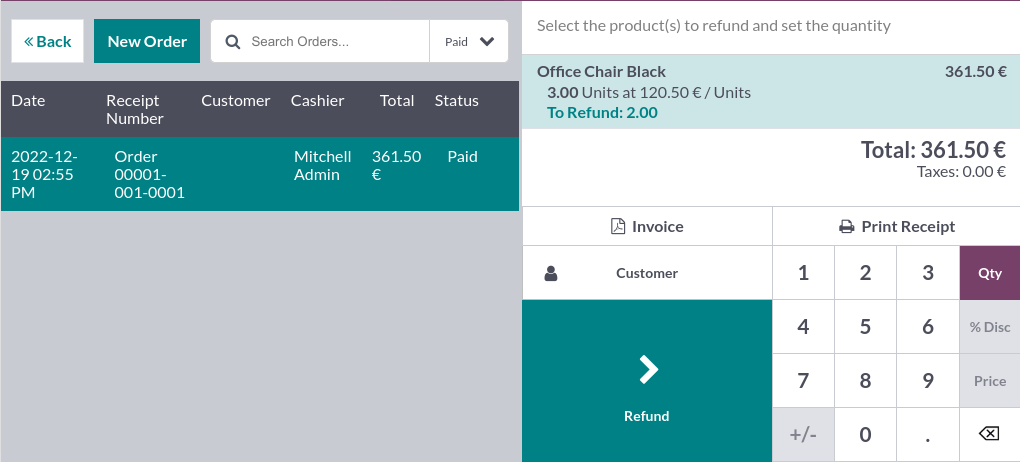
退貨及退款產品
若要為產品進行退貨及退款:
在 POS Dashboard 開始一個操作時段;
按一下 退款,並選取對應的訂單;
使用鍵盤選擇要退款的產品及數量;
按一下 退款 以返回上一畫面;
完成訂單後,按一下 付款 以進行退款;
按一下 驗證,然後可按 新訂單 以處理下一位客戶。
備註
你可使用搜尋列,依據 收據編號、日期 或 客戶,篩選 訂單列表 。
你也可在已開啟的操作時段中選擇退回的產品,並設定相等於退回產品數量的負數數量,以對產品進行退款。要執行此操作,請按一下 數量 及 +/-,然後按入退回產品的數量。
退货付款一经确认,Odoo 会生成所需的信用单据,并参考原始收据或发票,部分或全部取消单据。
管理收銀機
To add or take out cash to/from the register, click Cash In/Out on the upper left side of the screen.
系統會開啟一個彈出視窗,你可在該處選擇 存入現金 或 取出現金,然後輸入金額及原因,並按一下 確認。
關閉 POS 操作時段
To close your session, click Close in the upper right corner of your screen; doing so opens the Closing Control pop-up screen. From this screen, you can retrieve various information:
操作時段內執行的訂單數目及總金額;
按每種付款方式分組的預期收到金額。
關閉此視窗之前,請使用計算機圖示,點算及計算現金。系統會開啟一個彈出視窗,根據手動點算及存入的硬幣及鈔票數目,計算收銀機內的總現金金額。然後,按一下 確認 或 捨棄 以關閉視窗。計算得出的金額會在 點算所得 直欄列出,而 現金詳情 會在 備註 部分中詳列。
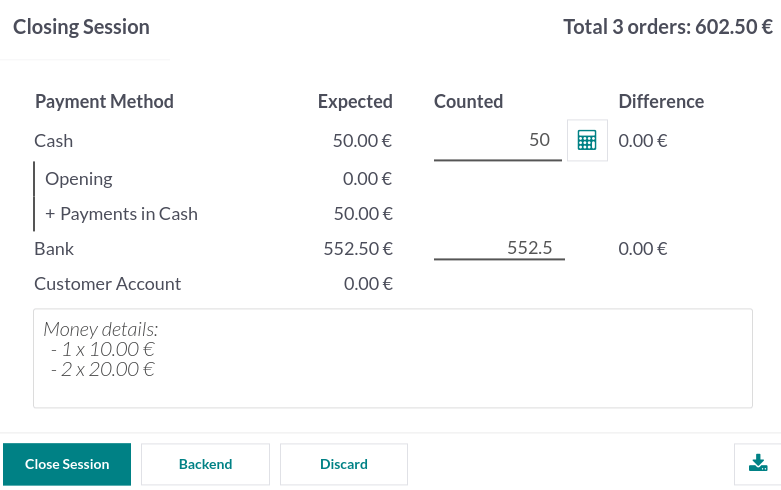
完成金額控制程序後,按一下 關閉操作時段,以完成結算並返回 POS Dashboard 。
備註
You can let the session open by clicking Backend or abort and keep selling by clicking Discard.
視乎你的設置,你可能只會在預期現金收入與點算所得的現金相等時,才可關閉操作時段。若想在兩者有差別時仍然關閉操作時段,請在 付款差異 畫面上按一下 確定。
小訣竅
強烈建議你每天結束營業時,關閉當天的 POS 操作時段。
要查看過往所有操作時段,請前往 。