故障排除
物联网盒子连接
无法找到连接物联网盒子的配对代码
配对代码应打印在连接到 IoT (物联网) 盒子的收据打印机上,还应在连接的显示器上显示。
在下列情况下,配对代码不会显示:
:abbr:`IoT(物联网)`盒子已连接到 Odoo 数据库。
:abbr:`IoT(物联网)`盒子没有连接到互联网。
代码仅在 IoT (物联网) 盒启动后 5 分钟内有效。过期后,它将自动从连接的显示器上删除。
物联网盒镜像的版本太旧。如果 IoT(物联网) 盒子的映像来自较早版本,则需要重新刷新 IoT(物联网) 盒子的 SD 卡以更新映像(请参阅 刷新 SD 卡)。
如果上述情况都不能解决问题,那么请检查电源端口旁边是否有固定的绿色 LED 指示灯,以确保 IoT(物联网) 盒子已正确启动。
物联网盒已连接,但未在数据库中显示
当一个 IoT (物联网) 盒子连接到数据库时,它可能会重新启动。如果是这样,可能需要长达五分钟的时间才能出现在数据库中。如果 5 分钟后仍未显示 IoT(物联网) 盒子,请确保 IoT(物联网) 盒子可以连接到数据库,并且服务器没有使用多数据库环境。
要从 IoT(物联网) 盒子访问数据库,请打开浏览器并输入数据库地址。
我的物联网盒子已连接到我的数据库,但无法访问
确保 IoT(物联网) 盒子和运行浏览器的计算机位于同一网络,因为 IoT(物联网) 盒子无法从本地网络之外进行访问。
HTTPS 证书不会生成
要生成 HTTPS(超文本传输协议安全)`证书,需要为 :abbr:`IoT(物联网)`盒子订阅物联网盒子。在为数据库和 :abbr:`IoT(物联网) 盒子配置“账户管理平台”的 IoT (物联网) 订阅之前连接 IoT(物联网) 盒子将导致不安全连接。
此外,防火墙也可能阻止 HTTPS(超文本传输协议安全) 证书的正确生成。在这种情况下,请停用防火墙,直到成功生成证书。还应注意的是,某些设备,如内置防火墙的路由器,可能会阻止生成 HTTPS(超文本传输协议安全) 证书。
列印機
未检测到打印机
如果打印机未出现在设备列表中,请访问 IoT(物联网) 盒子主页,确保它列在 打印机 下。
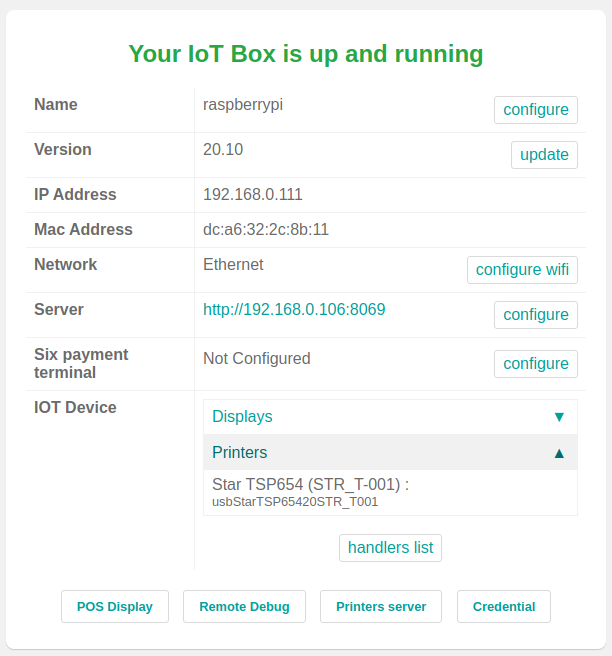
如果打印机不在 IoT(物联网)`盒子主页,请点击 :guilabel:`打印机服务器,转到 管理`选项卡并点击 :guilabel:`添加打印机。如果打印机未出现在列表中,则可能未正确连接。
我打印机输出随机文本
对于大多数打印机,应自动检测并选择正确的驱动程序。然而,在某些情况下,自动检测机制可能不够,如果没有找到驱动程序,打印机可能会打印随机字符。
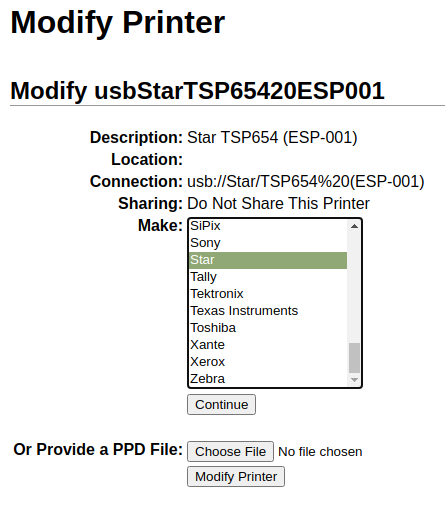
解决办法是手动选择相应的驱动程序。在 IOT(物联网)`盒子主页上,点击 :guilabel:`打印机服务器,进入 打印机`选项卡,并在列表中选择打印机。在 :guilabel:`管理 下拉菜单中,点击 修改打印机。按照步骤选择与打印机相对应的*品牌*和*型号*。
備註
Epson和Star收据打印机和Zebra标签打印机不需要驱动程序即可工作。确保没有为这些打印机选择驱动程序。
爱普生配置专案
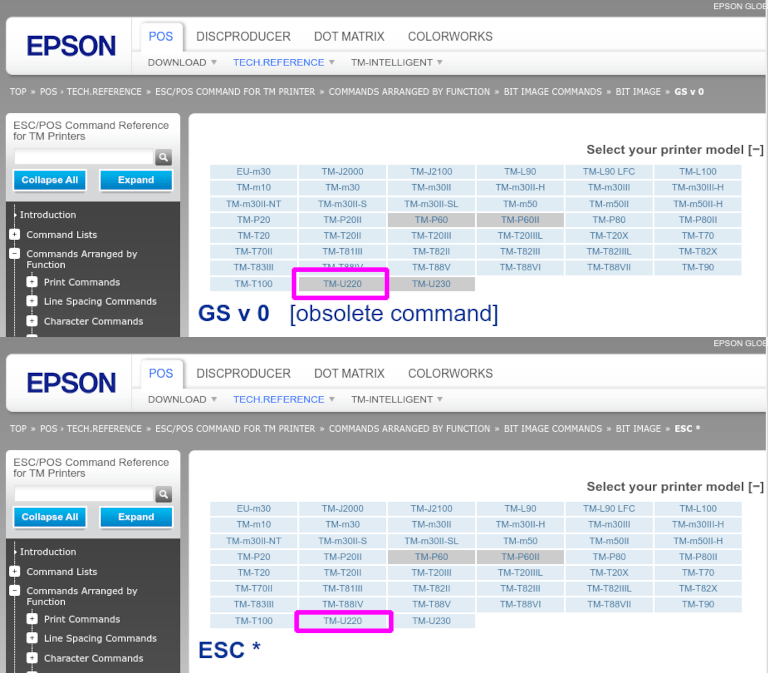
大多数爱普生打印机都支持使用 GS v 0 指令在 Odoo POS(销售点) 中打印收据。但是,以下爱普生打印机型号不支持此指令:
TM-U220
TM-U230
TM-P60
TMP-P60II
将打印机配置为使用 ESC* 指令,即可绕过这一问题。
强制执行 ESC * 指令的流程
爱普生打印机兼容性
第一步是检查打印机是否与 GS v 0 指令不兼容。
也參考
`Epson GS v 0 文档 <https://reference.epson-biz.com/modules/ref_escpos/index.php? content_id=94>``_ 适用于
GS v 0兼容打印机。Epson ESC * 文档 适用于
ESC *兼容打印机。
如果打印机不兼容 ESC * 指令,则无法执行以下流程。如果打印机兼容使用 ESC * 指令打印,请按照以下步骤使用 IoT(物联网) 盒子配置打印机。
用于 ESC* 的物联网盒子配置
要配置 IoT(物联网) 盒子使用 ESC * 命令打印,请通过导航至 进入 IoT(物联网) 盒子主页。然后点击 IP地址,将引导您进入 IoT(物联网) 盒子主页。
选择打印机
现在点击 打印机服务器 按钮。这将把浏览器重定向到 CUPS 页面。接下来,进入 ,选择要修改的打印机,然后单击 继续。
小訣竅
如果打印机名称仍不确定,请采取以下步骤:
注意*CUPS*页面上列出的打印机。
关闭打印机并刷新页面。
现在比较两个列表的差异,查看哪个打印机消失了。
重新打开打印机,再次刷新页面。
再次仔细检查列表,看看打印机是否再次出现。
消失并重新出现在打印机列表的就是该打印机名称。
備註
这可以是 本地打印机 下的 未知。
CUPS 命名惯例
CUPS` 将提示管理员提供三项信息: 姓名、 描述 和 位置。后两条信息不需要特别说明,但 姓名 应遵循特定惯例,以便与 ESC * 命令配合使用。
名称`应符合以下约定:`<printer_name>__IMC_<param_1>_<param_2>_…_<param_n>__
命名规则的细分:
打印机名称:这是打印机的名称。它可以是任何字符,只要不包含`_`、/、#、或 ` `(空格字符)。param_1:代表特定参数:缩放<X>:图片的缩放比例(保持相同的纵横比)。X应该是一个整数,描述应该使用的缩放百分比。Example
100是原始大小,50是一半大小,200是两倍大小。LDV:低密度垂直*(如果未指定,将设置为*高密度垂直)。LDH:低密度水平*(如果未指定,将设置为*高密度水平)。備註
密度 参数可能需要根据打印机型号以特定方式进行配置。
也參考
访问 Epson’s ESC * 文档,并在上面的表格中点击打印机型号,以查看是否应该设置这些参数。
Example
以下是正确和不正确名称格式的示例:
正确的名称格式:
EPSONTMm30II__IMC__EPSON_TM_U220__IMC_LDV_LDH_SCALE80__
名称格式不正确(不会妨碍打印,但结果可能不是预期的打印内容):
EPSON TMm 30II-> 名称不能有空格。EPSONTMm30II-> 名称本身是正确的,但不会使用ESC *。EPSONTMm30II__IMC-> 该名称缺少结尾__。EPSONTMm30II__IMC_XDV__-> 参数XDV与任何现有参数不匹配。EPSONTMm30II__IMC_SCALE__-> 参数`SCALE`缺少比例值。
完成添加打印机
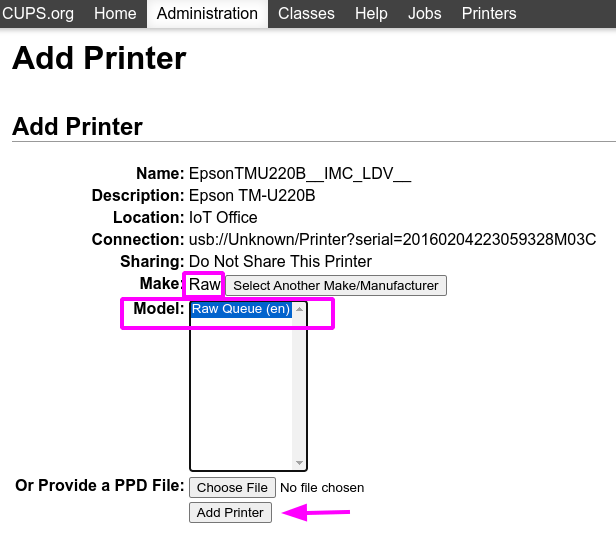
使用适当的命名约定设置打印机名称后,点击 继续。接下来,将 Make 值设置为 Raw,并将 Model 值设置为 Raw Queue (en)。
完成这些步骤后,单击 添加打印机。如果一切操作正确,页面应重定向到*横幅*页面。
此时,打印机应该已经创建,现在,物联网(IoT) 盒子只需检测到它,然后同步到 Odoo 服务器(这可能需要几分钟时间)。
将打印机添加至 Odoo PoS
一旦打印机在 Odoo 数据库中可见,请不要忘记在 PoS(销售点) 配置中将其选为 : abbr:IoT(物联网) 打印机。导航至 。
備註
如果打印机设置错误(仍在打印随机文本或打印的收据过大或过小),则不能通过打印机名称 CUPS 进行修改。相反,可以重复上述过程,从头开始设置另一台打印机,创建一台参数已修改的打印机。
**使用 ESC 设置爱普生 TM-U220B 打印机**示例
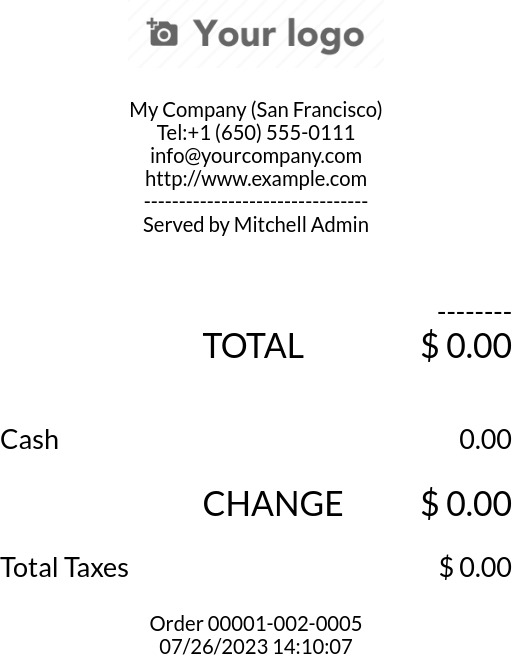
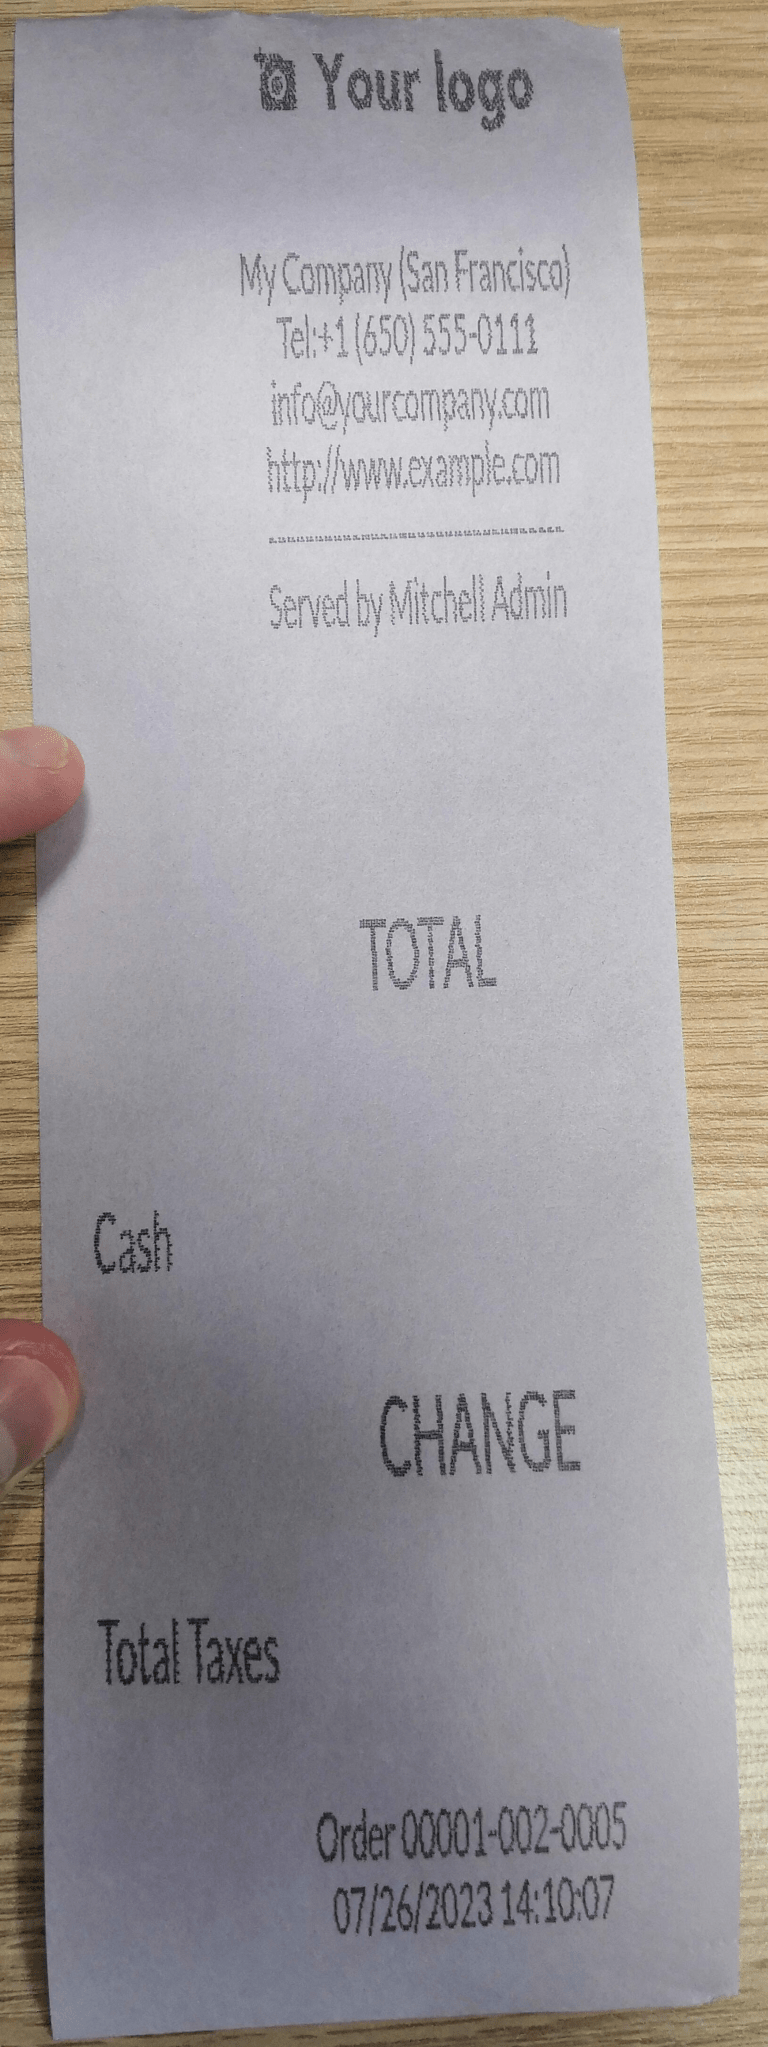
以下是使用 ESC * 命令对 TM-U220B 打印机型号进行故障排除的示例。下图中的收据是由于格式正确(理论上)而正确打印的收据示例:
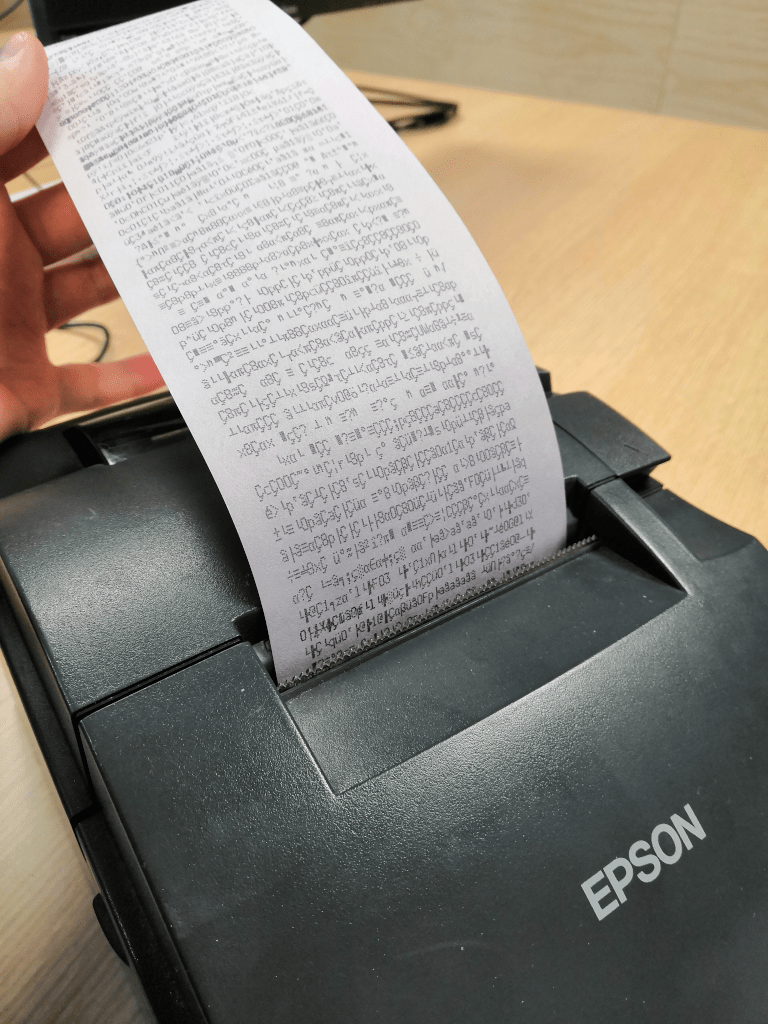
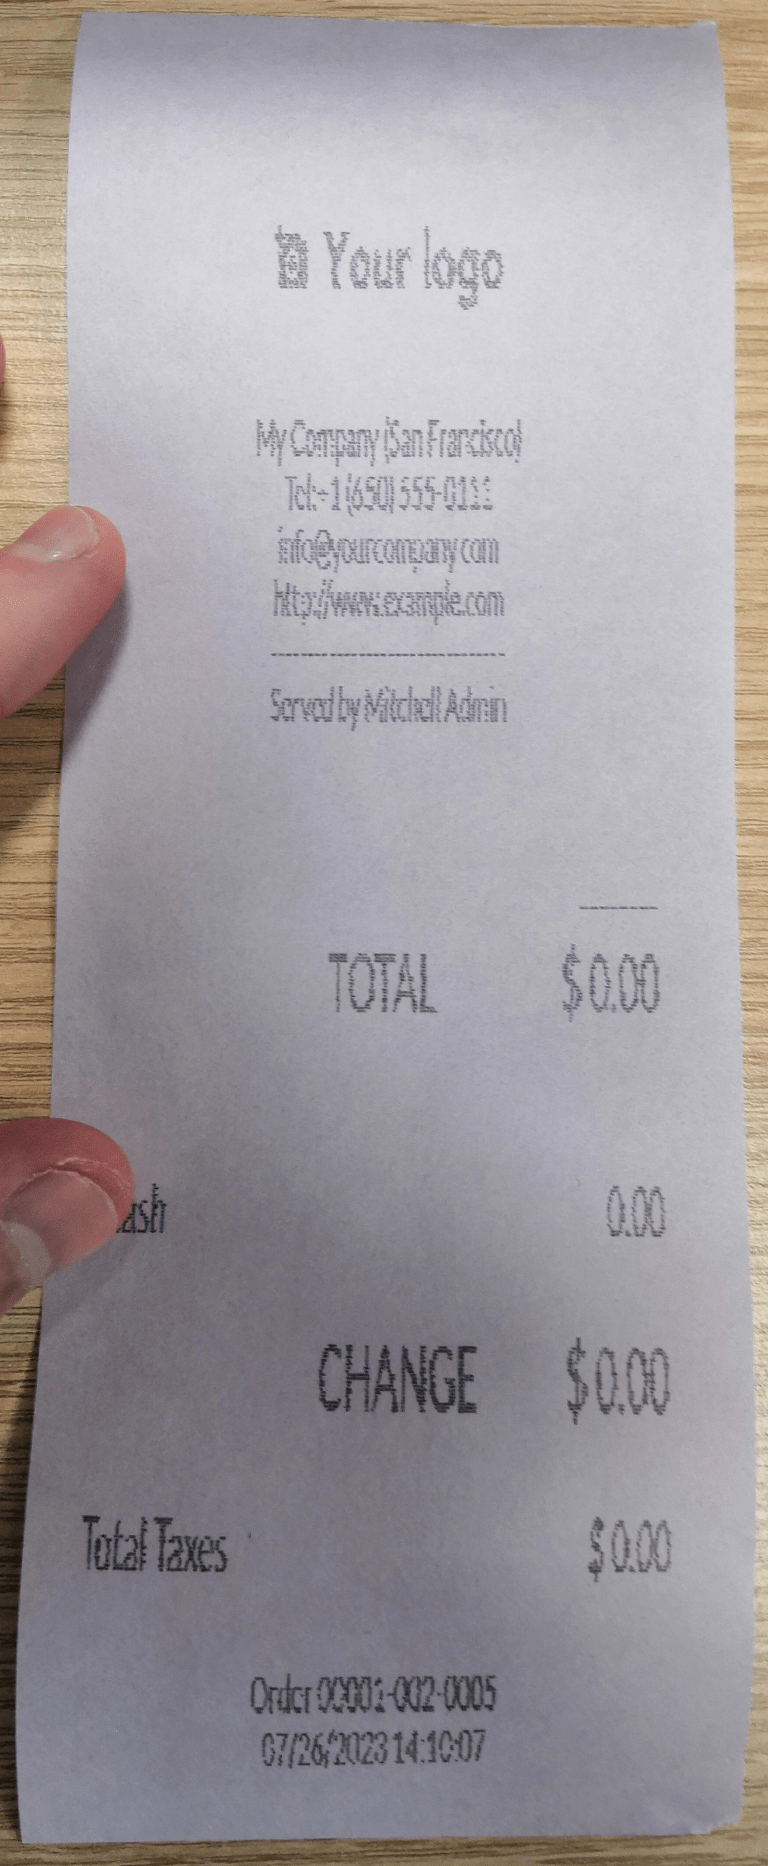
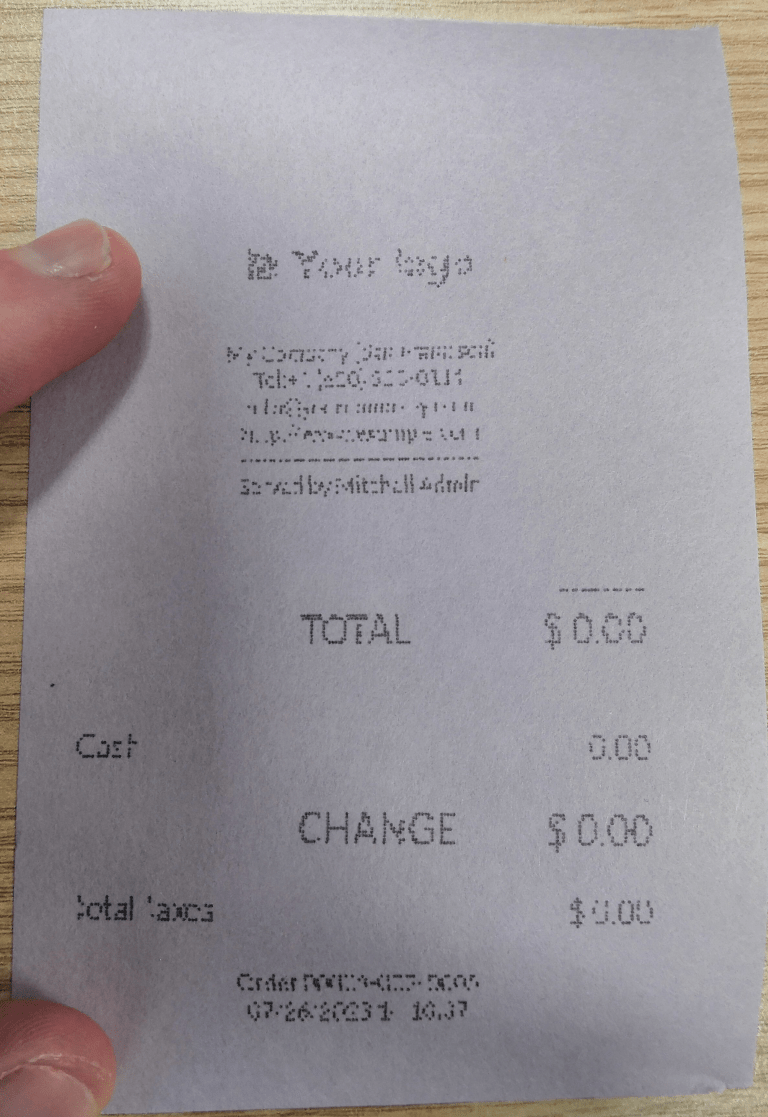
由于 TM-U220B 打印机型号不支持 GS v 0,因此在正确格式化之前立即打印该收据将不起作用。打印出来的将是随机字符:
要正确配置 Epson TM-U220B 打印机型号的格式化,请执行以下步骤。
在查阅了爱普生网站上有关这两种命令的兼容性:GS v 0 和`ESC * <https://reference.epson-biz.com/modules/ref_escpos/index.php?content_id=88>`_之后,可以看到 TM-U220B 确实与`GS v 0` 不兼容,但与`ESC *` 兼容。
添加打印机时,CUPS 会询问应添加哪台打印机:
在这种情况下,打印机是通过 USB (通用串行总线)`连接的,因此不会出现在 :guilabel:`已发现的网络打印机 中。相反,它可能是 本地打印机 下 未知 选项的一部分。将打印机的 :abbr:`USB (通用串行总线)`电缆从 :guilabel:`IoT(物联网)`框中拔出并刷新页面,:guilabel:`未知`打印机就会消失。重新插入后,打印机将重新出现,因此可以确定这就是所讨论的打印机。
在命名规则中,由于需要使用 ESC * 指令打印,因此必须添加 __IMC。请参考`Epson’s ESC *网站<https://reference.epson-biz.com/modules/ref_escpos/index.php?content_id=88>`_上的打印机型号,了解有关*density*参数的更多信息。
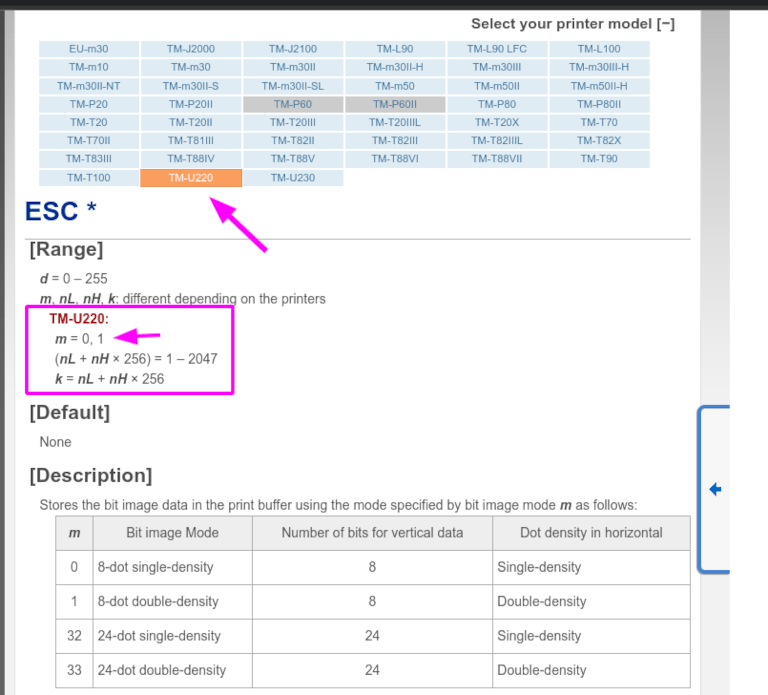
对于 TM-U220 这种特定型号,m 应等于 0 或 1。参考上图中粉色方框下方的 描述 时,m 值可能是 0、1、32 或 33。因此,在该打印机中,`m`值不能为 32 或 33(否则将打印出随机字符)。
表中包括数值: 32 和 33,如果 垂直数据位数 设置为 24,它们都会出现。这意味着*垂直密度高*。在配置 Epson TM-U220 时,需要强制使用 低垂直密度,因为该打印机型号不支持该命令 ESC * 的 高垂直密度。
要添加*低垂直密度*,请在命名规则中添加`LDV`参数。
点击 继续,以继续操作。接下来,将 Make 值设置为 Raw 并将 Model 值设置为 Raw Queue (en)。
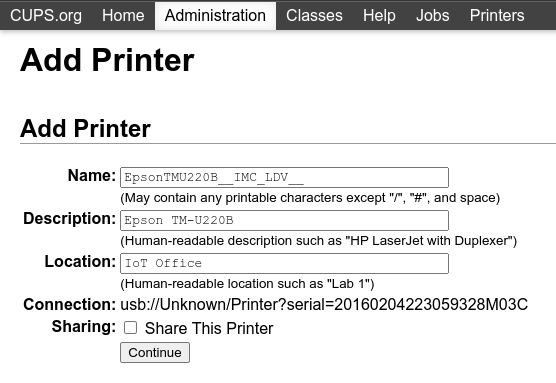
但是,当尝试使用命名规范:EpsonTMU220B__IMC_LDV__ 打印时,虽然能打印出收据,但收据太大,超出页边距。要解决这个问题,请添加一台新打印机(和命名规范),并设置 SCALE<X> 参数,以适应我们的收据尺寸。
示例如下:
打印机命名规则 |
|
|
|
|
|---|---|---|---|---|
|
|
|
|
|
|
DYMO LabelWriter 打印问题
DYMO LabelWriter 在与 IoT(物联网) 盒子一起打印时存在一个已知问题。OpenPrinting CUPS 服务器使用 本地 RAW 打印机 驱动程序安装打印机。要打印任何内容,需要设置正确的 品牌和型号,以便在使用设备时引用正确的驱动程序。
此外,还需要添加一台新打印机,以减少更新驱动程序后出现的打印延迟。
重要
DYMO LabelWriter 450 DUO 打印机是推荐与 Odoo 和 :abbr:`IoT (物联网)`盒子一起使用的 DYMO 打印机。它***必须***已连接到:abbr:`物联网`盒子,并已被 :abbr:`物联网 `盒子识别。
DYMO LabelWriter 450 DUO 打印机集标签打印机和磁带打印机于一体。在配置以下流程时,选择正确的型号(DYMO LabelWriter 450 DUO Label (en) 或 DYMO LabelWriter 450 DUO Tape (en))至关重要。
为了保持一致,以下两个过程都详细说明了 DYMO LabelWriter 450 DUO Label (en) 型号的配置。需要时更改型号。
DYMO LabelWriter 无法打印
如果 DYMO LabelWriter 没有打印任何内容,则需要安装新的驱动程序。
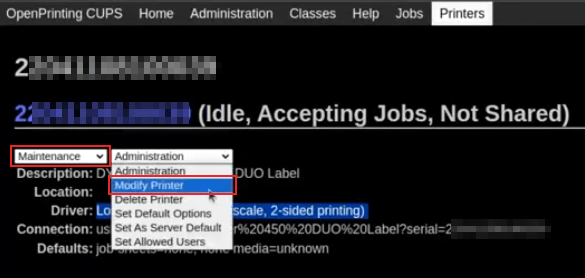
首先,点击主页:abbr:IoT(物联网)`框底部的 :menuselection:`打印机服务器,打开 OpenPrinting CUPS 控制台。然后,点击顶部菜单中的 。点击相关打印机,在第一个下拉菜单中选择 维护。然后在第二个下拉菜单中选择 修改打印机。
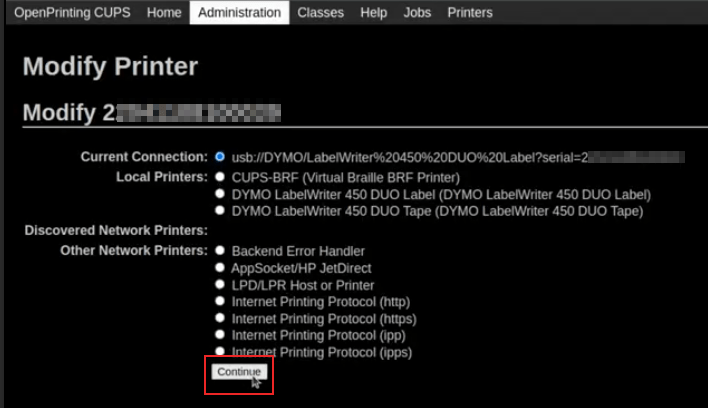
接下来,选择要进行修改的特定网络连接/打印机。点击:guilabel:继续。
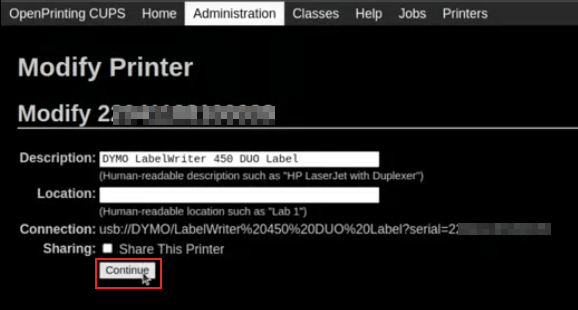
在下一页,点击:guilabel:继续,继续设置打印机的 品牌。
在 品牌 下从菜单中选择 DYMO。点击 继续 设置 型号。
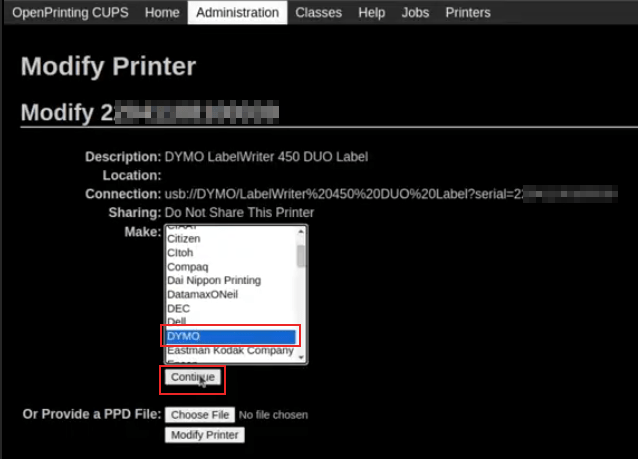
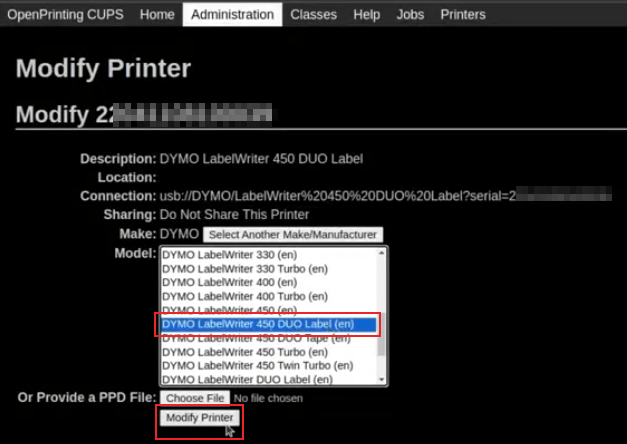
在下一页中,将 型号 设为 DYMO LabelWriter 450 DUO Label (en)`(或正在使用的 DYMO 打印机型号)。点击 :guilabel:`修改打印机 完成新驱动程序的设置,将出现一个确认页面。
重定向到确认页面,确认更新成功后,单击顶部菜单中的 按钮。
所有安装在 OpenPrinting CUPS 服务器上的打印机都会出现,包括新更新的::guilabel:`DYMO LabelWriter 450 DUO Label`(或正在使用的 DYMO 打印机型号)。点击刚刚更新的打印机。
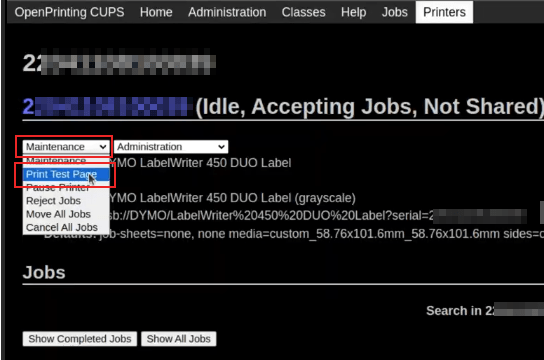
要打印测试标签,请点击:guilabel:管理 下拉菜单左边的 维护 下拉菜单,然后选择 打印测试页面。如果驱动程序更新成功,测试标签将延迟十秒钟打印出来。
为减少延迟,需要添加一台新打印机,请按以下步骤操作。
DYMO LabelWriter 打印延迟
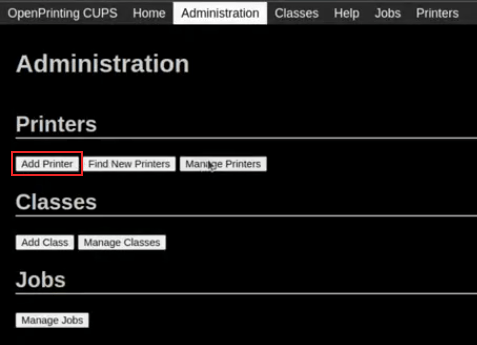
要解决修改驱动程序后的延迟问题,必须重新安装打印机。要重新安装打印机,请点击主页 IoT (物联网) 框底部的 打开 OpenPrinting CUPS 管理页面。然后,点击顶部菜单中的 ,再点击 添加打印机。
小訣竅
如果 DYMO LabelWriter 450 DUO 打印机根本无法打印或无法识别(具有 RAW 驱动程序类型),请更新设备上的驱动程序。请参阅 DYMO LabelWriter 无法打印。
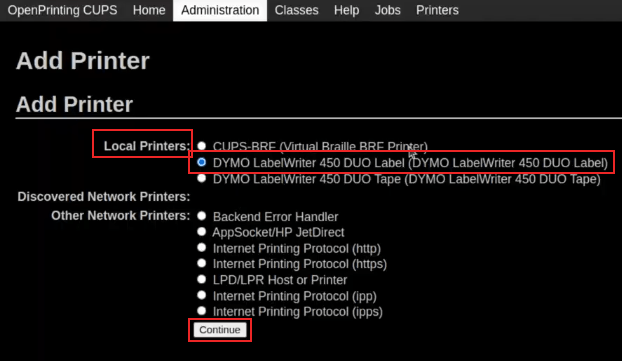
在下一屏幕的 本地打印机 部分中,选择预先安装的 DYMO LabelWriter 450 DUO Label (DYMO LabelWriter 450 DUO Label)](或正在使用的 DYMO 打印机型号)打印机。点击 :guilabel:`继续。
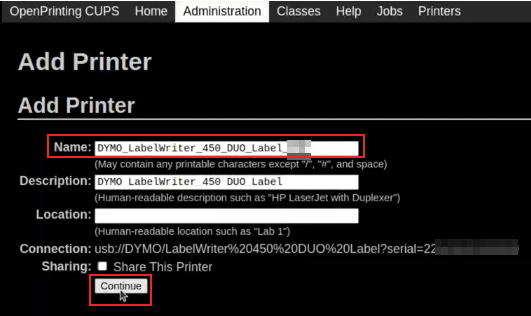
在下一屏幕中,将 名称 修改为可识别的名称,因为原始打印机仍将存在。点击 继续 进入下一屏幕。
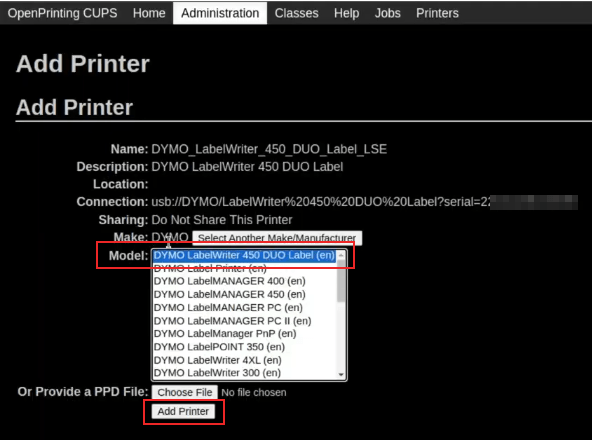
接下来,选择 型号。选择 DYMO LabelWriter 450 DUO Label (en)`(或正在使用的 DYMO 打印机型号),最后单击 :guilabel:`添加打印机 完成安装。
重定向到确认页面,确认安装成功后,点击顶部菜单中的 按钮。
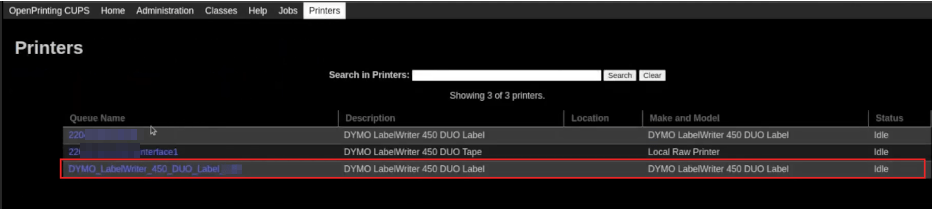
显示 OpenPrinting CUPS 服务器上安装的所有打印机,包括新安装的::guilabel:`DYMO LabelWriter 450 DUO Label`(或正在使用的 DYMO 打印机型号)。点击刚刚安装的打印机。
要打印测试标签,请点击 管理 下拉菜单左边的 维修 下拉菜单,然后选择 打印测试页面。测试标签应立即打印出来(延迟一到两秒)。
Zebra 打印机不打印任何内容
Zebra 打印机对打印的 Zebra 编程语言(ZPL)代码的格式非常敏感。如果打印机没有输出任何内容或打印了空白标签,请尝试通过在:ref:`开发者模式<developer-mode>`中访问:menuselection:`设置 –> 技术 –> 用户界面 –> 视图`并查找相应的模板,更改发送到打印机的报表格式。
也參考
查看 Zebra 打印 ZPL(Zebra 编程语言) 文件的说明,请点击 <https://supportcommunity.zebra.com/s/article/Print-a-zpl-file-using-the-Generic-Text-Printer>`_。
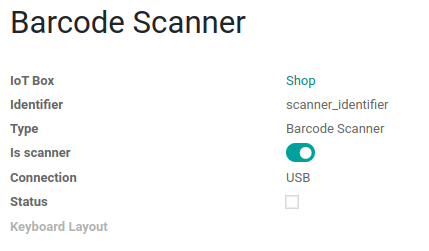
条形码扫描器
条形码扫描仪读取的字符与条形码不匹配
默认情况下,大多数条形码扫描仪都配置为 US QWERTY 格式。如果条形码扫描仪使用不同的布局,请转到设备的窗体视图()并选择正确的格式。
扫描条形码时不会发生任何情况
确保在 配置中选择了正确的设备,并将条形码配置为在每个条形码末尾发送一个 ENTER 字符(关键码 28)。为此,请导航至 。
条形码扫描仪被检测为键盘
重要
有些条形码扫描仪不标明自己是条形码扫描仪,而是标明自己是 USB 键盘,因此不会被 IoT (物联网) 盒子识别。
设备类型可通过进入其表单视图()并激活 是扫描仪 选项手动更改。
条形码扫描仪单独处理条形码字符
通过:abbr:`IoT(物联网)`框,从与条形码扫描仪配对的移动设备或平板电脑访问移动版 Odoo 时,扫描仪可能会将每个条形码字符作为一个单独的扫描来处理。在这种情况下,*键盘布局*选项**必须**在*条码扫描仪*表单页面上填写条码扫描仪的相应语言。
小訣竅
通过导航至 访问条形码扫描仪表单页面。
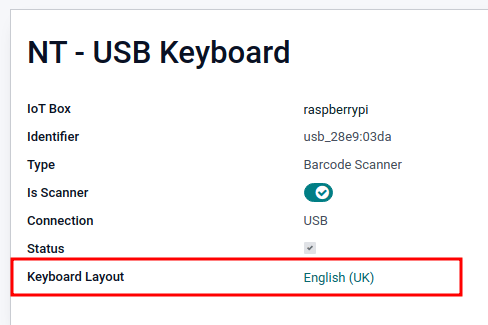
键盘布局`基于语言,根据设备和数据库语言的不同,可用选项也不同。例如::guilabel:`英语(英国)、英语(美国) 等。
钱箱
钱箱无法打开
应将钱箱连接到打印机,并在:abbr:POS(销售点)`配置中勾选 :guilabel:`钱箱`复选框。要执行此操作,请导航至 :menuselection:`POS 应用程序 --> POS 上的三点菜单 --> 物联网盒部分 --> 编辑 --> 收据打印机 --> 钱箱复选框。
比例
秤在结账过程中起着至关重要的作用,尤其是对于按重量而非固定价格销售的产品。
设置 Ariva S 秤
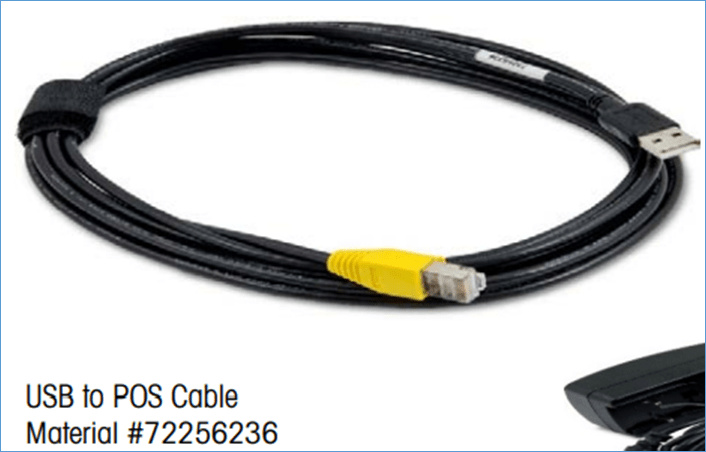
Odoo 确定 Ariva S 系列秤(由Mettler-Toledo, LLC.制造)的特定设置需要修改,并且需要 Mettler 专用的 :abbr:`USB(通用串行总线)`到专有 RJ45 电缆,以便秤与 Odoo 的: abbr:`IoT(物联网)`盒子一起运行。
要正确配置秤以便通过 IoT (物联网) 盒子进行识别,请遵循 Ariva S 系列秤的设置流程。
重要
在此过程中,必须使用 Mettler 官方提供的 USB (通用串行总线) 至 RJ45 连接线。
电线
Mettler 部件号为 72256236 - USB(通用串行总线)-至:abbr:`POS(销售点)`电缆。请联系 Mettler 或合作伙伴购买正品电缆。请注意,除此 Mettler 电缆外,其他**电线都不能用于此配置。使用连接到串行到:abbr:`USB(通用串行总线)适配器的纯串行电缆**无效。
設定
在进行以下配置时,请参阅 Mettler 的 Ariva S 系列秤设置指南:Ariva Checkout 秤用户指南。
首先,请翻阅上述手册的第 17 页*设置*。本指南列出了 Ariva S 系列秤的可能设置。
Follow the instructions, along with the following process:
按住 >T< 按钮 8 秒钟,或直到出现 CONF。
按 >T< 直到出现 GRP 3 ,然后按 >0< 确认。
在步骤 3.1 中,按 >T< 循环浏览选项,确保值设置为 :guilabel:`1`(USB 虚拟 COM 端口)。
按 >0< 直到 :guilabel:`3.6`(如有,否则跳过下一步)。
在步骤 3.6,确保值设置为 3 (8217 Mettler-Toledo (WO)),按 >T< 循环浏览选项。
按 >T< 直到出现 退出。
重要
除非另有需要,否则**不要**做任何其他更改。
按 >0<。
再次按 >0<,保存;电子秤重新启动。
Reboot the IoT box or restart the Windows virtual IoT service. The scale should then appear as Toledo 8217, as opposed to the previous display, where it appeared as Adam Equipment Serial.