Google 日历同步
将 Google 日历与 Odoo 同步,可同时查看和管理两个平台上的会议(双向更新)。这种整合有助于安排日程,从而避免错过会议。
在Google中设定
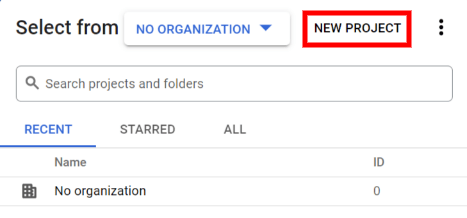
选择(或创建)一个项目
创建一个新的 Google API 项目并启用 Google 日历。首先,访问 `Google API 控制台<https://console.developers.google.com>`_并登录 Google 账户。
備註
如果是首次访问此页面,Google 将提示用户输入国家/地区并同意服务条款。请从下拉列表中选择一个国家,并同意 ToS(服务条款)。
接下来,单击:guilabel:选择项目`并选择(或创建)一个 API 项目,以便在其中配置 OAuth 和存储凭据。单击 :guilabel:`新建项目。
小訣竅
为 API 项目起一个清晰的名称,例如“Odoo Sync”,以便您轻松找到它。
启用 Google 日历 API
现在,点击左侧菜单中的 启用 API 和服务。如果没有出现 搜索栏,请再次选择 启用 API 和服务。
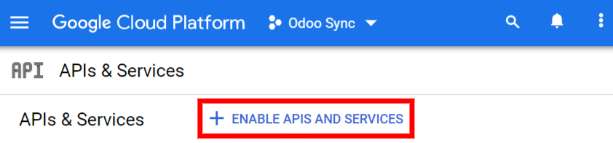
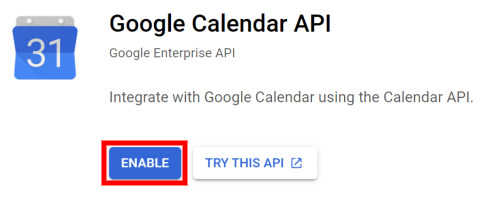
然后,使用搜索栏搜索 Google 日历 API,并从搜索结果中选择 Google 日历 API。点击 启用。
OAuth 同意屏幕
现在 API 项目已创建,应配置 OAuth。为此,请单击左侧菜单中的 OAuth 许可,然后选择 用户类型。
警告
个人 Gmail 帐户只允许使用**外部**用户类型,这意味着 Google 可能需要批准或添加*范围*。不过,使用*Google 工作空间*账户可以使用**内部**用户类型。
请注意,当 API 连接处于*外部*测试模式时,无需获得 Google 批准。该测试模式下的用户限制为 100 个。
在第二步 OAuth 同意屏幕 中,在 应用程序名称 字段中输入 Odoo,在 用户支持电子邮件 字段中选择电子邮件地址,在 开发者联系信息 部分中输入电子邮件地址。然后,单击 保存并继续。
单击 保存并继续 跳过第三步,即 。
接下来,如果继续测试模式(外部),请通过点击 添加用户 添加在 测试用户 步骤下配置的电子邮件地址,然后点击 保存并继续 按钮。应用程序注册摘要将出现。
最后,滚动到底部,点击 返回仪表板。
现在,OAuth 授权已经配置好了,是时候创建凭据了。
创建凭据
要将 Google 日历连接到 Odoo,需要 客户 ID 和 客户密钥。这是 Google 控制台的最后一步。首先点击左侧菜单中的 证书。然后,单击 创建凭据,并选择 OAuth 客户端 ID,Google 将打开创建凭据的指南。
在 下,为 应用类型 字段选择 网站申请,并为 名称 键入 我的 Odoo 数据库。
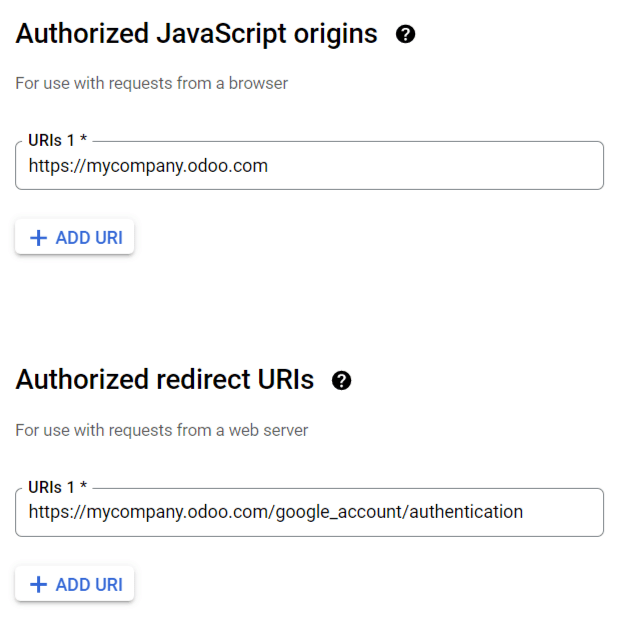
在 经授权 JavaScript Origins 部分,单击 + 添加 URI 并键入公司的 Odoo 完整 URL (统一资源定位器) 地址。
在 经授权重新定向 URIs 部分,单击 + 添加 URI,然后键入公司的 Odoo URL(统一资源定位符) 地址,后面跟上`/google_account/authentication`。最后,点击 创建。
将显示 客户 ID 和 客户密钥,将其复制到记事本中。
设置Odoo
找到 客户 ID 和 客户密钥 后,打开 Odoo 数据库并转到 。选中 Google 日历 旁边的复选框。
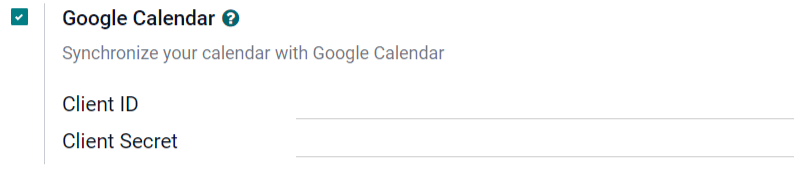
接下来,将 Google 日历 API 证书页面中的 客户 ID 和 客户密钥 复制并粘贴到 Google 日历 复选框下方的相应字段中。然后,单击 保存。
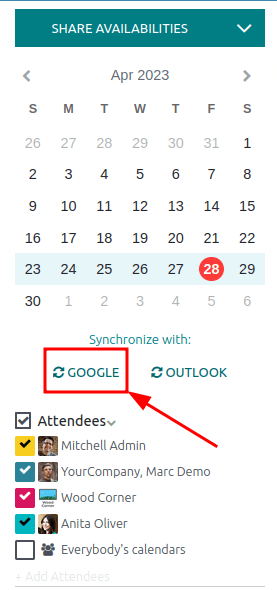
在 Odoo 中同步日历
最后,打开 Odoo 中的 应用程序,点击 Google 同步按钮,将 Google 日历与 Odoo 同步。
備註
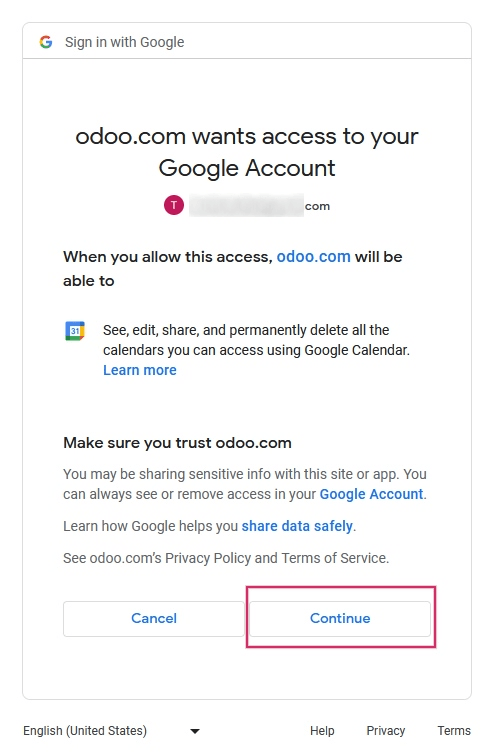
首次将 Google 日历与 Odoo 同步时,页面将重定向到 Google 账户。在那里,选择应具有访问权限的 电子邮件账户,然后选择 继续`(如果应用程序未经验证),最后选择 :guilabel:`继续`(允许传输数据)。
现在,Odoo 日历已成功与 Google 日历同步!
警告
Odoo 强烈建议在测试数据库和测试电子邮件地址(不用于任何其他目的)上测试 Google 日历同步,然后再尝试将所需的 Google 日历与用户的生产数据库同步。
一旦用户将 Google 日历与 Odoo 日历同步后:
在 Odoo 中创建活动会导致 Google 向所有参与者发送邀请。
在 Odoo 中删除活动会导致 Google 向所有参与者发送取消通知。
将联系人添加到活动会导致 Google 向所有参与者发送邀请。
从活动中删除联系人会导致 Google 向所有参与者发送取消通知。
在*Google 日历*中创建活动时,可在提示发送邀请电子邮件时选择 不发送,而无需发送通知。
故障排除同步
有时*Google 日历*账户可能无法与 Odoo 正确同步。同步问题可在数据库日志中看到。
在这种情况下,账户需要进行故障排除。可使用 重置账户 按钮进行重置,该按钮可通过导航至 访问。然后,选择要修改日历的用户,并点击 日历 选项卡。
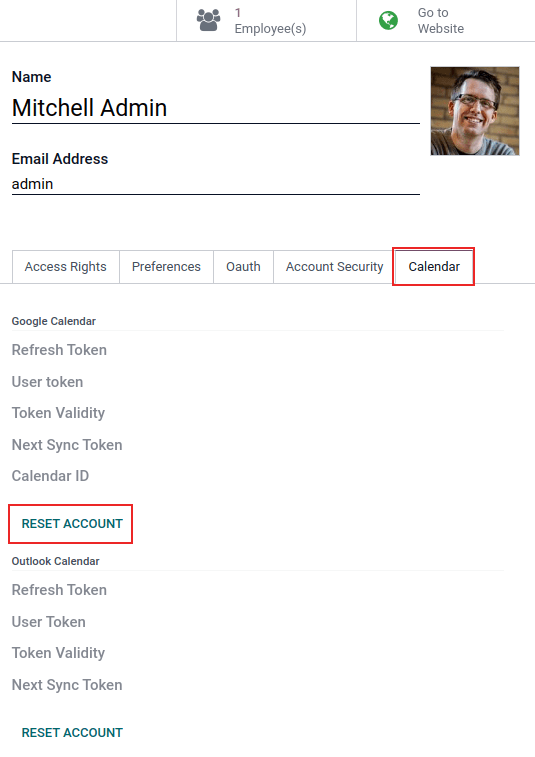
然后,在正确的日历下点击 重置账户。
重置选项
以下重置选项可用于排除 Google 日历与 Odoo 同步的故障:
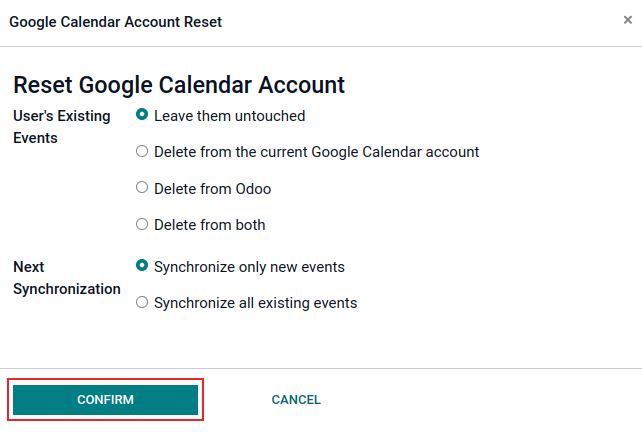
用户现有活动:
不做改动:不更改活动。
从当前的 Google 日历帐户中删除:从 Google 日历 中删除事件。
从 Odoo 中删除:从 Odoo 日历中删除活动。
同时删除:从 Google 日历 和 Odoo 日历中删除活动。
下一次同步:
只同步新活动:同步*Google 日历*和/或 Odoo 日历上的新事件。
同步所有现有活动:同步*Google 日历*和/或 Odoo 日历上的所有活动。
选择后点击 确认 以修改用户活动和日历同步。
谷歌OAuth常见问题解答
有时会出现配置错误,需要排除故障才能解决问题。以下是在配置 Google 日历 与 Odoo 一起使用时可能出现的最常见错误。
生产与测试发布状态
选择 生产 作为 发布状态 (而不是 测试)会显示以下警告信息:
在 OAuth 同意屏幕通过验证之前,OAuth 的敏感范围登录次数仅限 100 次。这可能需要几天的验证过程。
要更正此警告,请导航至 `Google API 平台<https://console.cloud.google.com/apis/credentials/consent>`_。如果 发布状态 为 生产中,请点击 返回到测试 以更正问题。
无新增测试用户
如果没有测试用户添加到 OAuth consent 屏幕,则会弹出 错误 403: access_denied。
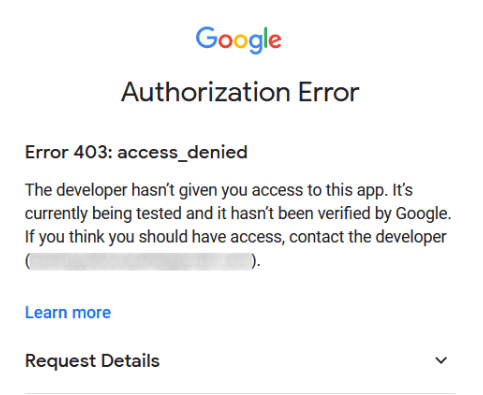
要纠正此错误,请返回 APIs & Services 下的 OAuth consent screen 并在应用程序中添加测试用户。添加要在 Odoo 中配置的电子邮件。
应用类型
创建凭证(OAuth 客户 ID 和 客户密钥)时,如果在 应用类型 中选择了 桌面应用程序,则会出现 授权错误`(:guilabel:`错误400:redirect_uri_mismatch)。
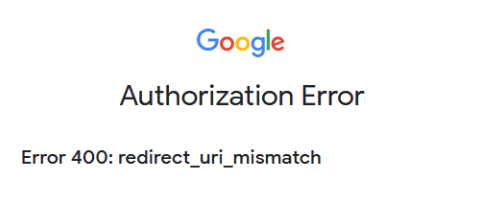
要纠正此错误,请删除现有凭证,并在 应用类型 中选择 网络应用 创建新凭证。
然后,在 授权重定向 URI 下,单击 添加 URI 按钮,并在字段中键入: https://yourdbname.odoo.com/google_account/authentication`,确保将 URL 中的*yourdbname*替换为**真实的** Odoo 数据库名称。
小訣竅
确保域(在 URI 中使用:https://yourdbname.odoo.com/google_account/authentication)与 web.base.url 系统参数中配置的域完全相同。
激活 开发者模式 并导航至 。