服務介紹
为了妥善维护车队,需要进行定期维护和定期维修。有必要为整个车队安排维修和管理服务,以确保所有车辆在需要时都处于良好的工作状态。
创建服务记录
要记录服务,请导航至 ,进入主服务仪表板。点击 创建 后会出现服务表单。填写表格中的信息,然后点击 保存。唯一需要填写的两个字段是 服务类型 和 车辆。
这些字段是:
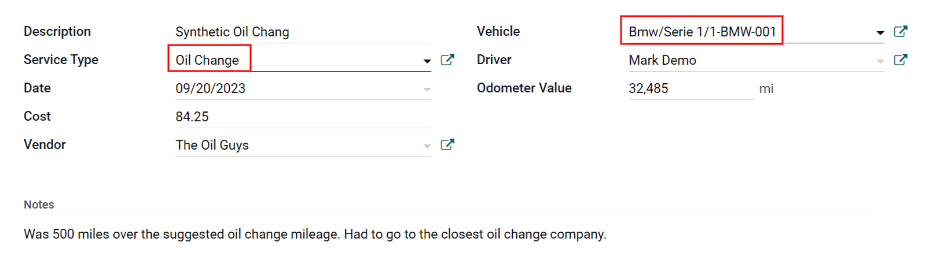
描述:输入服务的简短描述。
服务类型:从下拉菜单中选择服务类型,或输入新的服务类型,然后点击:guilabel:
创建`或:guilabel:`创建和编辑...。该列表在 Odoo 中没有预先配置。创建车队和记录服务时,需要创建服务类型。日期:使用日历模块,选择已提供或计划提供服务的日期。使用左右箭头图标导航到所需月份,然后点击日期进行选择。
费用:输入服务费用。
供应商:从下拉菜单中选择提供服务的供应商。如果系统中尚未输入供应商,请键入供应商名称,然后点击 创建,添加供应商,或点击 :guilabel:`创建并编辑…`创建供应商并编辑供应商表格。供应商表单允许输入名称以外的其他详细信息,如联系信息。
车辆:从下拉菜单中选择维修的车辆。选择车辆后,将填充 驾驶员 字段,并显示 里程 字段的计量单位。
驾驶员:当选择:guilabel:`车辆`时,为所选车辆列出的当前驾驶员。如果需要更改驱动程序,可从下拉菜单中选择另一个驱动程序。
里程表值:输入维修时的里程表读数。计量单位为公里(km)或英里(mi)。选择 车辆 时,测量单位将被填充。这来自车辆表单。要从公里改为英里,或从英里改为公里,请点击 车辆 字段中所选车辆旁边的 外部链接 按钮。更改度量单位,然后点击 保存。度量单位将在 :guilabel:` 里程表值` 字段中更新。
备注:在服务表格底部的备注选项卡中输入有关维修的任何备注。
服务清单
要查看数据库中记录的所有服务,包括新旧请求,请访问 。所有服务都会显示在列表视图中,包括每项服务的所有详细信息。
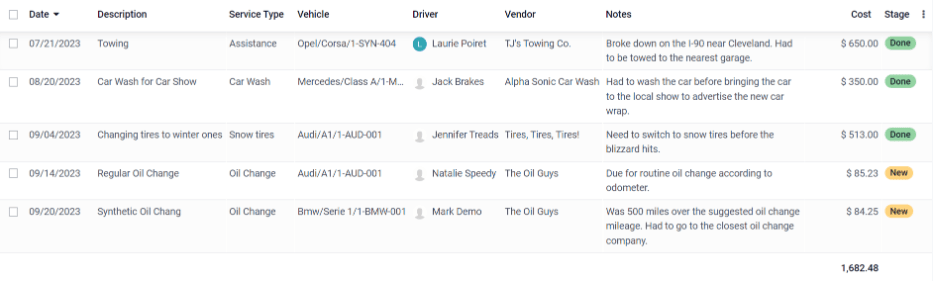
列出的每项服务都会显示以下信息:
日期:已执行或请求执行服务或维修的日期。
描述:对所执行的具体服务或维修类型的简短描述,以说明具体服务。
服务类型:执行的服务或维修。从必须配置的服务列表中选择。
车辆:服务所针对的具体车辆。
驾驶员:车辆当前的驾驶员。
供应商:执行服务或维修的特定供应商。
费用:服务或维修的总费用。
说明:记录与服务或维修相关的任何信息,以补充说明。
阶段:服务或维修的状态。选项包括 全新、运行中、已取消 或 已完成。
查看服务
It is recommended to view the list of services in one of several pre-configured ways to better view the information presented. In the top right corner of the list, there are several icons that when clicked, sort the data in different ways.

列表顯示
The default view of the services is the list view. This presents all the services in chronological order, from oldest to newest, in a list.
The information can be sorted by any column. At the top of each column, hover over the column name. An arrow appears to the right of the name. Click the arrow to sort the data by that specific column.
The default sorting is descending alphabetical order (A to Z). Click the arrow again to reverse the order, and go in reverse alphabetical order (Z to A). The one exception to this sorting is the default Date column, which sorts the information in chronological order (January to December) instead of alphabetical order.
看板檢視畫面
To view services by their stage, click on the Kanban icon, which is the second icon in the top right, and appears as four black squares in a cube.
All the services with the same status appear in the corresponding column, from Running to Cancelled. To change the status of a service, simply click and drag the service card to the desired stage.
圖表檢視模式
Another way to view the data is in a graph. To view the graph, click the Graph icon, which is the third icon in the top right, and appears as a small graph.
The graph displays the information in a graph where the X axis represents the Date and the Y axis represents the Cost. Each column represents a single month, and then is further organized by vehicle. Each vehicle is represented by a different color, and each month’s bar is divided by each vehicle.
樞紐分析檢視模式
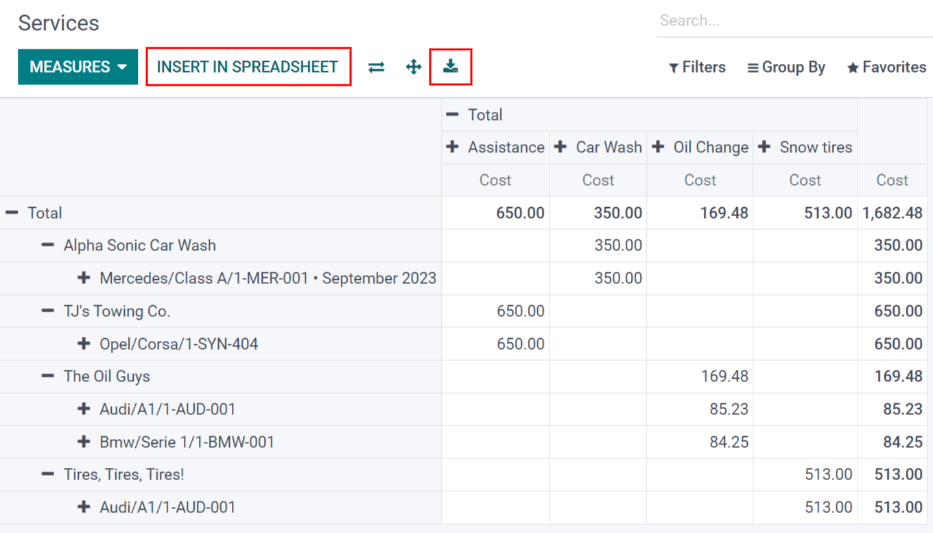
The final way to view the service data is in a spreadsheet pivot table. Click on the Pivot icon, which is the last icon in the top right, and appears as a small spreadsheet.
The data presented in the table shows the cost of each service or repair. The rows represent the vendors, and each vehicle that was serviced by them appears beneath each vendor. The column represent the different service types performed.
The table can be inserted in a spreadsheet or downloaded. To add the pivot table to a spreadsheet in
Odoo, click Insert In Spreadsheet and a pop-up appears. Select the spreadsheet the data
should be added to from the drop-down menu, and click Confirm. The spreadsheet then
loads on the screen. The spreadsheets are stored in Odoo’s Documents application. To download the
table in an xlsx format, click the Download icon.