Chapter 2 - Build your website
Create a page
Now that the theme has been set up, let’s move on to creating the content.
First of all, start by creating your first theme page: the home page. For now, only indicate “Hello” as content in the page.
Tip
You will need to deactivate the default homepage.
Zie ook
See reference documentation on how to desactivate a default page and how to start a new page.
/website_airproof/__manifest__.py¶'data': [
# Pages
'data/pages/home.xml',
]
/website_airproof/data/pages/home.xml¶<?xml version="1.0" encoding="utf-8"?>
<odoo noupdate="1">
<!-- Deactivate default homepage -->
<record id="website.homepage" model="ir.ui.view">
<field name="active" eval="False"/>
</record>
<!-- Home -->
<record id="page_home" model="website.page">
<field name="name">Home</field>
<field name="is_published" eval="True"/>
<field name="key">website_airproof.page_home</field>
<field name="url">/</field>
<field name="type">qweb</field>
<field name="arch" type="xml">
<t t-name="website_airproof.page_home">
<t t-call="website.layout">
<!-- Title -->
<t t-set="additional_title">One step beyond the horizon | Airproof</t>
<!-- Content -->
<div id="wrap" class="oe_structure">
<p>Hello</p>
</div>
</t>
</t>
</field>
</record>
</odoo>
Add a media
If you want the client to be able to reuse certain pictures that you are going to add on the website, they must be added to the image library.
To do the test, declare the drone image to add it to the library. You will find the drone picture here.
Zie ook
See reference documentation on how to add a media.
Go to the Website Builder, double-click on the logo, and you will see the drone image in the library.
To complete this exercise, you need to:
Put your PNG in the right image folder.
Create your
images.xmlfile. You can find all the necessary information in the images.xml file from our example module.Declare your file in the
__manifest__.py.
Add building blocks
Now, let’s get into the real work. Start adding content to the pages.
In an Odoo website, we create the content of a page using building blocks. These can be compared to
snippets editable by the user in the Website Builder. The standard main container for any snippet
is a section.
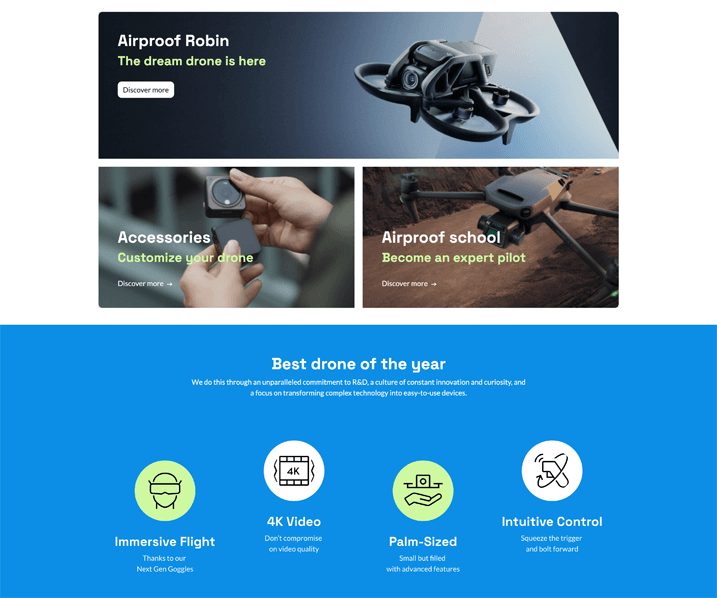
Based on the Airproof design, add the following elements to the homepage :
Create a section with the 3 boxes using the Big boxes building block.
For this section, you don’t want the future user to be able to edit it via the Website Builder.
Put an opacity filter on the background image of the 3 boxes.
Create another section containing the title and icons.
You can use these images and icons.
Zie ook
See reference documentation on how to write standard snippets.

Tip
To determine the code needed to create your building blocks :
- Create a test page via the website builder.Drag & drop the building block that interests you and apply the right design.Use the code generated via Editor HTML/SCSS in the menu.
You can also find the original building block code in Odoo :
odoo/addons/website/views/snippets/**.xml.
Find the solution in our Airproof example on home.xml.
