
Créer des événements
Avec l’application Événements, les organisateurs peuvent créer et configurer des événements en personne ou en ligne dans Odoo. Chaque nouvel événement contient plusieurs options pour personnaliser certaines logistiques telles que la vente de billets, le bureau d’inscription, les stands, les conférences, les sponsors, les salles, et bien plus encore.
Les événements peuvent être créés manuellement à partir de zéro ou construits à partir de modèles préconfigurés. Une fois lancée, l’application Événements s’intègre avec d’autres applications pour des fonctionnalités améliorées, notamment la promotion d’événements, la vente de billets d’inscription aux participants et la génération de pistes à l’aide de règles personnalisables.
Tableau de bord
To create an event, navigate to the Events app to land on the dashboard. By default, the Events dashboard uses the (Kanban) view, which showcases all events in the database in their respective pipeline stages. Other views can be set using the buttons at the top.
Chaque carte d’événement affiche le nom de l’événement, sa date prévue, son emplacement, le nombre de Participants attendus, toutes les activités planifiées liées à l’événement et le responsable de l’événement.
The default stages in the Kanban view are New, Booked, Announced, and Ended. The cards can be dragged and dropped into any stage in the pipeline.
Note
The Ended stage is folded by default and located at the end of the dashboard, next to the final stage.

To add a new stage, click the Add Stage button at the end of the dashboard. Enter a name for the stage, then click (Add) to add the stage or (Remove) to cancel.
Ajouter un nouvel événement
Events can be created by opening the and clicking New. This opens a new Events form.

At the top of the event form are a series of clickable smart buttons to view details about event metrics, including attendee registrations, booths, ticket sales, event tracks, and sponsors.
Sous les boutons intelligents se trouve le formulaire d’événement, qui contient divers champs et onglets cliquables pour configurer les détails nécessaires de l’événement.
Pour commencer, saisir quelques informations de base sur l’événement dans les champs suivants :
Nom de l’événement : Le titre de l’événement. Ce champ est obligatoire.
Date : La date prévue ou la plage de dates de l’événement (exprimée dans le fuseau horaire local). Ce champ est pré-rempli mais modifiable et est obligatoire.
Fuseau horaire d’affichage : Le fuseau horaire dans lequel la date de l’événement est affichée sur le site web. Ce champ est pré-rempli mais modifiable et est obligatoire.
Langue : La langue choisie pour toutes les communications de l’événement.
Note
To the right of the entered Event Name, there is a language tooltip, represented by an abbreviated language indicator (e.g.,
EN). When clicked, a Translate: name pop-up window appears, displaying various preconfigured language translation options available in the database.
Alternatively, to populate the event form from an event template, select an option in the Template drop-down menu.
De plus, ajouter les étiquettes correspondantes (par exemple, En ligne, Conférence) pour l’événement dans le champ Étiquettes. Plusieurs étiquettes peuvent être ajoutées par événement.
Astuce
Les étiquettes peuvent être affichées sur les événements listés sur le site web en activant la case à cocher Afficher sur le site web depuis .
Continuer en saisissant des informations telles que les points de contact et le lieu de l’événement dans les champs suivants :
Organisateur : l’organisateur de l’événement (une entreprise, un contact ou un employé).
Responsable : l’utilisateur spécifique responsable de la gestion de l’événement dans la base de données.
Société : la société spécifique dans la base de données à laquelle l’événement est lié. Ce champ apparaît uniquement en environnement multi-sociétés. Ce champ est rempli automatiquement mais modifiable. Il est obligatoire.
Website: The specific website in the database on which the event is published. If this field is left blank, the event can be published on all websites in the database.
Published: The toggle button to publish or un-publish the website for attendees.
Lieu : le lieu de l’événement. Ce champ récupère les informations de l’application Contacts. Alternativement, les informations peuvent être saisies manuellement.
To limit the number of registrations for the event, select Limit Registrations and enter the maximum number of attendees allowed in the resulting field.
Configurations supplémentaires de l’événement
Après avoir rempli les champs du formulaire d’événement, passer aux quatre onglets en bas pour une personnalisation supplémentaire.
Onglet billets
In the Tickets tab of the event form, create custom registration tickets and ticket tiers for events.

To create a ticket, click Add a line in the Tickets tab. In the Product field, either select the preconfigured Event Registration product, or create a new one by typing in the name of the new event registration product and then selecting either Create or Create and edit… from the resulting drop-down menu.
Then, enter a name for the ticket (e.g. Basic Ticket or VIP) in the Name field.
Important
In order for an event registration product to be selectable in the Tickets tab, the event registration Product Type must be set to Service and the Create on Order field must be set to Event Registration.
Astuce
Existing event registration products can be modified directly from the Product field by clicking the (right arrow) icon next to the product. Doing so reveals that product’s form. If the Inventory application is installed, additional choices are available to customize for the product.
Ensuite, définir le coût d’inscription du billet dans le champ Price.
Note
The Sales Price defined on the event registration product’s form sets the default cost of a ticket. Modifying the Price of the event ticket in the Tickets tab overrides the ticket’s default price with this new price.
Next, enter the Sales Start and Sales End dates in their respective fields. To do so, click into the blank field to reveal a calendar pop-over. Then, select the desired date and time and click Apply.
Optionally, designate a Maximum amount of the ticket that can be sold.
As attendees register, the Registration column automatically populates with the number of tickets sold.
To delete any tickets from the Tickets tab, click the (trash can) icon in the ticket’s corresponding line.
Astuce
To add an optional Description column to the Tickets tab, click the (additional options) drop-down menu at the end of the column titles.
Then, select the checkbox beside Description to add a brief description for each event ticket, informing registrants about ticket details.
Set up ticket combos
Optionally, users can combine the event registration ticket with separate products (e.g., food, beverages, or merchandise) to create a combo.
To do so, click the (additional options) drop-down menu and select the Additional Products checkbox. Then, in the resulting Additional Products column, select the products to combine with the registration ticket.
Attendees who register for the specific ticket from the website see the additional products included with their ticket on the Order summary page before confirming their order.
Example
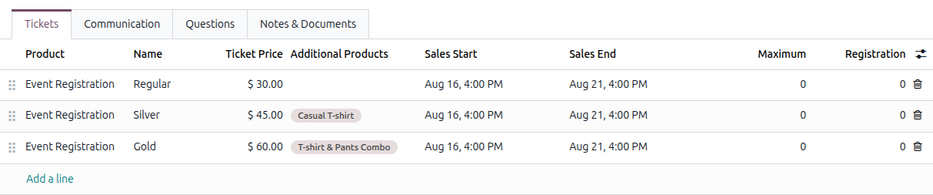
A company is hosting an event with three different ticket levels:
Basic: Only includes admission.
Silver: Includes admission and a casual T-shirt.
Gold: Includes admission, a T-shirt, and pants.
In the Tickets tab, three event registration products are added along with their names and the relevant Additional Products.
Onglet communication
In the Communication tab of an event form, create various marketing communications that can be scheduled to be sent at specific intervals leading up to and following the event.

Note
Par défaut, Odoo fournit trois communications préconfigurées distinctes sur chaque nouvelle fiche événement. L’une est un e-mail envoyé après chaque inscription pour confirmer l’achat auprès du participant. Les deux autres sont des rappels d’événement par e-mail programmés pour être envoyés à différents intervalles avant l’événement pour rappeler au destinataire l’événement à venir.
To add a communication in the Communication tab, click Add a line. Then, select the desired type of communication from the first drop-down menu in the Template column. The options are: Mail, SMS, Social Post, or WhatsApp.
Important
L’option Publication sociale n’apparaît que si l’application Marketing social est installée. L’option WhatsApp n’apparaît que si le module WhatsApp est installé.
Les modèles WhatsApp ne peuvent pas être modifiés pendant la configuration active. Une approbation séparée de Meta est requise.
Ensuite, sélectionner un modèle d’e-mail existant dans le deuxième menu déroulant du champ Modèle.
Next, define the Interval and Unit from their respective drop-down fields to specify when the communication should be sent. The Unit options are: Immediately, Hours, Days, Weeks, and Months.
Then, select one of the following options from the Trigger drop-down menu:
After each registration
Before the event starts
After the event started
After the event ended
Before the event ends
The (#) Sent column populates with the number of sent communications, along with different icons indicating the status of the communication:
(Running): The communication is active and running.
(Sent): The communications were sent and are no longer active.
(Scheduled): The communication is scheduled but has not been deployed.
Any number of communications can be added in the Communication tab of an event form.
Example
To send a confirmation email an hour after an attendee registers for an event, configure the communication as follows:
Intervalle :
1Unité : Heures
Déclencheur : Après chaque inscription
Note
Existing email templates can be modified directly from the Template drop-down menu by clicking the (Internal link) icon next to the template name. Doing so reveals a separate page where users can edit the Content, Email Configuration, and Settings of that particular email template.
To view and manage all email templates, activate Mode développeur (mode debug) and navigate to . Modify with caution as email templates affect all communications where the template is used.
Onglet Questions
In the Questions tab of an event form, users can create questionnaires to gather information from attendees when registering for the event.

Note
By default, Odoo provides three questions in the Questions tab for every event form. The default questions require registrants to provide their Name, Email, and an optional Phone number.
The information gathered from the Questions tab can be found on the Attendees dashboard, accessible via the Attendees smart button. Odoo populates individual records that contain basic information about the registrants, as well as their preferences.
To add a question in the Questions tab, click Add a line. Doing so reveals an Add: Question pop-up window. From here, users can select previously configured questions or click Create New to create a new one. Doing so opens a new Create Question pop-up window.

First, enter the question in the field at the top of the form. Then, specify if the question requires a Mandatory Answer.
Ensuite, sélectionner une option Type de question :
Sélection : fournir des options de réponse à la question que les inscrits peuvent choisir. Les options de réponse sélectionnables peuvent être gérées dans la colonne Réponses en bas de la fenêtre contextuelle.
Saisie de texte : permet aux utilisateurs de saisir une réponse personnalisée à la question dans un champ de texte.
Nom : fournit aux inscrits un champ pour qu’ils saisissent leur nom.
E-mail : fournit aux inscrits un champ pour qu’ils saisissent leur adresse e-mail.
Téléphone : Fournit aux participants un champ pour saisir leur numéro de téléphone.
Société : Fournit aux participants un champ pour saisir une société à laquelle ils sont associés.
Additionally, select one or more of the following options to configure the question’s visibility and extendability:
Ask once per order: Ask this question only once for each registration, applying the answer to every attendee in the order (if multiple tickets are purchased at once).
Default question: Automatically add this question for all new events.
Is Reusable: Allow this question to be reusable for all new events. If Default question is selected, this option is automatically enabled.
If Selection was chosen as the Question Type, an Answers tab appears. Add any answers to the question under this tab by clicking Add a line.
Once all the desired configurations have been entered, click Save & Close to save the question and return to the Questions tab on the event form. Or, click Save & New to save the question and configure another. To cancel, click Discard.
Users can add as many questions in the Questions tab as needed.
Astuce
Pour les types Sélection et Saisie de texte, un bouton Stats apparaît à droite de la ligne de question. Lorsqu’il est cliqué, Odoo affiche une page séparée présentant les métriques de réponse à cette question spécifique.
Notes & Documents tab
In the Notes & Documents tab of an event form, users can leave detailed internal notes and event-related instructions or information for attendees.
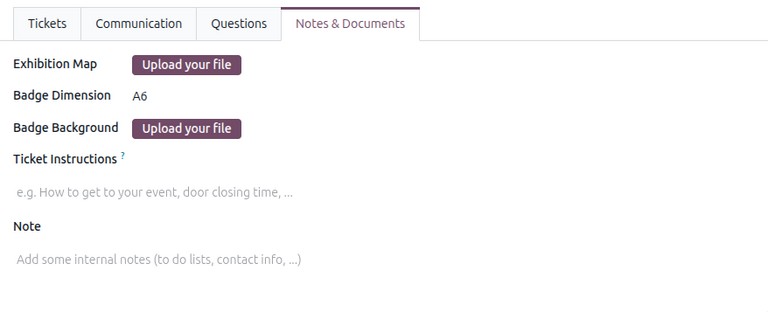
For in-person events, users can specify the venue map and attendee badge details in the following fields:
Exhibition Map: Upload an image of the event venue map. Do so by clicking Upload your file.
Badge Dimension: Select the desired paper format dimension for attendees” event badges. The options are A4 foldable, A6, 4 per sheet, and 96x82mm (Badge Printer).
Badge Background: Upload an image of the custom background image for the badge. Do so by clicking Upload your file.
In the Ticket Instructions field, users can leave specific instructions for attendees and display them on attendees” tickets.
In the Note field, users can leave internal notes for other event employees, such as « to-do » lists, contact information, instructions, and so on.
Publier des événements
Once all configurations and modifications are complete on the event form, the event can be published on the website. Doing so makes the event visible to website visitors and allows them to register for the event.
To publish an event, toggle the Published button on the event form.
Alternatively, click the Go to Website smart button to open the event webpage. Then, toggle the Unpublished button in the header menu, changing it to a Published switch. The event webpage is now published and accessible by all website visitors.
Voir également
Pour en savoir plus sur les fonctionnalités et options de conception de site web, consulter la documentation Blocs de construction.
Envoyer des invitations à l’événement
To send event invites to potential attendees, navigate to the desired event form via and click the desired event. On the event form, click the Invite button.
Doing so reveals a blank email form. Customize the message by specifying a mailing type, subject, recipients, and the mail body.
Astuce
L’envoi d’e-mails depuis Odoo est soumis à une limite quotidienne qui, par défaut, est de 200. Pour en savoir plus sur les limites quotidiennes, consulter la documentation Limite journalière atteinte.
Voir également