
إنشاء الفعاليات
باستخدام تطبيق الفعاليات، يمكن للمنظّمين إنشاء وتكوين فعاليات حضورية أو عبر الإنترنت في Odoo. تحتوي كل فعالية جديدة على عدد من الخيارات لتخصيص جوانب لوجستية معيّنة مثل بيع التذاكر ومكتب التسجيل والأكشاك والمسارات والرعاة والقاعات وغير ذلك.
يمكن إنشاء الفعاليات يدويًا من البداية أو بناؤها من قوالب مُعدّة مسبقًا. بمجرد الإطلاق، يتكامل تطبيق الفعاليات مع التطبيقات الأخرى للحصول على وظائف محسّنة، بما في ذلك الترويج للفعاليات وبيع تذاكر التسجيل للحاضرين وتوليد العملاء المحتملين باستخدام قواعد قابلة للتخصيص.
لوحة البيانات
To create an event, navigate to the Events app to land on the dashboard. By default, the Events dashboard uses the (Kanban) view, which showcases all events in the database in their respective pipeline stages. Other views can be set using the buttons at the top.
تعرض كل بطاقة فعالية اسم الفعالية وتاريخها المُجدول وموقعها وعدد الحاضرين المتوقّع وأي أنشطة مُجدولة مرتبطة بالفعالية ومدير الفعالية المسؤول.
المراحل الافتراضية في نافذة عرض كانبان هي جديد، و:guilabel:محجوز، و:guilabel:معلن، و:guilabel:منتهي. يمكن سحب البطاقات وإفلاتها في أي مرحلة من مراحل مسار العمل.
ملاحظة
The Ended stage is folded by default and located at the end of the dashboard, next to the final stage.

To add a new stage, click the Add Stage button at the end of the dashboard. Enter a name for the stage, then click (Add) to add the stage or (Remove) to cancel.
إضافة فعالية جديدة
Events can be created by opening the and clicking New. This opens a new Events form.

At the top of the event form are a series of clickable smart buttons to view details about event metrics, including attendee registrations, booths, ticket sales, event tracks, and sponsors.
أسفل الأزرار الذكية يوجد نموذج الفعالية، والذي يحتوي على حقول وعلامات تبويب قابلة للنقر مختلفة لتكوين التفاصيل اللازمة للفعالية.
للبدء، أدخل بعض المعلومات الأساسية حول الفعالية في الحقول التالية:
اسم الفعالية: عنوان الفعالية. هذا الحقل مطلوب.
التاريخ: التاريخ المجدول أو نطاق التواريخ للفعالية (معبر عنه بالتوقيت المحلي). يتم ملء هذا الحقل تلقائياً ولكن يمكن تعديله وهو مطلوب.
عرض المنطقة الزمنية: المنطقة الزمنية التي يتم فيها عرض تاريخ الفعالية على الموقع الإلكتروني. يتم ملء هذا الحقل تلقائياً ولكن يمكن تعديله وهو مطلوب.
اللغة: اللغة المختارة لجميع اتصالات الفعالية.
ملاحظة
To the right of the entered Event Name, there is a language tooltip, represented by an abbreviated language indicator (e.g.,
EN). When clicked, a Translate: name pop-up window appears, displaying various preconfigured language translation options available in the database.
Alternatively, to populate the event form from an event template, select an option in the Template drop-down menu.
بالإضافة إلى ذلك، أضف أي وسوم مقابلة (مثل عبر الإنترنت، مؤتمر) للفعالية في حقل الوسوم. يمكن إضافة وسوم متعددة لكل فعالية.
نصيحة
يمكن عرض الوسوم على الفعاليات المدرجة على الموقع الإلكتروني بتفعيل خانة الاختيار عرض على الموقع الإلكتروني من .
تابع بإدخال معلومات مثل جهات الاتصال وموقع المكان في الحقول التالية:
المنظم: منظم الفعالية (شركة أو جهة اتصال أو موظف).
المسؤول: المستخدم المحدد المسؤول عن إدارة الفعالية في قاعدة البيانات.
الشركة: الشركة المحددة في قاعدة البيانات المرتبطة بالفعالية. يظهر هذا الحقل فقط عند العمل في بيئة متعددة الشركات. يتم ملء هذا الحقل تلقائياً ولكن يمكن تعديله. وهو مطلوب.
Website: The specific website in the database on which the event is published. If this field is left blank, the event can be published on all websites in the database.
Published: The toggle button to publish or un-publish the website for attendees.
المكان: موقع مكان الفعالية. يسحب هذا الحقل المعلومات من تطبيق جهات الاتصال. بدلاً من ذلك، يمكن إدخال المعلومات يدوياً.
To limit the number of registrations for the event, select Limit Registrations and enter the maximum number of attendees allowed in the resulting field.
إعدادات إضافية للفعالية
بعد ملء الحقول في نموذج الفعالية، انتقل إلى علامات التبويب الأربع في الأسفل لمزيد من التخصيص.
تبويب التذاكر
In the Tickets tab of the event form, create custom registration tickets and ticket tiers for events.

To create a ticket, click Add a line in the Tickets tab. In the Product field, either select the preconfigured Event Registration product, or create a new one by typing in the name of the new event registration product and then selecting either Create or Create and edit... from the resulting drop-down menu.
Then, enter a name for the ticket (e.g. Basic Ticket or VIP) in the Name field.
مهم
In order for an event registration product to be selectable in the Tickets tab, the event registration Product Type must be set to Service and the Create on Order field must be set to Event Registration.
نصيحة
Existing event registration products can be modified directly from the Product field by clicking the (right arrow) icon next to the product. Doing so reveals that product's form. If the Inventory application is installed, additional choices are available to customize for the product.
بعد ذلك، حدد تكلفة التسجيل للتذكرة في حقل السعر.
ملاحظة
The Sales Price defined on the event registration product's form sets the default cost of a ticket. Modifying the Price of the event ticket in the Tickets tab overrides the ticket's default price with this new price.
Next, enter the Sales Start and Sales End dates in their respective fields. To do so, click into the blank field to reveal a calendar pop-over. Then, select the desired date and time and click Apply.
Optionally, designate a Maximum amount of the ticket that can be sold.
As attendees register, the Registration column automatically populates with the number of tickets sold.
To delete any tickets from the Tickets tab, click the (trash can) icon in the ticket's corresponding line.
نصيحة
To add an optional Description column to the Tickets tab, click the (additional options) drop-down menu at the end of the column titles.
Then, select the checkbox beside Description to add a brief description for each event ticket, informing registrants about ticket details.
Set up ticket combos
Optionally, users can combine the event registration ticket with separate products (e.g., food, beverages, or merchandise) to create a combo.
To do so, click the (additional options) drop-down menu and select the Additional Products checkbox. Then, in the resulting Additional Products column, select the products to combine with the registration ticket.
Attendees who register for the specific ticket from the website see the additional products included with their ticket on the Order summary page before confirming their order.
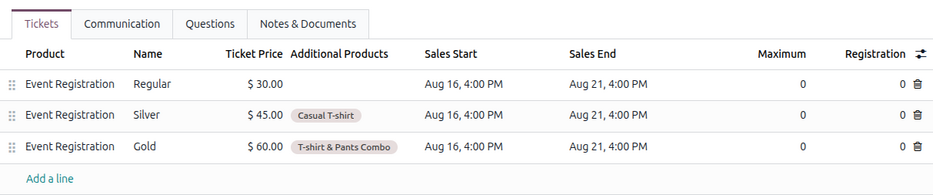
Example
A company is hosting an event with three different ticket levels:
Basic: Only includes admission.
Silver: Includes admission and a casual T-shirt.
Gold: Includes admission, a T-shirt, and pants.
In the Tickets tab, three event registration products are added along with their names and the relevant Additional Products.
تبويب التواصل
In the Communication tab of an event form, create various marketing communications that can be scheduled to be sent at specific intervals leading up to and following the event.

ملاحظة
بشكل افتراضي، يوفر Odoo ثلاثة اتصالات منفصلة مُعدة مسبقًا في كل نموذج فعالية جديد. واحد منها عبارة عن بريد إلكتروني يُرسل بعد كل تسجيل لتأكيد الشراء مع الحاضر. والاثنان الآخران عبارة عن تذكيرات بريد إلكتروني للفعالية مجدولة لإرسالها على فترات زمنية مختلفة قبل الفعالية لتذكير المستلم بالفعالية القادمة.
To add a communication in the Communication tab, click Add a line. Then, select the desired type of communication from the first drop-down menu in the Template column. The options are: Mail, SMS, Social Post, or WhatsApp.
مهم
يظهر خيار منشور اجتماعي فقط إذا كان تطبيق التسويق على وسائل التواصل الإجتماعي مثبتًا. يظهر خيار واتساب فقط إذا كانت وحدة WhatsApp مثبتة.
قوالب واتساب لا يمكن تعديلها أثناء التكوين النشط. مطلوب موافقة منفصلة من ميتا.
بعد ذلك، اختر نموذج بريد إلكتروني موجود من القائمة المنسدلة الثانية في حقل النموذج.
Next, define the Interval and Unit from their respective drop-down fields to specify when the communication should be sent. The Unit options are: Immediately, Hours, Days, Weeks, and Months.
بعد ذلك، حدد أحد الخيارات التالية من القائمة المنسدلة المُشغّل:
بعد كل تسجيل
قبل بدء الفعالية
بعد بدء الفعالية
بعد انتهاء الفعالية
قبل انتهاء الفعالية
The (#) Sent column populates with the number of sent communications, along with different icons indicating the status of the communication:
(Running): The communication is active and running.
(Sent): The communications were sent and are no longer active.
(Scheduled): The communication is scheduled but has not been deployed.
Any number of communications can be added in the Communication tab of an event form.
Example
To send a confirmation email an hour after an attendee registers for an event, configure the communication as follows:
الفترة:
1الوحدة: ساعات
المشغل: بعد كل تسجيل
ملاحظة
Existing email templates can be modified directly from the Template drop-down menu by clicking the (Internal link) icon next to the template name. Doing so reveals a separate page where users can edit the Content, Email Configuration, and Settings of that particular email template.
لعرض جميع قوالب البريد الإلكتروني وإدارتها، قم بتفعيل وضع المطور (وضع التصحيح) وانتقل إلى . يُرجى توخي الحذر عند التعديل، حيث تؤثر قوالب البريد الإلكتروني على جميع المراسلات التي يُستخدم فيها القالب.
تبويب الأسئلة
In the Questions tab of an event form, users can create questionnaires to gather information from attendees when registering for the event.

ملاحظة
By default, Odoo provides three questions in the Questions tab for every event form. The default questions require registrants to provide their Name, Email, and an optional Phone number.
The information gathered from the Questions tab can be found on the Attendees dashboard, accessible via the Attendees smart button. Odoo populates individual records that contain basic information about the registrants, as well as their preferences.
To add a question in the Questions tab, click Add a line. Doing so reveals an Add: Question pop-up window. From here, users can select previously configured questions or click Create New to create a new one. Doing so opens a new Create Question pop-up window.

أولاً، أدخل السؤال في الحقل الموجود أعلى النموذج. بعد ذلك، حدد ما إذا كان السؤال يتطلب إجابة إلزامية.
بعد ذلك، حدد خيار نوع السؤال:
التحديد: توفير خيارات إجابة للسؤال ليختار منها المسجلون. يمكن إدارة خيارات الإجابة القابلة للتحديد في عمود الإجابات في أسفل النافذة المنبثقة.
إدخال نص: يتيح للمستخدمين إدخال استجابة مخصصة للسؤال في حقل نصي.
الاسم: يوفر للمسجلين حقلاً لإدخال أسمائهم.
البريد الإلكتروني: يوفر للمسجلين حقلاً لإدخال عنوان بريدهم الإلكتروني.
رقم الهاتف: يوفر للمسجلين حقلاً لإدخال رقم هاتفهم.
الشركة: يوفر للمسجلين حقلاً لإدخال اسم الشركة المرتبطين بها.
بالإضافة إلى ذلك، حدد واحداً أو أكثر من الخيارات التالية لتهيئة إمكانية ظهور السؤال وقابليته للتوسيع:
السؤال مرة واحدة لكل طلب: اطرح هذا السؤال مرة واحدة فقط لكل تسجيل، مع تطبيق الإجابة على جميع الحضور في الطلب (في حال شراء عدة تذاكر دفعة واحدة).
سؤال افتراضي: أضِف هذا السؤال تلقائياً لجميع الفعاليات الجديدة.
قابل لإعادة الاستخدام: السماح بإعادة استخدام هذا السؤال في جميع الفعاليات الجديدة. إذا تم تحديد سؤال افتراضي، يتم تفعيل هذا الخيار تلقائياً.
إذا تم اختيار تحديد كـ نوع السؤال، يظهر تبويب الإجابات. أضِف أي إجابات للسؤال ضمن هذا التبويب بالنقر على إضافة سطر.
Once all the desired configurations have been entered, click Save & Close to save the question and return to the Questions tab on the event form. Or, click Save & New to save the question and configure another. To cancel, click Discard.
Users can add as many questions in the Questions tab as needed.
نصيحة
بالنسبة لأنواع الاختيار و:guilabel:إدخال النص، يظهر زر الإحصائيات على الجانب الأيمن من سطر السؤال. عند النقر عليه، يعرض Odoo صفحة منفصلة تعرض مقاييس الاستجابة لهذا السؤال المحدد.
تبويب الملاحظات والمستندات
In the Notes & Documents tab of an event form, users can leave detailed internal notes and event-related instructions or information for attendees.
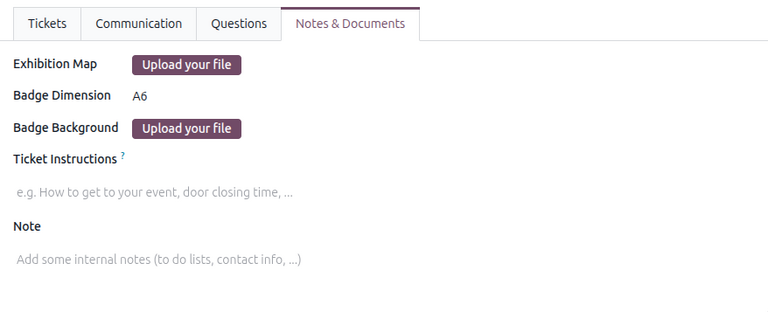
بالنسبة للفعاليات الحضورية، يمكن للمستخدمين تحديد خريطة المكان وتفاصيل شارة الحضور في الحقول التالية:
خريطة المعرض: قم بتحميل صورة لخريطة مكان الفعالية. يمكنك ذلك بالنقر على تحميل ملفك.
أبعاد الشارة: حدد أبعاد تنسيق الورق المطلوب لشارات الحضور. الخيارات هي A4 قابل للطي، و:guilabel:
A6، و:guilabel:4 لكل ورقة، و:guilabel:96x82mm (طابعة الشارات).خلفية الشارة: قم بتحميل صورة خلفية مخصصة للشارة. يمكنك ذلك بالنقر على تحميل ملفك.
في حقل تعليمات التذكرة، يمكن للمستخدمين ترك تعليمات محددة للحضور وعرضها على تذاكرهم.
في حقل الملاحظة، يمكن للمستخدمين ترك ملاحظات داخلية لموظفي الفعالية الآخرين، مثل قوائم "المهام المراد تنفيذها"، ومعلومات الاتصال، والتعليمات، وما إلى ذلك.
نشر الفعاليات
Once all configurations and modifications are complete on the event form, the event can be published on the website. Doing so makes the event visible to website visitors and allows them to register for the event.
To publish an event, toggle the Published button on the event form.
Alternatively, click the Go to Website smart button to open the event webpage. Then, toggle the Unpublished button in the header menu, changing it to a Published switch. The event webpage is now published and accessible by all website visitors.
انظر أيضًا
لمعرفة المزيد عن وظائف وخيارات تصميم الموقع الإلكتروني، راجع وثائق كتلة البناء.
إرسال دعوات الفعاليات
To send event invites to potential attendees, navigate to the desired event form via and click the desired event. On the event form, click the Invite button.
Doing so reveals a blank email form. Customize the message by specifying a mailing type, subject, recipients, and the mail body.
نصيحة
يخضع إرسال رسائل البريد الإلكتروني من Odoo لحد يومي، والذي يبلغ افتراضياً 200. لمعرفة المزيد حول الحدود اليومية، تفضل بزيارة وثائق تم الوصول إلى الحد اليومي.
انظر أيضًا