
Crear eventos
Con la aplicación Eventos, los organizadores pueden crear y configurar eventos presenciales o en línea en Odoo. Cada nuevo evento contiene una serie de opciones para personalizar aspectos logísticos específicos como venta de entradas, mostrador de registro, stands, charlas, patrocinadores, salas y más.
Los eventos se pueden crear manualmente desde cero o construir a partir de plantillas preconfiguradas. Una vez lanzada, la aplicación Eventos se integra con otras aplicaciones para funcionalidades mejoradas, incluyendo la promoción de eventos, venta de entradas de registro a asistentes y generación de oportunidades usando reglas personalizables.
Tablero
To create an event, navigate to the Events app to land on the dashboard. By default, the Events dashboard uses the (Kanban) view, which showcases all events in the database in their respective pipeline stages. Other views can be set using the buttons at the top.
Cada tarjeta de evento muestra el nombre del evento, su fecha programada, ubicación, número esperado de Asistentes, cualquier actividad programada relacionada con el evento y el responsable del evento.
The default stages in the Kanban view are New, Booked, Announced, and Ended. The cards can be dragged and dropped into any stage in the pipeline.
Nota
The Ended stage is folded by default and located at the end of the dashboard, next to the final stage.

To add a new stage, click the Add Stage button at the end of the dashboard. Enter a name for the stage, then click (Add) to add the stage or (Remove) to cancel.
Añadir un nuevo evento
Events can be created by opening the and clicking New. This opens a new Events form.

At the top of the event form are a series of clickable smart buttons to view details about event metrics, including attendee registrations, booths, ticket sales, event tracks, and sponsors.
Debajo de los botones inteligentes se encuentra el formulario de evento, que contiene varios campos y pestañas clicables para configurar los detalles necesarios del evento.
Para empezar, introduce información básica sobre el evento en los siguientes campos:
Nombre del evento: El título del evento. Este campo es obligatorio.
Fecha: La fecha o rango de fechas programadas del evento (expresada en la zona horaria local). Este campo se completa automáticamente pero es modificable y es obligatorio.
Mostrar zona horaria: La zona horaria en la que se muestra la fecha del evento en el sitio web. Este campo se completa automáticamente pero es modificable y es obligatorio.
Idioma: El idioma elegido para todas las comunicaciones del evento.
Nota
To the right of the entered Event Name, there is a language tooltip, represented by an abbreviated language indicator (e.g.,
EN). When clicked, a Translate: name pop-up window appears, displaying various preconfigured language translation options available in the database.
Alternatively, to populate the event form from an event template, select an option in the Template drop-down menu.
Además, añade las etiquetas correspondientes (p. ej., Online, Conferencia) para el evento en el campo Etiquetas. Se pueden añadir varias etiquetas por evento.
Truco
Las etiquetas se pueden mostrar en los eventos que aparecen en el sitio web activando la casilla Mostrar en el sitio web desde .
Continúa introduciendo información como puntos de contacto y ubicación del lugar en los siguientes campos:
Organizador: El organizador del evento (una empresa, contacto o empleado).
Responsable: El usuario específico responsable de gestionar el evento en la base de datos.
Empresa: La empresa específica en la base de datos con la que está relacionado el evento. Este campo solo aparece si se trabaja en un entorno multiempresa. Este campo se completa automáticamente pero es modificable. Es obligatorio.
Website: The specific website in the database on which the event is published. If this field is left blank, the event can be published on all websites in the database.
Published: The toggle button to publish or un-publish the website for attendees.
Lugar: La ubicación del evento. Este campo extrae información de la aplicación Contactos. Alternativamente, la información se puede introducir manualmente.
To limit the number of registrations for the event, select Limit Registrations and enter the maximum number of attendees allowed in the resulting field.
Configuraciones adicionales del evento
Después de completar los campos del formulario del evento, pasa a las cuatro pestañas en la parte inferior para una mayor personalización.
Pestaña de entradas
In the Tickets tab of the event form, create custom registration tickets and ticket tiers for events.

To create a ticket, click Add a line in the Tickets tab. In the Product field, either select the preconfigured Event Registration product, or create a new one by typing in the name of the new event registration product and then selecting either Create or Create and edit… from the resulting drop-down menu.
Then, enter a name for the ticket (e.g. Basic Ticket or VIP) in the Name field.
Importante
In order for an event registration product to be selectable in the Tickets tab, the event registration Product Type must be set to Service and the Create on Order field must be set to Event Registration.
Truco
Existing event registration products can be modified directly from the Product field by clicking the (right arrow) icon next to the product. Doing so reveals that product’s form. If the Inventory application is installed, additional choices are available to customize for the product.
Después, establezca el precio de la entrada en el campo Precio.
Nota
The Sales Price defined on the event registration product’s form sets the default cost of a ticket. Modifying the Price of the event ticket in the Tickets tab overrides the ticket’s default price with this new price.
Next, enter the Sales Start and Sales End dates in their respective fields. To do so, click into the blank field to reveal a calendar pop-over. Then, select the desired date and time and click Apply.
Optionally, designate a Maximum amount of the ticket that can be sold.
As attendees register, the Registration column automatically populates with the number of tickets sold.
To delete any tickets from the Tickets tab, click the (trash can) icon in the ticket’s corresponding line.
Truco
To add an optional Description column to the Tickets tab, click the (additional options) drop-down menu at the end of the column titles.
Then, select the checkbox beside Description to add a brief description for each event ticket, informing registrants about ticket details.
Set up ticket combos
Optionally, users can combine the event registration ticket with separate products (e.g., food, beverages, or merchandise) to create a combo.
To do so, click the (additional options) drop-down menu and select the Additional Products checkbox. Then, in the resulting Additional Products column, select the products to combine with the registration ticket.
Attendees who register for the specific ticket from the website see the additional products included with their ticket on the Order summary page before confirming their order.
Example
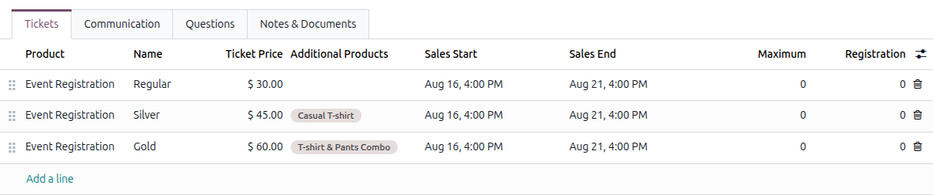
A company is hosting an event with three different ticket levels:
Basic: Only includes admission.
Silver: Includes admission and a casual T-shirt.
Gold: Includes admission, a T-shirt, and pants.
In the Tickets tab, three event registration products are added along with their names and the relevant Additional Products.
Pestaña de comunicación
In the Communication tab of an event form, create various marketing communications that can be scheduled to be sent at specific intervals leading up to and following the event.

Nota
Por defecto, Odoo proporciona tres comunicaciones preconfiguradas separadas en cada nuevo formulario de evento. Una es un correo electrónico enviado después de cada registro para confirmar la compra con el asistente. Las otras dos son recordatorios de evento por correo electrónico que están programados para enviarse en diferentes intervalos de tiempo antes del evento para recordar al destinatario el evento próximo.
To add a communication in the Communication tab, click Add a line. Then, select the desired type of communication from the first drop-down menu in the Template column. The options are: Mail, SMS, Social Post, or WhatsApp.
Importante
La opción Publicación social solo aparece si la aplicación Marketing social está instalada. La opción WhatsApp solo aparece si el módulo WhatsApp está instalado.
Las plantillas de WhatsApp no se pueden editar durante la configuración activa. Se requiere una aprobación separada de Meta.
Luego, selecciona una plantilla de correo electrónico existente del segundo menú desplegable en el campo Plantilla.
Next, define the Interval and Unit from their respective drop-down fields to specify when the communication should be sent. The Unit options are: Immediately, Hours, Days, Weeks, and Months.
Then, select one of the following options from the Trigger drop-down menu:
After each registration
Before the event starts
After the event started
After the event ended
Before the event ends
The (#) Sent column populates with the number of sent communications, along with different icons indicating the status of the communication:
(Running): The communication is active and running.
(Sent): The communications were sent and are no longer active.
(Scheduled): The communication is scheduled but has not been deployed.
Any number of communications can be added in the Communication tab of an event form.
Example
To send a confirmation email an hour after an attendee registers for an event, configure the communication as follows:
Intervalo:
1Unidad: Horas
Activar: Después de cada registro
Nota
Existing email templates can be modified directly from the Template drop-down menu by clicking the (Internal link) icon next to the template name. Doing so reveals a separate page where users can edit the Content, Email Configuration, and Settings of that particular email template.
To view and manage all email templates, activate Modo de desarrollador (modo de depuración) and navigate to . Modify with caution as email templates affect all communications where the template is used.
Pestaña de preguntas
In the Questions tab of an event form, users can create questionnaires to gather information from attendees when registering for the event.

Nota
By default, Odoo provides three questions in the Questions tab for every event form. The default questions require registrants to provide their Name, Email, and an optional Phone number.
The information gathered from the Questions tab can be found on the Attendees dashboard, accessible via the Attendees smart button. Odoo populates individual records that contain basic information about the registrants, as well as their preferences.
To add a question in the Questions tab, click Add a line. Doing so reveals an Add: Question pop-up window. From here, users can select previously configured questions or click Create New to create a new one. Doing so opens a new Create Question pop-up window.

First, enter the question in the field at the top of the form. Then, specify if the question requires a Mandatory Answer.
Después seleccione una opción relacionada con el tipo de pregunta:
Selección: Proporciona opciones de respuesta a la pregunta para que los participantes elijan. Las opciones de respuesta seleccionables se pueden gestionar en la columna Respuestas en la parte inferior de la ventana emergente.
Entrada de texto: Permite a los usuarios ingresar una respuesta personalizada a la pregunta en un campo de texto.
Nombre: Proporciona a los participantes un campo para que ingresen su nombre.
Correo electrónico: Proporciona a los participantes un campo para que ingresen su dirección de correo electrónico.
Teléfono: Proporciona a los participantes un campo para que ingresen su número de teléfono.
Empresa: Proporciona a los participantes un campo para que ingresen una empresa con la que estén asociados.
Additionally, select one or more of the following options to configure the question’s visibility and extendability:
Ask once per order: Ask this question only once for each registration, applying the answer to every attendee in the order (if multiple tickets are purchased at once).
Default question: Automatically add this question for all new events.
Is Reusable: Allow this question to be reusable for all new events. If Default question is selected, this option is automatically enabled.
If Selection was chosen as the Question Type, an Answers tab appears. Add any answers to the question under this tab by clicking Add a line.
Once all the desired configurations have been entered, click Save & Close to save the question and return to the Questions tab on the event form. Or, click Save & New to save the question and configure another. To cancel, click Discard.
Users can add as many questions in the Questions tab as needed.
Truco
En los tipos Selección y Entrada de texto aparece el botón Estadísticas del lado derecho de la línea de la pregunta. Al hacer clic, Odoo abre otra página con las métricas de respuesta a esa pregunta en específico.
Notes & Documents tab
In the Notes & Documents tab of an event form, users can leave detailed internal notes and event-related instructions or information for attendees.

For in-person events, users can specify the venue map and attendee badge details in the following fields:
Exhibition Map: Upload an image of the event venue map. Do so by clicking Upload your file.
Badge Dimension: Select the desired paper format dimension for attendees” event badges. The options are A4 foldable, A6, 4 per sheet, and 96x82mm (Badge Printer).
Badge Background: Upload an image of the custom background image for the badge. Do so by clicking Upload your file.
In the Ticket Instructions field, users can leave specific instructions for attendees and display them on attendees” tickets.
In the Note field, users can leave internal notes for other event employees, such as «to-do» lists, contact information, instructions, and so on.
Publicar eventos
Once all configurations and modifications are complete on the event form, the event can be published on the website. Doing so makes the event visible to website visitors and allows them to register for the event.
To publish an event, toggle the Published button on the event form.
Alternatively, click the Go to Website smart button to open the event webpage. Then, toggle the Unpublished button in the header menu, changing it to a Published switch. The event webpage is now published and accessible by all website visitors.
Ver también
Para obtener más información sobre la funcionalidad y opciones de diseño del sitio web, consulta la documentación de Bloque de construcción.
Enviar invitaciones a eventos
To send event invites to potential attendees, navigate to the desired event form via and click the desired event. On the event form, click the Invite button.
Doing so reveals a blank email form. Customize the message by specifying a mailing type, subject, recipients, and the mail body.
Truco
El envío de correos desde Odoo tiene un límite diario, que es de 200 de forma predeterminada. Consulte la documentación sobre Límite diario alcanzado para obtener más información.
Ver también