
Công
Work entries are created automatically in the Payroll app, based on the employee's salary structure type, and from the Planning, Attendances, and Time Off applications.
The Work Entries dashboard of the Payroll application provides a visual overview of the individual work entries for every employee.
Để mở bảng điều khiển, điều hướng đến .
Trên bảng điều khiển Mục nhập công việc, các mục nhập công việc xuất hiện theo thứ tự bảng chữ cái, dựa trên tên của nhân viên. Toàn bộ tháng được hiển thị, với ngày hiện tại được làm nổi bật bằng màu vàng nhạt.
If any entries have conflicts that need to be resolved, the dashboard defaults to filter only the Conflicting entries.
To remove the filter from the Search... bar to view all work entries, click the ✖️ (remove) icon on the Conflicting filter in the Search... bar, and all work entries appear in the list.
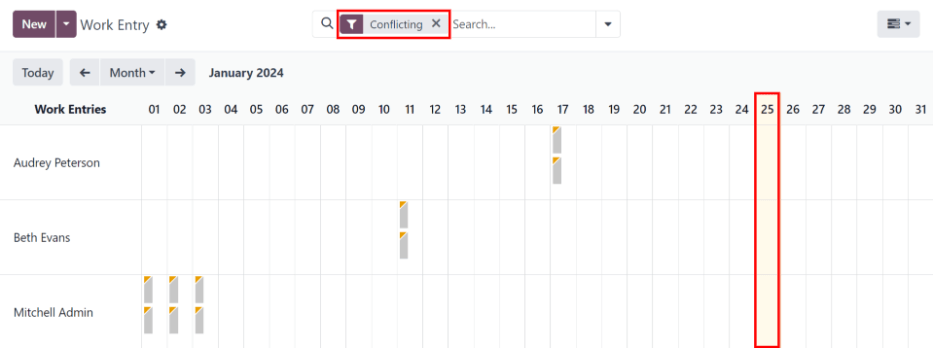
To change the view, so only the entries for a single day, week, or month are shown, click on Month. A drop-down menu appears with the options of Day, Week, or Month. Click on one of the options to only display data for that specific selection.
Use the ⬅️ (left arrow) and ➡️ (right arrow) icons on the left and right side of the Month button to adjust the displayed dates. The arrows adjust the date based on the type of time selected.
For example, if Month is selected, the arrows move one month with each click of the arrow. If Week or Day is selected, the time moves by either a week or a day for each click of the arrow, respectively.
At any point, to return to a view containing the current day, click the Today button.
Thêm mục nhập công việc mới
If a work entry is missing and needs to be added, such as sick time, or if an employee forgot to clock in and out for a shift, click New on the Work Entry dashboard, to create a new work entry.
A Create work entry pop-up form appears.
Nhập thông tin sau đây trên biểu mẫu:
Description: enter a short description for the work entry, such as
Sick Time. If this field is left blank, it automatically populates once an employee is selected. The default entry isAttendance: (Employee).Employee: select the employee the work entry is for, using the drop-down menu.
Work Entry Type: select the work entry type using the drop-down menu.
From and To: enter the start (From) and end (To) dates and times for the work entry.
First, click on either the From or To line to reveal a calendar pop-up window. Select the date by navigating to the correct month and year, using the < (left arrow) and > (right arrow) icons, then click on the specific day.
Next, select the time, by clicking on either the hour or minute fields at the bottom of the calendar, and select the desired time for both the hour and minutes.
When the date and time are correct for the entry, click the Apply button.
Duration: displays the hours based on the To and From entries. Modifying this field modifies the To field (the From field does not change).
Khi thông tin mong muốn đã được nhập, nhấp vào Lưu & Đóng để lưu mục nhập và đóng biểu mẫu bật lên.

Điểm không nhất quán
A conflict appears for any request that has not been approved, such as sick time or vacation, or if there are any errors on the work entry, such as required fields being left blank. Conflicts are required to be resolved before payslips can be generated.
Bất kỳ mục nhập công việc nào có xung đột cần được giải quyết đều được chỉ ra trên bảng điều khiển Mục nhập công việc chính, có thể được truy cập bằng cách điều hướng đến . Chỉ các xung đột cần giải quyết được hiển thị theo mặc định.
Các xung đột được chỉ ra bằng hình tam giác màu cam ở góc trên bên trái của từng mục nhập công việc riêng lẻ. Nhấp vào một mục nhập công việc riêng lẻ để xem ngày và giờ cho mục nhập công việc cụ thể, sau đó nhấp vào Chỉnh sửa để xem chi tiết xung đột trong cửa sổ bật lên.

Xung đột được giải thích ngắn gọn trong hộp văn bản màu cam trong cửa sổ bật lên Mở xuất hiện.
Mô tả, Nhân viên, và Loại mục nhập công việc được liệt kê ở phía bên trái của cửa sổ bật lên. Phạm vi ngày và giờ Từ và Đến, cũng như tổng thời gian (tính bằng giờ) trong trường Thời lượng, xuất hiện ở phía bên phải.
If the conflict is due to a time off request that has not been approved yet, a Time Off field appears on the left side, with the type of time off requested in the description.

Xung đột nghỉ phép
The most common work entry conflicts are for time off requests that have been submitted, but not yet approved, which results in duplicate work entries for that employee (one for time off and another for regular work).
If there is a conflict because a time off request is in the system for the same time that a regular work entry already exists, the time off request is entered in the Time Off field.
The time off conflict can be resolved either on the work entry pop-up window, or on a detailed time off request pop-up window.
Giải quyết trên mục nhập công việc
To resolve the time off conflict on this work entry pop-up window, click the Approve Time Off button to approve the time off request, and resolve the work entry conflict.
The Approve Time Off and Refuse Time Off buttons disappear. Click the Save & Close button to close the pop-up window. The conflict disappears from the Work Entry dashboard, since the conflict is resolved.
Giải quyết trên yêu cầu nghỉ phép
Để giải quyết xung đột nghỉ phép trên cửa sổ bật lên yêu cầu nghỉ phép chi tiết, nhấp vào nút Liên kết nội bộ ở cuối dòng mục Nghỉ phép, và chi tiết yêu cầu nghỉ phép xuất hiện trong cửa sổ bật lên mới. Yêu cầu có thể được chỉnh sửa nếu cần.
Nhấp vào nút Phê duyệt để phê duyệt yêu cầu, sau đó nhấp vào nút Lưu & Đóng để lưu các thay đổi và quay lại cửa sổ bật lên xung đột mục nhập công việc.

Bây giờ, nút Phê duyệt nghỉ phép được ẩn, chỉ nút Từ chối nghỉ phép hiển thị.
Nếu việc phê duyệt là một sai lầm, yêu cầu có thể bị từ chối tại đây bằng cách nhấp vào nút Từ chối nghỉ phép.
Vì nghỉ phép đã được phê duyệt trong cửa sổ nghỉ phép, nhấp vào X ở góc trên bên phải để đóng cửa sổ. Xung đột biến mất khỏi Bảng điều khiển Mục nhập công việc, vì nó đã được giải quyết.
Tạo lại mục nhập công việc
When regenerating work entries, any manual changes, such as resolved conflicts, are overwritten, and work entries are regenerated (or recreated) from the applications that created them.
Phương pháp này để sửa một số lượng lớn xung đột được khuyến nghị nhằm đảm bảo tất cả bản ghi đều chính xác. Mặc dù xung đột có thể được xử lý riêng lẻ, nhưng nếu chúng được gây ra từ một ứng dụng khác, thì phương pháp tốt nhất là đảm bảo các bản ghi trong những ứng dụng đó cũng chính xác. Đó là lý do nên xử lý các xung đột này trong chính ứng dụng đã gây ra xung đột.
Another reason this method is recommended is because, when work entries are regenerated, the conflicts reappear, if the issue in the related application is not resolved.
First, ensure the issues are resolved in the specific applications that caused the work entry conflicts.
Next, click the Regenerate Work Entries button at the top of the Work Entries dashboard, and a Work Entry Regeneration pop-up window appears.
Select the Employees to regenerate work entries for from the drop-down menu, and adjust the From and To fields, so the correct date range is displayed.
Nhấp vào nút Tạo lại mục nhập công, và các mục nhập công sẽ được tạo lại. Khi hoàn tất, cửa sổ bật lên sẽ đóng lại.

Example
An employee has incorrect work entries generated from the Planning app because they were incorrectly assigned to two work stations simultaneously. This should be fixed in the Planning app, instead of the Payroll app.
To correct this issue, modify the employee's schedule in the Planning app, so they are correctly assigned to only one work station. Then, in the Payroll app, regenerate work entries for that employee, for that specific time period.
The Payroll app then pulls the new, corrected data form the Planning app, and recreates the correct work entries for that employee. All conflicts for that employee are now resolved.
Generating payslips
To generate payslips, navigate to the time period the payslips should be generated for. Ensure the Conflicting filter is removed. When the desired pay period is displayed, click the Generate Payslips button.
Mẹo
If the Generate Payslips button is not active (appears pale purple, instead of dark purple), that indicates there are conflicts, or the date selected includes dates in the future. Resolve all conflicts before generating payslips.
When the Generate Payslips button is clicked, a batch entry appears on a separate page for the time period selected.
The batch name populates the Batch Name field in a default From (date) to (date)
format.
The date range to which the payslips apply appears in the Period field, and the company appears in the Company field. It is not possible to make changes to this form.
Click the Create Draft Entry button to create the payslips for the batch.
Click the Payslips smart button at the top of the page to view all the payslips for the batch.

Printing payslips
To print payslips, first view the individual payslips by clicking the Payslips smart button on the batch form.
Next, select the payslips to print from the Payslips list. Click the box next to each payslip to print, or click the box to the left of the Reference column title, to select all the payslips in the list at once.
Click the Print button, and a PDF file is created with all the specified payslips.

Ghi chú
The Print button does not appear until at least one payslip is selected in the list.
Volno k nahlášení
If a time off request is submitted for a time period that was already processed on a payslip, the time off request appears in the Time Off page in the Payroll app, which is accessible by navigating to .
On the Time Off page, the request appears with a status of To defer to next payslip. This is because the employee was already paid for that day, and it was logged as time spent at work, as a typical work day.
Để giữ số dư nghỉ phép của nhân viên chính xác, yêu cầu nghỉ phép phải được áp dụng cho kỳ lương tiếp theo. Điều này không chỉ đảm bảo số dư yêu cầu nghỉ phép được cập nhật mà còn loại bỏ nhu cầu làm lại các mục nhập công việc, hủy phiếu lương và phát hành lại phiếu lương.
The most common scenario when this situation occurs, is when payslips are processed a day or two before the pay period ends, and an employee is unexpectedly sick on one of the last days of the pay period. The employee puts in a time off request for a day that was already processed on a payslip as a regular work day. Instead of canceling the payslip, modifying the work entries, and reissuing the paycheck, Odoo allows for those time off requests to be applied to the following pay period, instead.
To view all the time off requests that need to be deferred to the next payslip, navigate to . The default filter for this report is To Defer.
All time off requests that need to be applied to the following pay period appear with a Payslip State of To defer to next payslip.

Hoãn nhiều mục nhập nghỉ phép
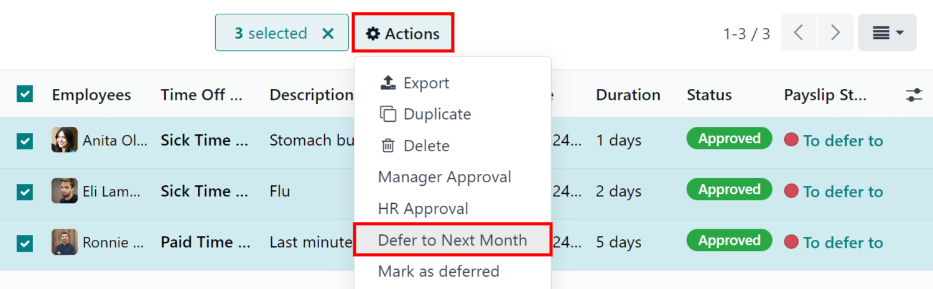
To select the work entries to defer, click the box to the left of the work entry line. To select all work entries in the list, click the box to the left of the Employees column title, at the top of the list.
Once any work entry is selected, two buttons appear at the top of the report: a (#) Selected button, and an Actions button. The (#) Selected button indicates how many entries are currently selected.
When all the desired work entries are selected, click the Actions button, and a menu appears with several choices. Click Defer to Next Month in the list, and all selected entries are deferred to the following month.
Hoãn từng mục nhập nghỉ phép riêng lẻ
Time off requests appearing on the Time Off to Report list can be deferred individually.
Click on an individual time off request, and the details for that request load.
Các chi tiết cụ thể cho yêu cầu nghỉ phép xuất hiện ở phía bên trái, và tất cả các yêu cầu nghỉ phép đã gửi của nhân viên xuất hiện ở phía bên phải (bao gồm cả yêu cầu trong chi tiết ở phía bên trái).
To defer the time off request to the next payslip, click the Report to Next Month button at the top. Once processed, the Report to Next Month button disappears, and the Payslip State changes from To defer to next payslip to Computed in Current Payslip.
To go back to the Time Off to Report list, click on Time Off in the breadcrumb menu.

Xem thêm