Ký tên
Odoo Sign cho phép bạn gửi, ký và phê duyệt tài liệu trực tuyến, sử dụng chữ ký điện tử.
Chữ ký điện tử thể hiện sự đồng ý của một người đối với nội dung của tài liệu. Giống như chữ ký viết tay, chữ ký điện tử đại diện cho một ràng buộc pháp lý theo các điều khoản của tài liệu đã ký.
Với Sign, bạn có thể tải lên bất kỳ tệp PDF nào và thêm các trường vào đó. Các trường này có thể được tự động điền với thông tin chi tiết của người dùng có trong cơ sở dữ liệu của bạn.
Giá trị pháp lý của chữ ký điện tử
Các tài liệu được ký qua ứng dụng Ký tên là chữ ký điện tử hợp lệ tại Liên minh Châu Âu và Hoa Kỳ. Chúng cũng đáp ứng các yêu cầu về chữ ký điện tử tại hầu hết các quốc gia. Tính hợp pháp của chữ ký điện tử được tạo bởi Odoo phụ thuộc vào pháp luật của quốc gia bạn. Các công ty kinh doanh quốc tế cũng nên xem xét luật chữ ký điện tử của những quốc gia khác.
Quan trọng
Thông tin dưới đây không có giá trị pháp lý; nó chỉ được cung cấp nhằm mục đích tham khảo chung. Vì luật liên quan đến chữ ký điện tử đang thay đổi nhanh chóng, chúng tôi không thể đảm bảo rằng tất cả thông tin đều được cập nhật. Chúng tôi khuyên bạn liên hệ với luật sư địa phương để được tư vấn pháp lý về việc tuân thủ và hiệu lực của chữ ký điện tử.
Liên minh Châu Âu
Quy định eIDAS thiết lập khuôn khổ cho chữ ký điện tử tại 27 quốc gia thành viên của Liên minh Châu Âu. Quy định này phân biệt ba loại chữ ký điện tử:
Chữ ký điện tử đơn giản
Chữ ký điện tử nâng cao
Chữ ký điện tử có chứng nhận
Odoo tạo ra loại thứ nhất, chữ ký điện tử đơn giản; các chữ ký này có giá trị pháp lý tại EU, như đã nêu trong quy định eIDAS.
Chữ ký điện tử có thể không được tự động công nhận là hợp lệ. Bạn có thể cần cung cấp bằng chứng hỗ trợ về tính hợp lệ của chữ ký. Mặc dù ứng dụng Sign cung cấp chữ ký điện tử đơn giản, một số bằng chứng hỗ trợ được tự động thu thập trong quá trình ký, chẳng hạn như:
Xác thực qua email và SMS (nếu được bật)
Bằng chứng nhận dạng mạnh mẽ thông qua itsme® (có sẵn tại Bỉ và Hà Lan)
Nhật ký truy cập có dấu thời gian, địa chỉ IP và có thể theo dõi vị trí địa lý đối với các tài liệu và chữ ký liên quan
Khả năng truy vết và không thể thay đổi tài liệu (bất kỳ thay đổi nào được thực hiện đối với tài liệu đã ký sẽ được Odoo phát hiện bằng cách sử dụng bằng chứng mật mã)
Ghi chú
Hoa Kỳ
Đạo luật ESIGN (Đạo luật Chữ ký điện tử trong thương mại quốc gia và quốc tế) ở cấp liên bang và quốc tế, cùng UETA (Đạo luật Giao dịch điện tử thống nhất) ở cấp tiểu bang, tạo khung pháp lý cho chữ ký điện tử. Lưu ý rằng Illinois và New York không áp dụng UETA nhưng có các đạo luật tương tự.
Nhìn chung, để được công nhận là hợp lệ, chữ ký điện tử phải đáp ứng năm tiêu chí:
Người ký phải thể hiện rõ ý định ký. Ví dụ, sử dụng chuột để vẽ chữ ký có thể thể hiện ý định. Người ký cũng phải có lựa chọn từ chối tài liệu điện tử.
Người ký trước tiên phải bày tỏ hoặc ngụ ý sự đồng ý tiến hành giao dịch bằng phương thức điện tử.
Chữ ký phải được gán rõ ràng. Trong Odoo, siêu dữ liệu như địa chỉ IP của người ký được thêm vào chữ ký, có thể được sử dụng làm bằng chứng hỗ trợ.
Chữ ký phải được liên kết với tài liệu đã ký, ví dụ, bằng cách lưu giữ hồ sơ chi tiết cách thức chữ ký được thu thập.
Các tài liệu đã ký điện tử cần được lưu giữ và bảo quản bởi tất cả các bên liên quan; ví dụ, bằng cách cung cấp cho người ký một bản sao đã thực hiện đầy đủ hoặc khả năng tải xuống bản sao.
Quốc gia khác
Gửi một tài liệu để ký
Chữ ký một lần
Bạn có thể nhấp vào Tải lên PDF để ký từ bảng điều khiển của bạn để ký một lần. Chọn tài liệu của bạn, mở nó, và kéo thả các trường cần thiết vào tài liệu của bạn. Bạn có thể sửa đổi vai trò được gán cho một trường bằng cách nhấp vào nó và chọn vai trò bạn muốn.
Khi sẵn sàng, nhấp vào Gửi, và điền vào các trường bắt buộc. Sau khi gửi, tài liệu của bạn vẫn khả dụng. Đi tới để xem tài liệu của bạn và trạng thái của các chữ ký.

Ngày hiệu lực và lời nhắc
You can set validity dates on limited-duration agreement documents or send automatic email reminders to obtain signatures on time. From your dashboard, click Send on your document. On the new page, go to the Options section and fill in the Valid Until and Reminder fields.
Mẫu
Bạn có thể tạo mẫu tài liệu khi bạn phải gửi cùng một tài liệu nhiều lần. Từ bảng điều khiển của bạn, nhấp vào Tải lên mẫu PDF. Chọn tài liệu và thêm các trường cần thiết. Bạn có thể sửa đổi vai trò của một trường bằng cách nhấp vào nó và chọn vai trò bạn muốn.
Nhấp Thuộc tính mẫu để thêm Thẻ vào mẫu của bạn, xác định Không gian làm việc tài liệu đã ký, thêm Thẻ tài liệu đã ký, đặt Liên kết chuyển hướng sẽ có sẵn trong thông báo xác nhận chữ ký nhận được sau khi ký, hoặc xác định Người dùng được ủy quyền nếu bạn muốn giới hạn việc sử dụng mẫu của mình cho những người dùng hoặc nhóm cụ thể được ủy quyền.
Các mẫu của bạn được hiển thị mặc định trên bảng điều khiển. Bạn có thể nhấp Gửi để nhanh chóng gửi mẫu tài liệu đến người ký hoặc Ký ngay nếu bạn sẵn sàng ký tài liệu ngay lập tức.
Mẹo
Bạn có thể tạo mẫu từ tài liệu đã gửi trước đó. Để thực hiện, truy cập . Trên tài liệu bạn muốn sử dụng, nhấp vào dấu ba chấm dọc (⋮), sau đó chọn Mẫu. Nhấp lại vào dấu ba chấm dọc (⋮) và chọn Khôi phục. Tài liệu của bạn giờ đã xuất hiện trên trang chủ cùng các mẫu khác.
Qui tắc
Mỗi trường trong tài liệu Sign liên quan đến một vai trò tương ứng với một người cụ thể. Khi tài liệu đang được ký, người được gán cho vai trò phải điền vào các trường được chỉ định và ký vào đó.
Các vai trò có sẵn bằng cách vào .
Có thể cập nhật các vai trò hiện có hoặc tạo các vai trò mới bằng cách nhấp vào Mới. Chọn Tên vai trò, thêm Bước xác thực bổ sung để xác nhận danh tính của người ký và nếu tài liệu có thể được chỉ định lại cho một liên hệ khác, hãy chọn Thay đổi được ủy quyền cho vai trò. Cũng có thể chọn Màu cho vai trò. Màu này có thể giúp hiểu vai trò nào chịu trách nhiệm cho trường nào khi cấu hình mẫu.
Nhận dạng bảo mật
Là chủ sở hữu tài liệu, bạn có thể yêu cầu Bước xác thực bổ sung thông qua xác minh SMS hoặc qua Itsme® (có sẵn ở Bỉ và Hà Lan). Cả hai tùy chọn xác thực đều yêu cầu tín dụng. Nếu bạn không còn tín dụng nào, các bước xác thực sẽ bị bỏ qua.
Xác minh SMS
Vào . Nhấp vào cột Bước xác thực bổ sung cho vai trò và chọn Mã duy nhất qua SMS.
Ghi chú
Trước khi có thể gửi tin nhắn SMS, bạn cần đăng ký số điện thoại của mình. Để làm điều này, vào và nhấp Mua tín dụng trong Xác thực bằng SMS.
Vào tài liệu cần ký, thêm trường yêu cầu xác minh SMS, ví dụ trường Chữ ký, và nhấp Gửi. Trên trang mới, chọn khách hàng và nhấp Gửi.
Người ký tài liệu điền vào trường Chữ ký, sau đó Ký, và nhấp Xác thực & Gửi tài liệu hoàn chỉnh. Trang Xác thực cuối cùng bật lên để thêm số điện thoại của họ. Mã một lần được gửi qua SMS.

Ghi chú
Tính năng này được bật theo mặc định.
Ngay sau khi Bước xác thực bổ sung áp dụng cho một vai trò, bước xác thực này được yêu cầu cho bất kỳ trường nào được gán cho vai trò này.
Itsme®
Xác thực Itsme® có thể được sử dụng để cho phép người ký cung cấp danh tính của họ bằng itsme®. Tính năng này chỉ có sẵn ở Bỉ và Hà Lan.
Tính năng này có thể được bật trong Cài đặt Sign và áp dụng tự động cho vai trò Khách hàng (được xác định bằng itsme®). Để bật nó cho các vai trò khác, vào . Nhấp vào cột Bước xác thực bổ sung cho vai trò và chọn Qua itsme®.
Vào tài liệu cần ký và thêm trường Chữ ký. Chuyển sang bất kỳ vai trò nào được cấu hình để sử dụng tính năng này, và nhấp Xác thực và Gửi.

Khi ký tài liệu, người ký hoàn thành trường Chữ ký và tiếp tục bằng cách nhấp vào Xác thực & Gửi tài liệu hoàn chỉnh, kích hoạt trang Xác minh cuối cùng nơi yêu cầu xác thực qua itsme®.
Mã băm người ký
Mỗi lần ai đó ký tài liệu, một băm - chữ ký điện tử duy nhất của thao tác - được tạo ra để đảm bảo khả năng truy vết, tính toàn vẹn và không thể thay đổi. Quy trình này đảm bảo rằng bất kỳ thay đổi nào được thực hiện sau khi chữ ký được đính kèm đều có thể dễ dàng phát hiện, duy trì tính xác thực và bảo mật của tài liệu trong suốt vòng đời của nó.
Khung bảo mật trực quan hiển thị phần đầu của băm được thêm vào chữ ký. Người dùng nội bộ có thể ẩn hoặc hiển thị nó bằng cách bật hoặc tắt tùy chọn Khung khi ký tài liệu.

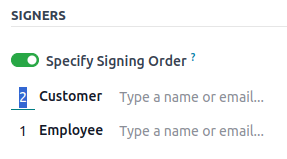
Thứ tự ký tên
Khi một tài liệu cần được ký bởi nhiều bên, thứ tự ký cho phép bạn kiểm soát thứ tự mà người nhận nhận được tài liệu để ký.
Sau khi tải lên tệp PDF với ít nhất hai trường chữ ký có hai vai trò khác nhau và nhấp Gửi, hãy bật công tắc Chỉ định thứ tự ký và tìm kiếm tên hoặc thông tin email của người ký để thêm họ. Bạn có thể quyết định thứ tự ký bằng cách nhập 1 hoặc 2 ở cột đầu tiên.
Mỗi người nhận chỉ nhận được thông báo yêu cầu ký sau khi người nhận trước đó đã hoàn thành hành động của họ.
Loại trường
Các trường được sử dụng trong tài liệu để chỉ ra thông tin nào phải được hoàn thành bởi người ký. Bạn có thể thêm trường vào tài liệu của mình đơn giản bằng cách kéo và thả chúng từ cột bên trái vào tài liệu của bạn.
Nhiều loại trường khác nhau có thể được sử dụng để ký tài liệu (giữ chỗ, tự động hoàn thành, v.v.). Bằng cách cấu hình các loại trường của riêng bạn, còn được gọi là loại mục chữ ký, quy trình ký có thể nhanh hơn cho khách hàng, đối tác và nhân viên của bạn.
Để tạo và chỉnh sửa loại trường, hãy vào .
Bạn có thể chọn một trường hiện có bằng cách nhấp vào nó hoặc bạn có thể Tạo một trường mới. Đầu tiên, chỉnh sửa Tên trường. Sau đó, chọn Loại trường:
Chữ ký: người dùng được yêu cầu nhập chữ ký của họ bằng cách vẽ nó, tạo chữ ký tự động dựa trên tên của họ hoặc tải lên tệp cục bộ (thường là hình ảnh). Mỗi trường loại Chữ ký tiếp theo sau đó sẽ sử dụng lại dữ liệu đã nhập trong trường đầu tiên.
Chữ viết tắt: người dùng được yêu cầu nhập chữ viết tắt của họ, theo cách tương tự như trường Chữ ký.
Văn bản: người dùng nhập văn bản trên một dòng.
Văn bản nhiều dòng: người dùng nhập văn bản trên nhiều dòng.
Hộp kiểm: người dùng có thể đánh dấu vào ô (ví dụ: để đánh dấu sự chấp thuận hoặc đồng ý của họ).
Lựa chọn: người dùng chọn một tùy chọn duy nhất từ nhiều tùy chọn khác nhau.
Cài đặt Tự động điền trường đối tác được sử dụng để tự động điền vào trường trong quá trình ký. Nó sử dụng giá trị của một trong các trường trên mô hình liên hệ (res.partner) của người ký tài liệu. Để thực hiện, hãy nhập tên kỹ thuật của trường mô hình liên hệ.
Mẹo
Để biết tên kỹ thuật của trường, hãy bật chế độ nhà phát triển và di chuột qua dấu chấm hỏi bên cạnh trường.
Ghi chú
Các giá trị tự động hoàn thành là gợi ý và có thể được sửa đổi theo yêu cầu của người ký tài liệu.
Kích thước của các trường cũng có thể được thay đổi bằng cách chỉnh sửa Chiều rộng mặc định và Chiều cao mặc định. Cả hai kích thước đều được định nghĩa theo tỷ lệ phần trăm của toàn bộ trang biểu thị bằng số thập phân, trong đó 1 tương đương với chiều rộng hoặc chiều cao đầy đủ của trang. Theo mặc định, chiều rộng của các trường mới tạo được đặt ở mức 15% (0.150) chiều rộng trang đầy đủ, trong khi chiều cao được đặt ở mức 1.5% (0.015) chiều cao trang đầy đủ.
Tiếp theo, hãy viết một Mẹo. Các mẹo sẽ hiển thị bên trong mũi tên ở phía bên trái màn hình của người dùng trong quá trình ký để giúp họ hiểu bước đó yêu cầu gì (VD: "Ký vào đây" hoặc "Điền ngày sinh của bạn"). Bạn cũng có thể sử dụng văn bản Phần giữ chỗ để hiển thị bên trong trường trước khi nó được điền.
