
Báo cáo PDF
With Studio, you can edit existing PDF reports (e.g., invoices, quotations, etc.) or create new ones.
Bố cục mặc định
The default layout of reports is managed outside Studio. Go to , then, in the Companies section, click Configure Document Layout. Layout settings are company-specific but apply to all reports.
Mẹo
You can see how the different settings affect the report layout in the report preview on the right, or download a sample invoice PDF by clicking Download PDF Preview.
Sử dụng các cài đặt sau:
Layout: Four layouts are available:


Font: Seven fonts are available: Lato, Roboto, Open Sans, Montserrat, Oswald, Raleway, and Tajawal (which supports Arabic and Latin scripts). Go to the Google Fonts website to preview them.
Logo công ty: Nhấp vào nút Chỉnh sửa để tải lên hoặc thay đổi logo. Thao tác này thêm logo vào bản ghi công ty trên mô hình Công ty, bạn có thể truy cập bằng cách vào sau đó nhấp vào Cập nhật thông tin trong phần Công ty.
Màu sắc: Thay đổi màu chính và màu phụ được sử dụng để cấu trúc báo cáo. Màu mặc định được tạo tự động dựa trên màu của logo.
Layout background: The following backgrounds are available:
Blank: nothing is displayed.
Geometric: an image featuring geometric shapes is displayed in the background.
Custom: upload a custom background image.
Company tagline: This is displayed in the header of external reports. You can add multiple lines of text.
Company details: These are displayed in the header of external reports. You can add multiple lines of text.
Paper format: to define the default paper size of reports. You can select A4 (21 cm x 29.7 cm), US Letter (21.59 cm x 27.54 cm), or QR codes page. This can also be defined for individual reports in the Paper format field in Studio.
Tạo báo cáo PDF mới
To create a new report for a model, access the model, click the Toggle Studio button, then click Reports. Click New and, in the popup window that opens, select the type of report. This is solely used to determine what is displayed in the header and footer:
Sau khi tạo báo cáo, bạn có thể bắt đầu chỉnh sửa.
Chỉnh sửa báo cáo PDF
To access the reports available for a model, access the model (e.g., sales orders), click the Toggle Studio button, then click Reports. Select an existing report to open it or create a new one.
Mẹo
Ngoài ra, bạn cũng có thể mở Studio, nhấp vào Báo cáo, và tìm kiếm một báo cáo hoặc mô hình cụ thể.
Quan trọng
It is strongly recommended to duplicate the standard report and perform changes in the duplicated version. To duplicate a report, hover the mouse pointer on the top right corner of the report, click the vertical ellipsis icon (⋮), and then select Duplicate.

Tùy chọn
Once you've selected or created a report, you can use the options in the left part of the screen to:
Change the Report name. The new name is applied everywhere (in Studio, under the Print button, and in the PDF file name).
Modify the Paper format. If no value is selected, the format defined in the default layout is used.
Show in print menu: to add the report in the Print menu available from the record.
Tải lại từ tệp đính kèm: để lưu báo cáo dưới dạng tệp đính kèm trên bản ghi vào lần đầu tiên nó được tạo và tải lại phiên bản gốc của báo cáo vào các lần tiếp theo. Điều này được yêu cầu về mặt pháp lý đối với hóa đơn và chủ yếu được sử dụng trong trường hợp này.
Giới hạn hiển thị cho các nhóm: để giới hạn tính khả dụng của báo cáo PDF cho các nhóm người dùng cụ thể.
Chỉnh sửa nguồn: để sửa đổi báo cáo trực tiếp trong tệp XML.
Đặt lại báo cáo: để hủy tất cả các thay đổi đã thực hiện đối với báo cáo và đặt lại về phiên bản tiêu chuẩn.
Xem trước bản in: để tạo và tải xuống bản xem trước báo cáo.
Trình chỉnh sửa báo cáo
The report editor allows you to modify the formatting and contents of the report.
Mẹo
You can Undo or Redo changes using the related buttons or the shortcuts
CTRL ZandCTRL Y.Các thay đổi được lưu tự động khi bạn rời khỏi báo cáo hoặc thủ công bằng nút Lưu.
Bạn có thể đặt lại báo cáo về phiên bản tiêu chuẩn bằng cách nhấp vào nút Đặt lại báo cáo ở phần bên trái màn hình.
Quan trọng
Chỉnh sửa đầu trang và chân trang của báo cáo sẽ ảnh hưởng đến tất cả các báo cáo tiêu chuẩn và tùy chỉnh.
Khối có điều kiện
Các hình chữ nhật đứt nét đại diện cho khối có điều kiện (câu lệnh if/else). Chúng được sử dụng để hiển thị/ẩn nội dung dựa trên các điều kiện cụ thể. Nhấp vào khối để xem các điều kiện.

Chọn một giá trị để xem trước đầu ra tương ứng và chỉnh sửa nó nếu cần thiết.

Ghi chú
Conditions can only be edited in XML.
Nội dung khác
Có hai loại nội dung văn bản trong báo cáo:
Static text, i.e., the text that's not highlighted in blue, which can be modified directly in the editor.
Dynamic text, i.e., the text that's highlighted in blue, which is replaced by field values when the report is generated, e.g., the SO number or the quotation date.
You can add content (e.g., fields, lists, tables, images, banners, etc.) to the report using
commands. Type / to open the powerbox, then type the command's
name or select it from the list.
Để thêm văn bản tĩnh vào báo cáo, hãy nhập văn bản vào vị trí bạn muốn.
Đối với các thay đổi nâng cao hơn, bạn có thể chỉnh sửa báo cáo trực tiếp trong XML.
Thêm trường
To add a field, type / and select the Field command. In the list that opens, select
or search for the field; click the right arrow next to the field name to access the list of related
fields if needed. Then, specify the default value and press Enter.

Add a data table
Data tables are used to display relational fields. To add
a data table, type /, select the Dynamic Table command, and select the relation to be
displayed in the table.
Ghi chú
Only relations of type one2many or many2many can be displayed as data tables.
Once the table has been added, you can add columns using the table tools. Position the cursor on top of the column, then click the purple rectangle and select an option.

You can then insert the field of your choice in the columns. The dialog box that opens shows the source object for the field (e.g., the Tag model) and the list of available fields.
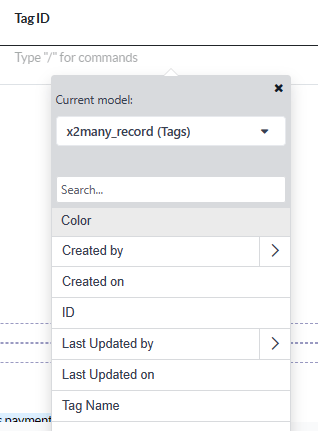
Ghi chú
The default row automatically iterates over the field's content, generating a row on the report for each field value (e.g., one row per tag). You can add static content rows above or below the generated rows using the table tools.
You can also add data tables by modifying the report's XML.
Định dạng
To format text in the report, select it, then format it using the options in the Trình soạn thảo văn bản.

Chỉnh sửa XML của báo cáo
Cảnh báo
Sửa đổi XML trực tiếp có thể gây ra sự cố báo cáo trong quá trình nâng cấp. Nếu điều này xảy ra, chỉ cần sao chép các thay đổi của bạn từ cơ sở dữ liệu cũ vào cơ sở dữ liệu đã nâng cấp.
Để chỉnh sửa XML của báo cáo, nhấp vào Edit sources trong ngăn bên trái.
Ví dụ
Sometimes, tables are not properly recognized as such due to complex structures. In those cases, you can still modify them manually in the report XML. For example, with a sales order, you can find the following structure in the XML (simplified for documentation purposes):
<!-- table root element -->
<table>
    <!-- thead = table header, the row with column titles -->
    <thead>
        <!-- table row element -->
        <tr>
            <!-- table header element -->
            <th>Name</th>
            <th>Price</th>
        </tr>
    </thead>
    <!-- table body, the main content -->
    <tbody>
        <!-- we create a row for each subrecord with t-foreach -->
        <tr t-foreach="record.some_relation_ids" t-as="line">
            <!-- for each line, we output the name and price as table cells -->
            <td t-out="line.name"/>
            <td t-out="line.price"/>
        </tr>
    </tbody>
</table>
To modify a table, you must ensure that each row has the same number of data cells. For example, in the case above, you need to add a cell in the header section (with e.g., the column title) and another one in the body section with the field content (usually, with a
t-outort-fielddirective).<table> <!-- table root element --> <thead> <!-- thead = table header, the row with column titles --> <tr> <!-- table row element --> <th>Name</th> <!-- table header element --> <th>Price</th> <th>Category</th> </tr> </thead> <tbody> <!-- table body, the main content --> <tr t-foreach="record.some_relation_ids" t-as="line"> <!-- we create a row for each subrecord with t-foreach --> <td t-out="line.name"/> <!-- for each line, we output the name and price as table cells --> <td t-out="line.price"/> <td t-out="line.category_id.display_name"/> </tr> </tbody> </table>Ghi chú
Cells can span multiple rows or columns. For more information, go to the Mozilla Developer Network website.
For example, you can modify the Quotation/Order report to add a column to display the product category in the main table:
<table class="table table-sm o_main_table table-borderless mt-4">
    <!-- In case we want to repeat the header, remove "display: table-row-group" -->
    <thead style="display: table-row-group">
        <tr>
            <th name="th_description" class="text-start">Description</th>
            <th>Product Category</th>
            <th name="th_quantity" class="text-end">Quantity</th>
            <th name="th_priceunit" class="text-end">Unit Price</th>
[...]
            <tr t-att-class="'bg-200 fw-bold o_line_section' if line.display_type == 'line_section' else 'fst-italic o_line_note' if line.display_type == 'line_note' else ''">
                <t t-if="not line.display_type">
                    <td name="td_name"><span t-field="line.name">Bacon Burger</span></td>
                    <td t-out="line.product_id.categ_id.display_name"/>
                    <td name="td_quantity" class="text-end">
                        <span t-field="line.product_uom_qty">3</span>
                        <span t-field="line.product_uom">units</span>
                        <span t-if="line.product_packaging_id">
To add a table in XML, you need to know the names of the fields and objects you wish to access and display. As an example, let's add a table that details the tags on a sales order:
<!-- table root element -->
<table class="table">
    <!-- thead = table header, the row with column titles -->
    <thead>
        <!-- table row element -->
        <tr>
            <!-- table header element -->
            <th>ID</th>
            <th>Name</th>
        </tr>
    </thead>
    <!-- table body, the main content -->
    <tbody>
        <!-- we create a row for each subrecord with t-foreach -->
        <tr t-foreach="doc.tag_ids" t-as="tag">
            <!-- for each line, we output the name and price as table cells -->
            <td t-out="tag.id"/>
            <td t-out="tag.name"/>
        </tr>
    </tbody>
</table>
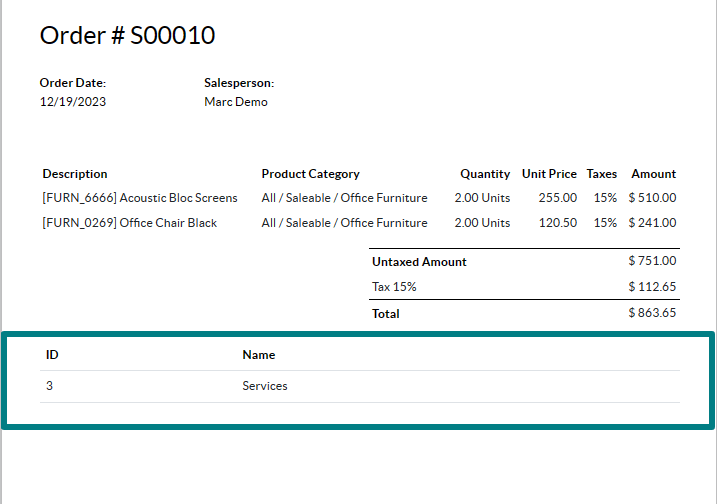
Ghi chú
When adding tables manually, style them using Bootstrap classes, like the table class included in the
example above.
Nếu bạn muốn hiển thị/ẩn nội dung dựa trên các điều kiện cụ thể, bạn có thể thêm thủ công các câu lệnh điều khiển if/else vào XML của báo cáo.
Ví dụ: nếu bạn muốn ẩn bảng dữ liệu tùy chỉnh nếu không có thẻ, bạn có thể sử dụng thuộc tính t-if để xác định điều kiện, sau đó được đánh giá là True hoặc False. Bảng sẽ không được hiển thị nếu không có thẻ trong báo giá.
<!-- table root element -->
<table class="table" t-if="len(doc.tag_ids) > 0">
    <!-- thead = table header, the row with column titles -->
    <thead>
        <!-- table row element -->
        <tr>
            <!-- table header element -->
            <th>ID</th>
            <th>Name</th>
        </tr>
    </thead>
    <!-- table body, the main content -->
    <tbody>
        <!-- we create a row for each subrecord with t-foreach -->
        <tr t-foreach="doc.tag_ids" t-as="tag">
            <!-- for each line, we output the name and price as table cells -->
            <td t-out="tag.id"/>
            <td t-out="tag.name"/>
        </tr>
    </tbody>
</table>
Nếu bạn muốn hiển thị khối khác khi câu lệnh t-if được đánh giá là Sai, bạn có thể chỉ định nó bằng câu lệnh t-else. Khối t-else phải theo ngay sau khối t-if trong cấu trúc tài liệu. Không cần chỉ định bất kỳ điều kiện nào trong thuộc tính t-else. Ví dụ, hãy hiển thị thông báo nhanh giải thích rằng không có thẻ nào trên báo giá:
<!-- table root element -->
<table class="table" t-if="len(doc.tag_ids) > 0">
    <!-- thead = table header, the row with column titles -->
    <thead>
        <!-- table row element -->
        <tr>
            <!-- table header element -->
            <th>ID</th>
            <th>Name</th>
        </tr>
    </thead>
    <!-- table body, the main content -->
    <tbody>
        <!-- we create a row for each subrecord with t-foreach -->
        <tr t-foreach="doc.tag_ids" t-as="tag">
            <!-- for each line, we output the name and price as table cells -->
            <td t-out="tag.id"/>
            <td t-out="tag.name"/>
        </tr>
    </tbody>
</table>
<div class="text-muted" t-else="">No tag present on this document.</div>
Bằng cách sử dụng ký hiệu t-if/t-else, trình soạn thảo báo cáo nhận ra rằng các phần này loại trừ lẫn nhau và nên được hiển thị dưới dạng các khối có điều kiện:

Bạn có thể chuyển đổi các điều kiện bằng trình soạn thảo để xem trước đầu ra của chúng:

Pokud chcete mít více možností, můžete také použít direktivy t-elif pro přidání mezilehlých podmínek. Například takto se mění název zpráv prodejních objednávek na základě stavu podkladového dokumentu.
<h2 class="mt-4">
    <span t-if="env.context.get('proforma', False) or is_pro_forma">Pro-Forma Invoice # </span>
    <span t-elif="doc.state in ['draft','sent']">Quotation # </span>
    <span t-else="">Order # </span>
    <span t-field="doc.name">SO0000</span>
</h2>
Název Pro-Forma Invoice se použije v závislosti na některých kontextových podmínkách. Pokud tyto podmínky nejsou splněny a stav dokumentu je buď draft nebo sent, použije se Quotation. Pokud nejsou splněny žádné z těchto podmínek, název zprávy je Order.
Working with images in a report can be challenging, as precise control over image size and
behavior is not always obvious. You can insert image fields using the report editor
(by using the /Field command), but inserting them in XML
using the t-field directive and accompanying t-options attributes provides better sizing and
positioning control.
Například následující kód vypisuje pole image_128 produktu řádku jako obrázek široký 64 pixelů (s automatickou výškou na základě poměru stran obrázku).
<span t-field="line.product_id.image_128" t-options-widget="image" t-options-width="64px"/>
Pro obrázkové widgety jsou k dispozici následující možnosti:
width: šířka obrázku, obvykle v pixelech nebo jednotkách délky CSS (např.rem) (nechte prázdné pro automatickou šířku).height: výška obrázku, obvykle v pixelech nebo jednotkách délky CSS (např.rem) (nechte prázdné pro automatickou výšku).class: CSS třídy aplikované na tagimg; k dispozici jsou Bootstrap třídy.alt: alternativní text obrázkustyle: atribut stylu; umožňuje volněji přepisovat styly než pomocí Bootstrap tříd.
Tyto atributy musí obsahovat řetězce, tj. text uzavřený v uvozovkách uvnitř uvozovek, např. t-options-width="'64px'" (nebo alternativně platný Pythonový výraz).
Ghi chú
Obrázkový widget nelze použít na tagu img. Místo toho nastavte direktivu t-field na uzlu span (pro inline obsah) nebo div (pro blokový obsah).
Například přidejme sloupec s obrázkem produktu do tabulky nabídky:
<table class="table table-sm o_main_table table-borderless mt-4">
    <thead style="display: table-row-group">
        <tr>
            <th>Image</th>
            <th name="th_description" class="text-start">Description</th>
            <th>Product Category</th>
            <th name="th_quantity" class="text-end">Quantity</th>
            <th name="th_priceunit" class="text-end">Unit Price</th>
[...]
        <t t-foreach="lines_to_report" t-as="line">
            <t t-set="current_subtotal" t-value="current_subtotal + line.price_subtotal"/>
            <tr t-att-class="'bg-200 fw-bold o_line_section' if line.display_type == 'line_section' else 'fst-italic o_line_note' if line.display_type == 'line_note' else ''">
                <t t-if="not line.display_type">
                   <td>
                       <span t-field="line.product_template_id.image_128"
                             t-options-widget="'image'"
                             t-options-width="'64px'"
                             t-options-class="'rounded-3 shadow img-thumbnail'"
                           />
                   </td>
                    <td name="td_name"><span t-field="line.name">Bacon Burger</span></td>
                    <td t-out="line.product_id.categ_id.display_name"/>
Atribut t-options-width omezuje šířku obrázku na 64 pixelů a Bootstrap třídy použité v t-options-class vytvoří rámeček podobný miniatuře se zaoblenými rohy a stínem.
