分析会计
分析会计可帮助您追踪成本和收入,并分析项目或服务的盈利能力。在创建日记账分录时,分析小组件允许在一个或多个分析账户中分配成本。
配置
进入 功能。
分析账户
分析账户提供了成本和收入概览。
进入 。要创建新的分析账户,请点击:guilabel:新建,然后填写所需信息:
分析账户:添加分析账户的名称;
客户:选择与项目相关的客户;
参考:添加参考信息,以便您在查看账单时更容易找到账户;
计划:添加 分析计划;
公司:如果您管理多个公司,请选择将使用分析账户的公司;
货币:选择分析账户的货币;
然后,填写您的 预算 信息。
分析计划
分析计划允许您对会计工作进行分析。例如,按项目或部门跟踪成本和收入。
您可以通过 。点击 新建,创建新计划。
必须填写以下信息:
母项:将您的计划链接到另一个 分析计划,以便在计划之间建立层次结构;
默认套用行为:决定在创建新日记账条目时,您的计划在小工具中的行为方式:
可选用:如果选中,则不强制要求在小工具中添加分析计划;
强制:如果选择此选项,计划旁边的小工具中,会显示橙色圆点,直到分析分配完成(随后变为绿色);如果未选择分析账户,则无法确认记项;
不可用:如果选中,分析计划在小工具中不可用。
颜色:选择与此特定计划相关的标签颜色;
公司:添加计划适用的公司;
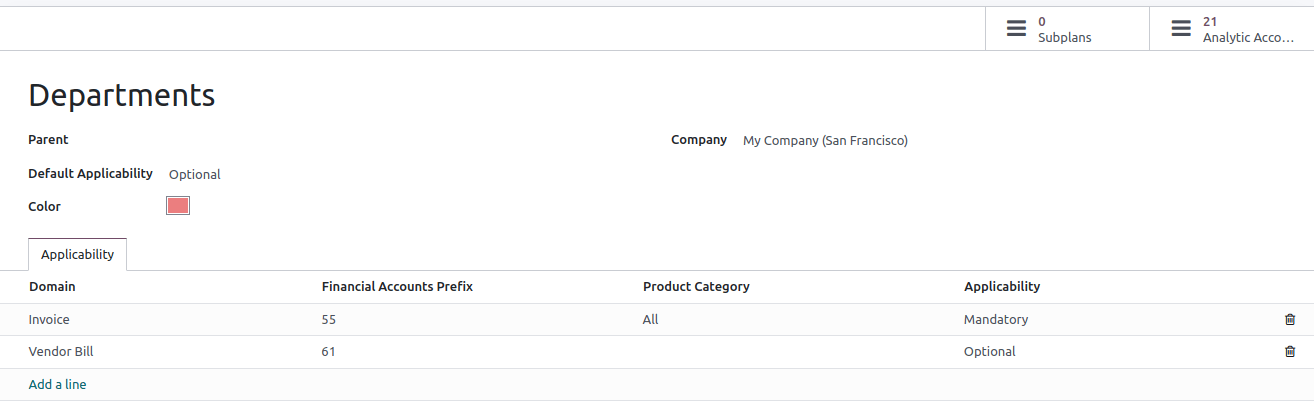
您还可以填写 适用性 选项卡,对计划的适用性进行微调:
域名:选择计划适用的会计文件;
财务账户前缀:选择应用此计划的账户前缀;
产品类别:决定计划适用的产品类别;
- 套用行为:决定创建新日记账时计划在小工具中的行为方式
您在此设置的套用行为,将会覆盖默认套用行为。
右上角有两个智能按钮:
子计划: 可以创建更复杂的分析结构。点击 子计划 智能按钮,然后点击 新建 添加子计划;
分析账户:到达与计划相关的分析账户。
注解
分析小工具是根据适用性和 分析分布模型,进行预填写;
每个分析计划必须至少有一个分析账户。
分析分配
创建发票或账单时,在 分析 列中添加计划。只有当您之前将分析计划与至少一个分析账户关联时,该字段才是必填字段。添加计划后,会打开一个**小工具**,您可以在其中填写不同的信息。您可以添加**标签**来反映相关的分析账户,并通过修改百分比来决定如何在账户之间分摊费用。

分析分配模型
分析分配模型会根据定义的条件自动应用特定的分配方式。
要创建新的分析分配模式,请访问 ,单击 新建,然后设置模式必须满足的自动应用条件:
账户前缀:此分析分布将适用于共享指定前缀的所有财务账户;
合作伙伴:选择将使用分析分布的合作伙伴;
合作伙伴类别:默认情况下该字段不可见:点击列选择按钮添加该字段,并勾选:guilabel:`合作伙伴类别`方框。添加将使用分析分布的合作伙伴类别;
guilabel:
产品:选择要使用分析分布的产品;产品类别:默认情况下该字段不可见:点击列选择按钮添加该字段,并勾选:guilabel:`产品类别`方框。选择要使用分析分布的产品类别;
分析: 添加分析账户及其分布;
公司:选择要使用分析分布的公司;
分析分配:如果满足上述条件,将在输入时自动选择在此字段中定义的 分析计划 以及在不同分析账户之间应用的分配。
小技巧
要同时**批量编辑**多个条目,进入 ,选择需要更新的条目。在 分析分配 栏中添加所需的分配,然后点击 软盘 图标保存。分析分布模板就会弹出,您可以将其保存起来以备后用。