墨西哥
网络研讨会
还提供了墨西哥本地化视频。该视频介绍了如何从零开始实施本地化,包括如何设置配置、如何完成常见的工作流程,并深入介绍了几个具体的使用案例。
介绍
Odoo 墨西哥本地化模块允许根据 CFDI <http://omawww.sat.gob.mx/ tramitesyservicios/Paginas/documentos/Anexo_20_Guia_de_llenado_CFDI.pdf> 版本 4.0 的 SAT 规范签署电子发票,这是一项法律要求,自 2022 年 1 月 1 日起生效。这些模块还增加了相关会计报告(如:DIOT,支持外贸和创建交货指南)。
注解
要在 Odoo 中以电子方式签署任何文件,请确保已安装 签名 应用程序。
配置
要求
在 Odoo 中配置墨西哥本地化模块之前,必须满足以下要求:
Be registered in the SAT, with a valid RFC.
Have a Certificate of Digital Seal (CSD).
Choose a PAC (Proveedor Autorizado de Certificación / Authorized Certification Provider). Currently, Odoo works with the following PACs: Solución Factible, Quadrum (formerly Finkok) and SW Sapien - Smarter Web.
Have knowledge and experience with billing, sales, and accounting in Odoo. This documentation only contains the necessary information needed to use Odoo.
Installing modules
Install the following modules to get all the features of the Mexican localization. The Accounting and Contacts modules are required to be installed for this configuration:
名称 |
技术名称 |
说明 |
|---|---|---|
墨西哥 - 会计 |
|
默认 财政本地化套装,为墨西哥本地化添加会计特征,如:最常见的税种和会计科目表 - 基于`SAT 会计科目分组代码 <https://www.gob.mx/cms/uploads/attachment/file/151586/codigo_agrupador.pdf>`_。 |
墨西哥电子数据交换 |
|
包括生成和验证 Electronics Documents 的所有技术和功能要求 - 基于 SAT 发布的技术文档。这样,您就可以向政府发送发票(带或不带附言)和付款补充。 |
墨西哥电子数据交换 4.0 版 |
|
必须按照 CFDI 4.0 的正确规范创建 XML 文档。 |
Odoo Mexican Localization Reports |
|
为墨西哥电子会计改编报告: 会计科目表、试算表和 DIOT。 |
Mexico - Localization Reports for Closing |
|
Necessary to create the Closing Entry (Also known as the month 13th move). |
Odoo Mexican XML Polizas Export |
|
Allows the export of XML files of Journal Entries for a compulsory audit. |
Odoo Mexican XML Polizas Export Edi bridge |
|
补充模块 |
注解
当从头开始安装数据库并选择 墨西哥 作为国家时,Odoo 会自动安装以下模块:墨西哥 - 会计、墨西哥电子数据交换、墨西哥电子数据交换 4.0 版。
以下模块为可选模块。建议*仅*在满足特定需求时安装。请确保这些模块是业务所需的。
名称 |
技术名称 |
说明 |
|---|---|---|
墨西哥电子数据交换(高级功能) |
|
为发票添加对外贸易补充:向国外销售产品的法律要求。 |
墨西哥电子数据交换 v4.0 (COMEX) |
|
为 CFDI 4.0 适配模块 |
Mexico - Electronic Delivery Guide |
|
Lets you create a Carta Porte: A bill of lading that proves to the government you are sending goods between A & B with a signed electronic document. |
Electronic Delivery Guide for Mexico CFDI 4.0 |
|
Adapts the module |
Odoo Mexico Localization for Stock/Landing |
|
Allows managing customs numbers related to landed costs in electronic documents. |
Configure your company
安装正确的模块后,下一步是验证公司是否配置了正确的数据。请进入 ,然后选择公司名称下的 更新信息。
在生成的表格中输入完整的 地址,包括:邮政编码、省/州、国家/地区 和 RFC (增值税 号码)。
根据 CFDI 4.0 的要求,公司主要联系人的姓名**必须**与您在|SAT|中注册的企业名称一致,不含法人实体缩写。
重要
从法律角度来看,墨西哥公司**必须**使用当地货币(MXN)。因此,Odoo 不提供管理其他配置的功能。如果您想管理其他货币,请将 MXN 作为默认货币,并使用 价目表 代替。
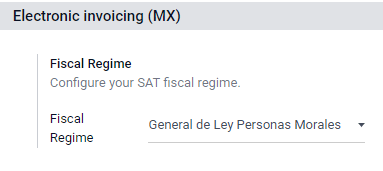
接下来,进入 ,然后从下拉列表中选择适用于您公司的制度,并点击 保存。
小技巧
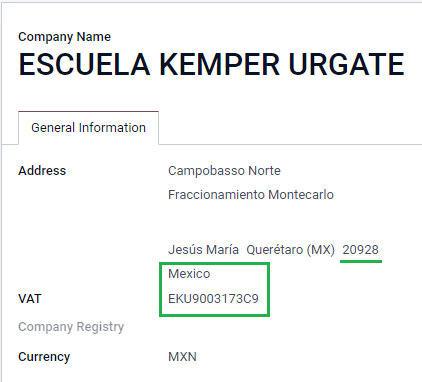
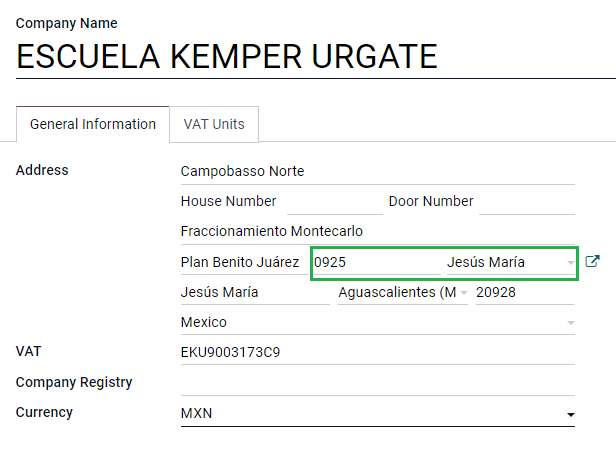
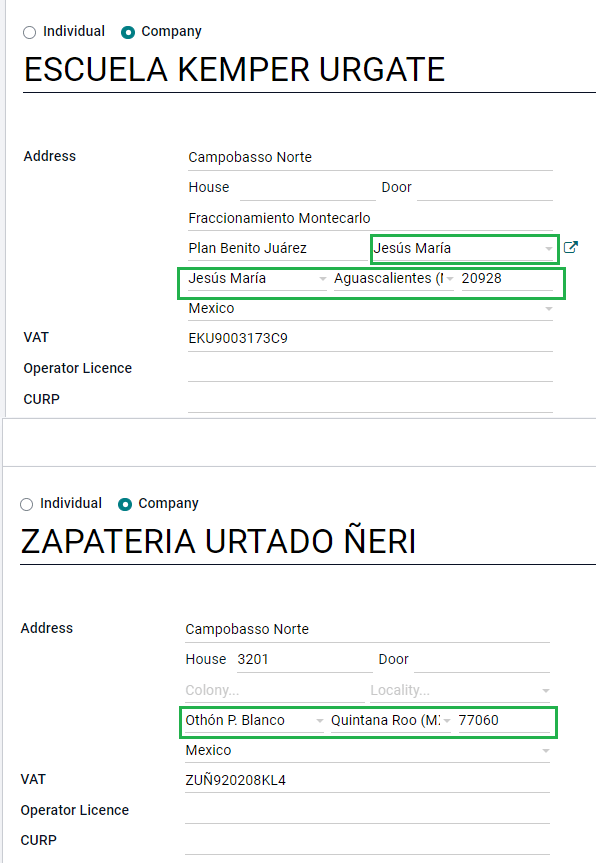
如果要测试墨西哥本地化,可将公司配置为墨西哥境内的真实地址(包括所有字段),并添加 EKU9003173C9 作为 增值税 和 ESCUELA KEMPER URGATE 作为 公司名称。在 财政制度 中使用 一般法律实体。
联系人
要创建可开发票的联系人,请转到 。然后,输入联系人姓名、地址,包括:邮政编码、:guilabel:`省/州、国家/地区 和 |RFC|(:guilabel:`增值税`号)。
重要
与您自己的公司一样,您的所有联系人都需要在 SAT 中注册正确的公司名称。这也适用于:guilabel:财政制度,需要添加到 MX EDI 选项卡中。
税
为了正确签署发票,需要为销售税添加一些额外的因素类型和税收对象配置。
因素类型
因素类型 字段已预先加载到默认税种中。如果创建了新税种,则需要确保配置此字段。要执行此操作,请转到 ,然后为所有记录启用 高级选项 选项卡中的 因素类型 字段,并将 税种 设置为 销售。
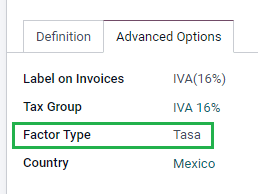
小技巧
Mexico manages two different kinds of 0% VAT to accommodate two scenarios:
0% VAT set the Factor Type as Tasa
VAT Exempt set the Factor Type as Exento
Tax object
CFDI 4.0 的一个要求是,生成的 XML 文件需要(或不需要)细分操作的税额。在 XML 文件中会添加三种不同的可能值:
01: 不含税 - 如果发票行不含任何税项,则自动添加此值。02: 须缴税 - 这是任何含税发票行的默认配置。03: 需缴税,不强制分解 - 某些客户可按需触发此值,以取代 02。
要使用 03 值,请导航至 ,并激活 无税款明细 复选框。
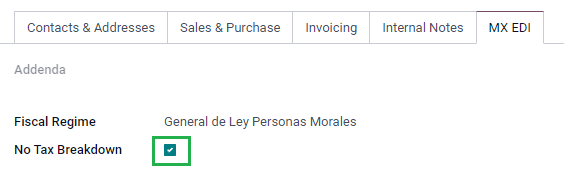
重要
:guilabel:`无税款明细`值**仅**适用于特定的财务制度和/或税种。在进行任何修改之前,请先咨询您的会计师,确认是否需要为您的业务使用这个功能。
其他税项配置
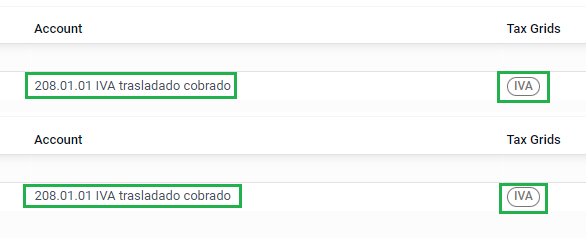
在记录付款时,Odoo 会将税款从现金基准转换账户转移到在 定义`选项卡中设置的账户。对于这种转移,在重新分类税款的会计凭证中会使用一个税基账户: (`Base Imponible de Impuestos en Base a Flujo de Efectivo) 。请不要删除这个账户。
如果您在 、 ISR 或 IEPS)。 Odoo 仅支持这三种税种组。
产品
要配置产品,进入 ,然后选择要配置的产品,或 创建 一个新产品。在 会计 标签和 UNSPSC 产品类别 字段中,选择代表产品的类别。该过程可以手动完成,或通过 批量导入。
注解
所有产品都需要有一个与之相关的 SAT 代码,以防止出现验证错误。
电子开票
PAC凭证
在您使用 SAT 处理您的 私人密钥 (CSD) <https://www.sat.gob.mx/aplicacion/16660/genera-y-descarga-tus-archivos-a-traves-de-la-aplicacion- certifica>`_后,您**必须**直接在您选择的 :ref:`PAC 注册,然后才能开始从 Odoo 创建发票。
在这些供应商中创建账户后,请访问 。在:guilabel:MX PAC`部分,输入您的 PAC 名称和您的凭据(:guilabel:`PAC 用户名`和 :guilabel:`PAC 密码)。
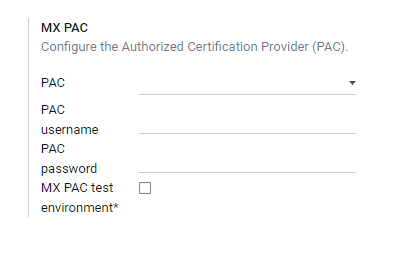
小技巧
如果您没有凭证,但想测试电子发票,可以激活 MX PAC 测试环境 复选框,并选择 Solucion Factible 作为 PAC 。您无需为测试环境添加用户名或密码。
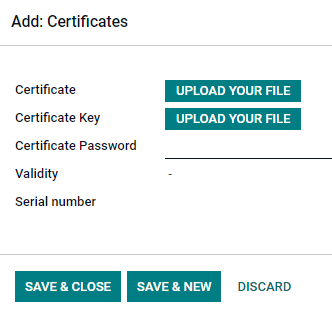
.cer 和 .key 证书
必须在 MX 证书 部分上传 <https://www.gob.mx/tramites/ficha/certificado-de-sello-digital/SAT139>`_ 公司的数字证书。要执行此操作,请进入 。在 MX 证书 部分,选择 添加一行,打开一个窗口。点击 创建,然后上传您的数字 证书 (.cer 文件)、您的 证书密钥 (.key 文件)和您的 证书密码。完成后,点击 保存并关闭。
工作流
电子开票
Odoo 中的发票流程基于 SAT 电子发票的附件 20 <http://omawww.sat.gob.mx/tramitesyservicios/Paginas/anexo_20.htm>`_ 版本 4.0。
客户开票
要从 Odoo 开具发票,必须使用 标准开票流程 创建客户发票。
当文件处于草稿模式时,可以对其进行更改(例如,可以添加客户可能需要的正确 付款方式 或 使用方法)。
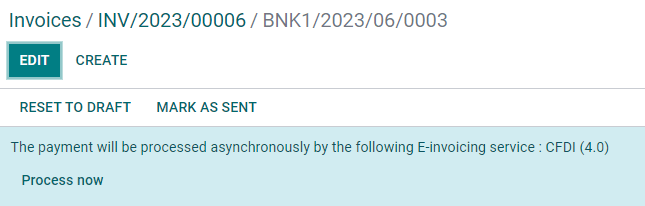
在您 确认 客户发票后,会出现一条蓝色信息,说明:该发票将由以下电子发票服务异步处理: CFDI (4.0)。
按下 立即处理 按钮后,文件将发送给政府,以便签署。收到政府发回的已签署文件后,文件上将显示 财政对页 字段,并在聊天中附上 XML 文件。
小技巧
如果点击发票上 SAT 状态 字段中的 重试,则可在 SAT 中确认 XML 文件是否有效。
如果在测试环境中,您将始终收到 未找到 消息。
若要通过邮件将已签名的发票发送给客户,您可直接从 Odoo 点击 发送并打印 按钮,将 XML 和 PDF 文件一起发送。您也可以点击 打印 按钮,选择所需的打印选项,将 PDF 文件下载到您的电脑。
贷记单据
发票属于单据类型 “I”(Ingreso),而贷记单属于单据类型 “E”(Egreso)。
对 信用证的标准流程 的唯一补充是,作为 SAT 的要求,信用证和发票之间必须有通过财务对开单的关系。
由于这一要求,字段 CFDI Origin 用 01| 添加了这一关系,后面是原始发票的财务对开页。

小技巧
要自动添加 CFDI Origin 字段,请使用发票上的 添加贷方票据 按钮,而不是手动创建。
Payment complements
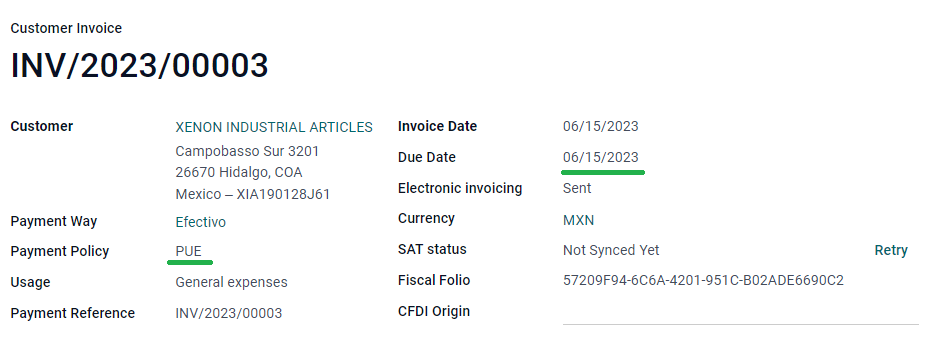
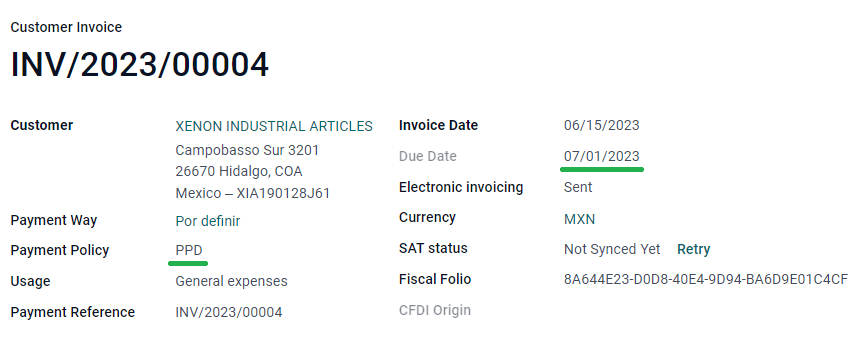
付款政策
One addition of the Mexican localization is the Payment Policy field. According to the SAT documentation, there are two types of payments:
PUE(Pago en una Sola Exhibición/Payment in a Single Exhibition)PPD(Pago en Parcialidades o Diferido/Payment in Installements or Deferred)
The difference lies in the Due Date or Payment Terms of the invoice.
要配置 PUE 发票,请导航至 ,然后选择同月内的发票 到期日,或选择不意味着更改到期月份的付款期限(立即付款,15 天,21 天,均在当月内)。
小技巧
某些 付款条款 已默认安装,可通过 进行管理。
要配置 PPD 发票,请导航至 ,然后选择一张 到期日 在下个月第一天之后的发票。如果您的 付款期限 在下个月到期,这也适用。
重要
Because the PPD policy implies that an invoice is not going to get paid at the moment, the correct Payment Way for the PPD invoices is 99 - Por Definir (To define).
支付流
In both cases, the payment process in Odoo is the same, the main difference being payments related to PPD invoices trigger the creation of a document type “P” (Pago).
如果付款与 PUE 发票相关,则可在向导中注册,并与相应的发票关联。要执行此操作,请导航至 并选择发票。然后,点击 登记付款 按钮。发票状态将变为 付款中,因为付款在银行对账时已有效验证。
参见
虽然此流程与 PPD 发票相同,但增加了创建 电子文档 的功能,这意味着需要一些额外的要求才能正确地将文档发送到 SAT。
从发票中,您需要确认收到付款的具体 付款方式。因此,付款方式 字段 不能 设置为`99 - Por Definir(待定义)`。
如果要在客户联系卡的 会计 选项卡中添加银行账号,则必须有一个有效的账号。
注解
具体配置见 SAT <http://omawww.sat.gob.mx/tramitesyservicios/Paginas/anexo_20.htm>`_ 的附件 20。通常,银行账户 需要 10 或 18 位数字用于转账,16 位数字用于信用卡或借记卡。
如果付款与带有 付款政策 PPD 已签署发票相关,一旦点击 立即处理,Odoo 将自动生成相应的付款补充。
警告
以 MXN 支付的款项**不能**用于支付多张美元发票。相反,应使用相应发票上的 登记付款 按钮将付款分成多笔付款。
开票取消
可以取消发送到 SAT 的电子数据交换文件。根据 Reforma Fiscal 2022,自 2022 年 1 月 1 日起,有两项要求:
通过所有取消请求,您**必须**指定*取消原因*。
发票开具 24 小时后,必须 要求客户接受取消。
有四种不同的取消原因。在 Odoo 中,您可以用 01 发票发送错误且有关系 和 02 发票发送错误且无关系 取消发票。
The following sections break down the process of canceling invoices for each cancellation reason in Odoo.
重要
Odoo has certain limitations to canceling invoices in the SAT: The reasons 03 and 04 (Operation did not take place and Nominative transactions related to a global invoice, respectively) are not currently supported by Odoo. For this, you need to cancel the invoice directly in the SAT, and press Retry in the SAT Status field.
01 - 发送的发票有错误,且有关联
由于任何字段出错,需要用新发票代替原发票时,必须使用此取消原因。
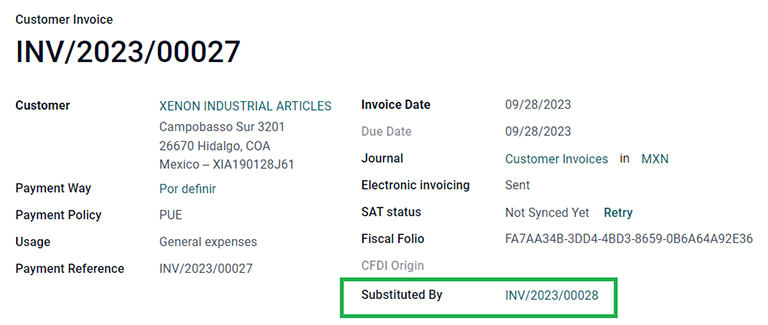
首先,导航至 ,然后选择旧发票。从旧发票复制 财政对开本。然后,导航到新发票,在 CFDI 起源 字段中添加值 04|,并在值后粘贴旧发票的 财政对开本。最后,签署新文件。
Next, navigate back to the old invoice, and notice the Substituted By field is now available. Click the Request EDI Cancellation button on the old invoice, and then click Process Now in the blue section that appears. The invoice status changes to Canceled, and a confirmation is logged in the chatter.
Now, the invoice should be canceled in the SAT as well. You can confirm this was done correctly, by pressing Retry in the SAT status field.
If the document was canceled more than 24 hours after its creation, you may need to ask the client to accept the cancellation in their “Buzón Tributario” directly from the SAT website.
注解
04| 只是帮助 Odoo 执行此过程的代码。它与方法 04 取消的原因无关。
02 - 发送的发票有错误但无关联
如果发送的发票有任何字段出错,且不需要用其他字段替换,则必须使用此取消原因。
在这种情况下,请导航至 并选择旧发票。在这里,唯一的要求是点击 请求 EDI 取消 按钮,然后点击 立即处理 按钮。
由于使用此取消原因时不会出现 替代者 字段,SAT 应自动检测到取消原因是 02。
付款取消
也可以取消 付款补充。要执行此操作,通过 进入付款页面,选择 请求 EDI 取消。与发票一样,会出现一个蓝色按钮。点击 立即处理,文件将发送到 SAT。几秒钟后,您可以点击 重试 确认当前的 SAT 状态。
最后,付款状态被移至 已取消。
注解
正如发票一样,当您建立新的 付款补充 时,可通过在 CFDI 来源 字段中,新增 04| 加上财务组合,以新增原始文件的关系。
开票特殊用例
CFDI 公开
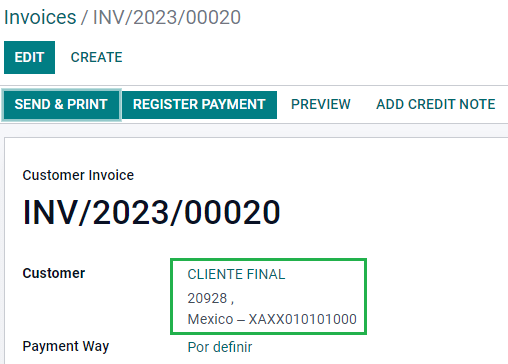
如果销售商品或服务的客户不需要发票,则必须创建*CFDI 公开*。
如果您使用 客户 名称 PUBLICO EN GENERAL,将会触发错误。这是 CFDI 4.0 中的一个主要变化,它要求使用该特定名称的发票需要附加字段,而 Odoo 目前不支持这些字段。因此,若要创建*CFDI to Public*,您需要为客户添加任何**不是**`PUBLICO EN GENERAL`的名称。(例如:CLIENTE FINAL)。
除此之外,还需要添加您公司的 ZIP 代码,将通用 RFC 设置为 XAXX010101000,并将客户的 财政制度 设置为:Sin obligaciones fiscales。
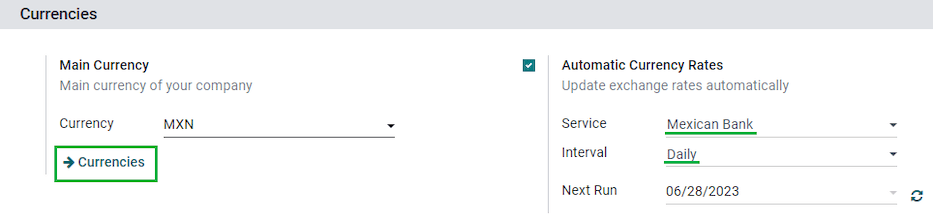
多币种
墨西哥的主要货币是 MXN。虽然所有墨西哥公司都必须使用这种货币,但也可以发送和接收不同货币的发票(和付款)。要启用 多币种,请导航至 ,并在 自动货币汇率 部分将 墨西哥银行 设置为 服务 。然后,将 间隔 字段设置为您希望更新汇率的频率。
这样,文档的 XML 文件将具有正确的汇率和总金额(外币和墨西哥比索)。
强烈建议使用 每种货币的银行帐户 。
注解
每天自动更新汇率的货币只有美元、欧元、英镑和日元。
首付
在某些情况下,您可能会收到客户的预付款,而这笔款项需要稍后应用到发票中。为了在 Odoo 中做到这一点,需要使用 CFDI 来源 字段正确地将发票相互链接起来。为此,必须安装 销售 应用程序。
参见
“墨西哥首付登记的官方文件<http://omawww.sat.gob.mx/tramitesyservicios/Paginas/documentos/Caso_uso_Anticipo.pdf>”_。
首先,导航至 应用程序,创建产品 Anticipo 并进行配置。产品类型 必须是 服务,并且使用 UNSPSC 类别 必须是:84111506 Servicios de facturación。
然后,进入 ,将 Anticipo 产品添加为默认产品。
创建包含总金额的销售订单,并创建首付款(使用百分比或固定金额)。然后签署文件,并 登记付款。
当客户收到最终发票时,根据同一销售订单再次创建发票。在 创建发票 向导中,选择 普通发票,并取消选中 扣除首付款。
然后,复制第一张发票的 Fiscal Folio 并粘贴到第二张发票的 CDFI 来源 中,在值之前添加前缀 07|。然后,在文件上签名。
然后,为第一张发票创建贷记单。复制第二张发票的 财政对页 并将其粘贴到贷方通知单的 CFDI 来源 中,添加前缀 07|。然后,在文件上签名。
这样,所有电子文件都相互关联。最后一步是全额支付新发票。在新发票的底部,您可以在 未结贷项 中找到赊销单,将其添加为付款。最后,使用 登记付款 向导登记剩余金额。
外部贸易
外贸是对普通发票的补充,根据 SAT 法规,在 XML 和 PDF 中为外国客户的发票添加某些值,例如:
收件人和发件人的具体地址
增加一个 关税比例 标签,用于识别产品类型
正确的 :guilabel:`Incoterm`(国际商业术语),其中包括(原产地证书 和 特殊计量单位)。
除了扩展所售商品的描述之外,还可以正确识别出口商和进口商。
自 2018 年 1 月 1 日起,开展 A1 类出口业务的纳税人必须进行对外贸易。目前的 CFDI 为 4.0,而对外贸易目前为 1.1 版
要使用此功能,必须安装 l10n_mx_edi_extended 和 l10n_mx_edi_extended_40 模块。
重要
安装前,请确保您的企业需要使用此功能。如有必要,在安装任何模块之前,请先咨询您的会计师。
配置
联系人
要为对外贸易配置您的公司联系人,请导航至 ,然后选择您的 公司。CFDI 4.0 要求您在联系人中添加有效的 ZIP 代码,而对外贸易补充要求您的 城市 和 州/省 也必须有效。所有三个字段都必须与 “官方 SAT 目录<sat-catalog>”_一致,否则您将收到错误信息。
警告
将 城市 和 州/省 添加到公司的 联系人 中,而不是公司本身。您可以在 中找到公司的联系人。
字段 地点 和 Colony 代码 是可选项,可直接在 中添加。这两个字段必须与 SAT 中的数据一致。
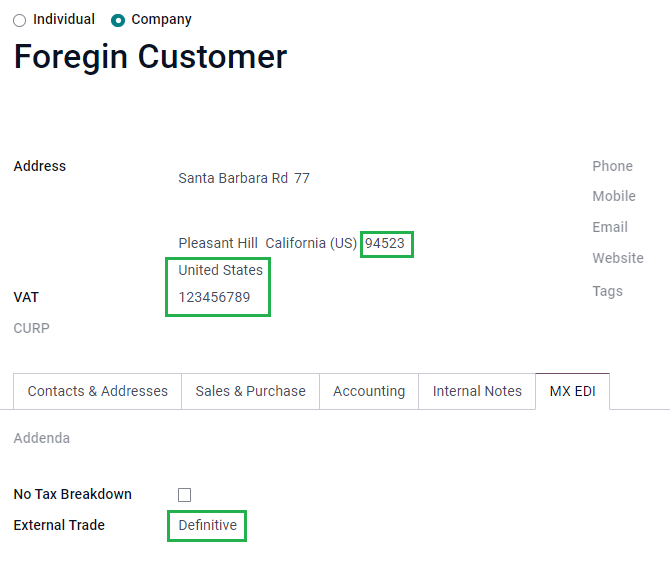
要配置外国接收客户的联系人数据,请导航至 ,然后选择外国客户的联系人。为避免出错,联系人必须填写以下字段:
整个公司的 地址,包括有效的 ZIP 代码和国外的 国家/地区。
国外 VAT 的格式(税号,例如:哥伦比亚
123456789-1)在 MX EDI 选项卡中,您需要确定客户是暂时(暂时)还是永久(确定性)接收货物。
重要
如果新联系人是通过复制墨西哥的另一个现有联系人创建的,请确保删除 财政制度 字段中的任何遗留信息。此外,不要启用 无税细目 选项。选择该选项会隐藏对外贸易联系配置所需的必填字段。
注解
在生成的 XML 和 PDF 文件中,VAT 会自动替换为国外交易的通用增值税:xexx010101000。
产品
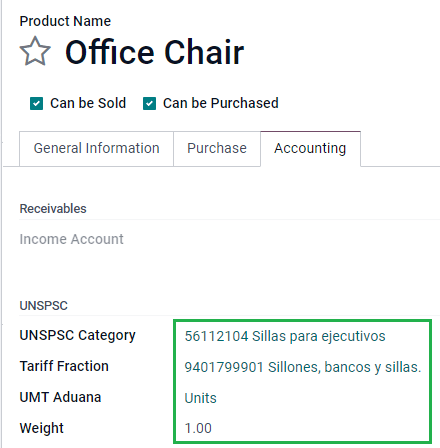
所有涉及对外贸易的产品都有四个必填字段,其中两个是对外贸易专用字段。
产品的 内部参考 在 一般信息 标签中。
产品的 重量 必须大于
0。The correct Tariff Fraction of the product in the Accounting tab.
The UMT Aduana corresponds to the Tariff Fraction.
小技巧
If the UoM code of the Tariff Fraction is
01, the correct UMT Aduana iskg.If the UoM code of the Tariff Fraction is
06, the correct UMT Aduana isUnits.
开具发票流程
创建发票之前,必须考虑到外部贸易发票需要将产品金额转换为美元。因此,多币种 **必须**启用,并且 USD **必须**在 货币 部分激活。要运行的正确 服务 是 墨西哥银行。
然后,在 中设置正确的汇率后,就只剩下 国际贸易术语 和 其他信息 标签中的可选 证书来源 字段了。
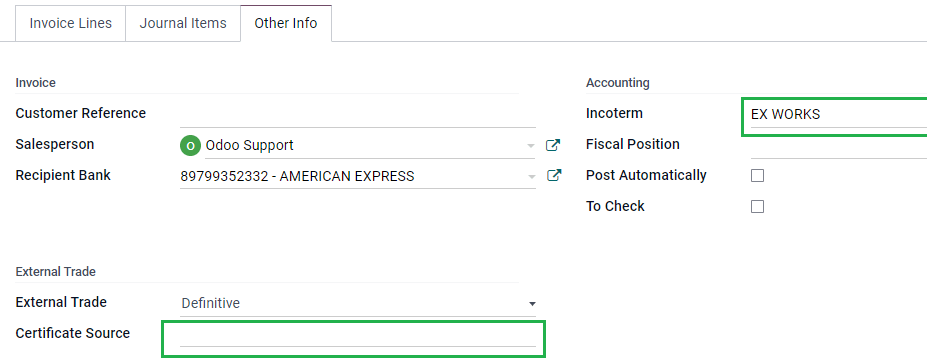
最后,使用与普通发票相同的流程签署发票,并点击 立即处理 按钮。
发货指南
Carta Porte 是提单:说明货物类型、数量和目的地的文件。
2021 年 12 月 1 日,所有运输提供商、中间商和货主均可使用该 CFDI 的 2.0 版本。Odoo 可以生成 “T”(Traslado)类型的单据,与其他单据不同,它是在交货单中创建的,而不是发票或付款单。
Odoo 可以创建带(或不带)地面运输的 XML 和 PDF 文件,并可以处理被视为 危险品 的材料。
要使用此功能,必须安装 l10n_mx_edi_extended、l10n_mx_edi_extended_40、l10n_mx_edi_stock 和 l10n_mx_edi_stock_40 模块。
除此之外,还需要安装 库存 和 销售 应用程序。
重要
Odoo 不支持 Carta Porte 类型文件 “I”(Ingreso)、空运或海运。如果需要此功能,请先咨询您的会计师,然后再做任何修改。
配置
Odoo 管理两种不同类型的 CFDI:
无联邦高速公路:当 到目的地 的距离 `小于 30 KM <http://omawww.sat.gob.mx/cartaporte/Paginas/documentos/PreguntasFrecuentes_Autotransporte.pdf>`_时使用。
联邦运输:当 目的地 距离超过 30 千米时使用。
除了常规发票的标准要求(客户的 RFC、UNSPSC 商品编码等)外,如果使用 非联邦公路,则无需任何外部配置。
对于 联邦运输 类型,则需要在联系人、车辆设置和产品中添加多项配置。这些配置信息会被添加到 XML 和 PDF 文件中。
联系方式和车辆
与外部贸易功能一样,公司和最终客户的 地址 必须完整。guilabel:ZIP 代码、城市 和:guilabel:省/州 必须与 Carta Porte <sat-catalog_>_ 的官方 SAT 目录一致。
小技巧
对于两个地址,字段 地点 都是可选的。
重要
送货指南使用的原产地地址在 中设置。虽然默认设置为公司地址,但您可以根据正确的仓库地址进行更改。
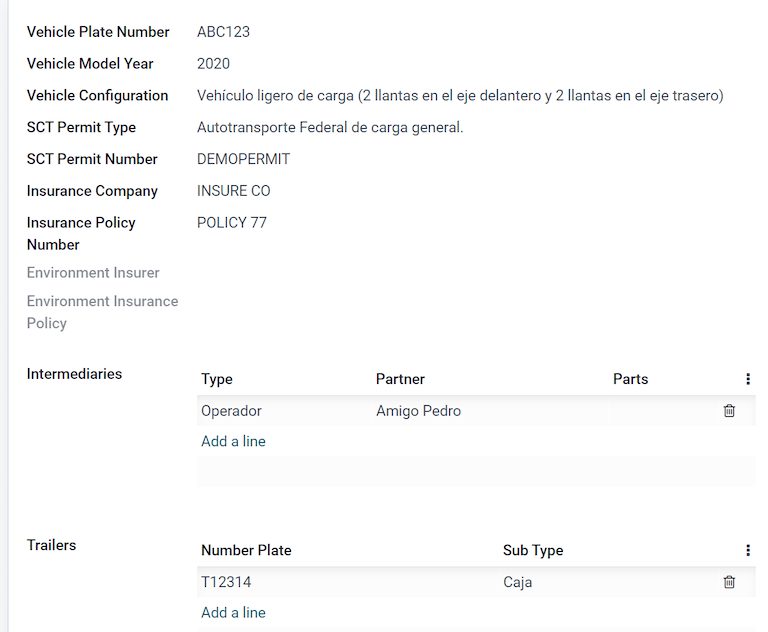
该功能的另一个新增功能是 中的 车辆设置 菜单。通过该菜单,您可以添加与送货单所用车辆相关的所有信息。
所有字段都必须填写,以便创建正确的送货指南。
小技巧
车牌号码 和 车牌号 字段必须包含 5 到 7 个字符。
在 中间商 部分,您必须添加车辆驾驶员。该联系人的唯一必填字段是 VAT 和 执照。
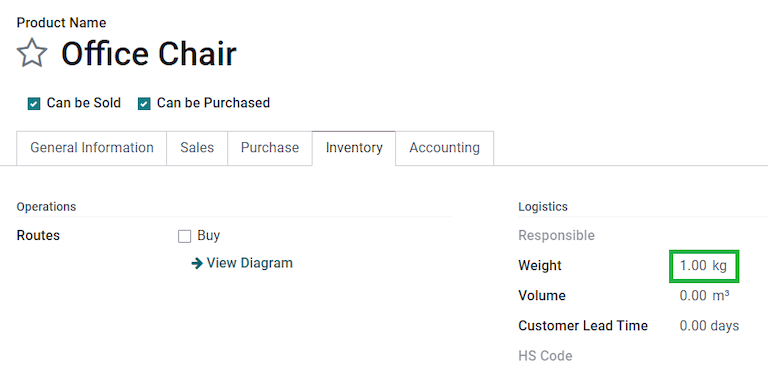
产品
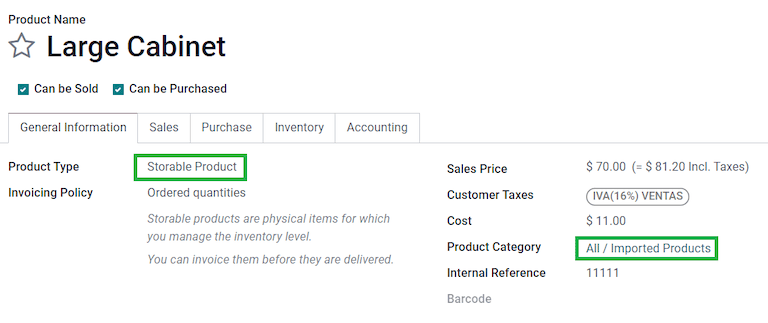
与常规发票类似,所有产品都必须有 UNSPSC 类别。除此以外,还有两种额外配置,适用于交货指南中涉及的产品:
必须将 产品 设置为 可储存产品 才能创建库存变动。
在 库存 选项卡中,重量 字段应大于`0`。
警告
创建值为 0 的产品交货指南将引发错误。由于 重量 已存储在送货单中,因此需要退回产品,并使用正确的数量重新创建送货单(和送货指南)。
销售和库存流动
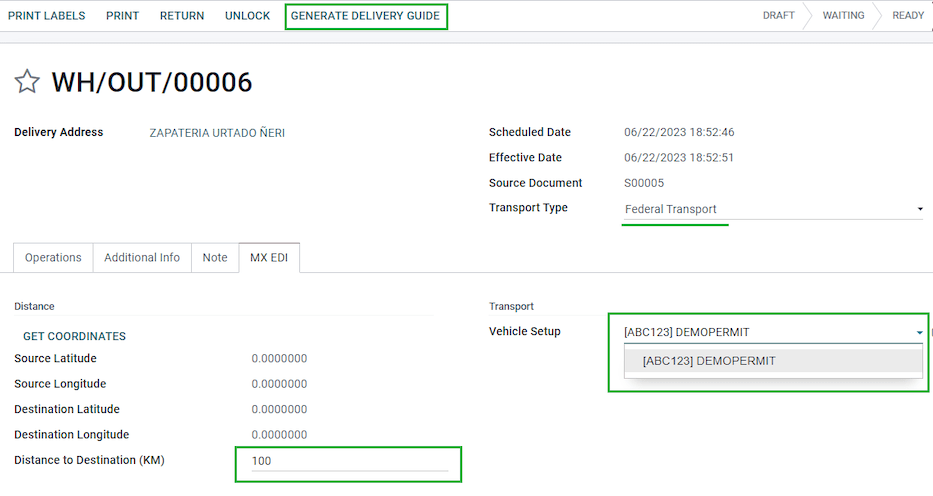
要创建送货指南,首先需要在 中创建并确认销售订单。这会生成一个 送货 智能按钮。点击该按钮,然后 验证 发送。
状态设置为 已完成 后,您可以编辑转运,并选择 运输类型 (非联邦公路 或 联邦运输)。
如果您的交付指南类型为 非联邦公路,您可以保存传输,然后点击 生成交付指南。生成的 XML 可在聊天记录中找到。
注解
除了所有产品中的 UNSPSC 以外,使用 非联邦公路 的送货指南不需要任何特殊配置,即可发送给政府。
如果您的交货指南类型为 联邦运输,则会出现 MX EDI 选项卡。在 到目的地的距离(KM) 中输入大于 0 的值,并选择用于此交货的 车辆设置。
危险隐患
在 官方 SAT 目录 <http://omawww.sat.gob.mx/tramitesyservicios/Paginas/complemento_carta_porte.htm>`_中,:guilabel:`UNSPSC 类别`中的某些值被视为*危险危害*。在使用 :guilabel:`联邦运输 创建交货指南时,需要额外考虑这些类别。
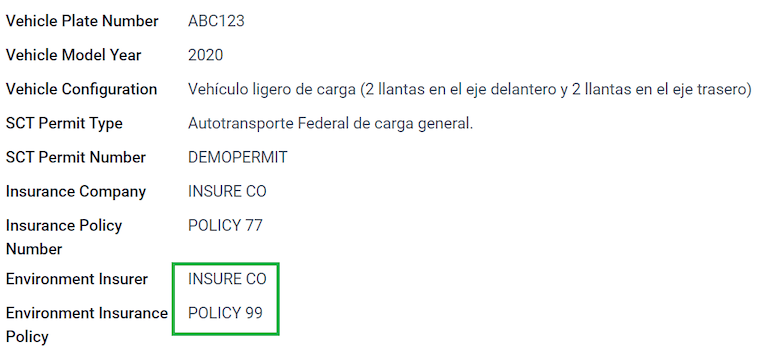
首先,从 选项卡中,危险品指定代码(MX) 和 危险包装(MX) 字段必须填写 SAT 目录中的正确代码。
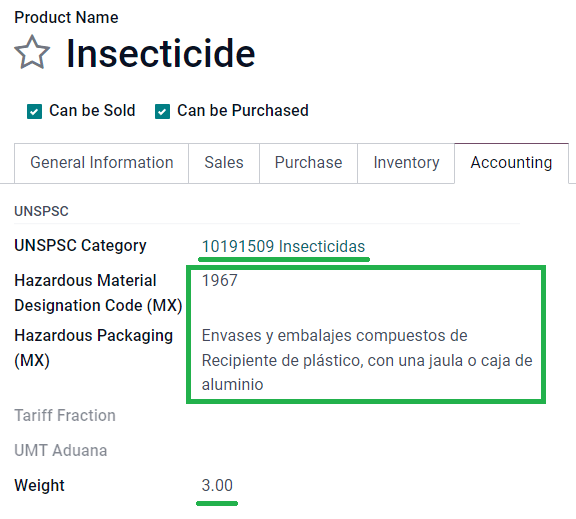
在 中,还必须填写 环境保险方 和 环境保险政策 中的数据。之后,继续按照常规流程创建交货指南。
海关编号
*海关申报单*(Pedimento Aduanero)是一份财务文件,证明已向财政实体(SAT)支付所有缴款,包括货物进出口。
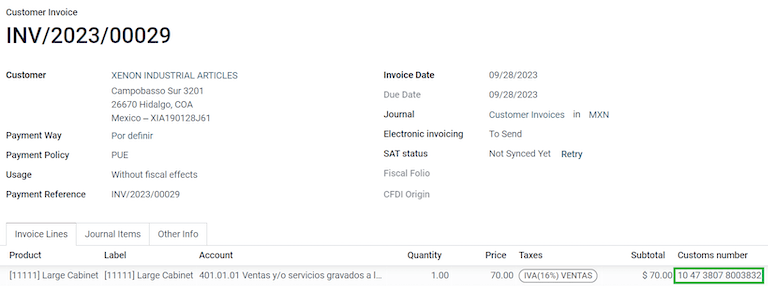
根据 CFDI 4.0 的 附件 20,在发票货物来自一手进口业务的单据中,海关编号 字段需要添加到业务涉及的所有产品行中。
要执行此操作,必须安装 l10n_mx_edi_landing 模块,以及 库存、采购 和 销售 应用程序。
重要
不要将这一特征与对外贸易相混淆。海关编号与进口货物直接相关,而对外贸易补充则与出口相关。如果需要此功能,请先咨询您的会计师,然后再做任何修改。
配置
为了追踪特定发票的正确海关编号,Odoo 使用 落地成本。转到 。确保 落地成本 已激活。
首先创建一个*服务*类型的产品,名为 Pedimento。在 采购 选项卡中,激活 为到岸成本 并选择 默认分割方法。
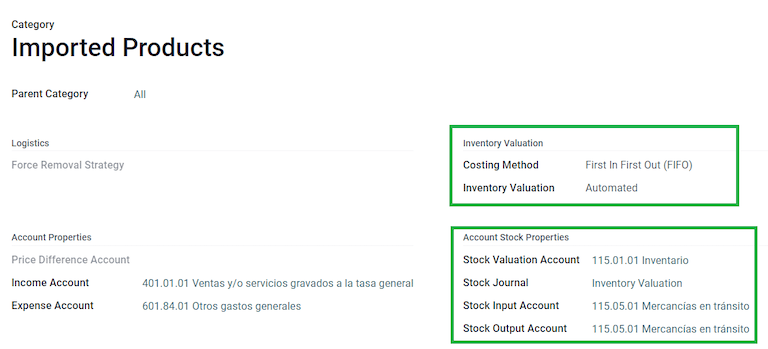
然后,配置保存海关编号的*可储存产品*。要执行此操作,请创建可储存产品,并确保 产品类别 具有以下配置。
成本计算方法:选择 FIFO 或 AVCO
库存估值:自动
库存估值账户: 115.01.01 Inventario。
库存日记账: 库存估值
库存输入账户: 115.05.01 Mercancías en tránsito
库存输出账户: 115.05.01 Mercancías en tránsito
采购和销售流程
配置产品后,请按照标准 采购流程。
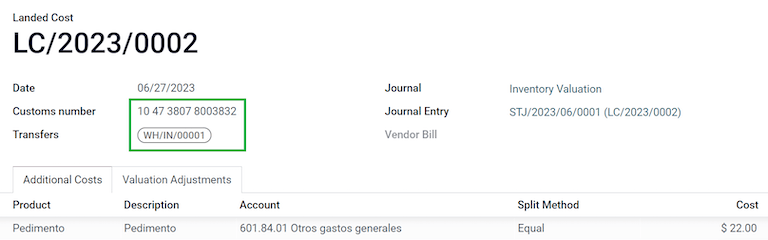
从 创建采购订单。然后,确认订单,显示 收货 智能按钮。点击 收货 智能按钮以 验证 收据。
进入 ,创建新记录。添加刚创建的转账,以及:产品 Pedimento 和 海关编号。
可选择添加成本金额。然后,验证到岸成本。一旦 已发布,与该收据相关的所有产品都会分配到海关编号。
警告
您只能添加 Pedimentos 号码 一次,因此在将正确的号码与转账关联时要小心。
现在,创建销售订单并确认。这将触发一个 送货 智能按钮。点击验证。
最后,根据销售订单创建发票并确认。与产品相关的发票行中有一个海关编号。该编号应与您之前创建的 落地成本 记录中添加的海关编号一致。
电子会计
在墨西哥,“电子会计<https://www.sat.gob.mx/aplicacion/42150/envia-tu-contabilidad-electronica>`_” 是指通过电子手段保存会计记录和条目,并每月通过 SAT 网站输入会计信息的义务。
它由三个主要 XML 文件组成:
当前使用的会计科目表的更新列表。
A monthly trial balance, plus a closing entry report, also known as: Trial Balance Month 13.
Either optional, or for a compulsory audit, an export of the journal entries in your general ledger.
生成的 XML 文件符合 `Anexo Técnico de Contabilidad Electrónica 1.3 <https://www.gob.mx/cms/uploads/attachment/file/151135/Anexo24_05012015.pdf>`_的要求。
除此之外,您还可以生成 DIOT: 供应商涉及 IVA 税款的分录报告,可导出为 .txt 文件。
要使用这些报告,必须安装 l10n_mx_reports, l10n_mx_reports_closing, l10n_mx_xml_polizas 和 l10n_mx_xml_polizas_edi 模块,以及 Accounting 模块。
You can find the Chart of accounts, Trial Balance Month 13, and DIOT reports in .
重要
您发送的报告的具体特点和义务可能会根据您的财政制度而发生变化。在向政府发送任何文件之前,请务必联系您的会计师。
会计科目表
墨西哥的 会计科目表 根据 SAT 的 Código agrupador de cuentas 遵循特定模式。
只要符合 SAT 的编码组,您可以创建任何账户:模式为 NNN.YY.ZZ 或 NNN.YY.ZZZ。
Example
例如,“102.01.99” 或 “401.01.001”。
在 中使用 SAT 编码组模式创建新账户时,正确的分组代码会出现在 标签 中,您的账户也会出现在 COA 报告中。
创建所有账户后,确保添加了正确的 标签。
注解
不能使用任何以 0 结尾的模式(如 100.01.01、301.00.003 或 604.77.00)。这会导致报告出错。
Once everything is set up, you can go to , and click the SAT (XML) button to generate an XML file containing all of your accounts, which will be ready to upload to the SAT website.
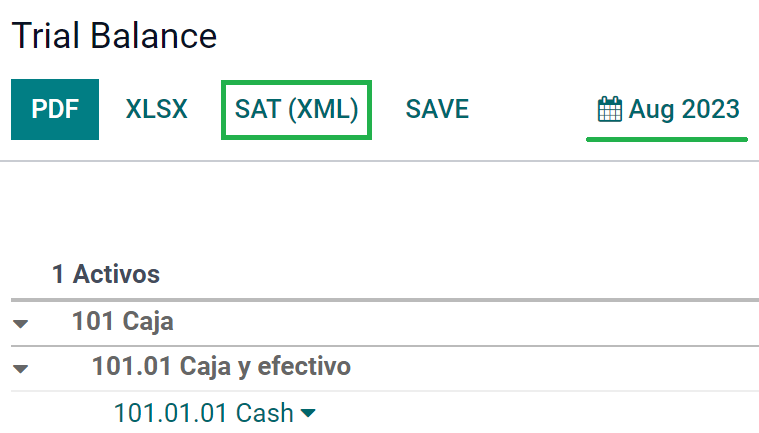
试算表
只要添加了正确的 编码组,试算表就会报告账户的初始余额、贷方余额和总余额。
This report can be generated monthly, and a corresponding XML file is created, if you go to , and click the SAT (XML) button. Select the month you want to download beforehand.
注解
Odoo 不会生成 Balanza de Comprobación Complementaria。
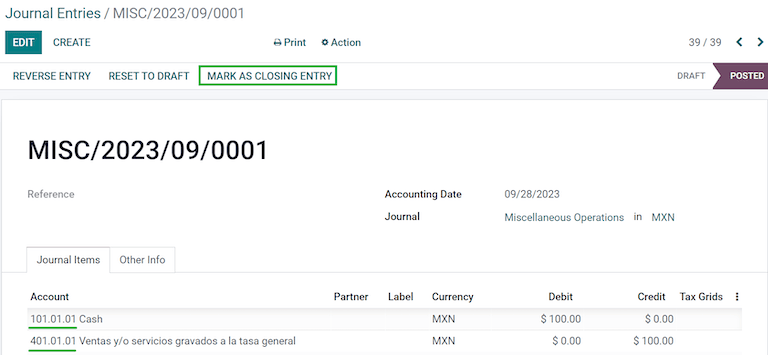
An additional report is the Month 13: a closing balance sheet that shows any adjustments or movements made in the accounting to close the year.
To generate this XML document, navigate to , and create a new document. Here, add all amounts to modify, and balance the debit and/or credit of each one.
After this is done, click Mark as Closing Entry, and the report found in , contains the total amount of the year, plus all the additions of the journal entry.
The XML file is generated by pressing the SAT (XML) button.

总账
根据法律规定,墨西哥的所有交易都必须以数字形式记录。由于 Odoo 会自动创建发票和付款的所有基本日记账分录,因此您可以导出日记账分录,以满足 SAT 的审计和/或退税要求。
小技巧
您可以根据当前需要,按时期或日记账进行筛选。
To create the XML, go to , and click XML (Polizas). Here, you can select between four types of Export types:
税务审计
审计认证
退货
赔偿
For Tax audit, or Audit certification, you need to write the Order Number provided by the SAT. For Return of goods, or Compensation, you need to write your Process Number, also provided by the SAT.
注解
如果您想在不发送的情况下查看此报告,请在 订单号 中使用 ABC6987654/99,在 流程编号 中使用 AB123451234512。
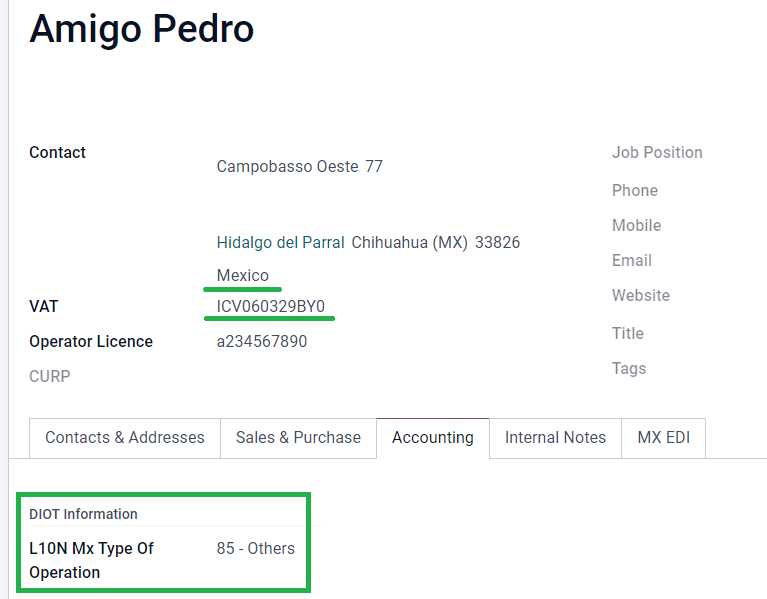
DIOT报告
DIOT(Declaración Informativa de Operaciones con Terceros / 与第三方合作的信息性声明)是 SAT 的一项附加义务,您应向 SAT 提供供应商账单中可抵扣和不可抵扣的付款、预扣和退还增值税的当前状态。
与其他报告不同,DIOT 被上传到 SAT 提供的包含 A-29 表格的软件中。在 Odoo 中,您可以将交易记录下载为 .txt 文件,然后上载到表格中,从而避免直接获取这些数据。
交易文件包含在供应商账单中登记的付款总额,按相应类型的 IVA 细分。所有供应商都必须输入 VAT 和 国家/地区 字样。
To get the DIOT report, go to . Select the month that suits you, and click DIOT (TXT) to
download the .txt file.

重要
You need to fill the field, L10N Mx Type of Operation, in the Accounting tab of each one of your vendors to prevent validation errors. Make sure that your foreign customers have their country set up for L10N Mx Nationality to appear automatically.