Stat de plată
Odoo Payroll is used to process work entries and create payslips for employees, including both regular pay and commission. Payroll works in conjunction with other Odoo apps, such as Employees, Timesheets, Time Off, and Attendances.
The Payroll app helps ensure there are no issues or conflicts when validating work entries, handles country-specific localizations to ensure that payslips follow local rules and taxes, and allows for salary assignments. Payroll configuration is critical to ensure accurate and timely processing of payslips.
Setări
To access the Settings, go to . Whether or not payslips are posted in accounting, and whether SEPA payments are created, is selected here.
The Settings screen is where localization settings are configured. Localizations are country-specific settings pre-configured in Odoo at the creation of the database, and account for all taxes, fees, and allowances for that particular country. The Localization section of the Settings includes a detailed view of all benefits provided to employees.
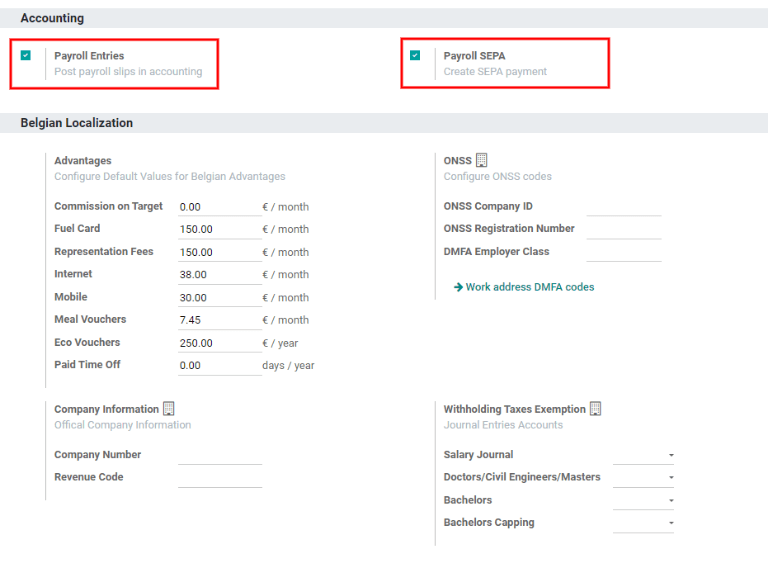
Any country-specific localizations are set up in the Localization section of the Settings screen. All localization items are pre-populated when the country is specified during the creation of the database. It is not recommended to alter the localization settings unless specifically required.
Intrări de lucru
O înscriere de lucru este o înregistrare individuală pe foaia de pontaj a unui angajat. Înregistrările de lucru pot fi configurate pentru a ține cont de toate tipurile de muncă și de concediu, cum ar fi Prezență, Concediul medical, Instruire sau Sărbătoare publică.
Tipuri de intrare în muncă
Când se creează o intrare de muncă în aplicația Salarizare sau când un angajat introduce informații în aplicația Foile de pontaj, trebuie selectat un Tip de intrare la muncă. Lista de Tipuri de intrare de lucru este creată automat pe baza setărilor de localizare stabilite în baza de date.
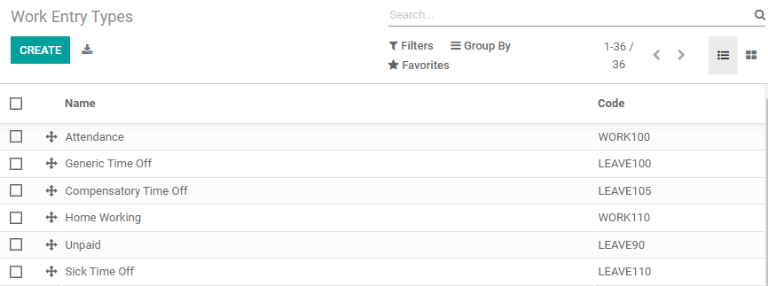
To view the current work entry types available, go to .
Each work entry type has a code to aid in the creation of payslips, and ensure all taxes and fees are correctly entered.
Nou tip de intrare în muncă
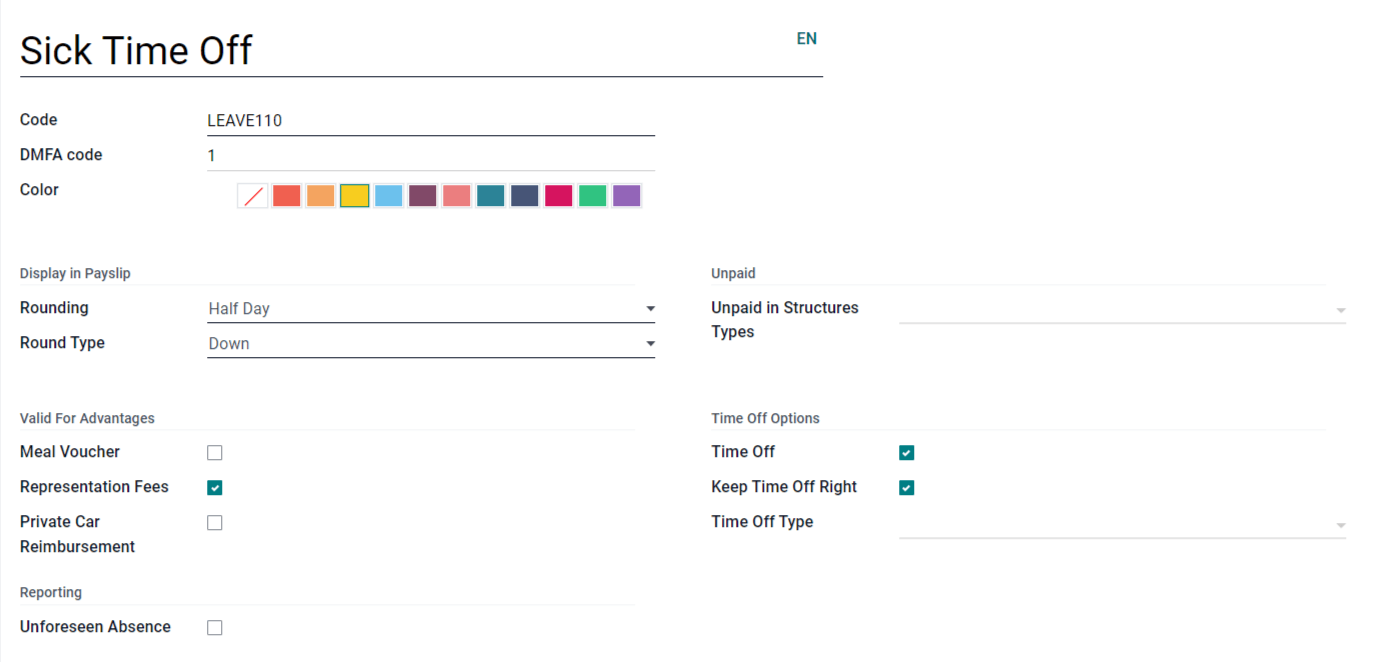
To create a new work entry type, click the Create button. Enter the information on the form:
Work Entry Type Name: The name should be short and descriptive, such as
Sick TimeorPublic Holiday.Code: This code appears with the work entry type on timesheets and payslips. Since the code is used in conjunction with the Accounting application, it is advised to check with the accounting department for a code to use.
DMFA Code: This code is used to identify DMFA entries on a corresponding DMFA report, and is for Belgian-based companies only.
Color: Select a color for the particular work entry type.
Rounding: The rounding method determines how timesheet entries are displayed on the payslip.
No Rounding: A timesheet entry is not modified.
Half Day: A timesheet entry is rounded to the closest half day amount.
Day: A timesheet entry is rounded to the closest full day amount.
Example
Dacă timpul de lucru este setat la o zi de lucru de 8 ore (săptămâna de lucru de 40 de ore), iar un angajat introduce un timp de 5,5 ore pe o foaie de pontaj, iar Rotunjire este setat la Fără rotunjire `, intrarea rămâne 5,5 ore. Dacă :guilabel:`Rotunjire este setată la Jumătate de zi, intrarea este schimbată la 4 ore. Dacă este setat la Day, se schimbă la 8 ore.
Unpaid in Structures Types: If the work entry is for unpaid work, specify which pay structure the work entry can apply to from the drop-down menu.
Check boxes: If any of the items in the list apply to the work entry, check off the box by clicking it. If Time Off is checked off, a Time Off Type field appears. This field has a drop-down menu to select the specific type of time off, or a new type of time off can be entered.
Working times
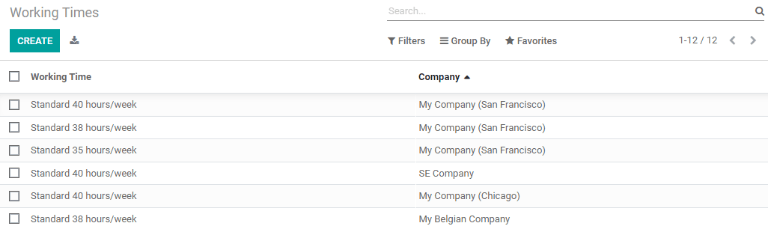
To view the currently configured working times, go to . The working times that are available for an employee’s contracts and work entries are found in this list.
Working times are company-specific. Each company must identify each type of working time they use. For example, an Odoo database containing multiple companies that use a standard 40-hour work week needs to have a separate working time entry for each company that uses the 40-hour standard work week.
New working time
To create a new working time, click the Create button. Enter the information on the form.
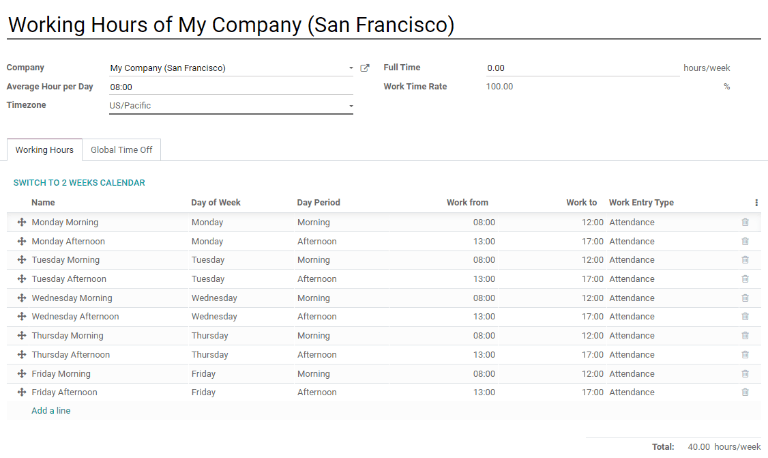
Câmpurile sunt completate automat pentru o săptămână obișnuită de lucru de 40 de ore, dar pot fi modificate. Mai întâi, schimbați numele timpului de lucru modificând textul din câmpul Nume. Apoi, faceți orice ajustări la zilele și orele care se aplică noului timp de lucru.
În fila Ore de lucru, modificați selecțiile Ziua săptămânii, Perioada zilei și Tipul de intrare de lucru făcând clic pe meniurile drop-down din fiecare coloană și făcând selecția dorită. Coloanele Work From și Work To sunt modificate prin introducerea orei.
Notă
Orele Work From și Work To trebuie să fie într-un format de 24 de ore. De exemplu, 2:00 PM va fi introdus ca 14:00.
If the working time should be in a two-week configuration, click the Switch To 2 Week Calendar button. This creates entries for an Even week and an Odd week.
Salariu
Tipuri de structuri
În Odoo, fișa de plată a unui angajat se bazează pe structuri și tipuri de structură, care afectează ambele modul în care un angajat introduce foile de pontaj. Fiecare tip de structură este un set individual de reguli pentru procesarea unei intrări în foaie de pontaj, care constă din diferite structuri imbricate în el. Tipurile de structură definesc cât de des este plătit un angajat, orele de lucru și dacă salariile se bazează pe un salariu (fix) sau câte ore a lucrat angajatul (variate).
De exemplu, un tip de structură ar putea fi „Angajat” și acel tip de structură ar putea avea două structuri diferite în el: o structură „Salarie obișnuită” care include toate regulile separate pentru procesarea plății obișnuite, precum și o structură pentru un „Sfârșit”. of Year Bonus` care include regulile doar pentru bonusul de sfârșit de an. Atât structura „Salarie obișnuită” cât și structura „Bonus de sfârșit de an” sunt structuri din tipul de structură „Angajat”.
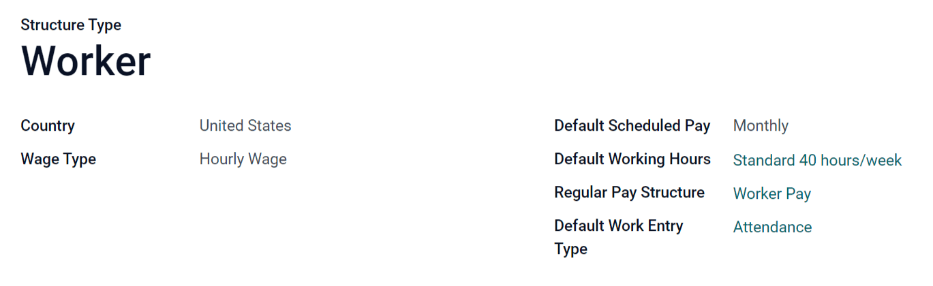
The different structure types can be seen by going to .
There are two default structure types configured in Odoo: Employee and Worker. Typically, Employee is used for salaried employees, which is why the wage type is Monthly Fixed Wage, and Worker is typically used for employees paid by the hour, so the wage type is Hourly Wage.

Click the Create button to make a new structure type. Most fields are pre-populated, but all fields can be edited. Once the fields are edited, click the Save button to save the changes, or click Discard to delete the entry.
Structuri
Structurile salariale sunt diferitele moduri în care un angajat este plătit într-o anumită structură și sunt definite în mod specific de diverse reguli.
Cantitatea de structuri de care are nevoie o companie pentru fiecare tip de structură depinde de câte moduri diferite sunt plătiți angajații și de modul în care este calculat salariul lor. De exemplu, o structură comună care ar putea fi utilă de adăugat poate fi un „Bonus”.
To view all the various structures for each structure type, go to .
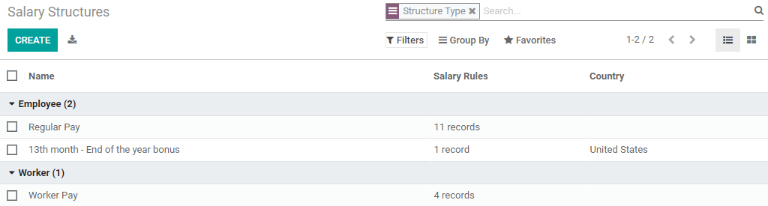
Fiecare structure type listează diferitele structuri asociate cu acesta. Fiecare structură conține un set de reguli care o definesc.
Faceți clic pe o structură pentru a vedea Regulile salariale. Aceste reguli sunt cele care calculează fișa de salariu pentru angajat.
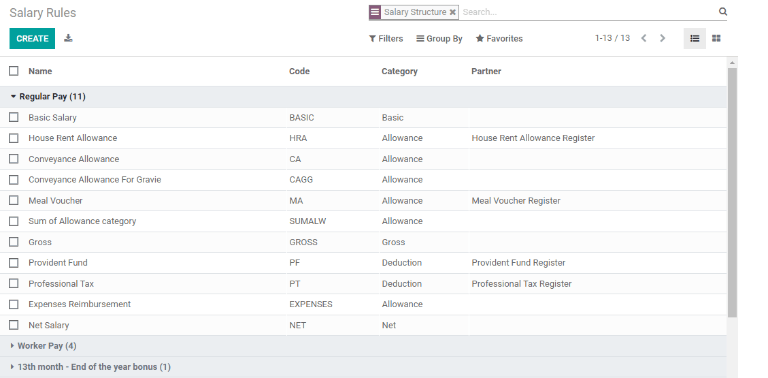
Reguli
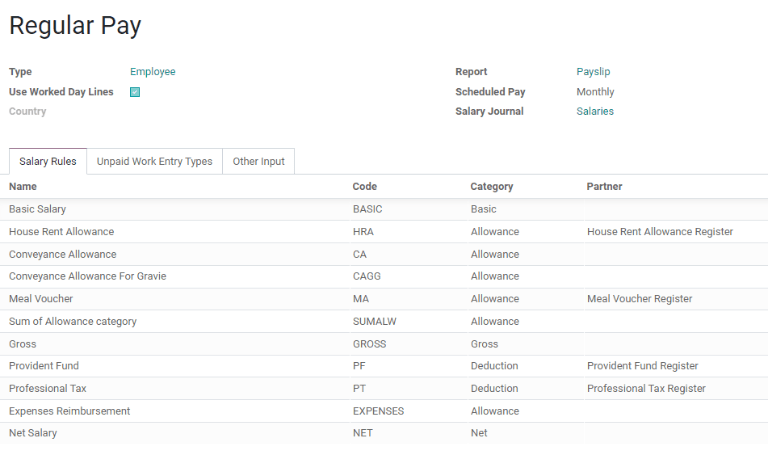
Each structure has a set of salary rules to follow for accounting purposes. These rules are configured by the localization, and affect the Accounting application, so modifications to the default rules, or the creation of new rules, should only be done when necessary.
To view all the rules, go to . Click on a structure (such as Regular Pay) to view all the rules.
To make a new rule, click Create. A new rule form appears. Enter the information in the fields, then click Save.
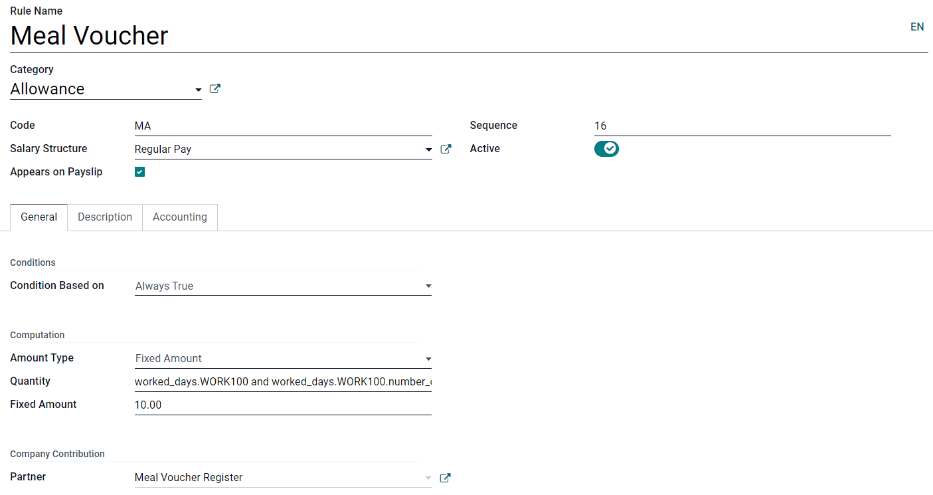
The required fields for a rule are:
Name: Enter a name for the rule.
Category: Select a category the rule applies to from the drop-down menu, or enter a new one.
Code: Enter a code to be used for this new rule. It is recommended to coordinate with the accounting department for a code as this will affect them.
Salary Structure: Select a salary structure the rule applies to from the drop-down menu, or enter a new one.
Condition Based on: In the General tab, select from the drop-down menu whether the rule is Always True (always applies), a Range (applies to a specific range, which is entered beneath the selection), or a Python Expression (the code is entered beneath the selection).
Amount Type: In the General tab, select from the drop-down menu whether the amount is a Fixed Amount, a Percentage (%), or a Python Code. Depending on what is selected, the fixed amount, percentage, or Python code needs to be entered next.
Parametrii regulii
Notă
Currently, the Rule Parameters feature found inside the menu is still in development and only serves a specific use case for Belgian markets. The documentation will be updated when this section has matured to more markets.
Alte tipuri de intrare
When creating payslips, it is sometimes necessary to add other entries for specific circumstances, like expenses, reimbursements, or deductions. These other inputs can be configured by going to .
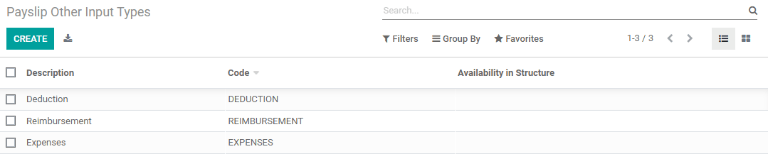
To create a new input type, click the Create button. Enter the Description, the Code, and which structure it applies to in the Availability in Structure field. If the input type applies to all structures, leave the Availability in Structure field blank. Click the Save button to save the changes, or click Discard to delete the entry.

Configurator pachet salarial
The various options under the Salary Package Configurator section of the menu all affect an employee’s potential salary. These sections (Advantages, Personal Info, and Resume) specify what benefits can be offered to an employee in their salary package.
Depending on what information an employee enters (such as deductions, dependents, etc.), their salary is adjusted accordingly. When an applicant applies for a job on the company website, the sections under Salary Package Configurator directly affect what the applicant sees, and what is populated as the applicant enters information.
Avantaje
When offering potential employees a position, there can be certain advantages set in Odoo in addition to the salary to make the offer more appealing (such as extra time off, access to a company car, reimbursement for a phone or internet, etc.).
To see the advantages, go to . Advantages are grouped by Structure type.
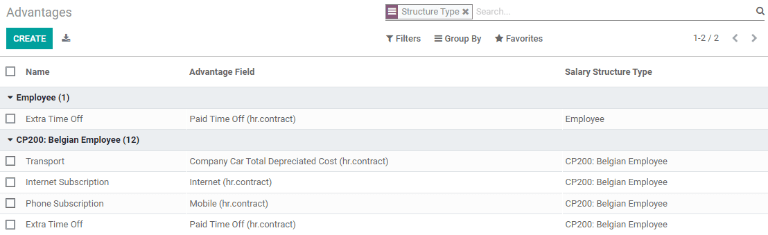
To make a new advantage, click the Create button. Enter the information in the fields, then click the Save button to save the changes, or click Discard to delete the entry.
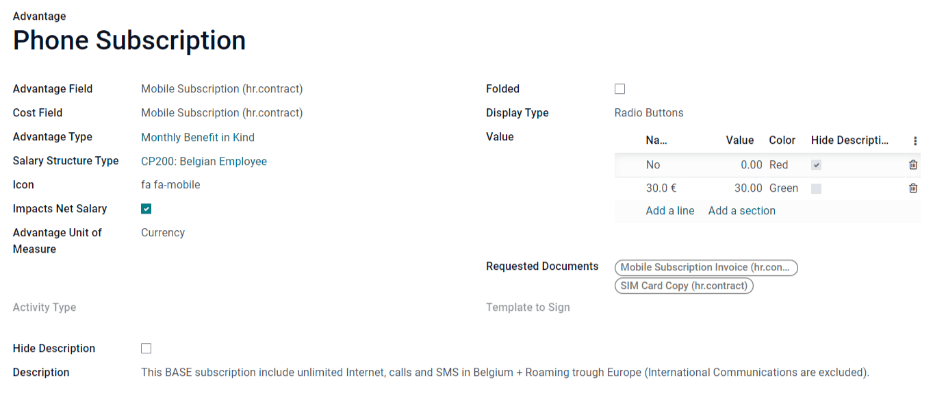
The required fields for an advantage are:
Name: Enter the name for the advantage.
Advantage Field: Select from the drop-down menu what field in the payslip this advantage appears under.
Advantage Type: Select from the drop-down menu what type of advantage the benefit is. Select from Monthly Benefit in Kind, Monthly Advantages in Net, Monthly Advantages in Cash, or Yearly Advantages in Cash.
Salary Structure Type: Select from the drop-down menu which salary structure type this advantage applies to.
Informație personală
Every employee in Odoo has an employee card that includes all of their personal information, resume, work information, and documents. To view an employee’s card, go to the main app dashboard, and click on the employee’s card, or go to and click on the employee’s card. Employee cards can also be viewed by going to the app.
Notă
Un card de angajat poate fi considerat ca un dosar de personal al angajatului.
The Personal Information section lists all of the fields that are available to enter on the employee’s card. To access this section, go to .
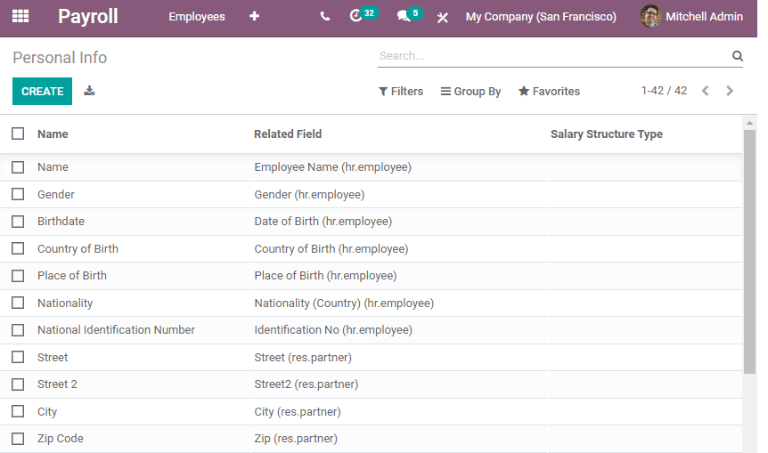
To edit an entry, select it from the list. Then, click the Edit button, and modify the entry. When done, click Save or Discard to save the information or cancel the edits.
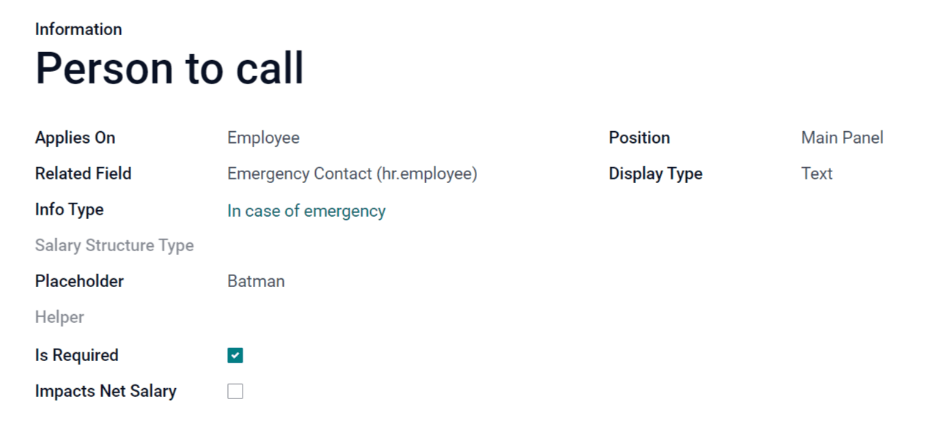
The two most important fields on the personal info form are Is Required and Display Type. Checking the Is Required box makes the field mandatory on the employee’s card.
The Display Type drop-down menu allows for the information to be entered in a variety of ways, from a Text box, to a customizable Radio button, a Checkbox, a Document, and more.
Once the information is entered, click the Save button to save the entry.
Reluare
Notă
Currently, the Resume feature found inside the menu is still in development and only serves a specific use case for Belgian markets. The documentation will be updated when this section has matured to more markets.