Recomandări
Odoo’s Referrals application is a centralized place where all information regarding referrals is housed, from points earned, coworkers hired, and rewards selected. Users can recommend people they know for job positions, then earn referral points as those people progress through the recruitment pipeline. Once enough referral points are earned, they can be exchanged for prizes. The Referrals application integrates with the Employees, Recruitment, and Website applications, all of which must be installed in order for the Referrals application to function.
The only configuration needed for the Referrals application after it is installed are the rewards; everything else is pre-configured when Odoo Referrals is installed.
Any user with either Referral User, Officer, or Administrator rights for the Recruitment application has access to the Referrals application. Only user’s with Administrator rights for the Recruitment application have access to the reporting and configurations menus. For more information on users and access rights, refer to these documents: Utilizatori and Drepturi de acces.
Onboarding
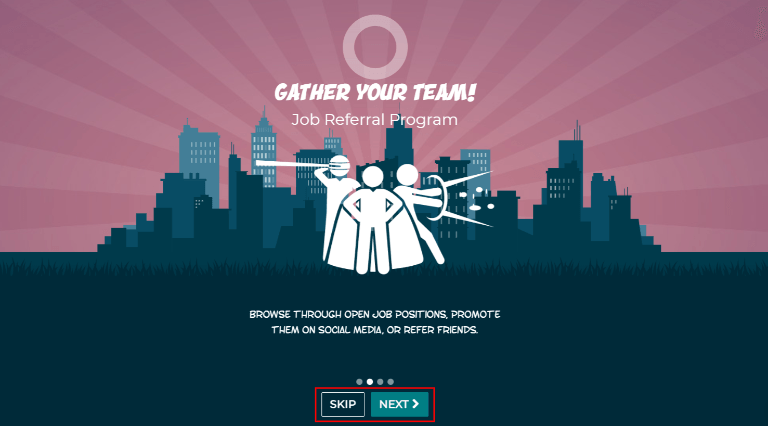
When opening the Referrals application for the first time, a pre-configured onboarding script appears. This is in the form of four slides, each explaining the different parts of the Referrals application. At the top of the dashboard, the following message is displayed throughout all the onboarding slides: GATHER YOUR TEAM! Job Referral Program. Behind this main message is an image, and beneath it some more explanatory text.
Fiecare dintre slide-urile de onboarding are o imagine și un mesaj corespunzătoare care este afișat. După ce ați citit fiecare mesaj, faceți clic pe butonul Next pentru a avansa la următorul diapozitiv.
Textul care apare pe fiecare diapozitiv este următorul:
O, nu! Răufăcătorii pândesc orașul! Ajută-ne să recrutăm o echipă de super-eroi pentru a salva ziua!
Răsfoiți posturile deschise, promovați-le pe rețelele sociale sau recomandați prieteni.
uilabel:
Strângeți puncte și schimbați-le cu cadouri minunate în magazin.Concurează împotriva colegilor tăi pentru a construi cea mai bună ligă a justiției!
Notă
The onboarding slides will appear every time the Referrals application is opened, until all the slides have been viewed and the Start Now button has been clicked. If the onboarding is exited at any point, or if the Start Now button has not been clicked, the onboarding slides will begin again when the Referrals application is opened. Once the Start Now button has been clicked, the onboarding slides will not be seen again, and the main dashboard will load when the Referrals application is opened from that point on.
At any point during onboarding, the Skip button may be clicked. This exits the onboarding, and the main Referrals dashboard loads. If Skip is clicked, onboarding slides will not load anymore when opening the Referrals application.
Notă
Dacă există candidați angajați pe care utilizatorul i-a recomandat înainte de a deschide aplicația Recomandări (adică diapozitivele de înscriere nu au apărut înainte), când se face clic pe Începe acum la sfârșitul înscrierii, în loc să accesați pagina principală. tabloul de bord, apare în schimb un ecran angajat.
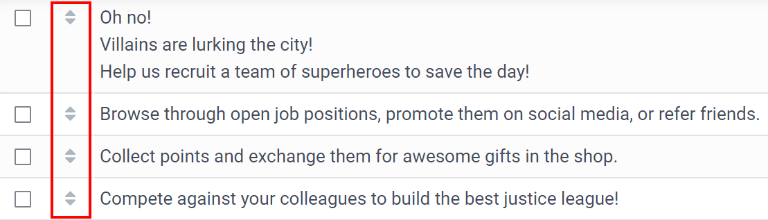
Modificarea slide-urilor de onboarding
Onboarding slides can be modified if desired. Only users with Administrator rights for the Recruitment application can modify onboarding slides. To edit a slide, navigate to Each line displays the text for the individual onboarding slide. To edit an onboarding slide, click on an individual slide line to open the slide’s onboarding form, then click Edit.
Make any changes to the message in the Text box. To change the order the slide appear in the onboarding, the Sequence can be modified. Type in the corresponding number to indicate the order in which the slides should be displayed. A Company may be selected, however, if this field is populated, that slide will only be displayed for that particular company.
The image can be modified as well. Hover over the image thumbnail in the top right corner of the form. A ✏️ (pencil) icon and 🗑️ (garbage can) icon appear. Click the ✏️ (pencil) icon to change the image. A file navigator window loads. Navigate to the desired image, select it, then click Open. The new image appears in the thumbnail. To delete an image, click the 🗑️ (garbage can) icon, then select a new image using the ✏️ (pencil) icon.
To save any changes, click Save, or click Discard to delete any changes and revert to the original content.

The order of the slides can also be changed directly in the Onboarding dashboard, without having to edit an individual onboarding slide. Click the up and down arrow symbol that appears after the checkbox and before the slide text, and drag the slide to the desired position. The Sequence automatically changes on all the slide’s onboarding forms, reflecting the new sequence.
Recomandări angajate
Când un candidat care a fost recomandat de un utilizator este angajat, acesta „își crește echipa de supereroi” și adaugă avatare de supereroi în tabloul de bord Recomandări.
După ce o recomandare a fost angajată, când utilizatorul deschide următoarea aplicație Recomandări, în loc de tabloul de bord principal, se încarcă o pagină angajată. Textul (Numele Recomandării) a fost angajat! Alege un avatar pentru noul tău prieten! apare.
Below this message are five avatar thumbnails to choose from. If an avatar has already been assigned to a referral, the thumbnail is greyed out, and the name the avatar has been chosen for appears beneath the avatar. Click on an available avatar to select it.
If more than one referral was hired since opening the Referrals application, after selecting the first avatar, the user is prompted to select another avatar for the subsequent hired referral. Once all avatars have been selected, the dashboard loads and all the avatars are now visible. Mouse over each avatar and their name is displayed above them.
Modificați prietenii
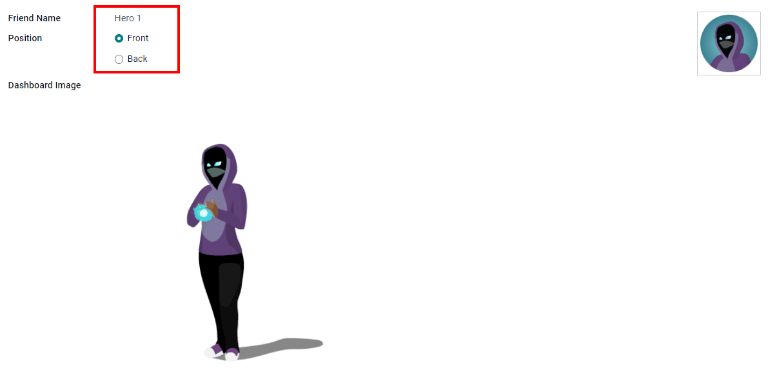
Friend avatars are able to be modified in the same manner that levels are modified. Only users with Administrator rights for the Recruitment application can make modifications to friends. The pre-configured friends can be seen and modified by navigating to . Each friend avatar appears in the Dashboard Image column, and the corresponding name appears in the Friend Name column. The default images are a motley group of hero characters, ranging from robots to dogs.
To modify a friend’s dashboard image, thumbnail, name, or position, click on an individual friend to open the referral friend form. Click Edit to make modifications. Type the name in the Friend Name field. The name is solely to differentiate the friends in the configuration menu; the friend’s name is not visible anywhere else in the Referrals application.
Poziție poate fi setată fie la Front, fie la Back. Aceasta determină poziția prietenului în raport cu avatarul super-erou al utilizatorului. Faceți clic pe butonul radio de lângă selecția dorită, iar prietenul va apărea fie în fața, fie în spatele avatarului utilizatorului atunci când este activat.
If desired, both the thumbnail Image and the Dashboard Image can be modified. Hover over the image being replaced to reveal a ✏️ (pencil) icon and 🗑️ (garbage can) icon. Click the ✏️ (pencil) icon and a file explorer window appears. Navigate to the desired image file then click Open to select it.
Once all changes have been made, click the Save button to save the changes, or click the Discard button to revert to the original information.
Atenționare
It is not advised to edit the images. An image file must have a transparent background in order for it to render properly. Only users with knowledge about transparent images should attempt adjusting any images in the Referrals application.
Once an image is changed and the friend is saved, it is not possible to revert to the original image. To revert to the original image, the Referrals application must be uninstalled then reinstalled.
Puncte de referință
The referral program is based on earning points that are then exchanged for rewards. On the main Referrals application dashboard, the top displays a summary of the user’s current points. The left side of the summary displays the total points earned, and the right side displays the points that are available to spend.
Pentru a vedea diferitele recomandări și punctele câștigate pentru fiecare, faceți clic pe unul dintre butoanele direct de sub avatare. Opțiunile sunt Recomandări, În curs și Succes.
Numărul actual de recomandări care sunt încă active în canalul de recrutare și nu au fost încă angajate sau refuzate, apare deasupra butonului În curs. Numărul de recomandări care au fost angajați apare deasupra butonului Succes. Numărul total de recomandări (atât cele în curs de desfășurare, cât și cele de succes combinate) apar deasupra butonului Recomandări.
Notă
Pentru a vizualiza recomandările asociate cu fiecare dintre categorii, Recomandări, În curs și Reușite, faceți clic pe butonul corespunzător. Sunt afișate toate recomandările pentru acea categorie specifică.
Recomandările mele
Pentru a vedea toate recomandările (atât în curs de desfășurare, cât și de succes) faceți clic pe butonul Recomandări. Se încarcă o fereastră Recomandarea mea. Acest ecran afișează toate recomandările, cu fiecare recomandare în propriul card de recomandare.
A successful referral has a green line down the left side of the card, and displays a ✓ Hired image in the top right corner of the card. Referrals that are in process display an In Progress image in the top right corner.
Each referral card lists the name of the applicant, the department the job position is in, the name of the job position, the person responsible for filling the role (recruiter), and the points earned.
Puncte
Punctele care pot fi câștigate pentru o recomandare sunt aceleași pentru toate posturile. Fiecare etapă a procesului de recrutare are puncte corespunzătoare atribuite. Etapele enumerate corespund etapelor configurate în aplicația Recrutare.
Pe fiecare card individual de recomandare, sub punctele câștigate este o diagramă cu bare care afișează câte puncte au fost câștigate din totalul de puncte posibile care pot fi câștigate dacă solicitantul este angajat.
Sub diagrama cu bare este o listă cu diferitele etape de recrutare și punctele câștigate atunci când recomandarea trece la acea etapă. Dacă o etapă a fost realizată și punctele au fost câștigate, în dreptul etapei apare o bifă verde.
Example
Structura de puncte preconfigurată pentru recomandări este următoarea:
Calificarea inițială: 1 punct
Primul interviu: 20 de puncte
Al doilea interviu: 9 puncte
Propunere de contract: 5 puncte
Contract Semnat: 50 de puncte
The total points earned for a referral that is hired is 85 points. Modifications of the points earned for each stage is done in the Recruitment application. Refer to the Recruitment documentation to modify the points for each stage.
Recompense
Creați recompense
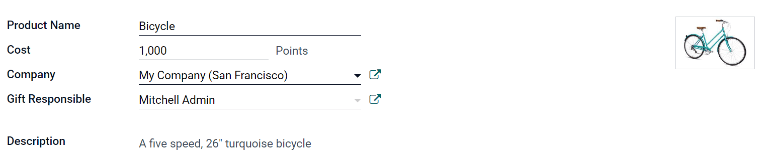
The rewards are the only configurations needed when setting up the Referrals application. Only users with Administrator rights for the Recruitment application can create or modify rewards. To add rewards, navigate to . Click Create and a reward form loads. Enter the following information on the form:
Product Name: Enter the name as it should appear for the reward.
Cost: Enter the amount of points required to redeem the reward.
Company: Using the drop-down menu, select the company the reward will appear for. If a reward is to be used for several companies, each company needs to have a record of the reward, with the company listed on the form.
Gift Responsible: Select the person who will be responsible for procuring and delivering the reward to the recipient, using the drop-down menu. This person is alerted when the reward is purchased, so they know when to deliver the reward to the recipient.
Description: Type in the description for the reward. This will be visible on the reward card, beneath the title.
Photo: Add a photo of the reward, which appears on the rewards page. Hover over the image square, and two icons appear, a ✏️ (pencil) and a 🗑️ (garbage can). Click the ✏️ (pencil) icon and a file explorer appears. Navigate to the photo file, then click Open to select it.
The only required fields are the Product Name, Company, and Description.
Important
It is advised to enter a Cost and add a Photo. If a cost is not entered, the default cost will be listed as zero, which would list the reward as free in the reward shop. If a photo is not selected, a placeholder icon will be displayed on the rewards page.
Valorificați recompense
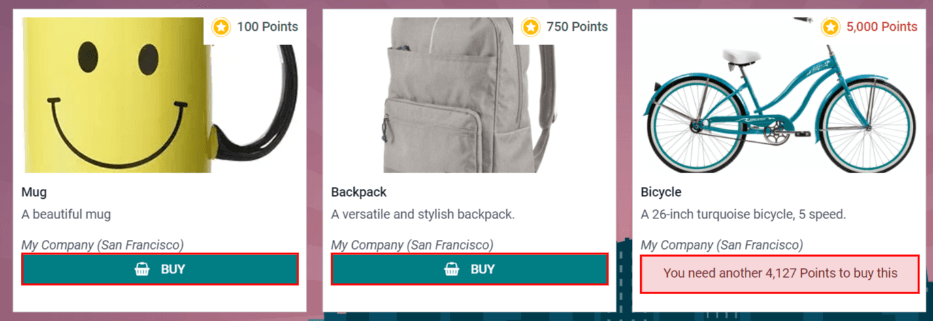
To redeem points for a reward, click the Rewards button on the main Referrals dashboard. All the configured rewards are listed in individual reward cards. The points required to purchase the reward is listed in the top right corner of the card. If the user has enough points to purchase a reward, a 🧺 (basket) Buy button appears at the bottom of the reward card. If they do not have enough points for a reward, the reward card displays You need another (x) points to buy this instead of a buy button.
Click the 🧺 (basket) Buy button on a reward to purchase it. A confirmation pop-up appears, asking if the user is sure they want to purchase the reward. Click OK to purchase the item, or Cancel to close the window and cancel the purchase.
După ce se face clic pe OK, fereastra pop-up se închide, iar punctele folosite pentru achiziționarea recompensei sunt scăzute din punctele disponibile ale utilizatorului. Recompensele prezentate sunt acum actualizate pentru a reflecta punctele disponibile curente ale utilizatorului.
Nivele
The referrals application has pre-configured levels that are reflected in the user’s avatar on the Referrals dashboard. As a user refers potential employees and earns points, they can level up, much like in a video game.
Nivelurile nu au impact funcțional asupra performanței aplicației. Acestea sunt folosite exclusiv în scopul de a adăuga niveluri de realizare pentru ca participanții să le urmărească, de a gamifica recomandări pentru utilizator.
The user’s current level is displayed at the top of the main Referrals application dashboard, directly beneath their photo, in a Level: X format. In addition, a colored ring appears around the user’s photo, indicating how many points the user currently has, and how many additional points they need to level up. The cyan colored portion of the ring represents points earned, while the white colored portion represents the points still needed before they can level up.
Modificați nivelurile
Only users with Administrator rights for the Recruitment application can modify levels. The pre-configured levels can be seen and modified by navigating to . Each avatar appears in the Image column, and the corresponding level number appears in the Level Name column. The default images are of Odoo superheroes, and each level adds an additional element to their avatar, such as capes and shields.
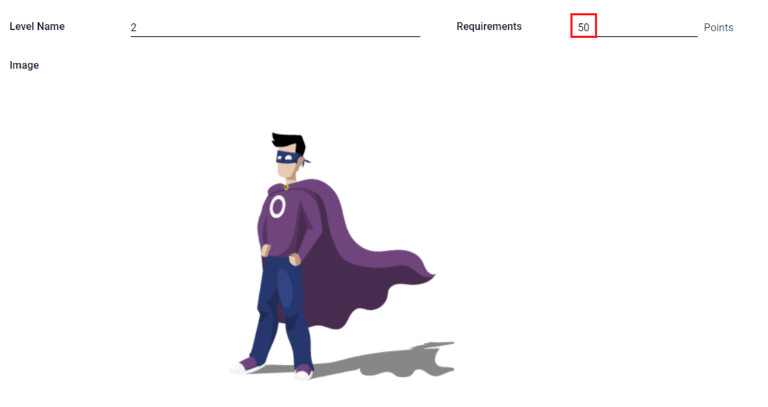
To modify a level’s image, name, or points required to reach the level, click on an individual level in the list to open the level form. Click Edit to make modifications.
Type in the name or number of the level in the Level Name field. What is entered is displayed beneath the user’s photo on the main dashboard when they reach that level. Enter the number of referral points needed to reach that level in the Requirements field. The points needed to level up are the total accumulated points earned over the lifetime of the employee, not additional points from the previous level that must be earned.
If desired, the Image can also be modified. Hover over the image to reveal a ✏️ (pencil) icon and 🗑️ (garbage can) icon. Click the ✏️ (pencil) icon and a file explorer window appears. Navigate to the desired image file then click Open to select it.
Once all changes have been made, click the Save button to save the changes, or click the Discard button to revert to the original information.
Atenționare
It is not advised to edit the images. An image file must have a transparent background in order for it to render properly. Only users with knowledge about transparent images should attempt adjusting any images in the Referrals application.
Once an image is changed and the level is saved, it is not possible to revert to the original image. To revert to the original image, the Referrals application must be uninstalled then reinstalled.
Creșteți nivelul
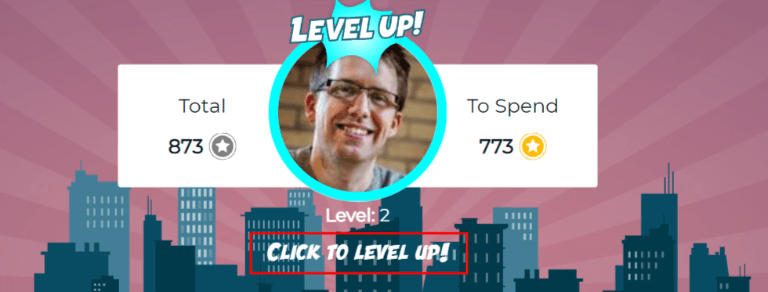
Odată ce au fost acumulate suficiente puncte pentru a crește nivelul, cercul din jurul fotografiei utilizatorului este complet completat cu o culoare cyan, deasupra fotografiei apare o imagine mare care indică Level up!, iar expresia Click pentru a crește nivelul! apare sub fotografia utilizatorului și sub nivelul actual.
Faceți clic pe graficul LEVEL UP!, pe fotografia utilizatorului sau pe textul Clic pentru a crește nivelul! de sub fotografia utilizatorului pentru a crește nivelul utilizatorului. Avatarul utilizatorului se schimbă la nivelul actual, iar inelul din jurul fotografiei este actualizat pentru a indica numărul curent de puncte.
Creșterea nivelului nu costă utilizatorului niciun punct, utilizatorul trebuie pur și simplu să câștige suma specificată de puncte necesară.
Notă
Odată ce un utilizator a atins cel mai înalt nivel configurat, acesta va continua să acumuleze puncte care pot fi răscumpărate pentru recompense, dar nu mai poate să urce nivelul. Inelul din jurul fotografiei lor rămâne cyan solid.
Alerte
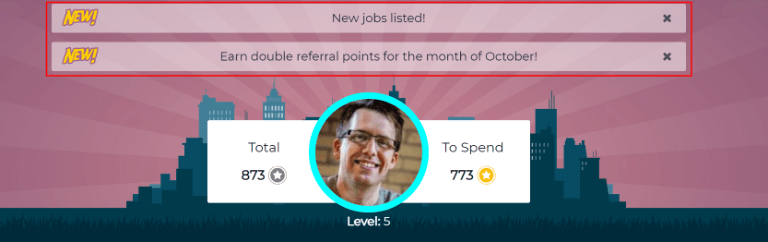
In the Referrals application, it is possible to post a message, also referred to as an alert, at the top of the dashboard to share important information with users. These alerts appear as a thin semi-transparent banner, with the word New! appearing on the far left. The text for the alert is in the center of the banner, and on the far right side is an X.
Alerts appear on the main dashboard for the specified time configured on the individual alert. If a user does not wish to see a specific alert again, click the X in the far right side of the alert. This removes the alert from the dashboard and will not appear again, even when opening the Referrals application for the first time in a new session.
Creați o alertă
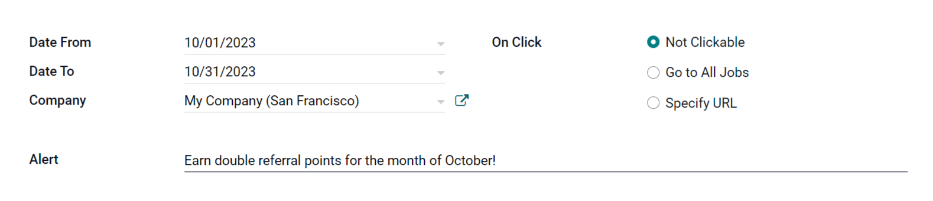
Only users with Administrator rights for the Recruitment application can create alerts. To add a new alert, navigate to the .
Click Create and a blank alert form loads. Enter the following information on the form:
Date From: The date the alert starts. On this date, the alert will be visible on the dashboard.
Date To: The date the alert ends. After this date, the alert will be hidden from view.
Company: The current company populates this field by default. To modify the company the alert should be displayed for, select the company from the drop-down menu. If this field remains blank, the alert is visible to everyone with access to the Referrals application. If a company is specified, only user’s within that company (who also have access to the Referrals application) will see the alert.
Alert: Enter the text for the alert. This message appears inside the alert banner on the main dashboard.
On Click: There are three options for the alert. Click the radio button next to the desired selection. The options are:
Not Clickable: The alert only displays text, there is no link to click.
Go to All Jobs: The alert contains a link that when clicked, navigates to the website with all the currently posted job positions.
Specify URL: The alert contains a link to a specific URL, that when clicked, navigates to that URL. When selected, a URL field appears below the On Click section. Enter the URL in the field.
Raportare
Only users with Administrator rights for the Recruitment application have access to the Reporting feature in Referrals. To access the reports, click . The main view is the Reporting Dashboard view, which contains three sections.
În partea de sus a ferestrei, raportul afișează o diagramă cu bare cu câți candidați recomandați sunt angajați și câți sunt încă în curs de angajare. Candidații sunt împărțiți în continuare pe canal, arătând în mod specific de unde a venit recomandarea, cum ar fi o recomandare directă, Facebook etc. Dacă un canal nu apare în raport, înseamnă că nu există recomandări de la acel canal anume.
Treimea din mijloc oferă toate datele specifice care au fost urmărite. Aceasta include câte puncte totale au fost câștigate pentru toate recomandările, câți solicitanți au fost îndrumați, angajați sau refuzați, câți solicitanți a referit utilizatorul conectat curent, câte puncte totale au fost câștigate și câte puncte au fost acordate pentru refuz. solicitanții.
Treimea de jos afișează un tabel pivot. Acest tabel poate fi inserat într-o foaie de calcul nouă sau existentă. Pentru a face acest lucru, faceți clic pe butonul Insert in Spreadsheet chiar deasupra diagramei. Apare o fereastră pop-up în care se întreabă în ce foaie de calcul să insereze diagrama pivot. Selectați foaia de calcul dorită din meniul derulant sau selectați Foaie de calcul nouă. Faceți clic pe Confirmați și se încarcă foaia de calcul selectată, cu noul tabel în ea.
Notă
The spreadsheet is stored in the Documents application. This application needs to be installed in order to use the Insert in Spreadsheet option.
Vedeți și
recomandări/share_jobs