Depanare
Conexiune cu caseta IoT
Nu se poate localiza codul de asociere pentru a conecta cutia IoT
Codul de asociere ar trebui să fie tipărit pe imprimantele de chitanțe conectate la caseta IoT și ar trebui să fie afișat și pe monitoarele conectate.
Codul de asociere nu apare în următoarele circumstanțe:
Caseta IoT este deja conectată la o bază de date Odoo.
Caseta IoT nu este conectată la Internet.
Codul este valabil doar 5 minute după pornirea casetei IoT. Este eliminat automat de pe afișajele conectate când acest timp a expirat.
Versiunea imaginii casetei IoT este prea veche. Dacă imaginea casetei IoT este dintr-o versiune anterioară, atunci cardul SD al casetei IoT trebuie să fie re-flash pentru a actualiza imaginea ( vezi Flashing card SD).
Dacă niciunul dintre cazurile enumerate mai sus nu corectează problema, atunci asigurați-vă că caseta IoT a pornit corect, verificând dacă un LED verde fix se afișează lângă portul de alimentare.
IoT box este conectat, dar nu este afișat în baza de date
Când o casetă IoT se conectează la o bază de date, aceasta poate reporni. Dacă da, poate dura până la cinci minute până să apară în baza de date. Dacă caseta IoT încă nu se afișează după cinci minute, asigurați-vă că caseta IoT poate ajunge la baza de date și că serverul nu folosește un mediu cu mai multe baze de date.
Pentru a accesa baza de date din caseta IoT, deschideți un browser și introduceți adresa bazei de date.
Caseta IoT este conectată la baza de date Odoo, dar nu poate fi accesată
Asigurați-vă că caseta IoT și computerul care rulează browserul sunt situate în aceeași rețea, deoarece caseta IoT nu poate fi accesată din afara localului. reţea.
Certificatul HTTPS nu generează
Pentru a genera un certificat HTTPS, este necesar un abonament IoT box pentru caseta IoT. Conectarea casetei IoT înainte de a configura un abonament IoT pentru baza de date și caseta IoT cu Account Manager va avea ca rezultat o conexiune nesecurizată.
În plus, un firewall poate împiedica generarea corectă a certificatului HTTPS. În acest caz, dezactivați firewall-ul până când certificatul este generat cu succes. De asemenea, trebuie remarcat faptul că anumite dispozitive, cum ar fi un router care are un firewall încorporat, pot împiedica generarea certificatului HTTPS.
Vedeți și
Imprimantă
Imprimanta nu este detectată
Dacă o imprimantă nu apare în lista de dispozitive, accesați pagina principală a casetei IoT și asigurați-vă că este listată sub Imprimante.
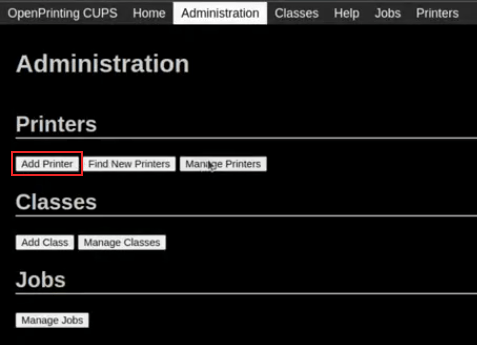
Dacă imprimanta nu este prezentă pe pagina principală a casetei IoT, faceți clic pe Printers Server, accesați fila Administration și faceți clic pe :guilabel:`Add Printer `. Dacă imprimanta nu este prezentă în listă, probabil că nu este conectată corect.
Imprimanta scoate text aleatoriu
Pentru majoritatea imprimantelor, driverul corect ar trebui detectat și selectat automat. Cu toate acestea, în unele cazuri, mecanismul de detectare automată ar putea să nu fie suficient și, dacă nu este găsit niciun driver, imprimanta poate imprima caractere aleatorii.
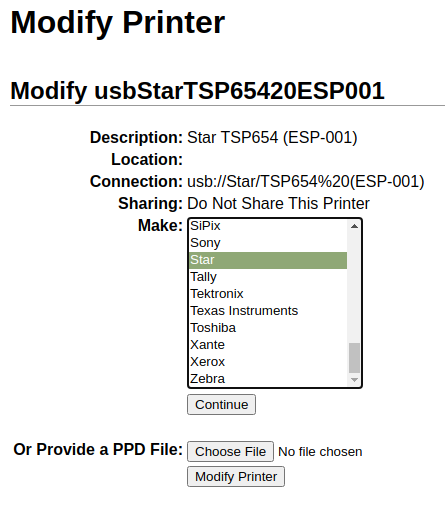
Soluția este să selectați manual driverul corespunzător. Pe pagina de pornire a casetei IoT, faceți clic pe Server imprimante, accesați fila Imprimante și selectați imprimanta din listă. În meniul drop-down Administrare, faceți clic pe Modify Printer. Urmați pașii și selectați marca și modelul corespunzătoare imprimantei.
Notă
Imprimantele pentru bonuri Epson și Star și imprimantele Zebra pentru etichete nu necesită un driver pentru a funcționa. Asigurați-vă că nu este selectat un driver pentru aceste imprimante.
Caz special de configurare Epson
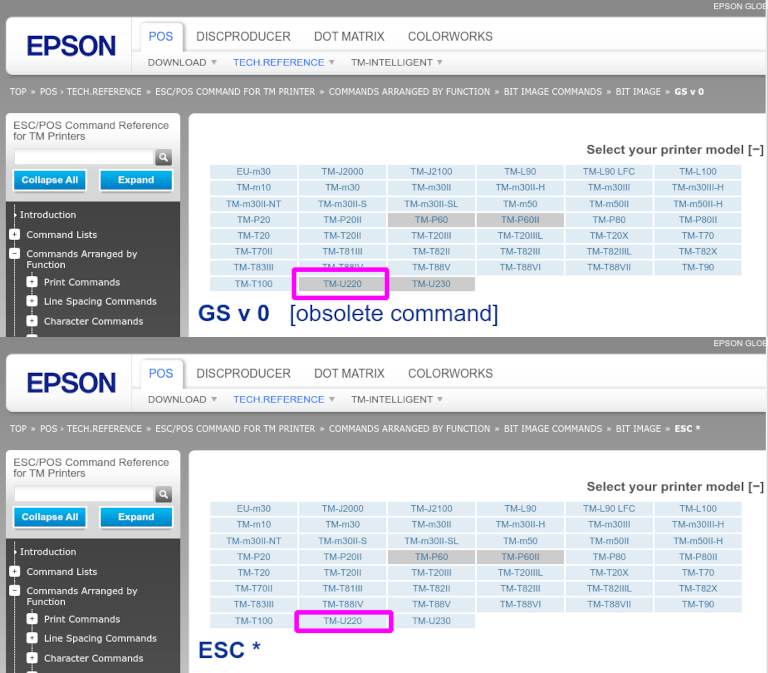
Majoritatea imprimantelor Epson acceptă tipărirea chitanțelor în Odoo POS folosind comanda GS v 0. Cu toate acestea, următoarele modele de imprimantă Epson nu acceptă această comandă:
TM-U220
TM-U230
TM-P60
TMP-P60II
Ocoliți această problemă configurând imprimanta să folosească comanda ESC *.
Proces pentru a forța comanda ESC *
Compatibilitate cu imprimanta Epson
Primul pas este să verificați dacă imprimanta este incompatibilă cu comanda GS v 0.
Vedeți și
Documentația Epson GS v 0 pentru imprimante compatibile
GS v 0.Documentația Epson ESC * pentru imprimantele compatibile
ESC *.
Dacă imprimanta nu este compatibilă cu comanda ESC * atunci următorul proces nu este posibil. Dacă imprimanta este compatibilă să utilizeze comanda ESC * pentru a imprima, urmați acest proces pentru a configura imprimanta cu caseta IoT.
Configurare cutie IoT pentru ESC *
Pentru a configura caseta IoT pentru a utiliza comanda ESC * pentru a imprima, accesați pagina principală a casetei IoT navigând la . Apoi faceți clic pe adresa IP și aceasta va fi direcționată către pagina de pornire a casetei IoT.
Alegerea imprimantei
Acum faceți clic pe butonul Server imprimante. Aceasta va redirecționa browserul către pagina CUPS. Apoi, accesați , alegeți imprimanta care trebuie modificată, apoi faceți clic pe Continuare.
Sfat
Dacă numele imprimantei este încă incert, urmați următorii pași:
Luați notă de imprimantele listate pe pagina CUPS.
Opriți imprimanta și reîmprospătați pagina.
Acum comparați diferența cu prima listă pentru a vedea ce imprimantă a dispărut.
Porniți din nou imprimanta și reîmprospătați pagina.
Verificați din nou lista pentru a vedea dacă imprimanta reapare.
Imprimanta care a dispărut și reapare din nou pe imprimantele listate este numele imprimantei în cauză.
Notă
Acesta poate fi Necunoscut sub Imprimante locale.
Convenția de denumire CUPS
CUPS va solicita administratorului trei informații: Nume, Descriere și Locația. Ultimele două informații nu trebuie să fie specifice, totuși, Nume ar trebui să urmeze o anumită convenție pentru a lucra cu comanda ESC *.
Nume ar trebui să se potrivească cu această convenție: <nume_imprimante>__IMC_<param_1>_<param_2>_..._<param_n>__
O defalcare a convenției de denumire:
printer_name: Acesta este numele imprimantei. Poate fi orice caracter atâta timp cât nu conține_,/,#sau ` ` (caracter spațiu).IMC: Aceasta înseamnă Coloana mod imagine (numele simplificat pentruESC *).param_1: Aceasta reprezintă parametrul specific:SCALE<X>: Scara imaginii (cu același raport de aspect).Xar trebui să fie un număr întreg care descrie procentul de scară care ar trebui utilizat.Example
100este dimensiunea originală,50este jumătate din dimensiune,200este de două ori dimensiunea.LDV: Low Density Vertical (va fi setat la High Density Vertical dacă nu este specificat).LDH: Low Density Horizontal (va fi setat la High Density Horizontal dacă nu este specificat).Notă
Este posibil ca parametrii Densitate să fie configurați într-un mod special, în funcție de modelul imprimantei.
Vedeți și
Vizitați documentația Epson ESC * <https://reference.epson-biz.com/modules/ref_escpos/index.php?content_id=88>`_ și faceți clic pe modelul de imprimantă din tabelul de mai sus pentru a vedea dacă imprimanta trebuie setați acești parametri.
Example
Următoarele sunt exemple de formatare corectă și necorespunzătoare a numelui:
Formatarea corectă a numelui:
EPSONTMm30II__IMC__EPSON_TM_U220__IMC_LDV_LDH_SCALE80__
Formatarea incorectă a numelui (acest lucru nu va împiedica imprimarea, dar este posibil ca rezultatul să nu aibă rezultatul imprimat așteptat):
EPSON TMm 30II-> Numele nu poate avea spații.EPSONTMm30II-> Numele în sine este corect, dar nu va folosiESC *.EPSONTMm30II__IMC-> Acest nume lipsește la sfârșit__.EPSONTMm30II__IMC_XDV__-> ParametrulXDVnu se potrivește cu niciun parametru existent.EPSONTMm30II__IMC_SCALE__-> ParametruluiSCALElipsește valoarea scalei.
Terminați de adăugat o imprimantă
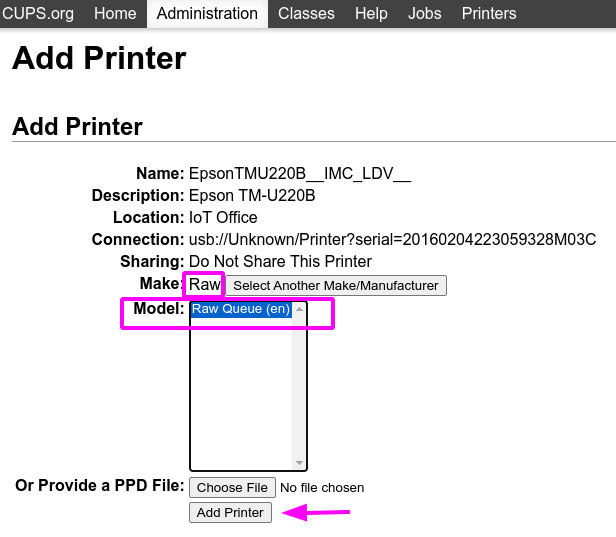
După ce setați numele imprimantei cu convenția de denumire corespunzătoare, faceți clic pe Continuare. Apoi, setați valoarea Make la Raw și pentru valoarea Model, setați aceasta la Raw Queue (en).
După parcurgerea acestor pași, faceți clic pe Add Printer. Dacă totul a fost făcut corect, pagina ar trebui să redirecționeze către pagina Bannere.
În acest moment ar fi trebuit creată imprimanta, acum caseta IoT trebuie doar să o detecteze și apoi să se sincronizeze cu serverul Odoo (acest lucru ar putea dura câteva minute).
Adăugarea imprimantei la Odoo PoS
Odată ce imprimanta este vizibilă în baza de date Odoo, nu uitați să o alegeți în configurația PoS ca imprimanta IoT. Navigați la .
Notă
Dacă imprimanta a fost configurată incorect (încă imprimă text aleatoriu sau chitanța tipărită este prea mare sau prea mică), atunci nu poate fi modificată prin numele imprimantei cu CUPS. În schimb, procesul de mai sus poate fi repetat pentru a configura o altă imprimantă de la zero pentru a crea una cu parametri modificați.
Exemplu de configurare a imprimantei Epson TM-U220B folosind ESC
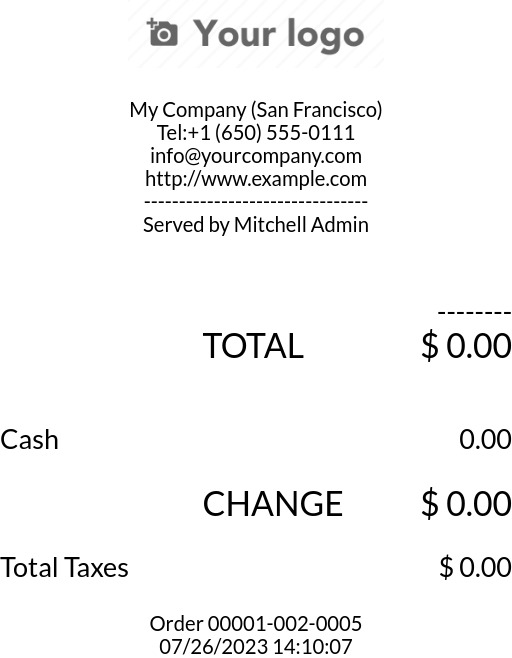
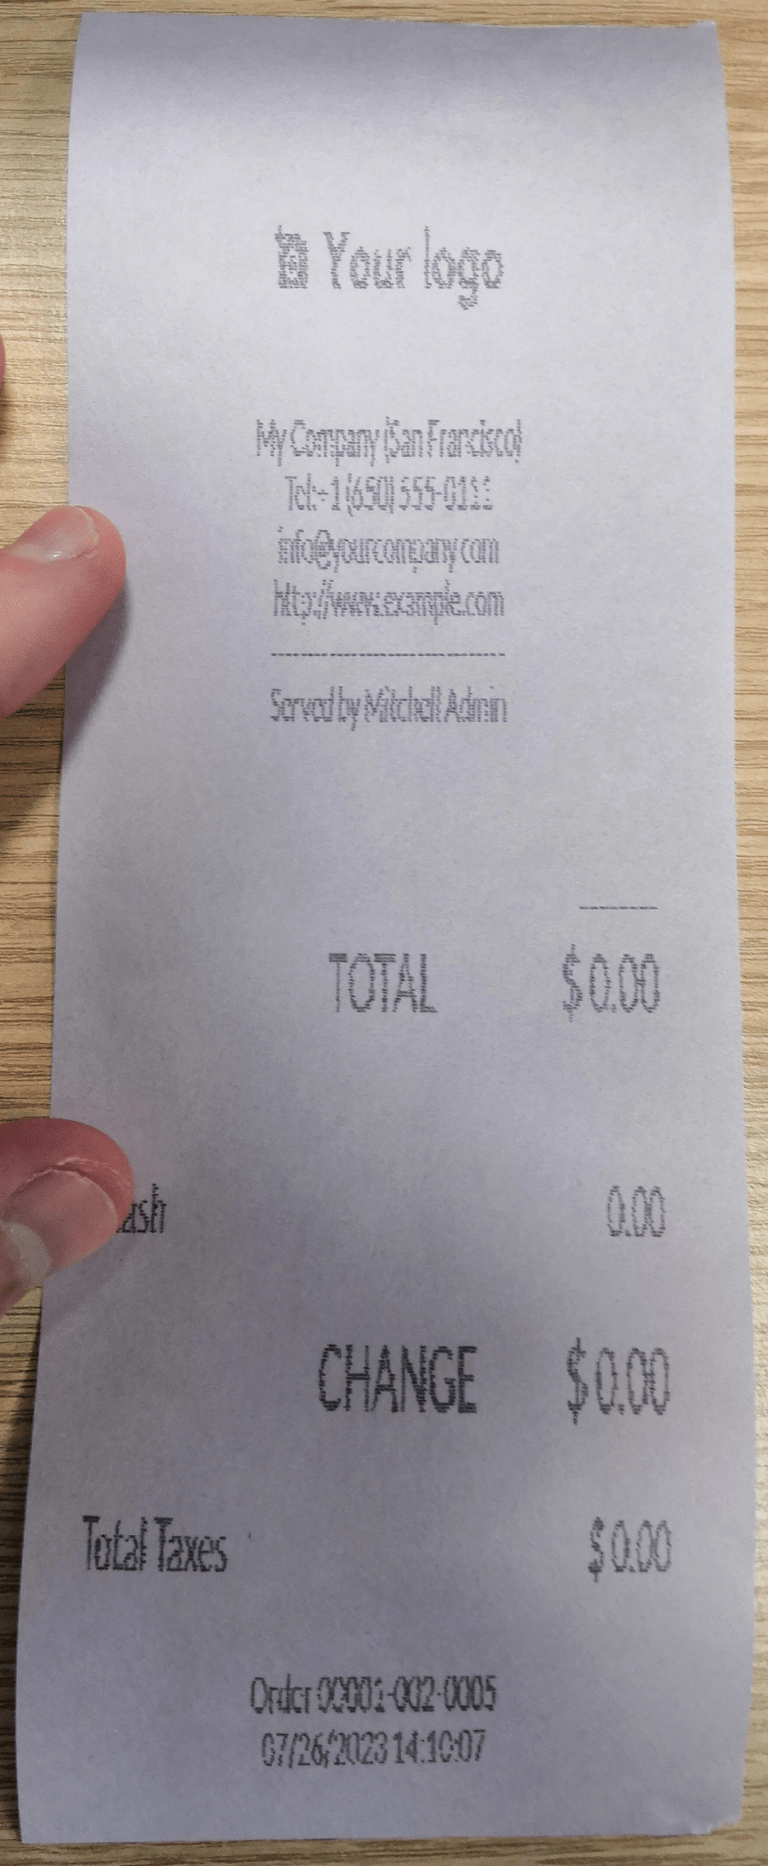
Următorul este un exemplu de proces de depanare pentru un model de imprimantă TM-U220B folosind comanda ESC *. Chitanța din imaginea de mai jos este un exemplu de chitanță care se imprimă corect datorită formatării corecte (teoretic):
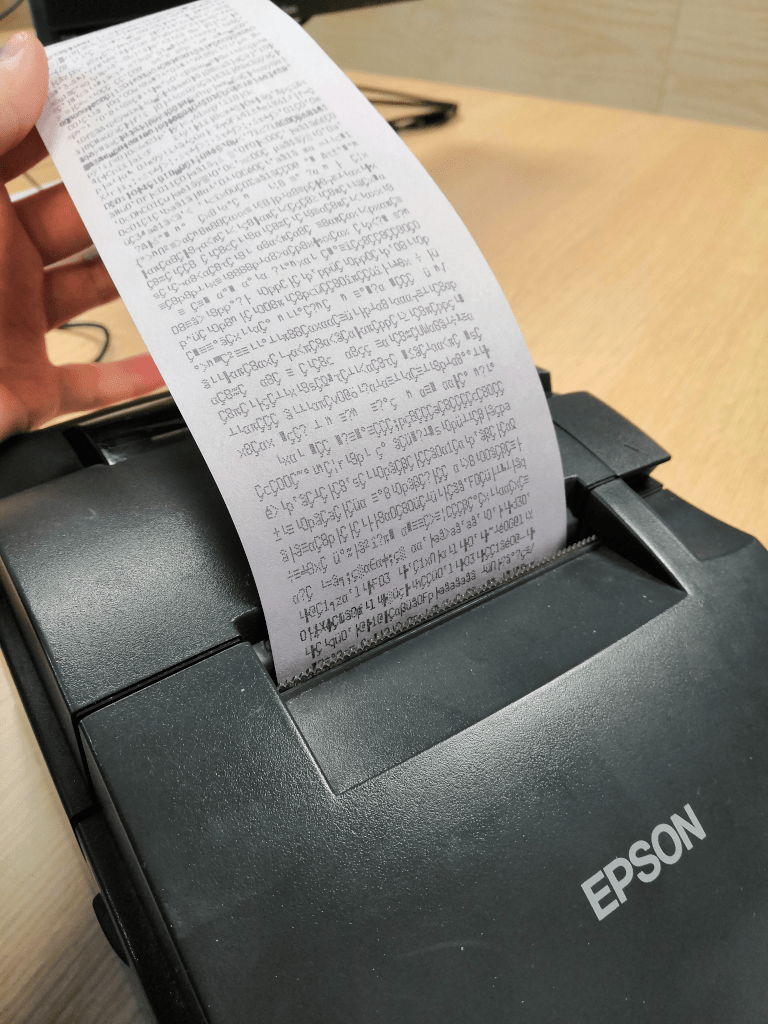
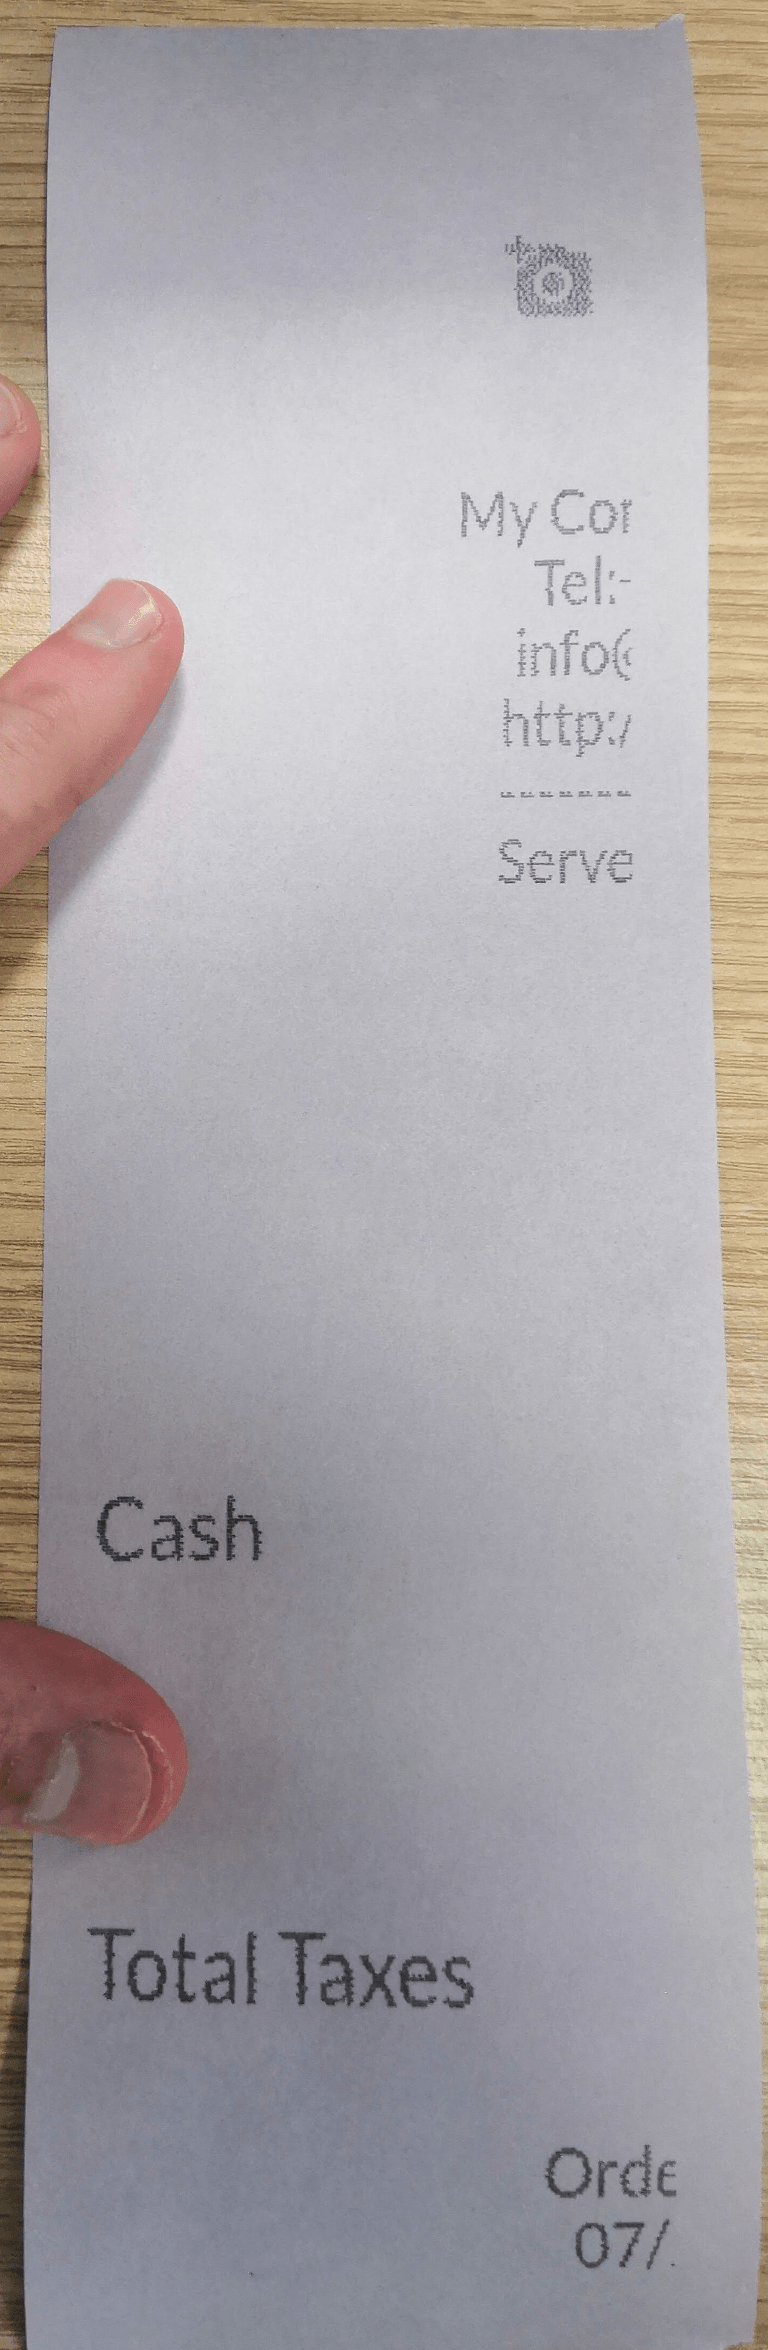
Încercarea de a imprima această chitanță imediat înainte de formatarea corectă nu va funcționa, deoarece modelul de imprimantă TM-U220B nu acceptă GS v 0. În schimb, caracterele aleatorii se vor imprima:
Pentru a configura corect formatarea pentru modelul de imprimantă Epson TM-U220B, parcurgeți următorii pași.
După consultarea site-ului web Epson pentru compatibilitate pentru ambele comenzi: GS v 0 și ESC *, se poate observa că într-adevăr TM-U220B nu este compatibil cu GS v 0, dar este compatibil cu ` ESC *`.
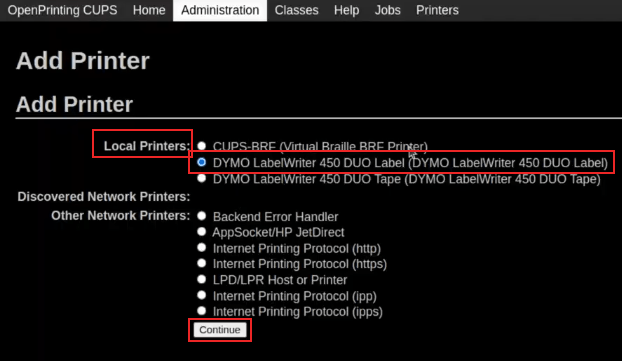
Când adăugați imprimanta, CUPS va întreba ce imprimantă trebuie adăugată:
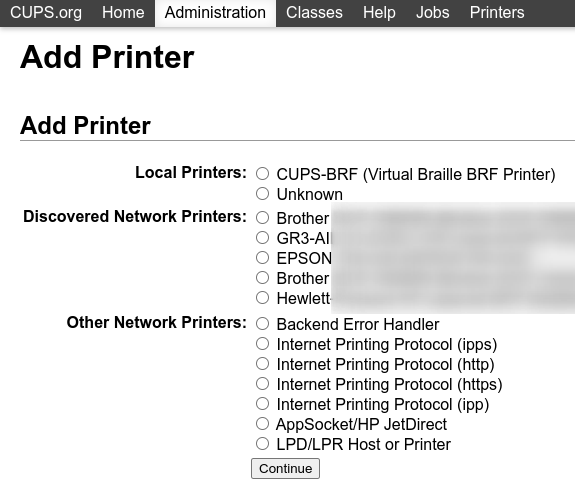
În acest caz, imprimanta este conectată prin USB, așa că va face parte din Discovered Network Printers. În schimb, este probabil parte a selecției Necunoscut de sub Imprimante locale. Prin deconectarea cablului USB al imprimantei din caseta IoT și reîmprospătând pagina, imprimanta Unknown dispare. Prin conectarea din nou la priză, imprimanta reapare, deci se poate spune că aceasta este imprimanta în cauză.
Pentru convenția de denumire, deoarece trebuie să se imprime folosind comanda ESC *, este imperativ să adăugați __IMC. Consultați modelul imprimantei pe site-ul Epson ESC * pentru a afla mai multe despre parametrii density.
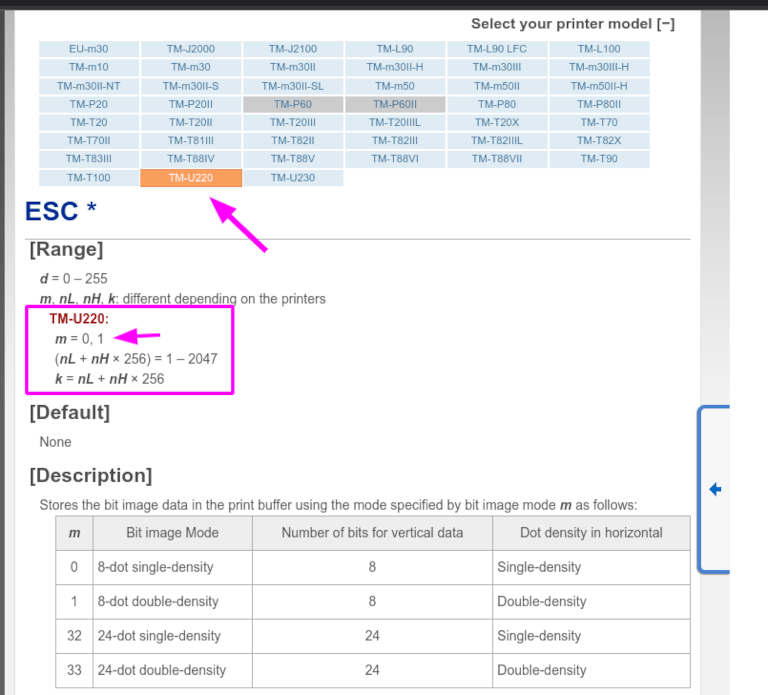
Pentru acest model special, TM-U220, m ar trebui să fie egal cu 0 sau 1. În timp ce faceți referire la Description de sub caseta roz din imaginea de mai sus, valorile m pot fi 0, 1, 32 sau 33. Deci, în cazul imprimantei, valoarea m NU poate fi 32 sau 33 (altfel vor fi tipărite caractere aleatorii).
Tabelul include valorile numerice: 32 și 33, ambele apar dacă Numărul de biți pentru date verticale este setat la 24. Aceasta înseamnă că este o densitate verticală ridicată. În cazul configurării Epson TM-U220, va trebui forțată Low Vertical Density, deoarece acest model de imprimantă nu acceptă High Vertical Density pentru această comandă ESC *.
Pentru a adăuga o Low Vertical Density, adăugați parametrul LDV la convenția de denumire.
Faceți clic pe Continuați pentru a continua. Apoi, setați valoarea Make la Raw și pentru valoarea Model, setați aceasta la Raw Queue (en).
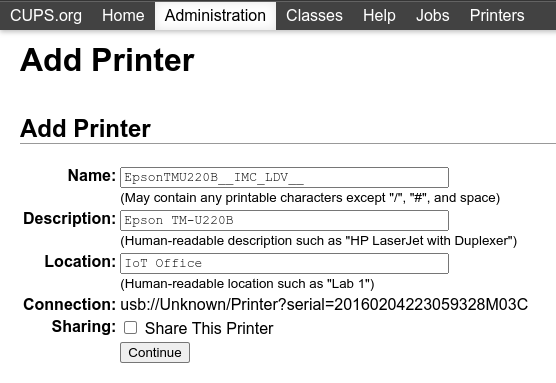
Cu toate acestea, când încercați să imprimați cu convenția de denumire: EpsonTMU220B__IMC_LDV__, tipărește chitanța, dar este prea mare și în afara marginii. Pentru a rezolva acest lucru, adăugați o nouă imprimantă (și convenția de denumire) cu parametrul SCALE<X> pentru a vă adapta la dimensiunea chitanței noastre.
Aiici sunt câteva exemple:
Convenția de denumire a imprimantei |
|
|
|
|
|---|---|---|---|---|
|
|

|
|
|

|
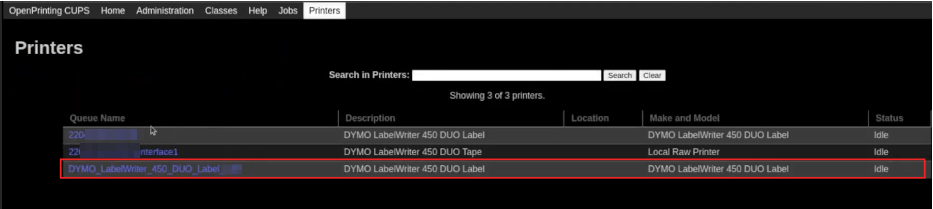
Problemă de imprimare DYMO LabelWriter
DYMO LabelWriter are o problemă cunoscută la imprimarea cu caseta IoT. Serverul OpenPrinting CUPS instalează imprimanta utilizând driverele Local RAW Printer. Pentru a imprima orice, trebuie setat corect Marcă și model, astfel încât driverul corect este referit atunci când utilizați dispozitivul.
În plus, trebuie adăugată o nouă imprimantă pentru a reduce întârzierea de imprimare care apare după actualizarea driverului.
Important
Imprimanta DYMO LabelWriter 450 DUO este imprimanta DYMO recomandată pentru utilizare cu Odoo și cutia IoT. Acesta trebuie să fie deja conectat și recunoscut în caseta IoT.
Imprimanta DYMO LabelWriter 450 DUO conține două imprimante într-una: o imprimantă de etichete și o imprimantă de bandă. Alegerea modelului corect (fie DYMO LabelWriter 450 DUO Label (en) sau DYMO LabelWriter 450 DUO Tape (en)) este crucială atunci când configurați următoarele procese.
Pentru a menține lucrurile consistente, ambele procese de mai jos detaliază configurația pentru modelul DYMO LabelWriter 450 DUO Label (ro). Schimbați modelul când este necesar.
DYMO LabelWriter nu se imprimă
În cazul în care DYMO LabelWriter nu imprimă nimic, trebuie instalat un nou driver.
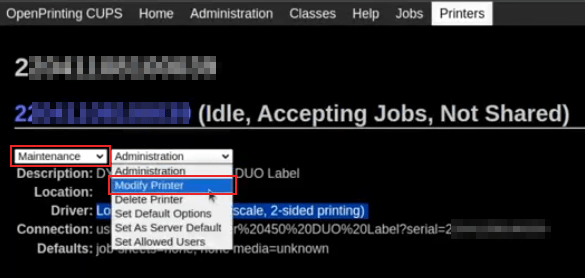
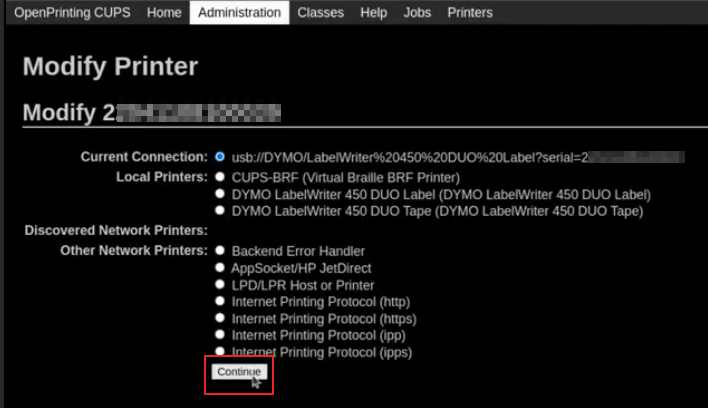
Mai întâi, deschideți consola OpenPrinting CUPS făcând clic pe în partea de jos a paginii de pornire a casetei IoT. Apoi, faceți clic pe din meniul de sus. Faceți clic pe imprimanta în cauză și selectați Maintenance în primul meniu drop-down. Apoi, selectați Modify Printer în al doilea meniu drop-down.
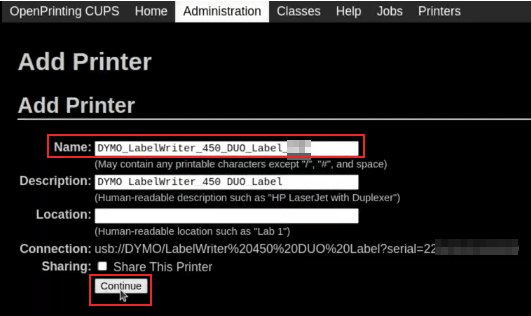
Apoi, selectați conexiunea de rețea/imprimanta specifică pe care trebuie făcută modificarea. Faceți clic pe Continuați.
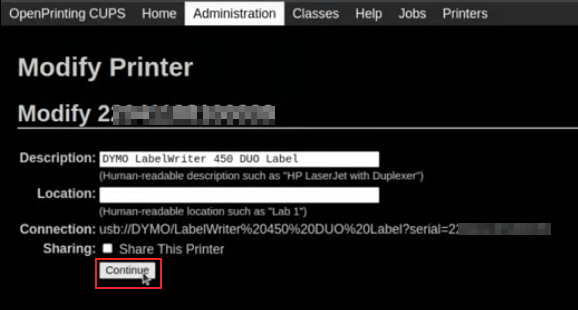
Pe pagina următoare, faceți clic pe Continuați pentru a continua la setarea Marca a imprimantei.
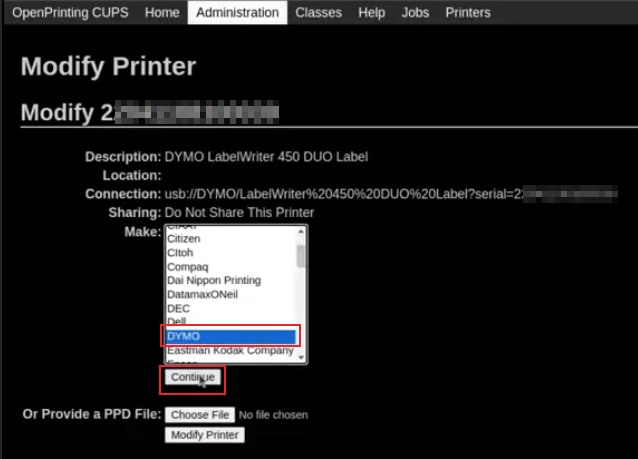
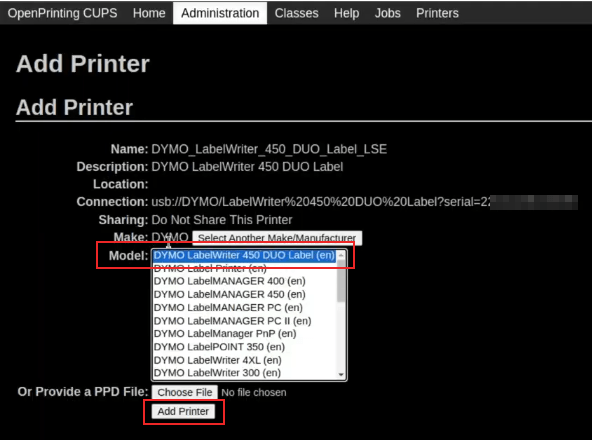
Sub Make selectați DYMO din meniu. Faceți clic pe Continuați pentru a seta Modelul.
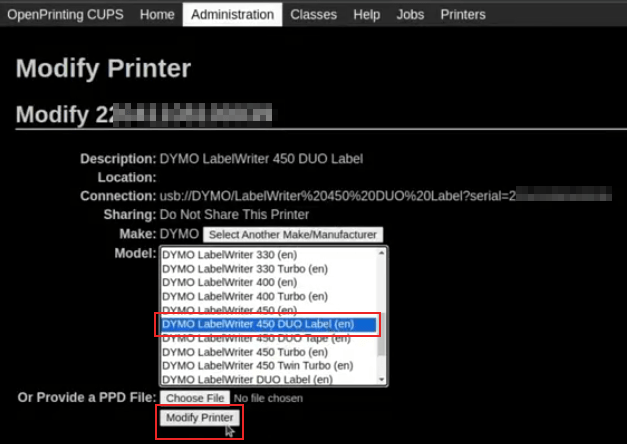
Pe următoarea pagină, setați Model la DYMO LabelWriter 450 DUO Label (en) (sau oricare model de imprimantă DYMO utilizat). Faceți clic pe Modify Printer pentru a finaliza setarea noului driver, va apărea o pagină de confirmare.
După ce ați fost redirecționat către o pagină de confirmare, confirmând o actualizare reușită, faceți clic pe butonul din meniul de sus.
Apar toate imprimantele instalate pe serverul OpenPrinting CUPS, inclusiv noul actualizat: DYMO LabelWriter 450 DUO Label (sau oricare model de imprimantă DYMO utilizat). Faceți clic pe imprimanta care tocmai a fost actualizată.
Pentru a imprima o etichetă de testare, faceți clic pe meniul derulant Maintenance din stânga meniului drop-down Administrare și selectați Print Test Page. Eticheta de testare va fi tipărită cu o întârziere de zece secunde dacă actualizarea driverului a avut succes.

Pentru a reduce această întârziere, va trebui adăugată o nouă imprimantă, urmați procesul de mai jos.
Întârzierea imprimării DYMO LabelWriter
Pentru a rezolva problema de întârziere după modificarea driverului, imprimanta trebuie să fie reinstalată. Pentru a reinstala imprimanta, deschideți pagina de administrare OpenPrinting CUPS făcând clic pe , în partea de jos a paginii de pornire a casetei IoT. Apoi, faceți clic pe în meniul de sus, apoi faceți clic pe Adăugați o imprimantă.
Sfat
Dacă imprimanta DYMO LabelWriter 450 DUO nu se imprimă deloc sau nu este recunoscută (are un tip de driver RAW), atunci actualizați driverele de pe dispozitiv. Consultați DYMO LabelWriter nu se imprimă.
Pe ecranul următor, în secțiunea Imprimante locale, selectați imprimanta preinstalată DYMO LabelWriter 450 DUO Label (DYMO LabelWriter 450 DUO Label) (sau oricare model de imprimantă DYMO utilizat). Faceți clic pe Continuați.
Pe următorul ecran, modificați Nume la ceva ce poate fi recunoscut, deoarece imprimanta originală va fi în continuare prezentă. Faceți clic pe Continuați pentru a fi dus la următorul ecran.
Apoi, alegeți Model. Selectați DYMO LabelWriter 450 DUO Label (en) (sau oricare model de imprimantă DYMO utilizat) și, în final, faceți clic pe Add Printer pentru a finaliza instalarea.
După ce ați fost redirecționat către o pagină de confirmare, confirmând o instalare reușită, faceți clic pe butonul din meniul de sus.
Apar toate imprimantele instalate pe serverul OpenPrinting CUPS, inclusiv noul instalat: DYMO LabelWriter 450 DUO Label (sau oricare model de imprimantă DYMO este utilizat). Faceți clic pe imprimanta care tocmai a fost instalată.
Pentru a imprima o etichetă de testare, faceți clic pe meniul derulant Maintenance din stânga meniului drop-down Administrare și selectați Print Test Page. Eticheta de testare trebuie imprimată imediat (întârziere de una până la două secunde).
Imprimanta Zebra nu imprimă nimic
Imprimantele Zebra sunt destul de sensibile la formatul codului Zebra Programming Language (ZPL) care este imprimat. Dacă nu iese nimic din imprimantă sau sunt tipărite etichete goale, încercați să schimbați formatul raportului care este trimis către imprimantă accesând în :ref :developer mode <developer-mode> și căutați șablonul corespunzător.
Vedeți și
Consultați instrucțiunile Zebra despre tipărirea fișierelor ZPL aici.
Scaner de coduri de bare
Caracterele citite de scanerul de coduri de bare nu se potrivesc cu codul de bare
În mod implicit, majoritatea scanerelor de coduri de bare sunt configurate în format QWERTY SUA. Dacă scanerul de coduri de bare folosește un aspect diferit, accesați vizualizarea formular a dispozitivului () și selectați formatul corect.
Nu se întâmplă nimic când un cod de bare este scanat
Asigurați-vă că dispozitivul corect este selectat în configurația și că codul de bare este configurat să trimită un caracter ENTER (cod cheie 28) la sfârșitul fiecărui cod de bare. Pentru a face acest lucru, navigați la .
Scannerul de cod de bare este detectat ca o tastatură
Important
Unele scanere de coduri de bare nu se fac publicitate ca scanere de coduri de bare, ci ca o tastatură USB și nu vor fi recunoscute de caseta IoT.
Tipul de dispozitiv poate fi modificat manual accesând vizualizarea formularului () și activând opțiunea Is scanner.
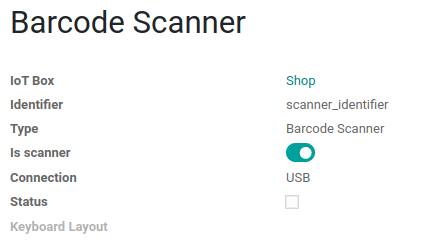
Scanerul de coduri de bare procesează caracterele codurilor de bare individual
Când accesați versiunea mobilă a Odoo de pe un dispozitiv mobil sau tabletă, asociată cu un scaner de coduri de bare, prin caseta IoT, scanerul poate procesa fiecare caracter de cod de bare ca o scanare individuală. În acest caz, opțiunea Keyboard Layout trebuie să fie completată cu limba corespunzătoare a scanerului de coduri de bare pe pagina de formular Barcode Scanner.
Sfat
Accesați pagina de formular a scanerului de coduri de bare navigând la .
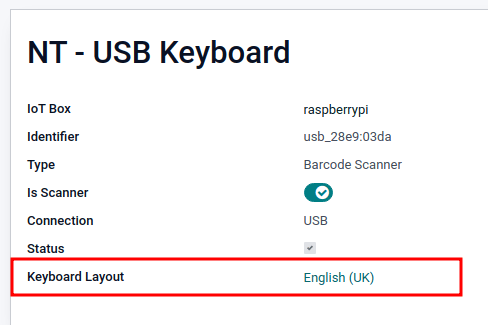
Keyboard Layout se bazează pe limbă, iar opțiunile disponibile variază, în funcție de dispozitiv și de limba bazei de date. De exemplu: Engleză (UK), Engleză (SUA) etc.
Sertar de bani
Sertarul de numerar nu se deschide
Sertarul de numerar trebuie să fie conectat la imprimantă și caseta de selectare Sertar de numerar trebuie bifată în configurația PoS. Pentru a face acest lucru, navigați la .
Cântar
Cântarele joacă un rol crucial în procesul de plată, în special pentru produsele vândute la greutate, mai degrabă decât la prețuri fixe.
Configurați cântare Ariva S
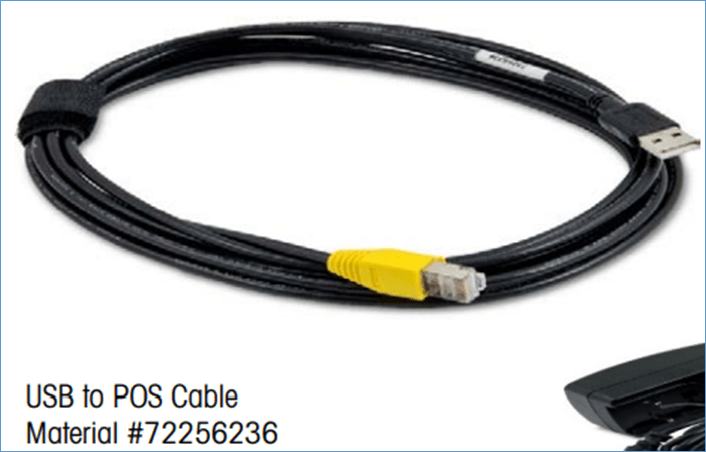
Odoo a stabilit că o anumită setare în cântarele din seria Ariva S (fabricate de Mettler-Toledo, LLC.) necesită modificări și este necesar un cablu Mettler USB-la-proprietar RJ45 dedicat Mettler :abbr:` scala pentru a funcționa cu caseta Odoo IoT.
Pentru a configura corect scala pentru recunoaștere prin caseta IoT, urmați acest proces de configurare pentru cântarele din seria Ariva S.
Important
Este crucial să utilizați cablul oficial Mettler USB-la-RJ45 în timpul acestui proces.
Cablu
Numărul piesei Mettler este 72256236 - cablu USB-la-POS. Contactați Mettler sau un partener pentru a cumpăra un cablu autentic. Rețineți că niciun alt cablu în afara acestui cablu Mettler nu funcționează pentru această configurație. Utilizarea unui cablu numai serial atașat la un adaptor serial la:abbr:USB (Universal Serial Bus) este nu eficientă.
Configurare
Consultați Ghidul de configurare Mettler pentru cântarele din seria Ariva S în timpul următoarei configurări: Ariva Checkout Scale User’s Guide.
Pentru a începe, mergeți la pagina 17 din manualul de mai sus pentru Configurare. Acest ghid enumeră setările potențiale pentru cântarele din seria Ariva S.
Urmați instrucțiunile, împreună cu următorul proces, pentru a seta cântarul în modul de configurare. Mai întâi, țineți apăsat butonul >T< timp de opt secunde sau până când apare CONF.
Apoi, apăsați >T< până când apare GRP 3, apoi apăsați >0< pentru a confirma.
Sub 3.1, asigurați-vă că setarea este setată la 1 (porturi COM Virtuale USB). Apăsați >T< pentru a parcurge opțiunile din grupul 3.1.
Odată ce 3.1 este setat la 1, apăsați >0< pentru a confirma selecția. Continuați să apăsați >0< până când apare GRP 4.
Acum, apăsați >T< până când apare EXIT.
Important
Nu faceți alte modificări decât dacă este necesar altfel.
Odată ce apare EXIT, apăsați >0<. După aceasta, apăsați din nou >0< pentru a SAVE. Acum cântarul repornește.
În cele din urmă, reporniți caseta IoT pentru a recunoaște modificările făcute în configurația scalei. După repornire, cântarul apare ca Toledo 8217, spre deosebire de afișajul anterior, unde apărea ca Adam Equipment Serial.