Create new vehicles
Odoo’s Fleet app manages all vehicles and the accompanying documentation that comes with vehicle maintenance and driver’s records.
All vehicles are organized on the main Fleet dashboard. Each vehicle has its own vehicle form, which is displayed as a card in the kanban view, according to it’s status. Every vehicle form is displayed in its current corresponding kanban stage. The default stages are New Request, To Order, Ordered, Registered, Downgraded, Reserve, and Waiting List.
To add a new vehicle to the fleet, click the Create button, and a blank vehicle form loads. Enter the vehicle information in the vehicle form, then click Save.
Câmpuri pentru formularul vehiculului
Model: select the vehicle’s model from the drop-down menu. If the model is not listed, type in the model name and click either Create or Create and Edit.
Placă de înmatriculare: introduceți numărul de înmatriculare al vehiculului în acest câmp.
Etichete: selectați orice etichetă din meniul derulant sau introduceți o nouă etichetă. Nu există limită pentru numărul de etichete care pot fi selectate.
Notă
The Model is the only required field on the new vehicle form. When a model is selected, other fields will appear on the vehicle form, and relevant information will auto-populate fields that apply to the model. If some of the fields do not appear, this may indicate there is no model selected.
Secțiunea șofer
Această secțiune a formularului vehiculului se referă la persoana care conduce în prezent mașina, precum și la orice planuri de schimbare a șoferului în viitor și când.
Driver: select the driver from the drop-down menu, or type in a new driver and click either Create or Create and Edit.
Mobility Card: if the selected driver has a mobility card listed on their employee card in the Employees application, the mobility card number will appear in this field. If there is no mobility card listed and one should be added, edit the employee card in the Employees application.
Future Driver: if the next driver for the vehicle is known, select the next driver from the drop-down menu, or type in the next driver and click either Create or Create and Edit.
Plan To Change Car: if the current driver set for this vehicle plans to change their vehicle, either because they are waiting on a new vehicle that is being ordered, or this is a temporary vehicle assignment and they know which vehicle they will be driving next, check this box. If the current driver does not plan to change their vehicle and use this current vehicle, do not check this box.
Assignment Date: select the date the vehicle will be available for another driver using the drop-down calendar. Select the date by navigating to the correct month and year using the ⬅️ (left arrow) and ➡️ (right arrow) icons, then click on the specific day. If this field is blank, this indicates the vehicle is currently available and can be reassigned to another driver. If it is populated, the vehicle will not be available to assign to another driver until the date entered.
Important
A driver does not have to be an employee, but a driver must be listed in the Contacts application. When creating a new driver, the driver is added to the Contacts application, not the Employees application.
Secția de vehicule
This section of the vehicle form relates to the physical vehicle, it’s various properties, when it was added, where it is located, and who is managing it.
Immatriculation Date: select the date the vehicle is acquired using the drop-down calendar.
Cancellation Date: select the date the vehicle lease will expire, or when the vehicle will be no longer available, using the drop-down calendar.
Număr șasiu: introduceți numărul șasiului în câmp. Acesta este cunoscut în unele țări ca număr VIN.
Ultimul contor de parcurs: introduceți ultima citire cunoscută a contorului de parcurs în câmpul de număr. Folosind meniul derulant de lângă câmpul de număr, selectați dacă citirea contorului de parcurs este în kilometri (km) sau mile (mi).
Fleet Manager: select the fleet manager from the drop-down menu, or type in a new fleet manager and click either Create or Create and Edit.
Location: type in the location for the vehicle in the field. The most common scenario for when this field would be populated is if a company has several office locations. The typical office location where the vehicle is located would be the location entered.
Company: select the company that the vehicle will be used for and associated with from the drop-down menu, or type in a new company and click either Create or Create and Edit.
Important
Creating a new company may cause a subscription price change depending on the current plan. Refer to Odoo’s pricing plan for more details.

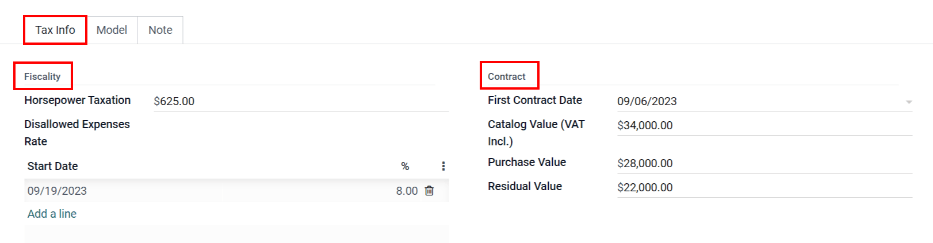
Fila Informații fiscale
Fiscalitate
Horsepower Taxation: enter the amount that is taxed based on the size of the vehicles engine. This is determined by local taxes and regulations, and varies depending on the location. It is recommended to check with the accounting department to ensure this value is correct.
Disallowed Expense Rate: this is the amount of non-deductible expenses for the vehicle. This amount is not counted towards any deductions on a tax return or as an allowable expense when calculating taxable income. It is recommended to check with the accounting department to ensure the value(s) entered are correct.
Start Date: enter the Start Date and (%) Percentage for when the Disallowed Expense Rate value goes into effect. Click Add a line to enter a date. Click on the blank line to display a calendar. Select the date by navigating to the correct month and year using the ⬅️ (left arrow) and ➡️ (right arrow) icons, then click on the specific day. Enter the percentage that is disallowed in the % (percent) field to the right of the date. The percentage should be entered in an XX.XX format. Repeat this for all entries needed.
Contract
First Contract Date: selectați data de începere a primului contract al vehiculului utilizând calendarul drop-down. De obicei, aceasta este ziua în care vehiculul este achiziționat sau închiriat.
Valoare de catalog (TVA inclus): introduceți MSRP (Prețul de vânzare cu amănuntul sugerat de producător) pentru vehicul în momentul achiziției sau închirierii.
Valoare de cumpărare: introduceți prețul de cumpărare sau valoarea leasingului pentru vehicul.
Valoare reziduală: introduceți valoarea curentă a vehiculului.
Notă
The values listed above will affect the accounting department. It is recommended to check with the accounting department for more information and/or assistance with these values.
Fila Model
Dacă modelul noului vehicul este deja configurat în baza de date, fila Model va fi populată cu informațiile corespunzătoare. Dacă modelul nu este deja în baza de date și trebuie configurată fila Model, configurați noul model de vehicul.
Check the information in the Model tab to ensure it is accurate. For example, the color of the vehicle, or whether there is a trailer hitch installed or not, are examples of information that may need updating.

Fila Notă
Introduceți orice notă pentru vehicul în această secțiune.