Sincronizarea calendarului Outlook
Sincronizarea Calendarului Outlook al unui utilizator cu Odoo este utilă pentru a ține evidența sarcinilor și întâlnirilor în toate aplicațiile conexe.
Configurare Microsoft Azure
Pentru a sincroniza Calendarul Outlook cu Calendarul Odoo, este necesar un cont Microsoft Azure. Crearea unui cont este gratuită pentru utilizatorii care nu au încercat sau au plătit niciodată Azure. Pentru mai multe informații, vedeți opțiunile contului de pe „site-ul web Azure <https://azure.microsoft.com/en-us/free/?WT.mc_id=A261C142F>`_.
Consultați documentația Microsoft despre cum să configurați un Microsoft Entra ID ( numit oficial Microsoft Azure Active Directory (Azure AD)). Aceasta este o consolă API pentru gestionarea și înregistrarea aplicațiilor Microsoft.
Utilizatorii Microsoft Entra ID existenți ar trebui să se conecteze la Portalul pentru dezvoltatori Microsoft Azure. Apoi, selectați Vizualizare în secțiunea etichetată Gestionați ID-ul Microsoft Entra.
Înregistrați aplicația
După ce vă conectați cu Microsoft Entra ID, „înregistrați o aplicație <https://docs.microsoft.com/en-us/azure/active-directory/develop/quickstart-register-app>`_.
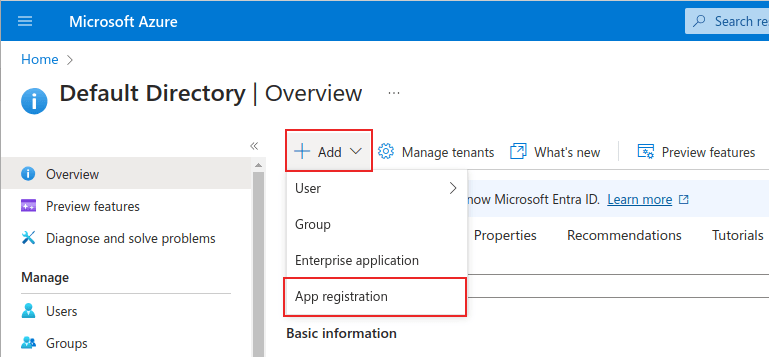
Pentru a crea o aplicație, faceți clic pe + Adaugă în meniul de sus. Din meniul derulant rezultat, selectați Înregistrare aplicație.
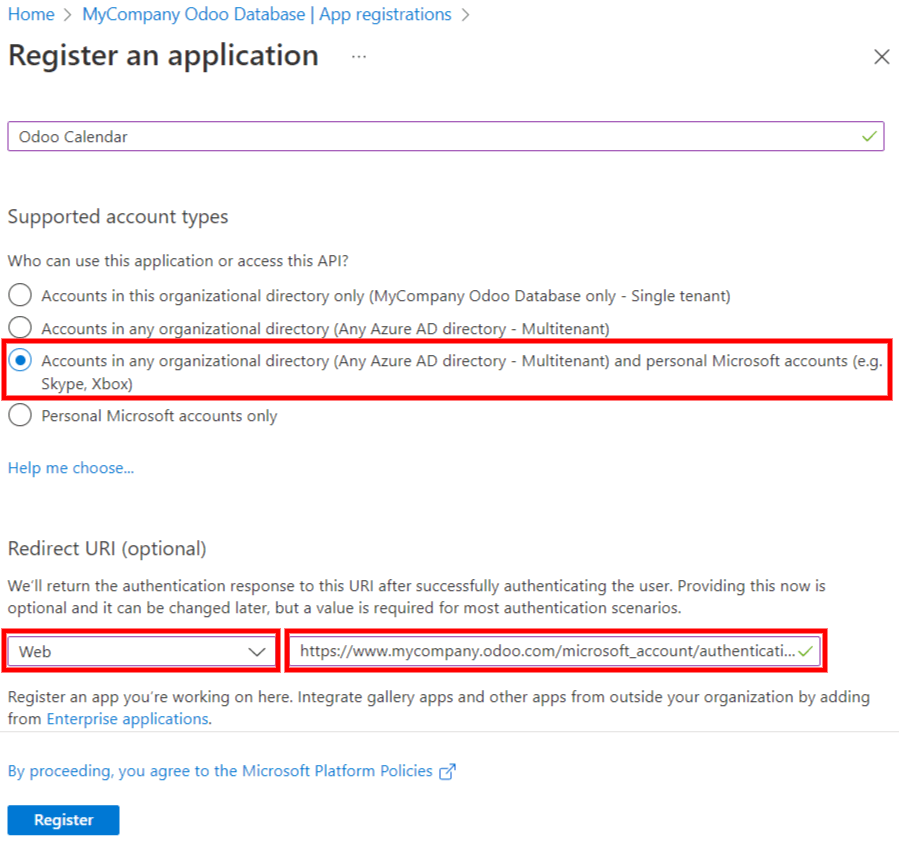
Introduceți un Nume unic pentru aplicația conectată.
Alegerea Tipul de cont acceptat adecvată este esențială, altfel aplicația conectată nu va funcționa. Utilizatorii care doresc să-și conecteze Calendarul Outlook la Odoo ar trebui să selecteze opțiunea Conturi din orice director organizațional (Orice director Microsoft Entra ID - Multitenant) și conturi personale Microsoft (de exemplu, Skype, Xbox) pentru :guilabel:` Tipuri de cont acceptate`.
Când configurați URI de redirecționare, alegeți opțiunea Web din primul meniu derulant. Apoi, introduceți URI (URL-ul) bazei de date Odoo urmat de /microsoft_account/authentication.
Example
Introduceți https://yourdbname.odoo.com/microsoft_account/authentication pentru URI de redirecționare. Înlocuiți yourdbname.odoo.com cu URL.
Sfat
Asigurați-vă că URL-ul (domeniul) al bazei de date utilizat în URI este exact același domeniu ca cel configurat în parametrul de sistem web.base.url.
Accesați web.base.url activând developer mode și navigând la . Apoi, selectați-l din lista Key de pe pagina System Parameters.
Pentru mai multe informații despre restricțiile și limitările URI-urilor, verificați restricțiile și limitările `Redirect URI (URL de răspuns) de la Microsoft <https://docs.microsoft.com/en-us/azure/active-directory/develop/reply-url> `_ pagina.
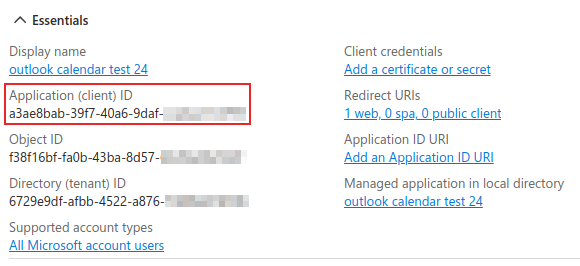
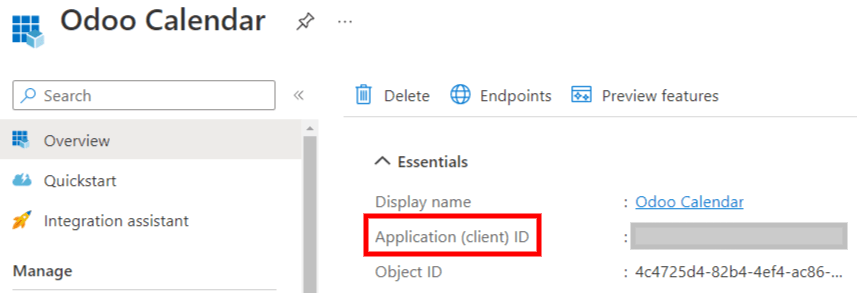
În cele din urmă, pe pagina de înregistrare a aplicației, faceți clic pe butonul Înregistrați pentru a finaliza înregistrarea aplicației. Se produce ID-ul aplicației (client). Copiați această valoare, așa cum este necesară mai târziu, în Configurare în Odoo.
Creați secretul clientului
A doua acreditare necesară pentru a finaliza sincronizarea Calendarului Outlook Microsoft este Secretul clientului. Utilizatorul trebuie să adauge un secret de client, deoarece acest lucru permite Odoo să se autentifice, nefiind nevoie de interacțiune din partea utilizatorului. Certificatele sunt optionale.
Pentru a adăuga un secret de client, faceți clic pe în meniul din stânga. Apoi faceți clic pe + Secret client nou pentru a crea secretul clientului.

Apoi, tastați o Descriere și selectați când secretul clientului Expiră. Opțiunile disponibile includ: 90 zile (3 luni), 365 zile (12 luni), 545 zile (18 luni), 730 zile (24 luni) ` sau :guilabel:`Custom. Opțiunea Custom permite administratorului să seteze o dată Start și End.
În cele din urmă, faceți clic pe Adăugați la Adăugați un secret de client.
Sfat
Deoarece resetarea sincronizării poate fi dificilă, Odoo recomandă setarea datei de expirare maximă permisă pentru secretul clientului (24 de luni sau personalizat), astfel încât nu este nevoie să resincronizați în curând.
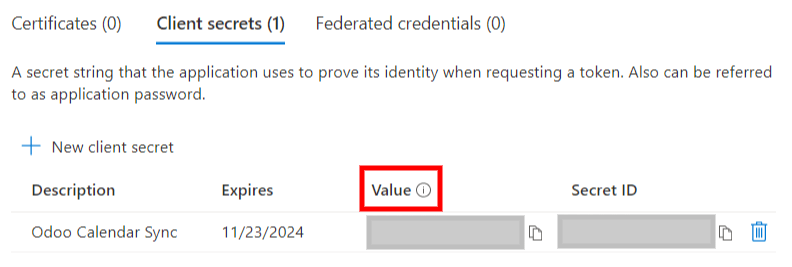
Copiați Valoare pentru a fi utilizat în secțiunea următoare.
Atenționare
Valorile secrete ale clientului nu pot fi vizualizate, decât imediat după creare. Asigurați-vă că salvați secretul când este creat înainte de a părăsi pagina.
Configurare în Odoo
În baza de date Odoo, accesați și bifați caseta de selectare de lângă setarea Outlook Calendar. Nu uitați să faceți clic pe Salvați pentru a implementa modificările.
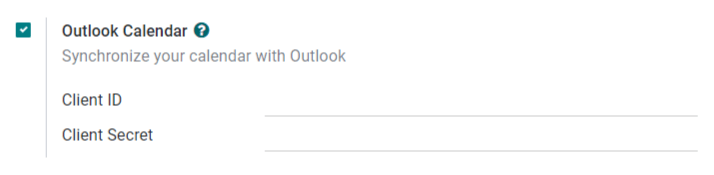
Din portalul Microsoft Azure, în secțiunea Prezentare generală a aplicației, copiați ID aplicației (client), dacă nu a fost deja copiat și inserați-l în :guilabel: Câmpul „ID client” în Odoo.
Copiați Value (Valoarea secretă a clientului) achiziționată anterior și inserați-o în câmpul Secret client din Odoo.
În cele din urmă, pe pagina din Odoo, faceți clic pe Salvați.
Sincronizați cu Outlook
Atenționare
Odoo recomandă în mod deosebit să testați sincronizarea calendarului Outlook pe o bază de date de testare și o adresă de e-mail de testare (care nu este folosită pentru nici un alt scop) înainte de a încerca să sincronizați calendarul Outlook dorit cu baza de date de producție a utilizatorului.
Dacă utilizatorul are orice evenimente trecute, prezente sau viitoare pe calendarul său Odoo înainte de sincronizarea calendarului Outlook, Outlook va trata evenimentele extrase din calendarul Odoo în timpul sincronizării ca evenimente noi, provocând trimiterea unei notificări prin e-mail de la Outlook tuturor participanților la eveniment.
Pentru a evita trimiterea neașteptată a e-mailurilor tuturor participanților la evenimentele trecute, prezente și viitoare, utilizatorul trebuie să adauge evenimentele din calendarul Odoo în calendarul Outlook înainte de prima sincronizare, să șteargă evenimentele din Odoo, și apoi să înceapă sincronizarea.
Chiar și după sincronizarea calendarului Odoo cu calendarul Outlook, Outlook va trimite totuși o notificare tuturor participanților la eveniment la fiecare dată când un eveniment este editat (creat, șters, dezarhivat, sau dată/timpul evenimentului modificat), fără excepții. Aceasta este o limitare care nu poate fi rezolvată pe partea de Odoo.
În concluzie, odată ce un utilizator sincronizează calendarul Outlook cu calendarul Odoo:
Crearea unui eveniment în Odoo provoacă trimiterea unei invitații prin e-mail tuturor participanților la eveniment de la Outlook.
Ștergerea unui eveniment în Odoo provoacă trimiterea unei anulații prin e-mail tuturor participanților la eveniment de la Outlook.
Dezarhivarea unui eveniment în Odoo provoacă trimiterea unei invitații prin e-mail tuturor participanților la eveniment de la Outlook.
Arhivarea unui eveniment în Odoo provoacă trimiterea unei anulații prin e-mail tuturor participanților la eveniment de la Outlook.
Adăugarea unui contact la un eveniment provoacă trimiterea unei invitații prin e-mail tuturor participanților la eveniment de la Outlook.
Eliminarea unui contact dintr-un eveniment provoacă trimiterea unei anulații prin e-mail tuturor participanților la eveniment de la Outlook.
Sincronizare calendar Odoo și Outlook
În baza de date Odoo, deschideți modulul Calendar și faceți clic pe butonul de sincronizare Outlook din partea dreaptă a paginii, sub calendarul lunar.

Sincronizarea este un proces bidirecțional, ceea ce înseamnă că evenimentele sunt reconciliate în ambele conturi (Outlook și Odoo). Pagina redirecționează către o pagină de conectare Microsoft și utilizatorului i se cere să se conecteze la contul său, dacă nu este deja. În cele din urmă, acordați permisiunile necesare făcând clic pe Accept.

Notă
Toți utilizatorii care doresc să folosească sincronizarea trebuie pur și simplu să să sincronizeze calendarul cu Outlook. Configurarea contului Azure al Microsoft se face o singură dată, deoarece ID-urile clientului și secretele clientului ale chiriașilor Microsoft Entra ID sunt unice și ajută utilizatorul să gestioneze o anumită instanță a serviciilor cloud Microsoft pentru utilizatori interni și externi.
Depanați sincronizarea
Pot exista momente în care contul Microsoft Outlook Calendar nu se sincronizează corect cu Odoo. Problemele de sincronizare pot fi văzute în jurnalele bazei de date.
În aceste cazuri, contul necesită depanare. O resetare poate fi efectuată folosind butonul Resetare cont, care poate fi accesat navigând la . Apoi, selectați utilizatorul pentru a modifica calendarul și faceți clic pe fila Calendar.
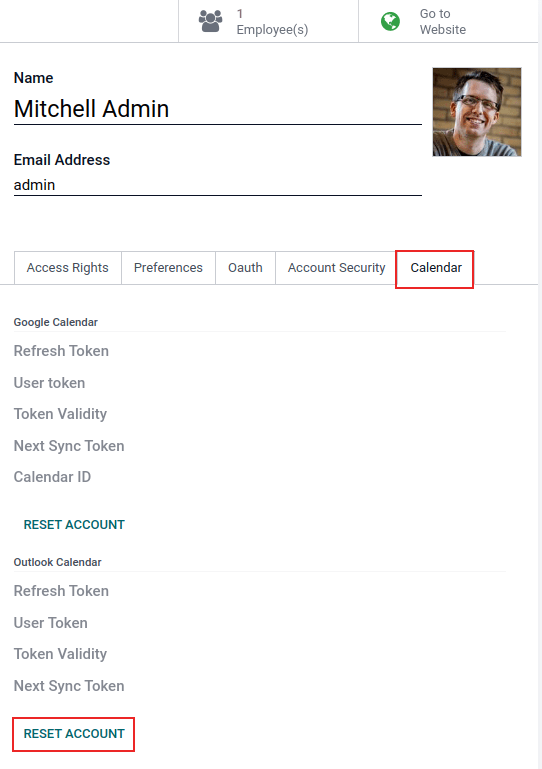
Apoi, faceți clic pe Resetați contul sub calendarul corect.
Opțiuni de resetare
Următoarele opțiuni de resetare sunt disponibile pentru depanarea Microsoft Outlook Calendar sincronizare cu Odoo:
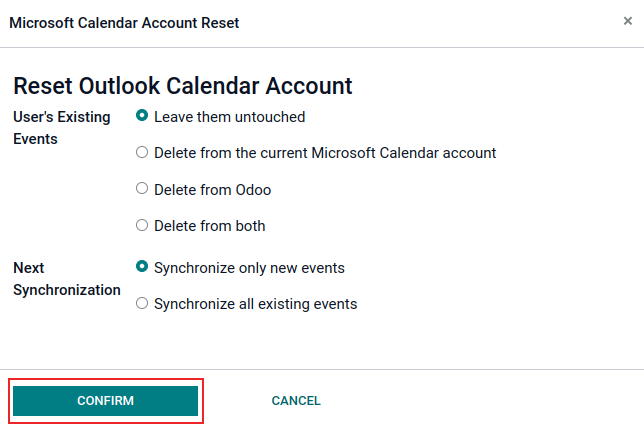
Evenimente existente ale utilizatorului:
Lasa-le neatinse: fara modificari la evenimente.
Ștergeți din contul curent Microsoft Calendar: ștergeți evenimentele din Microsoft Outlook Calendar.
Șterge din Odoo: șterge evenimentele din calendarul Odoo.
Ștergeți din ambele: ștergeți evenimentele atât din Calendarul Microsoft Outlook, cât și din calendarul Odoo.
Următoarea sincronizare:
Sincronizați numai evenimente noi: sincronizați evenimente noi pe Calendarul Microsoft Outlook și/sau calendarul Odoo.
Sincronizează toate evenimentele existente: sincronizați toate evenimentele din Calendarul Microsoft Outlook și/sau calendarul Odoo.
Faceți clic pe Confirmați după ce ați făcut selecția pentru a modifica evenimentele utilizatorului și sincronizarea calendarului.