前台
The Odoo Frontdesk application provides a way for visitors to check in to a building or location, and alert the person they are meeting about their arrival. Additionally, they can request a pre-configured beverage to be brought to them, while they wait.
This application is ideal for businesses that do not have someone working at a reception desk, locations without a designated waiting area available to guests and visitors.
配置
The first item to configure with the Frontdesk application is the station, followed by any drink selections that might optionally be offered.
岗位
In Odoo’s Frontdesk application, a Station can be thought of as any location where someone can sign in and wait for an employee. This is typically some form of waiting room, such as a lobby. Each station has a kiosk where visitors check in.
When setting up the Frontdesk application, a minimum of one station must be configured, but there is no limit to how many stations can be created and configured.
To create a station, navigate to , and click New. When clicked, a blank frontdesk form appears.
Enter the following information on the form:
Frontdesk Name: enter a name for the specific frontdesk location. This should be short and easily identifiable, such as
Reception DeskorMain Lobby. This field is required in order to create a station.Responsibles: select the person (or persons) who are alerted when a visitor checks in using this specific frontdesk. Multiple selections can be entered. This field is required in order to create a station.
Kiosk URL: this field auto-populates once the frontdesk form is saved, with at least the Frontdesk Name and Responsibles fields filled. To save manually, click the (cloud with upward arrow) icon, located at the top of the form.
Once saved, a URL is generated in the Kiosk URL field. This URL is one way the frontdesk kiosk is accessed.
To access the kiosk, click the Copy button at the end of the URL, and navigate to that URL in a web browser. This URL opens that specific station’s frontdesk sign-in page.
小技巧
To add an image/photo to a frontdesk form, hover over the (camera with a ‘+’ sign) icon in the top-right of the form to reveal a ✏️ (pencil) icon.
Click on the ✏️ (pencil) icon to open a file explorer, navigate to the desired image/photo file, then click Open to select it.
The image selected for the station photo appears as the background image for the station kiosk.
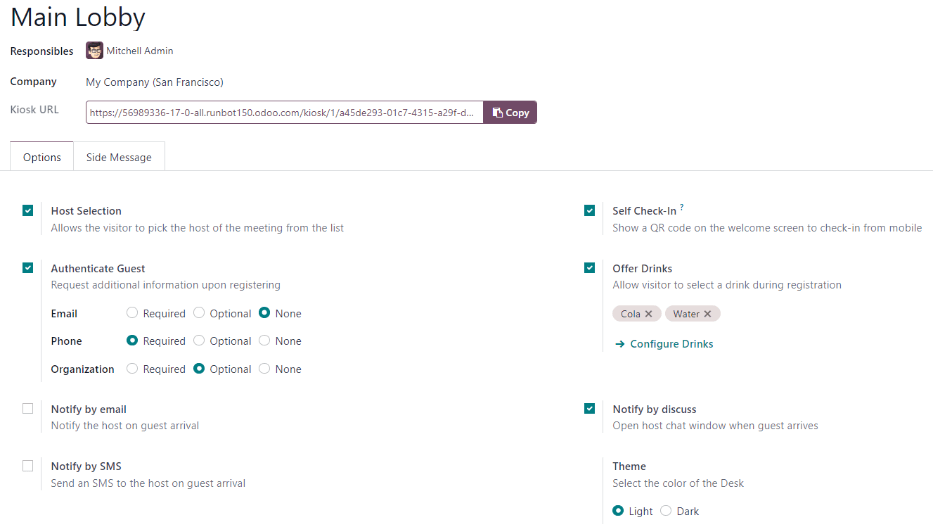
“选项”选项卡
Host Selection: if the visitor is attending a meeting, this option allows the visitor to select the meeting host from a presented list, and notify that individual. When enabled, additional fields appear, as detailed below.
Authenticate Guest: if additional information is required when a guest checks in, enable this option, and select which of the following are required:
Email: select whether the guest’s email address is Required, Optional, or if the information is not requested at all (None).
Phone: select whether the guest’s phone number is Required, Optional, or if the information is not requested at all (None).
Organization: select whether the guest’s organization is Required, Optional, or if the information is not requested at all (None).
Theme: select the color mode of the kiosk. Choose either Light or Dark. The Light selection displays a pale gray background on the kiosk, whereas the Dark selection displays a dark gray and black background.
Self Check-In: enable this option to present a check-in QR code on the kiosk. The QR code allows guests to check in using their mobile device, instead of using the kiosk. This option is recommended for a busy kiosk with multiple guests checking in at any time.
Offer Drinks: enable this option to offer guests a drink upon check in. If this option is enabled, it is necessary to configure the drinks being offered, via the Configure Drinks link that appears when the option is enabled. Once all drink options are configured, select each drink to be offered using the drop-down menu.
注解
The following options are only visible in the Options tab if the Host Selection option is enabled.
Notify by email: enable this option to have an email sent to the person the guest is visiting upon check in. When enabled, an Email Template field appears beneath, with the default Frontdesk Email Template selected.
To change the default email template, click the drop-down menu in the Email Template field, then select another email template.
To modify the currently selected template, click the Internal link (arrow) icon at the end of the line, and make any edits to the template.
Notify by SMS: enable this option to have an SMS (text) message sent to the person the guest is visiting upon check in. When enabled, an SMS Template field appears beneath, with the default Frontdesk SMS Template selected.
To change the default SMS template, click the drop-down menu in the SMS Template field, and select another SMS template.
To modify the currently selected template, click the Internal link (arrow) icon at the end of the line, and make any desired edits to the content of the template. The SMS message may have a maximum of 242 characters, which fits in 4 SMS (UNICODE) messages.
Notify by Discuss: this option is enabled by default when the Host Selection option is enabled. This option opens a Discuss application message window with the person the guest is visiting upon check in.
When enabled, a default message appears for the person the guest is visiting. The Discuss application must be installed in order for this option to work.
注解
Discuss is installed by default when creating an Odoo database, and does not count towards billing. As long as the Discuss application is not intentionally uninstalled, the Notify by Discuss option works.
Example
The default message format for the Notify by Discuss option is: (Frontdesk Station)
Check-In: (Guest Name) (Guest Phone Number) (Organization) to meet (Name of employee).
An example of how that might appear in a Discuss message is: Main Lobby Check-In: John Doe
(123-555-1234) (Odoo, Inc.) to meet Marc Demo.
Side Message tab
Enter any desired text to appear on the station kiosk after a guest has checked in, such as a welcome greeting or any necessary instructions. The text appears on the confirmation page, on the right side of the screen after a guest has completed the check-in process.
饮料可乐
After a station is created, the next step is to configure the drinks to offer visitors, if desired. This step is not necessary or required for the Frontdesk application to work, and only needs to be configured if drinks are offered to guests.
To add a drink option, navigate to , and click New. Doing so reveals a blank drink form to configure.
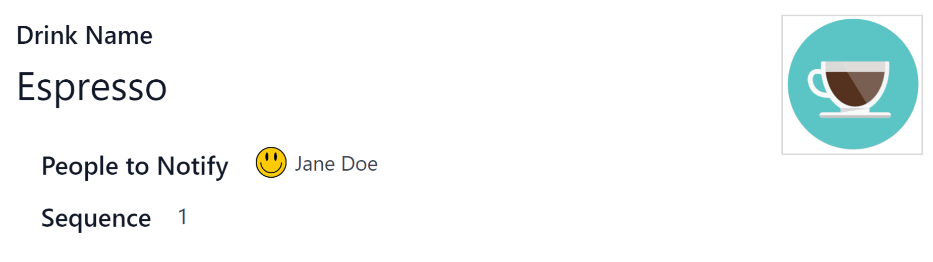
Enter the following information on the drink form:
Drink Name: type the name of the drink option in this field. This field is required.
People to Notify: use the drop-down menu in this field to select who is notified when the drink is selected. Multiple people can be entered in this field. This field is required.
Sequence: enter a numerical value in this field to indicate where in the list of drink options this specific option appears. The lower the number, the higher on the list the drink appears. For example, entering the number one would place that drink at the top of the list, and appear first in the sequence.
小技巧
To add an image/photo to a drink form, hover over the (camera with a ‘+’ sign) icon in the top-right of the form to reveal a ✏️ (pencil) icon.
Click on the ✏️ (pencil) icon to open a file explorer, navigate to the desired image/photo file, then click Open to select it.
The image selected now appears in the picture field, and is set as the image for the drink.
Station dashboard
小技巧
To add an image/photo to a drink form, hover over the (camera with a ‘+’ sign) icon in the top-right of the form to reveal a ✏️ (pencil) icon.
Click on the ✏️ (pencil) icon to open a file explorer, navigate to the desired image/photo file, then click Open to select it.
The image selected now appears in the picture field, and is set as the image for the drink.
访问者
To access a complete list of visitors that are currently checked in, navigate to .
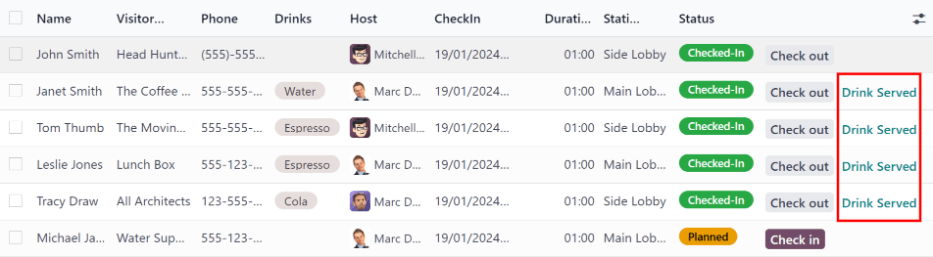
The visitors are listed in a list view, with the following details that were entered when they checked in:
注解
By default, the Planned or Checked-In and Today filters appear in the Search… bar.
Name: the guest’s name.
Visitor Company: the company the guest represents.
Phone: the guest’s phone number.
Drinks: the drink the guest requested.
Host: who the guest is waiting to see.
CheckIn: the date and time the guest checked in.
Checkout: the date and time the guest checked out. As mentioned, in the default view, only guests with a Checked-In or Planned status are visible. Guests with check-out times are only visible if the Today filter is not active.
Duration: the amount of time the guest has been checked in for.
Station: the location of where the guest checked in.
Status: the status of the guest. The options are Checked-In, Planned, Checked-Out, or Canceled. In the default view, only guests with a Checked-In or Planned status are visible.
Email: the guest’s email address.
To the far right of the titled columns on the Visitors page is an untitled column, where a guest’s status can be updated.
When a guest leaves, click the available Check out button to update the guest’s record, and log the date and time they left.
If a scheduled guest arrives, and they did not check in using the Frontdesk kiosk, they can be checked in here, by clicking the available Check in button to log the date and time they arrived.
Beside the untitled status column a Drink Served button appears, but only if that particular visitor requested a drink.
When their drink has been served, click the Drink Served button to indicate the drink has been delivered to the guest. Once clicked, that button disappears.
If any column is not visible, or if a visible column is preferred to be hidden, click the Additional Options (two horizontal lines with dots) icon, located at the end of the column name list.
Clicking that reveals a drop-down menu of column options to enable or disable. A ✅ (checkmark) icon indicates the column is visible.
Planned visitors
If a guest is expected to arrive at a future date and time, it is possible to enter their information into the Frontdesk application in advance.
To create a planned guest, navigate to . Then, enter the same information as any other visitor. The only required fields are the visitor’s Name and the Station at which they are expected to arrive.
重要
If a guest is planned in advance, they must be checked in from the list on the Visitors page in the Frontdesk application (). If a planned guest checks in using a kiosk, they will be checked in separately, and their planned visitor entry remains listed as Planned.
Only when a planned guest is checked in inside the application’s visitor list, their Planned status changes to Checked-In.
If a guest does check in using a kiosk, ensure all records are current, and the list of currently on-site guests is correct. Be sure to check in and/or check out the correct entries, so the visitors list correctly reflects who is currently on the premises.
Ensure planned guests are informed that they should not check in using the kiosk if they are listed as a planned guest in advance.
Frontdesk flow
Set up each kiosk for use after configuring the various stations. It is recommended to use a dedicated device for each frontdesk kiosk, such as a tablet.
Navigate to the kiosk in one of two ways:
Navigate to the main Frontdesk application dashboard, and click the Open Desk button on the desired station card. The kiosk loads in a new browser tab.
Navigate to , and click on the desired station. Then, click the Copy button at the end of the Kiosk URL line, and paste the URL into a new browser tab or window.
重要
It is recommended to log out of the database, and close the tab, after navigating to the kiosk. That way, there is no possibility of a visitor accessing the database when checking-in.
Visitor flow
When a visitor arrives at a facility, they approach a frontdesk kiosk, and enter their information. The information requested is what was configured for that specific frontdesk station. If any information is required, the field displays a red asterisk (*). The visitor must enter the required information in order to check in.
Once all the information is entered, the visitor taps the Check In button.
If drinks were configured for the station, after tapping Check In, a registration
confirmation screen loads, along with the question: Do you want something to drink?
The visitor can tap either Yes, please, or No, thank you.
If they select Yes, please, a drink selection screen appears, and the pre-configured options are listed. The visitor then taps the desired selection, or, if they do not want anything, they can tap the Nothing, thanks button at the bottom of the screen.
If a drink selection was made, a Thank you for registering! Your drink is on the way. message
appears.
At any point in the check-in process, if ten seconds pass with no selection, the kiosk returns to the main welcome screen.
Once the visitor has checked in, the person they are visiting, and any other users who were configured to be notified when checks ins occur at the kiosk, are notified. The notification is either by email, SMS message, a Discuss chat, or any combination of those three options.
If the visitor requested a drink, the user(s) configured as the People to Notify on the
drink form, are notified via the Discuss application. The message that appears is: (Visitor Name)
just checked-in. They requested (Drink Name).
Once the drink has been delivered to the guest, the person who delivered the drink is responsible for marking the drink as delivered.
To mark a drink as delivered, navigate to on the desired station card.
This opens a list of all the visitors checked in at that station, and are waiting for a drink. Click the Drink Served button at the end of the line for the visitor who was served. Once they are marked as having their drink served, the visitor disappears from the list.
Once the visitor has completed their business, and has left the premises, it is important to check them out for accurate record keeping.
To check visitors out properly, navigate to . Doing so opens a list of all the visitors who are currently checked-in at that station.
Click the Check Out button near the end of the line for the visitor who left. Once they are marked as checked-out, the visitor disappears from the list.
重要
Visitors do not check themselves out when they leave. It is important to check out visitors for accurate record keeping.
Always have an accurate list of who is on the premises at any given time. This is important for security purposes, and in the case of an emergency.
报告
The Frontdesk application has two reports available: Visitors and Drinks.
To access either of these reports, navigate to to reveal a drop-down menu containing the options: Visitors and Drinks.
The Visitors report displays the number of visitors by month, for the current year. The Drinks report shows how many total requests were made for each drink.
As with all reports in Odoo, the filters and groups can be modified to show other metrics, as well.