Email Marketing
The Odoo Email Marketing app provides drag-and-drop design tools, pre-built templates, and other interactive features to create engaging email campaigns. The Email Marketing app also provides| detailed reporting metrics to track the campaigns’ overall effectiveness.
电子邮件营销仪表板
After installing the application, click the app icon from the main Odoo dashboard. Doing so reveals the main Mailings dashboard in the default list view.

In the search bar, the default filter of My Mailings is present to show all the mailings related to the current user. To remove that filter, click the ✖️ (remove) icon next to the filter in the search bar. Doing so reveals all the mailings in the database.
The information on the Mailings dashboard has four different view options, located in the upper-right corner as individual icons.
The view options, from left-to-right, are:
列表视图
The list view, represented by the ☰ (horizontal lines) icon in the upper-right corner, is the default view of the Mailings dashboard in the Email Marketing app.
While in list view, there are columns dedicated to different aspects of information related to the listed emails. Those columns are as follows:
Date: the date the email was sent.
Subject: the subject of the email.
Responsible: the user who created the email, or the user who has been assigned to the email.
Sent: how many times the email has been sent.
Delivered (%): percentage of sent emails that have been successfully delivered.
Opened (%): percentage of sent emails that have been opened by the recipients.
Clicked (%): percentage of sent emails that have been clicked by the recipients.
Replied (%): percentage of sent emails that have been replied to by the recipients.
Status: the status of the email (Draft, In Queue, or Sent).
To add or remove columns, click the Additional Options (two horizontal lines with dots) icon, located to the far-right of the column titles in list view. Doing so reveals a drop-down menu of additional column options.
看板视图
The Kanban view, represented by the (inverted bar graph) icon, can be accessed in the upper-right corner of the Mailings dashboard in the Email Marketing app.
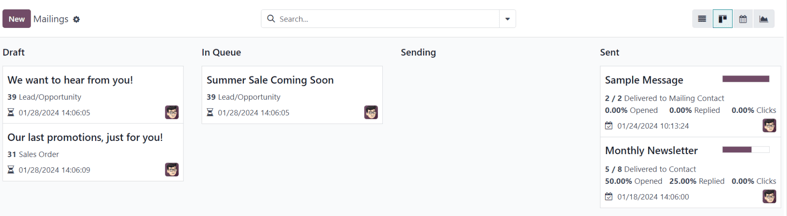
While in Kanban view, the email information is displayed in the various stages.
The stages are: Draft, In Queue, Sending, and Sent.
Draft: the email is still being written/created.
In Queue: the email is scheduled to be sent at a later date.
Sending: the email is currently being sent to its recipients.
Sent: the email has already been sent to its recipients.
In each stage, there are drag-and-drop cards representing the emails that have been created/sent, and the stage they are in represents the current status of that mailing.
Each card on the Mailings dashboard provides key information related to that specific email.
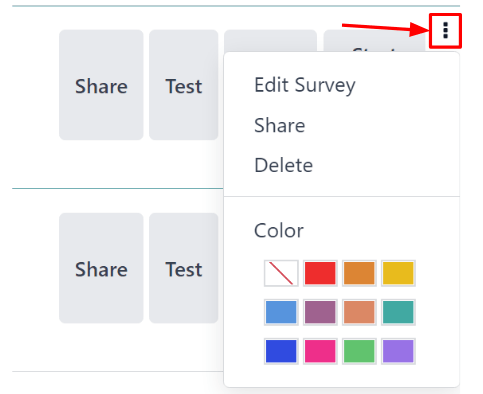
When the cursor hovers over the upper-right corner of an email campaign card, a ⋮ (three vertical dots) icon appears. When clicked, a mini drop-down menu reveals the option to color-code the email, Delete the email, or Archive the message for potential future use.
日历视图
The calendar view, represented by a 📆 (calendar) icon, can be accessed in the upper-right corner of the Mailings dashboard in the Email Marketing app.
While in calendar view, a monthly calendar (by default), shows when the mailings have been sent or are scheduled to be sent.
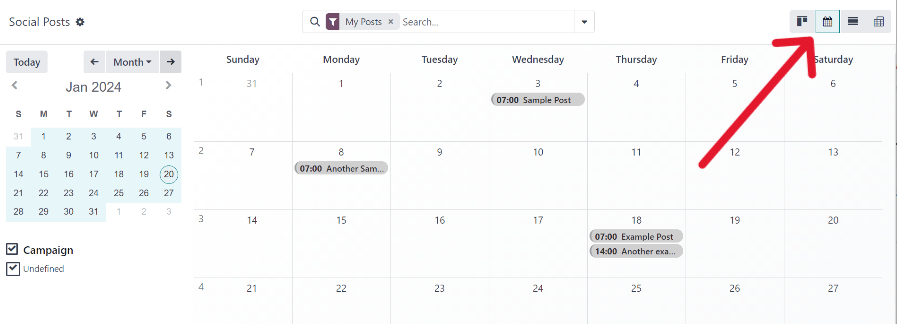
The current date is represented by a 🔴 (red circle) icon over the date on the calendar.
To the right of the calendar, the options to filter the results by Responsible and/or Status are available, via checkboxes.
小技巧
To hide the right sidebar, click the (panel-right) icon, located above the sidebar.
In the top-left corner, above the calendar, the option to change the time period being displayed is available via a drop-down menu, which shows Month, by default. When clicked, the drop-down menu that appears reveals the options: Day, Week, Month (default), Year, and Show weekends (selected by default).
Clicking any of those options changes the calendar display to reflect that desired amount of time.
Clicking either ⬅️ (left arrow) icon or ➡️ (right arrow) icon changes the calendar to a previous or future time, depending on what is clicked, based on the chosen amount of time being represented.
To jump back to the current date, click the Today button.
图形视图
The graph view, represented by a (line graph) icon, can be accessed in the upper-right corner of the Mailings dashboard in the Email Marketing app.
While in graph view, the status of the emails on the Mailings page is represented in a bar graph, but other graph view options can be implemented, if needed.

In the upper-left corner, above the graph, there is a Measures drop-down menu. When clicked, different filter options become available to further customize the graph views.
Those Measures options are: A/B Testing percentage and Count (default).
To the right of the Measures drop-down menu is an Insert in Spreadsheet button, if the Documents application is installed. When clicked, a pop-up window appears, in which the ability to add the graph to a spreadsheet or dashboard becomes available.
Beside the Measures drop-down menu and Insert in Spreadsheet button are different graph view options. From left-to-right, those graph view options are: (bar chart) (default), (line chart), and (pie chart).
注解
Each graph view option provides its own series of additional view options, which appear to the right of the selected graph view option.
Search options
Regardless of the view chosen for the Mailings dashboard in the Email Marketing app, the Filters, Group by, and Favorites options are always available to further customize the information being displayed.
To access those options, click the (downward arrow) icon, located to the right of the search bar. Doing so reveals a drop-down mega menu featuring those filtering and grouping options.
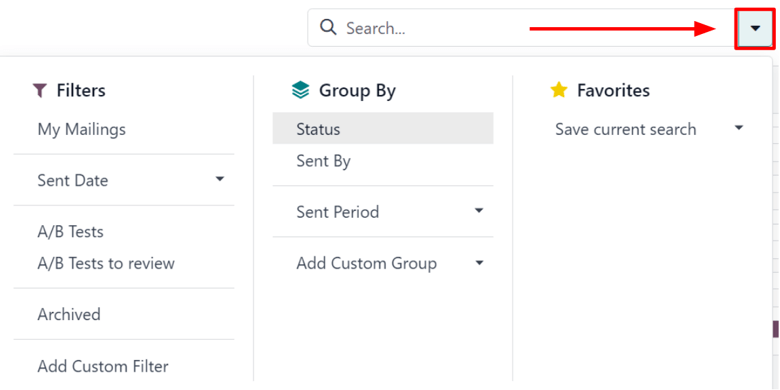
These options provide various ways to specify and organize the information seen on the Mailings dashboard.
This section of the drop-down mega menu provides different ways to filter email results being shown on the Mailings dashboard in the Email Marketing app.
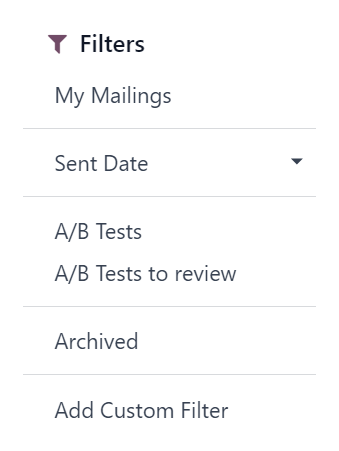
The options are: My Mailings, Sent Date, A/B Tests, A/B Tests to review, Archived, and Add Custom Filter.
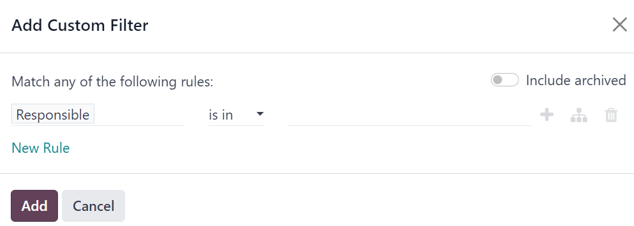
If Add Custom Filter is selected, Odoo reveals a pop-up window, with three customizable fields to fill in, in order to create custom filter rules for Odoo to use to retrieve results that fit more specific criteria.
This section of the drop-down mega menu provides different ways to group email results being shown on the Mailings dashboard in the Email Marketing app.
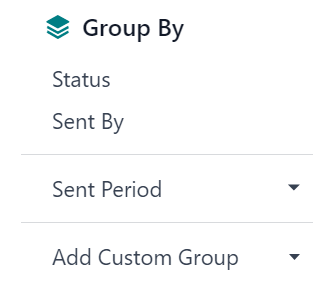
Using this section, the data can be grouped by the messages’ Status, or who it was Sent By.
还有按 发送日期 分组数据的选项,该选项有自己的子菜单可供选择。发送日期 选项包括 年, 季度, 月, 周 和 日。
If none of the above Group By options deliver the desired results, click Add Custom Group at the bottom of the Group By section. Doing so reveals a drop-down menu, wherein custom criteria can be selected and applied, thus delivering any grouping of data that may be desired.
This section provides the opportunity to save custom filters and/or groupings for future use. To utilize this section, click the Save current search field, which reveals additional fields.
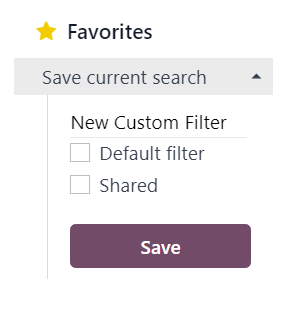
Give the favorited filter/grouping a title on the blank line above the checkboxes for Default filter and Shared.
Ticking the box for Default filter makes this favorited filter/grouping the default option. Ticking the box for Shared allows other users to see and use this favorited filter/grouping.
When all desired options are configured, click Save to save the filter/grouping in the Favorites section of the mega drop-down menu.
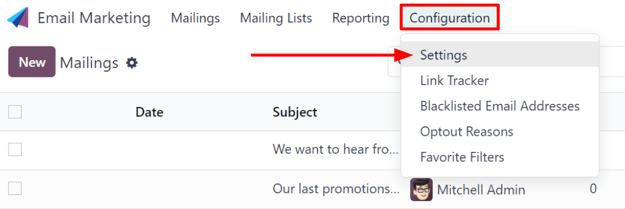
设置
To view and modify the Email Marketing settings, navigate to .
On the Settings page, there are four features available.
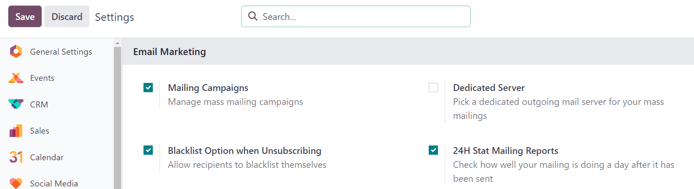
The features are:
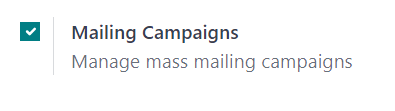
邮件营销活动:启用管理批量邮件营销活动的选项。
退订时的黑名单选项:允许收件人在退订过程中将自己列入黑名单,今后不再收到邮件。
guilabel: “专用服务器”:提供使用单独的专用服务器发送邮件的选项。启用后,Odoo 会显示一个新字段(和链接),必须在其中输入特定的服务器配置,才能正确连接到 Odoo。
24H Stat Mailing Reports: allows users to check how well mailings have performed a day after it has been sent.
创建电子邮件
To create an email, open the application, and click the New button in the upper-left corner of the Mailings dashboard page.
Clicking New reveals a blank email form.

On the email form, there are fields for the Subject and Recipients of the email.
Beneath that, there are three tabs: Mail Body, A/B Tests, and Settings.
Subject
First, enter a Subject to the email. The Subject is visible in the recipients’ inbox, allowing them to quickly see what the message is about.
注解
The Subject field is mandatory. An email can not be sent without a Subject.
The (smiley face with a plus sign) icon at the end of the Subject field represents emojis that can be added to the Subject field. Clicking that icon reveals a pop-up menu of emojis that can be used.
Beside the (smiley face with a plus sign) icon at the end of the Subject field is an empty (star) icon. When clicked, the (star) icon turns gold, and the email is saved as a template in the Mail Body tab, which can be used again in the future.
收款人
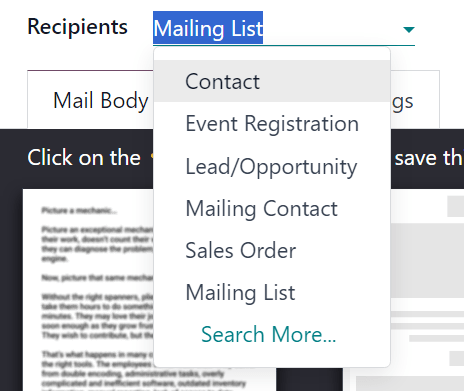
Beneath the Subject field on the email form is the Recipients field. In this field, select the recipients of the email. By default, the Mailing List option is selected, but clicking the field reveals a drop-down menu of other recipient options.
With the default Mailing List option selected, a specific mailing list must be chosen from the adjacent Select mailing lists field drop-down menu.
小技巧
More than one mailing list can be chosen from the Select mailing lists field.
Odoo then sends the email to contacts on that specific mailing list(s).
参见
点击 收件人 字段后,会出现一个包含其他选项的下拉菜单。每个选项都提供了 Odoo 为电子邮件创建目标受众的不同方法。
Those options (excluding the default Mailing List) provide the option to create a more specified recipient filter, in an equation-like format, which appears beneath the Recipients field.
The Recipients field options, other than the default Mailing List option, are as follows:
Contact: ties specifically to the Contacts app, and includes all the contacts entered in the database.
Event Registration: ties specifically to the Events app, and provides opportunities to interact with event registrants, in order to communicate important information about the event(s), or nurture other valuable actions, such as post-event surveys, purchases, etc.
Lead/Opportunity: ties specifically to records in the CRM application, which opens up a number of opportunities to influence sales or purchase decisions.
Mailing Contact: ties specifically to the Email Marketing app, and focuses on specific mailing contacts that have been entered in that specific application, and are related to a specific mailing list. These contacts are also unique because they do not have their own contact card in the Contacts application. This list can be accessed by navigating to .
Sales Order: ties specifically to the Sales app, and focuses on a specific sales orders in the database.
Add recipient filter
To add a more specific recipient filter to any Recipient option, select any recipient option (other than Mailing List), and click the Modify filter (right-facing arrow) icon beneath the Recipient field to reveal three subsequent filter rule fields, formatted like an equation.
It is highly recommended that users implement detailed targeting criteria for the Recipients field. Typically, a single line of targeting logic is not sufficient enough for an email campaign.
While the Mailing List option is adequate for the Recipients field, the Lead/Opportunity and Event Registration options provide far more detailed targeting criteria, which can be added on top of those seed sources.
Example
For example, with the Lead/Opportunity option chosen in the Recipients field, users can add various custom criteria related to Created on dates, Stages, Tags, Lost Reasons, Sales Teams, Active statuses, Country, and so much more.

To reveal the sub-menu options within the filter rule fields, click each field, and make the desired selections, until the preferred configuration has been achieved.
The number of records in the database that match the configured rule(s) are indicated beneath the configured filter rule(s), in green.

注解
第一个规则字段中的子菜单选项可以进行第二项选择,以提供更具体的筛选条件。
To the right of each rule, there are three additional options, represented by ➕ (plus sign), (sitemap), and 🗑️ (trash) icons.
The ➕ (plus sign) icon adds a new node (line) to the overall targeting logic.
The (sitemap) icon adds a branch to the node. A branch contains two additional, indented sub-nodes that are related to that specific rule, providing even more specificity to the parent line above it.
The 🗑️ (trash) icon deletes a specific node (line) in the array of logic.
Mail Body tab
In the Mail Body tab, there are a number of pre-configured message templates to choose from.
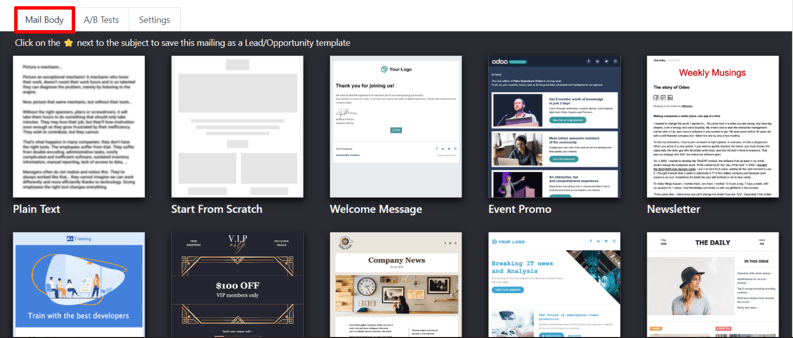
Select the desired template, and proceed to modify every element of its design details with Odoo’s drag-and-drop building blocks, which appear on the right sidebar when a template is chosen.
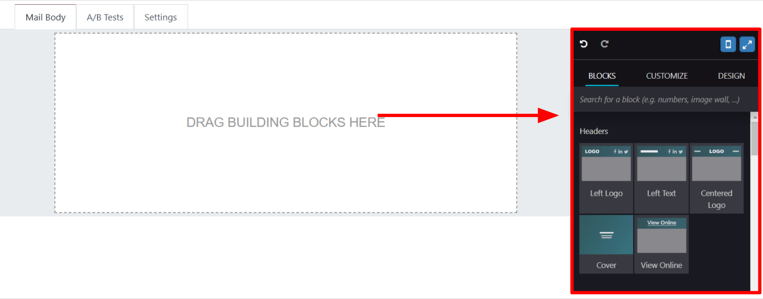
The features on the sidebar used to create and customize emails are separated into three sections: Blocks, Customize, and Design.
Each building block provides unique features and professional design elements. To use a building block, drag-and-drop the desired block element onto the body of the email being built. Once dropped, various aspects of the building block can be customized.
小技巧
To build an email from the ground up, without any building block elements, select the
Plain Text template. When selected, Odoo provides a completely blank email canvas,
which can be customized in a number of way using the front-end rich text editor that accepts
forward slash / commands.
When / is typed into the blank body of the email, while using a Plain Text
template, a drop-down menu of various design elements appears, which can be used to create the
desired email design.

A/B Tests tab
Initially, when the A/B Tests tab is opened on an email form, the only option available is Allow A/B Testing. This is not a required option.
If this option is enabled, recipients are only mailed once for the entirety of the campaign.
This allows the user to send different versions of the same mailing to randomly selected recipients to gauge the effectiveness of various designs, formats, layouts, content, and so on – without any duplicate messages being sent.
When the checkbox beside Allow A/B Testing is ticked, an on (%) field appears, in which the user determines the percentage of the pre-configured recipients that are going to be sent this current version of the mailing as part of the test.
注解
The default figure in the on (%) field is 10, but that figure can be changed at any
time.
Beneath that, two additional fields appear:
The Winner Selection field provides a drop-down menu of options, wherein the user decides what criteria should be used to determine the “winning” version of the email tests that are sent.
The options in the Winner Selection field are as follows:
Manual: allows the user to determine the “winning” version of the mailing. This option removes the Send Final On field.
Highest Open Rate (default): the mailing with the highest open rate is determined to be the “winning” version.
Highest Click Rate: the mailing with the highest click rate is determined to be the “winning” version.
Highest Reply Rate: the mailing with the highest reply rate is determined to be the “winning” version.
Leads: the mailing with the most leads generated is determined to be the “winning” version.
Quotations: the mailing with the most quotations generated is determined to be the “winning” version.
Revenues: the mailing with the most revenue generated is determined to be the “winning” version.
The Send Final On field allows users to choose a date that is used to know when Odoo should determine the “winning” email, and subsequently, send that version of the email to the remaining recipients.
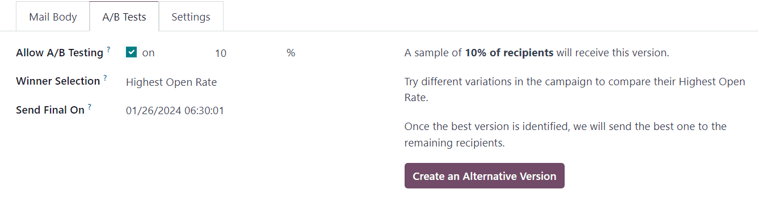
To the right of those fields is a Create an Alternative Version button. When clicked, Odoo presents a new Mail Body tab for the user to create an alternate version of the email to test.
设置选项卡
The options present in the Settings tab of the mail form are divided into two sections: Email Content and Tracking.
注解
The options available in the Settings tab vary depending on if the Mailing Campaigns feature is activated in . See 邮件营销 for more information.
Without the Mailing Campaigns feature activated, the Settings tab on the email form only contains the Preview Text, Send From, Reply To, Attachments, and Responsible fields.
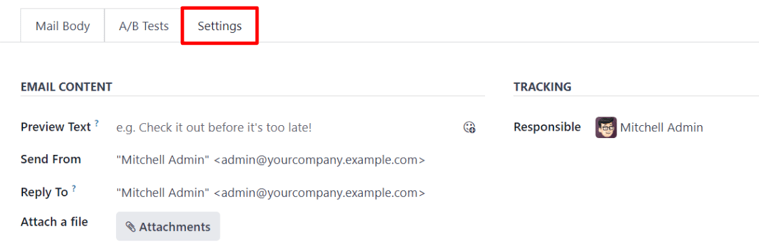
Email content
Preview Text: allows the user to enter a preview sentence to encourage recipients to open the email. In most inboxes, this is displayed next to the subject. If left empty, the first characters of the email content appear, instead. The ability to add an emoji in this field is available, as well, via the (smiley face with a plus sign) icon.
Send From: designate an email alias that displays as the sender of this particular email.
Reply To: designate an email alias to whom all the replies of this particular email are sent.
Attach a file: if any specific files are required (or helpful) for this email, click the Attachments button, and upload the desired file(s) to the email.
Tracking
Responsible: designate a user in the database to be responsible for this particular email.
注解
If the Mailing Campaign feature is activated, an additional Campaign field appears in the Tracking section of the Settings tab.
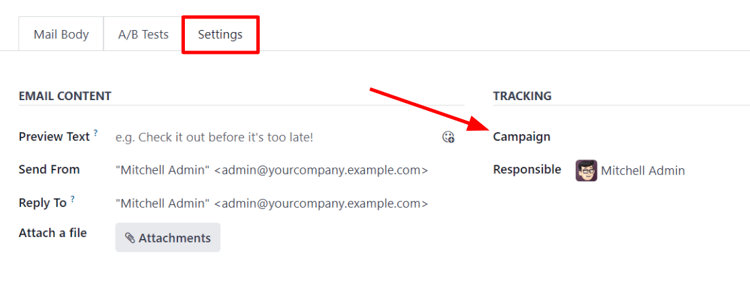
The additional Campaign field allows users to attach this particular email to a mailing campaign, if desired.
If the desired campaign is not available in the initial drop-down menu, select Search More to reveal a complete list of all mailing campaigns in the database.
Or, type the name of the desired mailing campaign in the Campaign field, until Odoo reveals the desired campaign in the drop-down menu. Then, select the desired campaign.
Send, schedule, test
Once the mailing is finalized, the following options can be utilized, via buttons located in the upper-left corner of the email form: Send, Schedule, and Test.
Send
The Send button reveals a Ready to unleash emails? pop-up window.
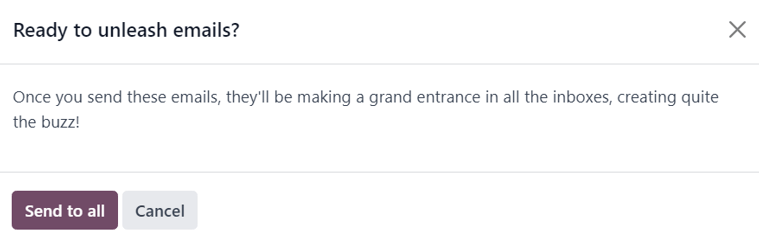
When the Send to all button is clicked, Odoo sends the email to the desired recipients. Once Odoo has sent the mailing, the status changes to Sent.
Schedule
The Schedule button reveals a When do you want to send your mailing? pop-up window.
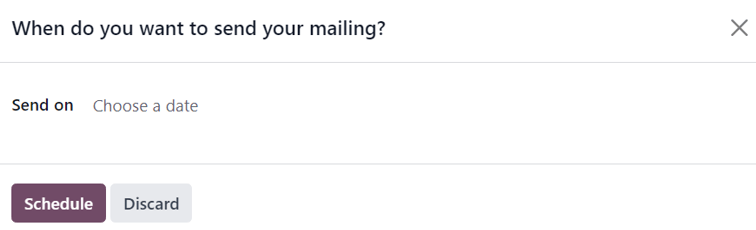
In this pop-up window, click the Send on field to reveal a calendar pop-up window.
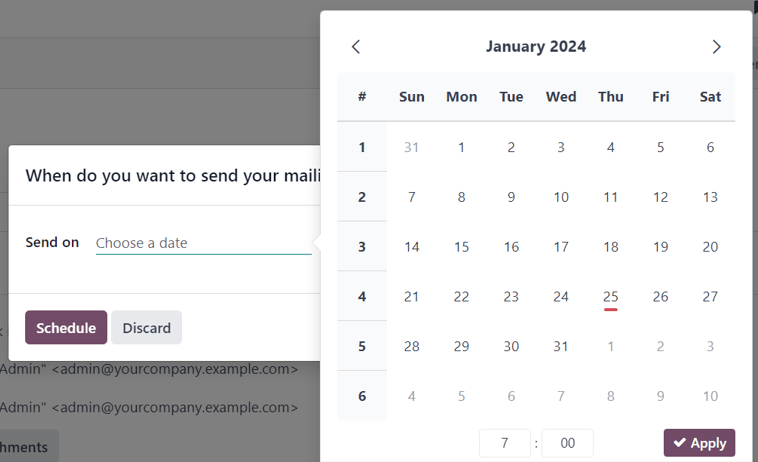
From the calendar pop-up window, select the future date and time for Odoo to send this email. Then, click ✔️ Apply. When a date and time are chosen, click the Schedule button, and the status of the mailing changes to In Queue.
Test
The Test button reveals a Test Mailing pop-up window.
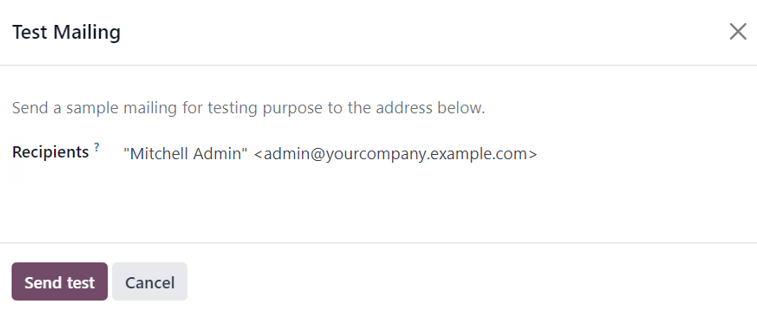
From this pop-up window, enter the email addresses of the contacts to whom Odoo should send this test email in the Recipients field. Multiple contacts can be added in this field, if desired.
Once all the desired email addresses have been entered in the Recipients field, click the Send Test button.
警告
By default, there’s a daily limit applied for all emails sent throughout all applications. So, if there are remaining emails to be sent after a limit has been reached, those mailings are not sent automatically the next day. The sending needs to be forced, by opening the email and clicking Retry.
邮件营销
The Email Marketing application provides users with the ability to build mailing campaigns.
In order to create and customize mailing campaigns, the Mailing Campaigns feature must be activated in the Settings page of the Email Marketing application. To do that, navigate to , tick the box beside Mailing Campaigns, and click the Save button.
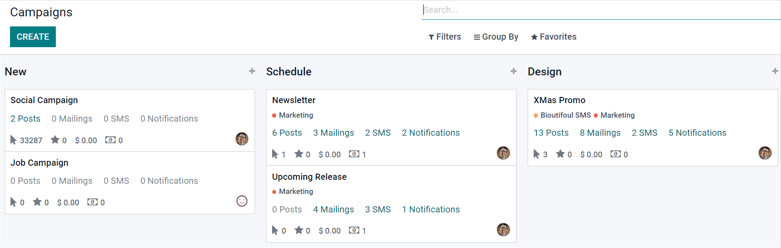
Once the Mailing Campaigns feature is activated, a new Campaigns menu option appears in the header.
When that is clicked, Odoo reveals a separate Campaigns page, displaying all the mailing campaigns in the database, and the current stage they are in, showcased in a default Kanban view.
注解
This information can also be viewed in a list, by clicking the ☰ (horizontal lines) icon in the upper-right corner.
Clicking any campaign from the Campaigns page reveals that campaign’s form.
There are two different ways to create and customize campaigns in the Email Marketing application, either directly from the Campaigns page or through the Settings tab on an email form.
Create mailing campaign (from campaigns page)
When the Mailing Campaigns feature is activated, a new Campaigns option appears in the header of the Email Marketing application. Campaigns can be created directly on the Campaigns page in the Email Marketing app.
To do that, navigate to .
看板视图
When the New button is clicked in the default Kanban view on the Campaigns page, a Kanban card appears in the New stage.
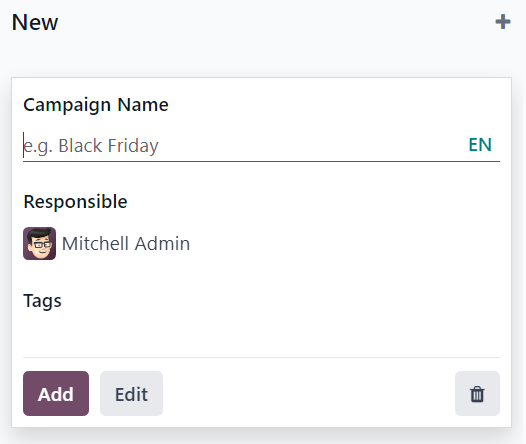
New campaign cards can also be made by clicking the ➕ (plus sign) at the top of any Kanban stage on the Campaigns page.
When the new campaign Kanban card appears, the options to enter a Campaign Name, a Responsible, and Tags become readily available.
To add the campaign to the Kanban stage, click the Add button.
To delete the campaign, click the 🗑️ (trash can) icon.
To further customize the campaign, click the Edit button, which reveals the campaign form for additional modifications.
注解
A Campaign Name must be entered in the Kanban card, in order for the Edit button to reveal the campaign form for further modifications.
列表视图
To enter the list view on the Campaigns page, click the ☰ (horizontal lines) icon in the upper-right corner. Doing so reveals all campaign information in a list format.
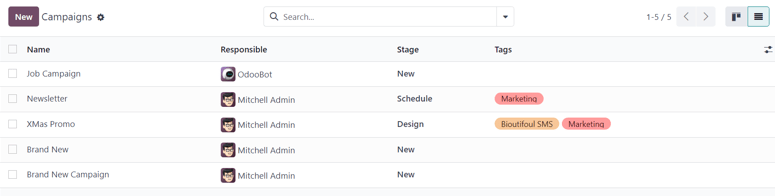
To create a campaign from the Campaigns page while in list view, click the New button. Doing so reveals a blank campaign form.
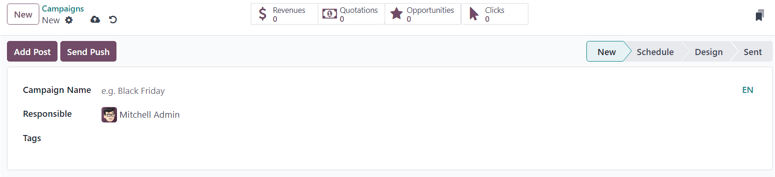
From this campaign form, a Campaign Name, a Responsible, and Tags can be added.
At the top of the form, various metric-related smart buttons can be seen that showcase specific analytics related to the campaign. Those smart buttons are: Revenues, Quotations, Opportunities, and Clicks.
注解
Once a Campaign Name is entered and saved, additional buttons appear at the top of the campaign form.
Those additional buttons are: Send Mailing and Send SMS.
Campaign form
On the campaign form (after clicking Edit from the Kanban card, or selecting an existing campaign from the Campaigns page) there are additional options and metrics available.
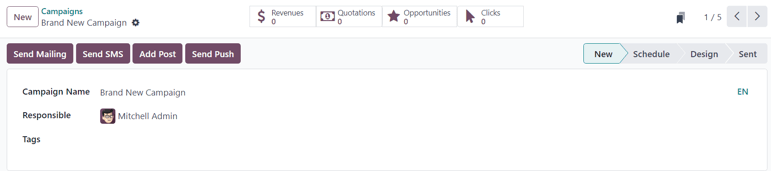
At the top of the form, various smart buttons can be seen that showcase specific analytics related to the campaign. Those smart buttons are: Revenues, Quotations, Opportunities, and Clicks.
There are also buttons to Send Mailing, Send SMS, Add Post, and Add Push (push notification).
注解
If the Send Mailing and Send SMS buttons are not readily available, enter a Campaign Name, then save (either manually or automatically). Doing so reveals those buttons.
The status of the campaign can be viewed in the upper-right corner of the campaign form, as well.
Create mailing campaign (from settings tab)
To create a new campaign from the Settings tab of a mailing form, click the Campaign field, and start typing the name of the new campaign. Then, select either Create “[Campaign Name]” or Create and edit… from the drop-down menu that appears.
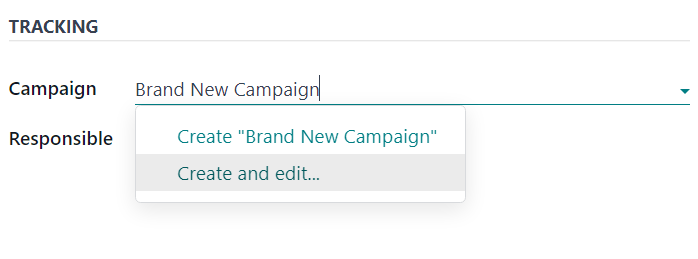
Select Create to add this new mailing campaign to the database, and modify its settings in the future.
Select Create and Edit… to add this new mailing campaign to the database, and reveal a Create Campaign pop-up window.
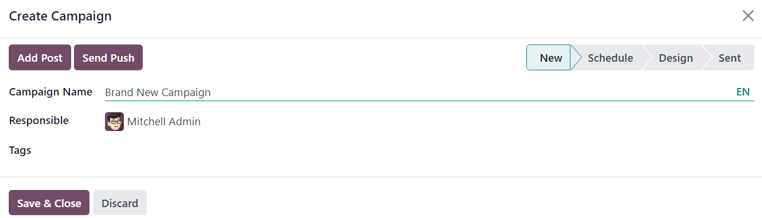
Here, the new mailing campaign can be further customized. Users can adjust the Campaign Name, assign a Responsible, and add Tags.
Buttons to Add Post or Send Push (push notifications) are also available.
There is also a status located in the upper-right corner of the Create Campaign pop-up window.
When all modifications are ready to be finalized, click Save & Close. To delete the entire campaign, click Discard.