合同
Every employee in Odoo is required to have a contract to be paid. A contract outlines the terms of an employee’s job position, compensation, working hours, and any other details specific to their role.
重要
Contract documents (PDFs) are uploaded and organized using the Documents application, and are signed using the Sign application. Ensure these applications are installed to send and sign contracts. Please refer to the 文档 and 标志 documentation.
To view the employee contracts, go to from the top menu. All employee contracts are displayed in a default list view, grouped into four categories: New, Running, Expired, and Cancelled.
The default view has all categories collapsed. The number of contracts in each category is displayed
next to the category name (example: Running (20)). To view the list of contracts under any
category, click on the category, and the list expands downward, showing all contracts beneath it.

注解
The list of contracts in the Payroll application matches the list of contracts in the Employees application.
Create new contracts
For an employee to be paid, an active contract is required. When a new contract is needed, click the New button on the Contracts dashboard. A contract form appears where the information can be entered.
General information section
Contact Reference: type in the name or title for the contract, such as
John Smith
Contract
. This field is required.Employee: using the drop-down menu, select the employee that the contract applies to.
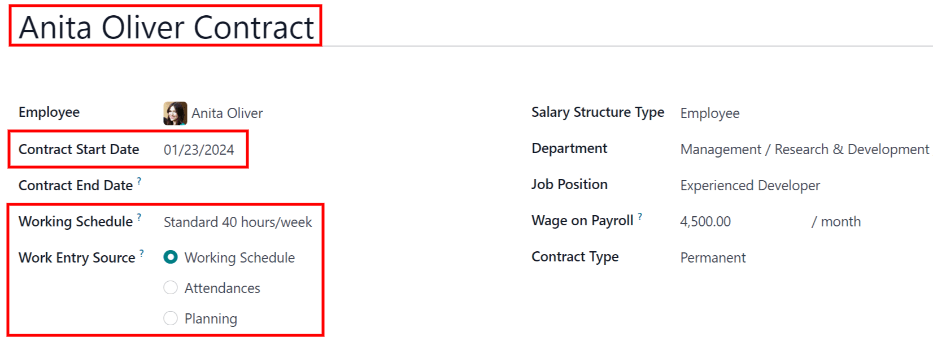
Contract Start Date: the date the contract starts. To choose a date, click the drop-down menu, navigate to the correct month and year with the < > (arrow) icons, then click on the desired date. This field is required.
Contract End Date: if the contract has a specific end date, click the drop-down menu, navigate to the correct month and year with the < > (arrow) icons, then click on the desired date.
Working Schedule: select one of the working schedules from the drop-down menu. This field is required.
小技巧
The Working Schedule drop-down menu displays all the working schedules for the selected company. To modify or add to this list, go to . Click New, and create a new working schedule, or click on an existing working schedule and make edits.
Work Entry Source: select how the work entries are generated. This field is required. Click the radio button next to the desired selection. The options are:
Working Schedule: work entries are generated based on the selected Working Schedule.
Attendances: work entries are generated based on the employee’s check-in records in the Attendances application. (This requires the Attendances application).
Planning: work entries are generated based on the planned schedule for the employee from the Planning application. (This requires the Planning application).
Salary Structure Type: select one of the salary structure types from the drop-down menu. The default salary structure types are Employee or Worker. A new salary structure type can be created, if needed.
Department: select the department the contract applies to from the drop-down menu.
Job Position: select the specific job position the contract applies to from the drop-down menu.
注解
If the selected Job Position has a contract template linked to it with a specific Salary Structure Type, the Salary Structure Type changes to the one associated with that Job Position.
Wage on Payroll: enter the employee’s monthly wage.
Contract Type: choose either Permanent, Temporary, Seasonal, Full-Time, or Part-Time from the drop-down menu.
The general information section filled out, with the required fields highlighted in red.
Salary Information tab
This section is where the specific salary details are defined. This section is country-specific, so depending on where the company is located, these fields may vary.
The following fields are universal and apply to all localizations:
Wage Type: select either Fixed Wage or Hourly Wage from the drop-down menu.
Schedule Pay: select how often the employee is paid using the drop-down menu. Options are Annually, Semi-annually, Quarterly, Bi-monthly, Monthly, Semi-monthly, Bi-weekly, Weekly, or Daily.
Wage: enter the employee’s gross wage. The metric for the Wage is based on what is selected for the Schedule Pay.
Example
If Annually is selected for the Schedule Pay, then the Wage field appears in a
$0.00/yearformat. If the Schedule Pay is set to Bi-weekly, then the Wage field appears in a$0.00/two weeksformat.Yearly Cost (Real): this field automatically updates after the Schedule Pay and Wage fields are entered. This amount is the total yearly cost for the employer. This field can be modified. However, if this is modified, the Wage field updates, accordingly. Ensure both the Wage and Yearly Cost (Real) are correct if this field is modified.
Monthly Cost (Real): this field automatically updates after the Schedule Pay and Wage fields are entered. This amount is the total monthly cost for the employer. This field cannot be modified, and is calculated based on the Yearly Cost (Real).

Contract Details tab
合同详情选项允许添加和编辑合同,并可将合同发送给员工进行审批和签字。
Contract Template: select a pre-existing contract template from the drop-down menu. Contract templates are typically created through the configuration menu, and stored in the Documents application.
Sign section
HR Responsible: select the person who is responsible for validating the contract from the drop-down menu. This field is required.
New Contract Document Template: select a contract from the drop-down menu to be modified for this new employee contract. These documents are stored in the Sign application.
Contract Update Document Template: select a contract from the drop-down menu, if the employee has an existing contract that requires updating. These documents are stored in the Sign application.
重要
The HR Responsible, New Contract Document Template, and
Contract Update Document Template fields are only visible if the Sign application
is installed, along with the hr_contract_salary and hr_contract_salary_payroll modules. The Sign application is where the contract templates are stored.
This application is required for an employee to sign any contract.
Accounting section
Analytic Account: select the account the contract affects from the drop-down menu. It is recommended to check with the accounting department to ensure the correct account is selected.
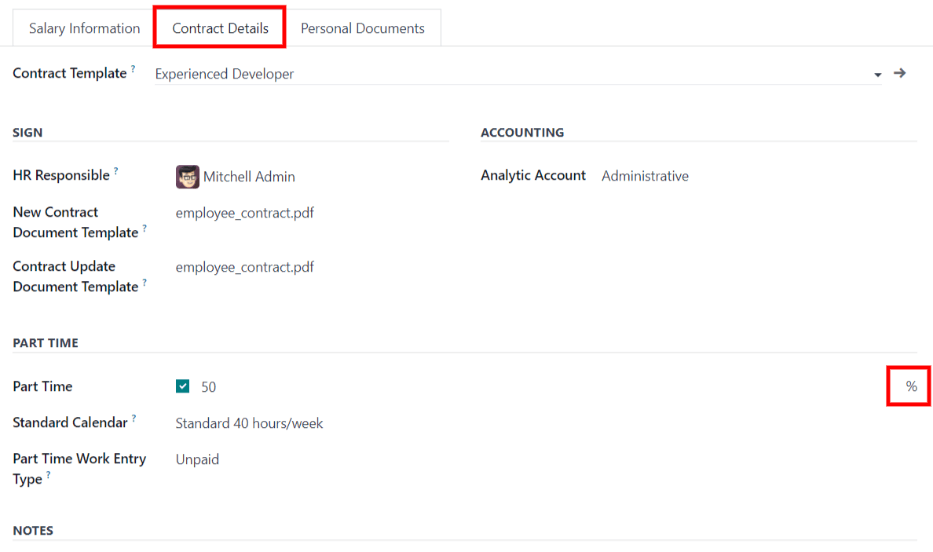
Part Time section
Part Time: tick this box if the employee is working part-time. When active, additional fields appear:
% (Percentage): enter the percent of time the employee works as compared to a full-time employee.
Standard Calendar: select the working hours that a typical full-time worker uses from the drop-down menu.
Part Time Work Entry Type: select the work entry type that generates the balance of a full-time working schedule.
Example
If a full-time employee works 40 hours a week, and the employee works 20, enter
50in the % (Percentage) field (50% of 40 hours = 20 hours). The employee generates twenty (20) hours of work entries under the work entry typepart-time, and another twenty (20) hours of work entries under the work entry typegeneric time off, for a total of forty (40) hours worth of work entries.
Notes section
Notes: a text field where any notes for the employee contract are entered for future reference.
Personal Documents tab
Once an Employee is selected in the General Information section, the Personal Documents tab appears.
If any documents are needed to keep on file, add them in the Personal Documents tab. Depending on what other applications are installed, and what kind of benefits are enabled (and offered) to the employee, the various options to add a file varies. The Image option always appears, and is available by default.
Click the Upload your file button next to the corresponding document, navigate to the file, then click Open to select the document and add it to the tab.
Modifying contract templates
Contracts templates can be modified at any point when changes are needed.
To modify a contract template, refer to the contract templates section of the main payroll documentation.
Salary attachments
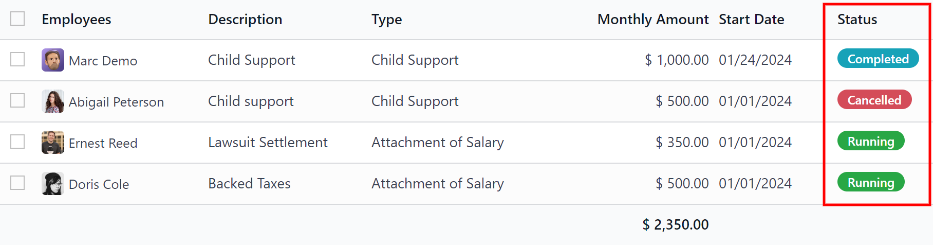
Any automatic deductions or allocations for an employee, such as child support payments and wage garnishments, are referred to as a salary attachment. Navigate to to view a list of all the currently configured salary attachments.
Each salary attachment appears with all its relevant details displayed. The Status for each attachment is color-coded in the far right column.
Currently running salary attachments have a Status of Running, and appear in green. Salary attachments that have been paid in-full, and are no longer active, have a Status of Completed, and appear in blue. Cancelled salary attachments have a Status of Cancelled, and appear in red.
New salary attachment
To create a new salary attachment from the Salary Attachment page, click New, and a blank salary attachment form loads. Enter the following information on the form:
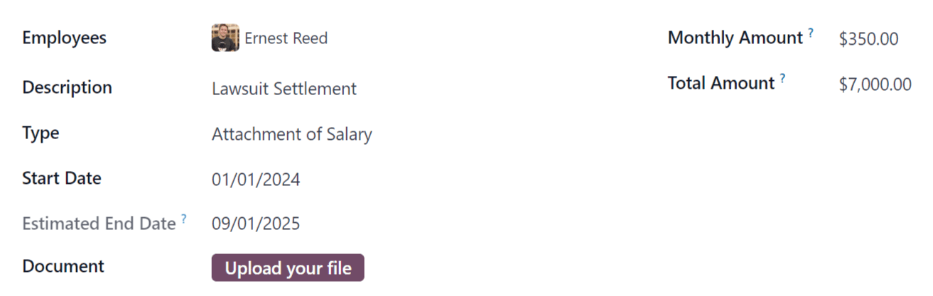
Employees: add any employees the salary attachment applies to using the drop-down menu.
小技巧
Multiple employees can be added, if the salary attachment details are identical. After all employees are added, a Create Individual Attachments button appears at the top of the form.
After the form is completed, click the Create Individual Attachments button to create separate salary attachments for each of the employees listed in this field.

This is a time-saving tip, so that separate salary attachments do not need to be created individually. They can be created in a batch using this method.
Description: enter a description for the specific type of salary attachment.
Type: select the type of salary attachment from the drop-down menu. The options listed come from the salary attachment types configured in the configuration menu.
Start Date: enter the date the salary attachment begins. The first of the current month populates this field, by default. Click on the date, and a calendar appears. Navigate to the desired month and year, using the < > (arrow) icons, and click on the date to select it.
Document: if any documents are needed for the salary attachment, click the Upload your file button, and a file explorer appears. Navigate to the file, and click Open to select them, and attach them to the form.
Monthly Amount: enter the amount to be taken out of the paycheck each month for this salary attachment.
Estimated End Date: this field only appears after the Monthly Amount field is populated, and if the Type is not set to Child Support. This date is when the salary attachment is predicted to end, and is automatically calculated once both, the Monthly Amount and Total Amount, fields are populated. This is calculated based on how much is required to be paid, and how much is paid towards that amount each month. If either the Monthly Amount or Total Amount changes, this field automatically updates. It is not possible to modify this field.
Total Amount: enter the total amount to be paid in this field. If Child Support is selected for the Type, this field does not appear.
重要
When the total amount has been paid for the salary attachment, navigate to the individual salary attachment, and click the Mark as Completed button at the top of the form. This changes the status to Completed, and the garnishments are no longer taken out of the employee’s paychecks.
Offers
Once a contract has been created or modified, the contract must be sent to the employee to be accepted and signed.
Send an offer
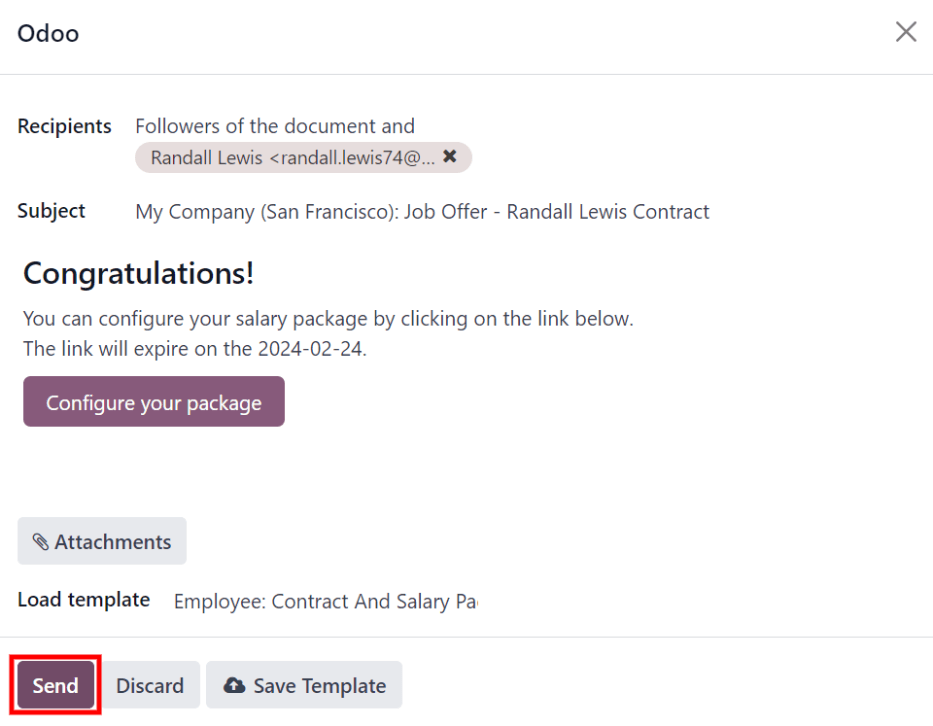
Open an individual contract by navigating to , and click on a contract to open the contract form. Click on the Generate Offer button at the top of the page, and a Generate Simulation Link pop-up form appears.

The Generate Simulation Link pop-up form contains all the information pulled from the contract, including the Contract Template, Job Position, Job Title, Department, Contract Start Date, Default Vehicle, Contract Type, and Yearly Cost.
At the bottom of the pop-up form is a Link Expiration Date. This is the timeframe that
the contract offer is valid for. By default, this field is pre-populated with 30 days, but it can
be modified.
Click the Send By Email button, and a Send Offer Email template pop-up window appears. Make any modifications to the email, and attach any additional documents needed, then click Send to send the offer.
注解
To send a contract using the Generate Simulation Link, there must be a signature field in the contract PDF being sent to the employee, so they can sign it.
Accept an offer
Once the offer email is received, the offer can be accepted, and the contract can be signed.
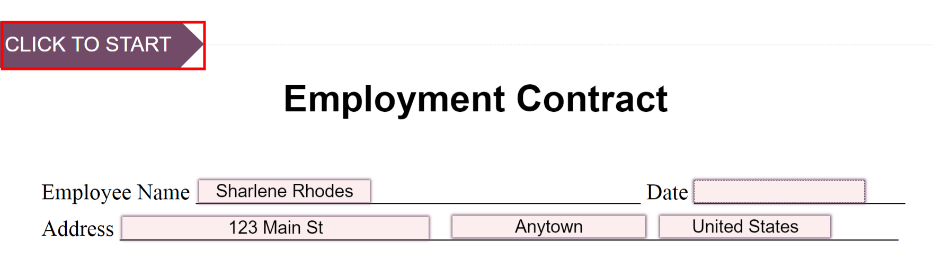
In the offer email, click the Configure your package button, and the offer loads in a new tab. Enter the requested information on the form. Next, click the Review Contract & Sign button to begin the signing process.
Click the CLICK TO START button at the top-left of the contract. Follow the prompts to complete the signature request. The contract auto-populates with the information entered on the Configure your package page. When done, click the Validate & Send Completed Document button at the bottom of the contract.
After the document is signed by the (potential) employee, management signs the contract next. The manager’s signature is completed directly in the Sign application.
注解
Depending on the localization settings, there may be the option to customize the offer in the Configure your package tab.
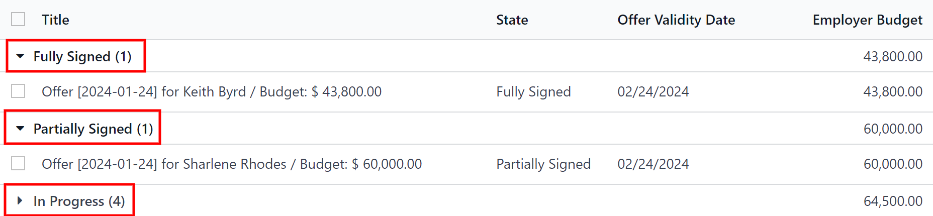
View offers
To view the current offers, navigate to . This presents all offers in a list view, grouped by status, and displays the number of offers in each status category. The statuses are: Fully Signed, Partially Signed, In Progress, and Expired.
To view the offers with a specific status, click on the status to expand the list. If a specific status has no offers, the status is not visible in the list.