公司
A centralized management environment allows an administrator to select multiple companies simultaneously, and set their specific warehouses, customers, equipment, and contacts. It provides the ability to generate reports of aggregated figures without switching interfaces, which facilitates daily tasks, and enhances the overall management process.
危险
Utilizing a multi-company environment in an Odoo database warrants a subscription change from Standard (or One App Free) to a Custom plan. Should the administrator not migrate the subscription to a Custom plan after adding another company, the database risks being deactivated. For more information, consult the Odoo Pricing page.
If the customer is on the Standard plan, and adds multi-company functionality to the database, it triggers an upsell for the Custom plan.
If they are on a Yearly or Multi-year contract, this creates an upsell order, with a 30-day limit (risking deactivation). If multi-company functionality is fully removed within that time period, the next time the database pings, the upsell order and limit are removed automatically.
If the customer is on a Monthly contract, once the next bill is created, and multi-company functionality is still detected while they are on a Standard plan, they are automatically switched, and billed on the Custom plan.
Should the customer want to go back to Standard, the Customer Success Team must be contacted.
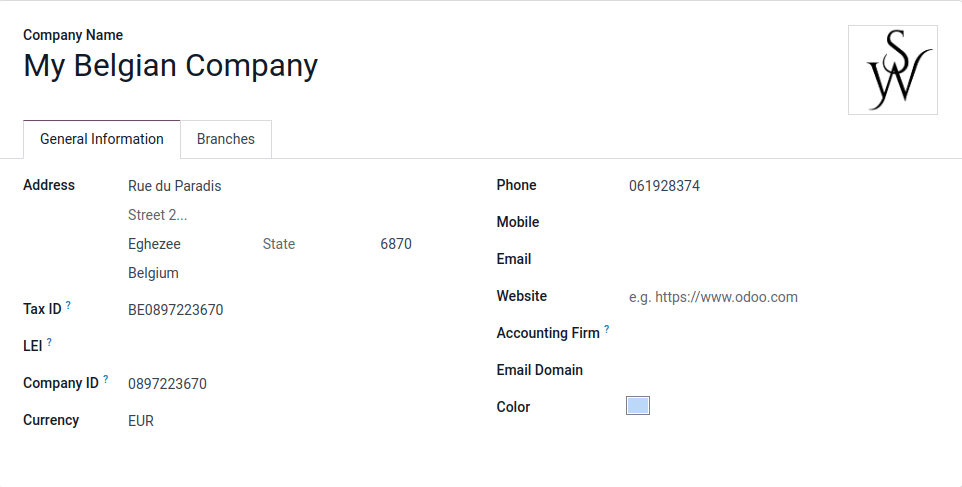
To create a new company, navigate to , and click Manage Companies. Then, click New to create a new company.
Proceed to fill out the new company form that appears.
小技巧
To archive a company, navigate to . Then, tick the checkbox to the left of the company to be archived. If the Companies page is not in list view, click the ≣ (four bars) icon, located in the top-right corner of the page.
After selecting the appropriate company, click the ⚙️ Actions icon, and select Archive from the resulting drop-down menu.
To ensure all records related to the archived company are archived, contact Odoo’s Support Team.
Should a record not be archived, there is a risk of reactivating the archived company, and creating the upsell again.
管理公司和记录
Go to . Then, either click New, and fill in the form with the company’s information, or select a pre-existing company to edit it.
小技巧
Activate the developer mode to set social media accounts and company-specific email system parameters. See this documentation on 社媒营销 and 管理出站邮件.
Companies also have a Parent Company set on the company form in developer mode.
Switch between companies
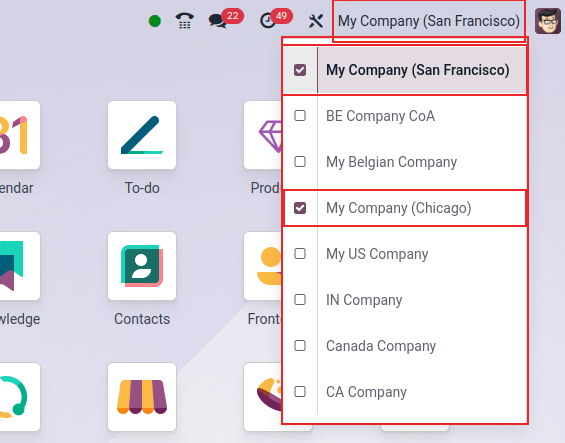
Switch between (or select) multiple companies, by clicking on the company name, located in the far-right corner of the header menu, anywhere throughout the database. Tick the checkboxes next to the desired company name(s) to activate them. The highlighted company represents the current environment that is in use. To switch environments, click on the desired company name.
Example
In the example below, the user has access to eight companies, two are activated, and the environment the database is in belongs to: My Company (San Francisco).
Share records
Data (such as, products, contacts, and equipment) can be shared, or set to be shown for a specific company only. To do so, on their forms, choose between:
空白字段 :记录会在所有公司内共享。
添加公司:记录对登录到该特定公司的用户可见。
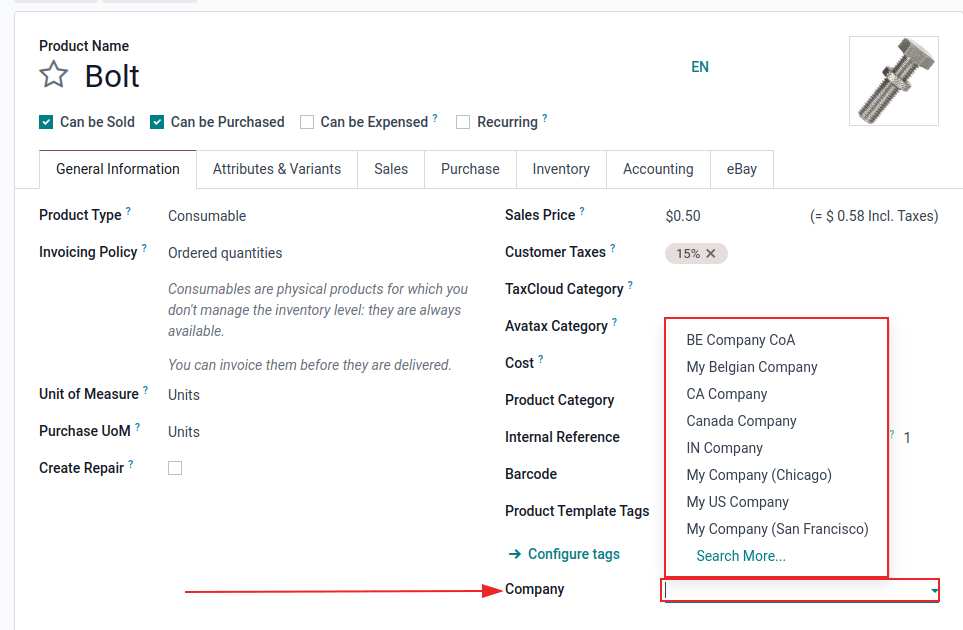
When an environment is selected from the top menu, along with an additional company, records are shared between the two companies.
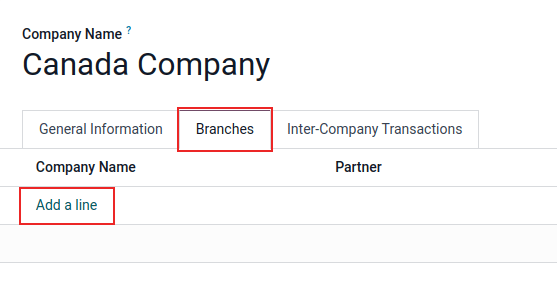
Branches
Branches are available to add to a company. Branches can be added by navigating to . Then, select the desired company from the list. From the company detail form, open the Branches tab. To add a branch, click Add a line, and fill out the Create Branches pop-up form that appears.
小技巧
Activate the developer mode to set social media accounts and company-specific email system parameters. See this documentation on 社媒营销 and 管理出站邮件.
Branches also have a Parent Company set on the branch form in developer mode. Accounting and fiscal localizations for the branch are set on the Parent Company. To do so, select the company from the company selector in the top menu, and go to .
危险
Adding a branch to a company triggers an upsell, should the database be in the Standard or One App Free pricing plans. Adding one or more branches constitutes a multi-company database, and needs to be moved to the Custom pricing plan.
For more information on pricing, see Odoo’s pricing page.
Employee access
Once companies are created, manage the employees’ Access Rights for Multi Companies.
To access the Access Rights, navigate to .
From the Users page, select a user from the list to modify. Then, either change the fields for Allowed Companies or Default Company.
Multiple companies can be set for Allowed Companies, and only one can be set as the Default Company.
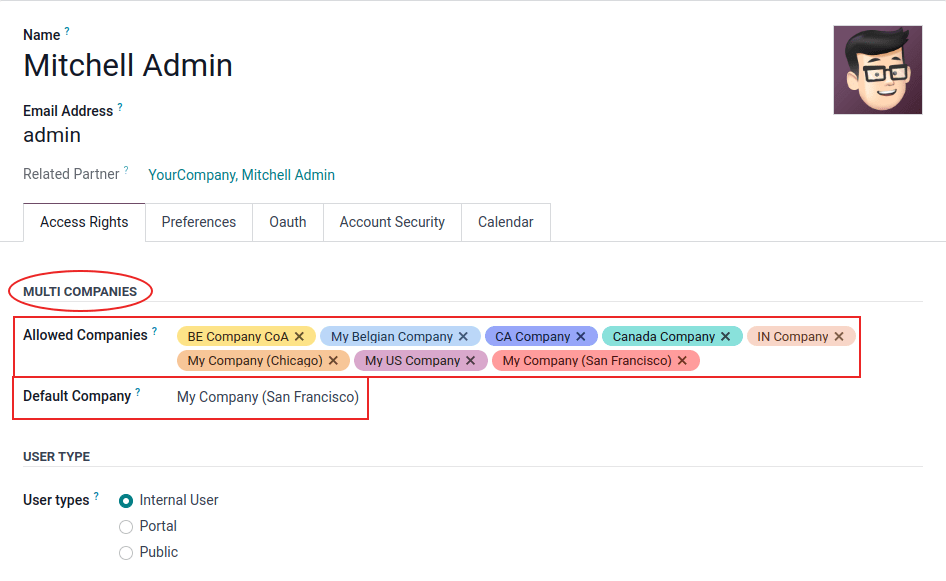
If an administrator has multiple companies activated on the database, and is editing a record, the editing occurs on the record’s related company.
Example
If editing a sale order issued under JS Store US, while working on the JS Store Belgium
environment, the changes are applied under JS Store US (the company from which the sale order
was issued).
When creating a record, the company taken into account is:
The current company selected in the company selector, in the upper-right hand of the screen (the one that is highlighted/active)
OR
No company is set (because none is set on the product and contact forms, for example)
OR
The company set is the company linked to the document (the same as if a record is being edited)
Document format
To set document formats according to each company, activate and select the respective company, and, under the , click on Configure Document Layout and edit the information as needed.
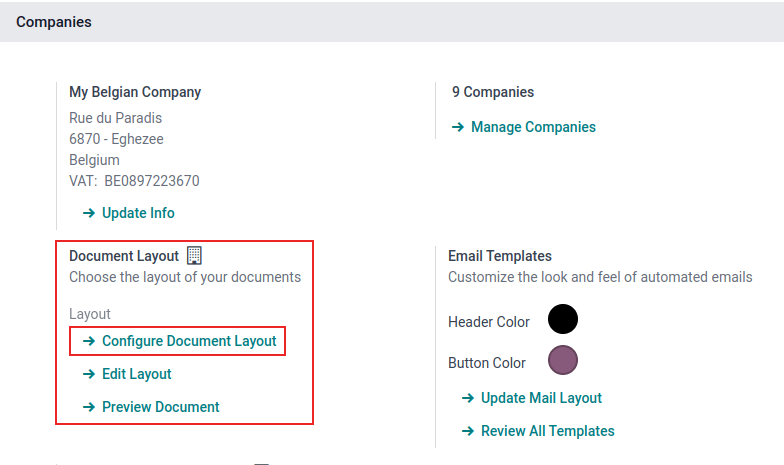
Company Details can be edited on the document layout. By default, this field is populated from the company information listed, when navigating here: , and select a company from the list.
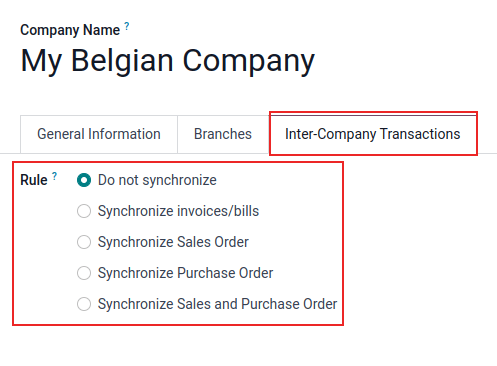
Inter-company transactions
First, activate the developer mode. Then, make sure each one of the companies is properly set in relation to:
Next, navigate to . Then, select the desired company from the list. On the company form, select the Inter-Company Transactions tab, on the individual company’s detail form.
With the respective company activated and selected, choose one of the following Rule options:
Do not synchronize: do not synchronize any inter-company transactions.
Synchronized invoice/bills: generates a bill/invoice when a company confirms a bill/invoice for the selected company.
Synchronize Sales Order: generates a drafted sales order using the selected company warehouse, when a sales order is confirmed for the selected company. If, instead of a drafted sales order, it should be validated, enable Automatic Validation.*
Synchronize Purchase Order: generates a drafted purchase order using the selected company warehouse, when a purchase order is confirmed for the selected company. If, instead of a drafted purchase order, it should be validated, enable Automatic Validation.*
Synchronize Sales and Purchase Order: generates a drafted purchase/sales order using the selected company warehouse, when a sales/purchase order is confirmed for the selected company. If, instead of a drafted purchase/sales order, it should be validated, enable Automatic Validation.*
* The given option needs to be selected, so Automatic Validation appears in the configuration.
注解
Products must be configured as Can be sold and shared between the companies. See Product type.
Example
Synchronize invoice/bills: an invoice posted on JS Store Belgium, for JS Store
US, automatically creates a vendor bill, and generates a drafted purchase/sales order using the
selected company warehouse, when a sales/purchase order is confirmed for the selected company.
If, instead of a drafted purchase/sales order, it should be validated, enable
Automatic Validation.
Synchronize sales/purchase order: when a sale order for JS Store US is confirmed on
JS Store Belgium, a purchase order on JS Store Belgium is automatically created (and
confirmed, if the Automatic Validation feature was enabled).
小技巧
Remember to test all workflows as a user other than the administrator.