服务
To properly maintain a fleet of vehicles, regular maintenance as well as periodic repairs are needed. Scheduling repairs and managing services for an entire fleet is necessary to ensure all vehicles are in good working order when they are needed.
Create service records
To log a service for a vehicle, go to the main Services dashboard by navigating to . Open a new service form by clicking the New button in the top-left corner.
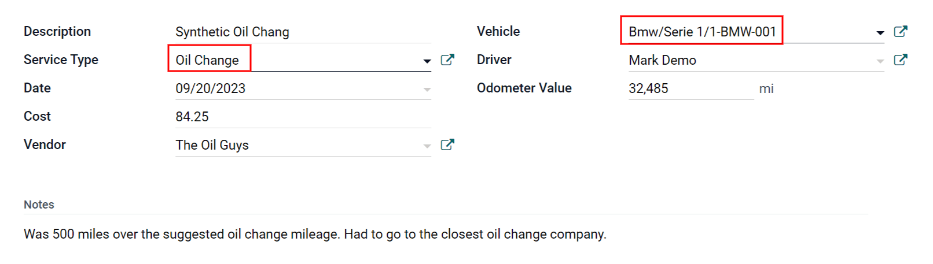
Fill out the information on the form. The only two fields that are required to be populated are Service Type and Vehicle.
The service form automatically saves as data is entered. However, the form can be saved manually at any time by clicking the Save manually option, represented by a (cloud upload) icon.
The fields on the form are:
Description: enter a brief description of the service.
Service Type: select the type of service performed using the drop-down menu. Or, enter a new type of service, and click either Create “service type” or Create and edit… to add the service type and configure it.
重要
Service Types are not pre-configured in Odoo. When logging a service for the first time, the type of service needs to be created before it can be selected.
Date: using the calendar popover window, select the date the service was provided, or is scheduled to be performed. Navigate to the desired month using the < > (arrow) icons, then click on the date to select it.
Cost: enter the cost of the service.
Vendor: select the vendor who performed the service using the drop-down menu. If the vendor has not already been entered in the system, type in the vendor name, and click either Create to add them, or Create and edit… to add and configure the vendor.
Vehicle: select the vehicle that was serviced from the drop-down menu. When the vehicle is selected, the Driver field is populated, and the unit of measure for the Odometer Value field appears.
Driver: the current driver listed for the selected vehicle is populated when the Vehicle is selected. If the driver needs to be changed, another driver can be selected from the drop-down menu.
Odometer Value: enter the odometer reading when the service was done. The units of measure are either in kilometers (km) or miles (mi), depending on how the selected vehicle was configured.
When the Vehicle is selected, the unit of measure for this field is populated. This comes from the vehicle form.
小技巧
To change from kilometers to miles, or vice versa, click the Internal Link button to the right of the vehicle selected in the Vehicle field.
Change the unit of measure, then navigate back to the service form, via the breadcrumb links. The unit of measure is then updated in the Odometer Value field.
Notes: enter any notes for the repair at the bottom of the service form.
Create service type
Service types must be created from a service form. There is no other way to access the list of service types.
On the service form, type in the name of the new Service Type in the corresponding field. Then, click Create and edit…, and a Create Service Type pop-up form appears.
The service type entered on the service form automatically populates the Name field, which can be modified, if desired.
Then, select the Category for the new service type from the drop-down menu in that field. The two default options to choose from are Contract or Service. Additional categories cannot be created.
If the service applies to only contracts or services, select the corresponding Category. If the service applies to both contracts and services, leave this field blank.
When done, click Save & Close.
Create vendor
When a service is done for the first time, typically, the vendor is not in the database yet. It is best practice to add the full details for a vendor in the database, so that any necessary information can be easily retrieved.
On the service form, type in the name of the new Vendor in the corresponding field. Then, click Create and edit…, and a Create Vendor form appears.
The vendor name entered on the service form populates the Name field, by default. This field can be modified, if desired.
注解
Different tabs or fields may be visible on the Create Vendor form, depending on what other applications are installed.
一般信息
Fill out the following information in the top-half of the form:
Individual or Company: select whether the new vendor being added is an individual or a company, by clicking the corresponding radio button.
When a selection is made, some fields may disappear from the form. If any of the fields below are not visible, that is because Company was selected, instead of Individual.
Name: enter a name for the individual or company in this field.
Company Name: using the drop-down menu, select the company that the vendor is associated with, if any.
If the Company radio button at the top of the form is selected, this field does not appear.
Contact: enter the contact information in this section.
If desired, the Contact field can be changed to a different type of contact. Click on Contact to reveal a drop-down menu. The available options to select are Contact, Invoice Address, Delivery Address, Follow-up Address, or Other Address.
If desired, select one of these other options for the Contact field, and enter the corresponding information.
If Company is selected for the Individual or Company field, this field is labeled Address, and cannot be modified.
Tax ID: enter the vendor’s tax ID in this field.
Job Position: enter the vendor’s job position in this field. If the Company radio button at the top of the form is selected, this field does not appear.
Phone: enter the vendor’s phone number in this field.
Mobile: enter the vendor’s mobile number in this field.
Email: enter the vendor’s email address in this field.
Website: enter the vendor’s website address in this field.
Title: using the drop-down menu, select the vendor’s title in this field. The default options are Doctor, Madam, Miss, Mister, and Professor.
If the Company radio button at the top of the form is selected, this field does not appear.
Tags: using the drop-down menu, select any tags that apply to the vendor.
To add a new tag, type in the tag, then click Create “tag”.
There is no limit to the number of tags that can be selected.
Image: a photo of either the main contact person, or the company logo, can be added to the form. Hover over the 📷 (camera) box, in the top-right of the form, to reveal a ✏️ (pencil) icon, and click it. A file explorer window appears. Navigate to the desired file, then click Open to select it.

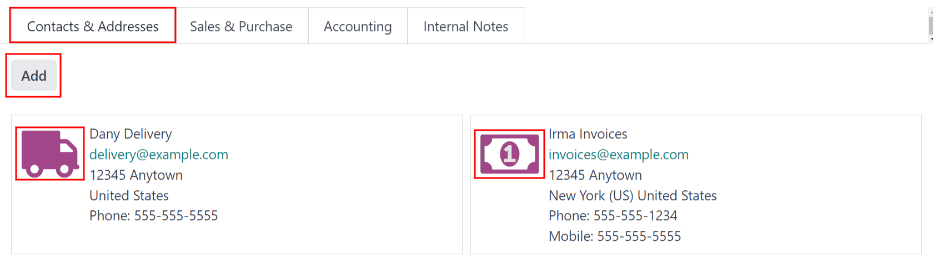
Contacts & Addresses tab
After the top-half of the Create Vendor form is filled out, add any other contacts and addresses associated with the vendor in this tab.
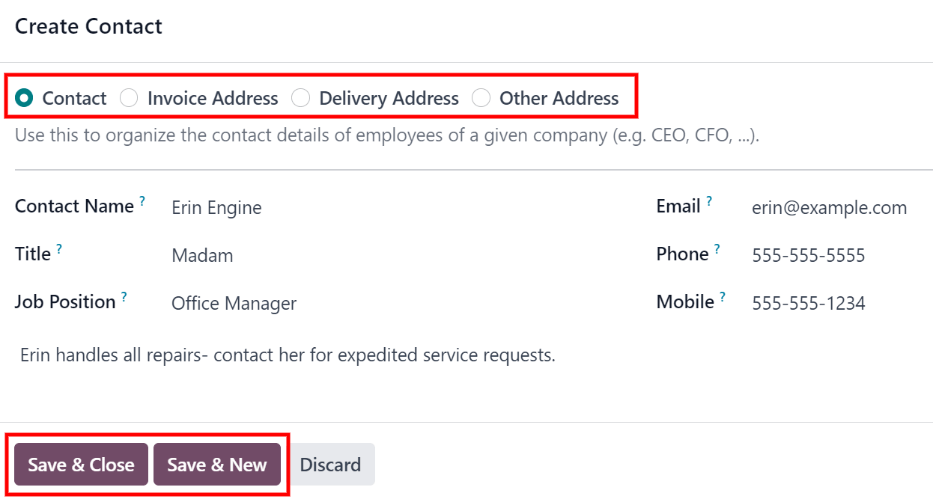
Click the Add button to add a new contact, and a Create Contact pop-up window appears.
Select one of the appropriate contact type options from the radio buttons, located at the top of the pop-up window. Those options are as follows:
Contact: select this option to add general contact details for employees of the associated vendor.
Invoice Address: select this option to add a preferred address for all invoices. When added to the form, this address is selected by default when sending an invoice to the associated vendor.
Delivery Address: select this option to add a preferred address for all deliveries. When added to the form, this address is selected by default when delivering an order to the associated vendor.
Follow-up Address: select this option to add a preferred address for all follow-up correspondence. When added to the form, this address is selected by default when sending reminders about overdue invoices.
Other Address: select this option to add any other necessary addresses for the vendor.
注解
If an option other than Contact is selected for the contact type, an Address section appears on the form. Enter the address details in the Address section.
Add any notes to the Internal notes… section of the form.
After all of the information is added, click either Save & Close to add the one new contact, or Save & New to add the current address record and create another address record.
As contacts are added to this tab, each contact appears in a separate box, with an icon indicating what type of contact is listed.
Example
A Delivery Address displays a ⛟ (truck) icon inside that specific address box, whereas an Invoice Address displays a 💵 (dollar bill) icon inside.
Sales & Purchase tab
Enter the following sales and purchasing information for the various sections below. Depending on the other installed applications, additional fields and sections may appear. The following are all default fields for the Fleet application only.
Sales
Salesperson: using the drop-down menu, select a user as the main point of contact for sales with this vendor.
This person must be an internal user of the company, meaning they can log into the database as a user.
Misc
Company ID: if the company has an ID number other than its tax ID, enter it in this field.
Reference: enter any text to give more information regarding the contact. This is an internal note to provide any additional information.
Example
A company has several people with the same name, Mary Jones. The Reference field could state
Mary Jones at X108 - returnsto provide additional details.
Internal Notes tab
Add any notes that pertain to the vendor, or any other necessary information, in this tab.
List of services
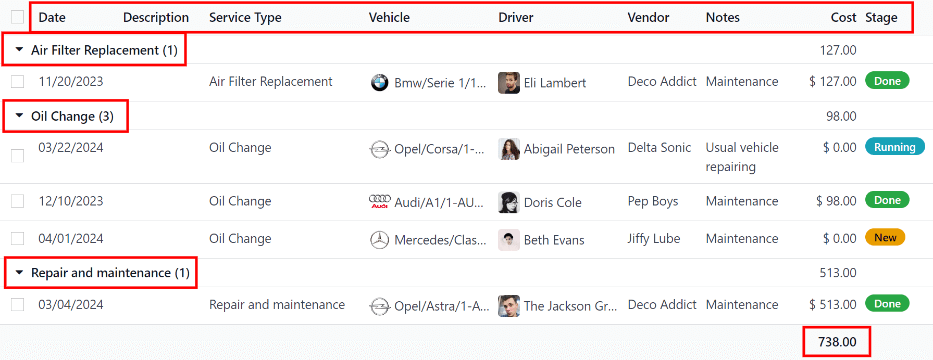
To view all services logged in the database, including old and new requests, navigate to . All services appear in a list view, including all the details for each service.
The service records are grouped by service type. The number of repairs for each service type appears in parentheses after the name of the service type.
Each service listed displays the following information:
Date: the date that the service, or repair, was performed (or requested to be performed).
Description: a short description of the specific type of service, or repair, performed to clarify the specific service.
Service Type: the type of service, or repair, performed. This is selected from a list of services that must be configured.
Vehicle: the specific vehicle the service was performed on.
Driver: the current driver for the vehicle.
Vendor: the specific vendor who performed the service, or repair.
Notes: any information associated with the service, or repair, that is documented to add clarification.
Cost: the total cost of the service, or repair.
Stage: the status of the service, or repair. Options are New, Running, Done, or Canceled.
At the bottom of the Cost column, the total cost of all services and repairs are listed.
View services
It is recommended to view the list of services in one of several pre-configured ways to better view the information presented. In the top-right corner of the list, there are several icons that when clicked, sort the data in different ways.
列表视图
The default view of the service records is a list view. This presents all the services, first grouped alphabetically by type of service, then grouped by status.
The information can be re-sorted by any column. At the top of each column, hover over the column name, and an arrow appears in the far-right of that column. Click the arrow to sort the data by that specific column.
The default sorting is in descending alphabetical order (A to Z), represented by a ⌄ (down arrow) icon. Click the ⌄ (down arrow) icon to reverse the alphabetical order (Z to A). The ⌄ (down arrow) icon changes to an ^ (up arrow) icon.
The two exceptions to this sorting are the default Date column and the Cost column. The Date column sorts the information in chronological order (January to December), instead of alphabetical order. The Cost column sorts the information by repair price, from lowest to highest.
Add a service
To add a service record from the list view, click the New button, and a service form loads. Enter all the information on the service form.
The form automatically saves as data is entered.
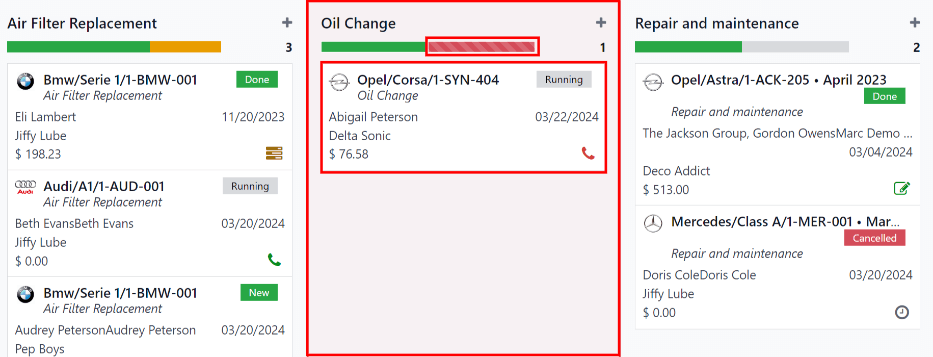
看板视图
To view services by their stage, click the Kanban button, which is the second icon in the top-right corner, and appears as two different length bars beneath a line.
All services are organized by service type, and appear in the corresponding Kanban column.
The number of repairs for each type of service appears in the far-right of each Kanban column header.
The collective status of the scheduled activities for each service type appears in the color-coded bar beneath each Kanban column title. Repairs with activities scheduled in the future appear green, activities due today appear yellow, overdue activities appear red, and repairs with no activities scheduled appear gray.
Each Kanban card displays a color-coded activity-related icon, such as a 🕘 (clock) icon or 📞 (phone) icon, for example. These icons indicate both the type of scheduled activity and the status. The status of the activity corresponds to the colors in the status bar. Click on an activity icon to view the details of that specific activity.
The length of the color bar is proportionate to the number of corresponding activities with that specific status in that particular stage. Hover over a color section to reveal the number of service records in that specific grouping.

To view only the records with a specific status, click the desired color bar section. The background color for the column changes to a pale hue of the same color (either green, yellow, red, or gray), and the color bar appears striped instead of solid. Only repairs and services with the selected status appear in the column.
Schedule activities
To schedule an activity for a repair or service from the Kanban view, click the activity icon in the lower-right corner of the service record, and click + Schedule an activity. A Schedule Activity pop-up window appears.
注解
Depending on what kind of activity, if any, is scheduled, the activity icon may appear differently. For example, a 📞 (phone) appears if a phone call is scheduled, or an ✉️ (envelope) appears if an email is scheduled.
Enter the following information on the form:
Activity Type: using the drop-down menu, select the activity being scheduled. The default options are Email, Call, Meeting, To-Do, and Upload Document.
Summary: enter a short description of the activity, such as
Schedule oil change.Due Date: using the calendar popover, select the date the activity must be completed. Using the < (left) and > (right) arrow icons, navigate to the desired month, then click on the date to select it.
Assigned to: using the drop-down menu, select the user responsible for the activity.
Notes: add any notes or details in the blank area in the bottom-half of the form.
When the Schedule Activity is completed, click Schedule to schedule the activity, or click Done & Schedule Next to schedule the current activity and schedule another activity for the same repair.
参见
For more detailed information regarding activities, refer to the main activities document.
Add a service
A new repair can be added from this view. Click the ➕ (plus icon) in the top-right corner of the Kanban column, and a new block appears at the top of the column, beneath the Kanban title.
Enter a Title for the service or repair, then click Add. A Create service form appears in a pop-up window. Enter all the information on the service form, then click Save & Close to add the record. The new record now appears in the Kanban column.
图形视图
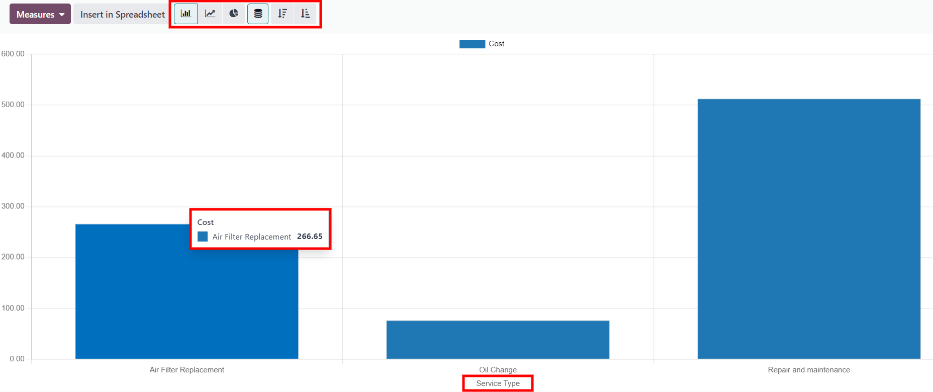
Another way to view the data is in a graph. To change to the graph view, click the Graph icon, which is the third icon in the top-right, and appears as a small graph.
The default graph view displays the service information in a stacked bar chart, grouped by Service Type. The X-axis represents the Service Type and the Y-axis represents the Cost.
Each column visually represents the total cost for all repairs and services for that specific Service Type. Hover over any bar to reveal a popover window that displays the total Cost for the service and repairs the bar represents.
The graph can change to either a Line Chart or a Pie Chart by clicking the corresponding button above the graph. Additionally, the graph can display the data in either Stacked, Descending, or Ascending order, by clicking the corresponding buttons.
数据透视视图
Another way to view the service data is in a spreadsheet pivot table. Click the Pivot icon, which is the fourth icon in the top-right, and appears as a small spreadsheet.
The default way the data is presented shows the total cost of each type of service. The horizontal rows represent the various types of service, with a different service type in its own line. The vertical columns represent the total costs for each specific type of service, further divided by the type of service.
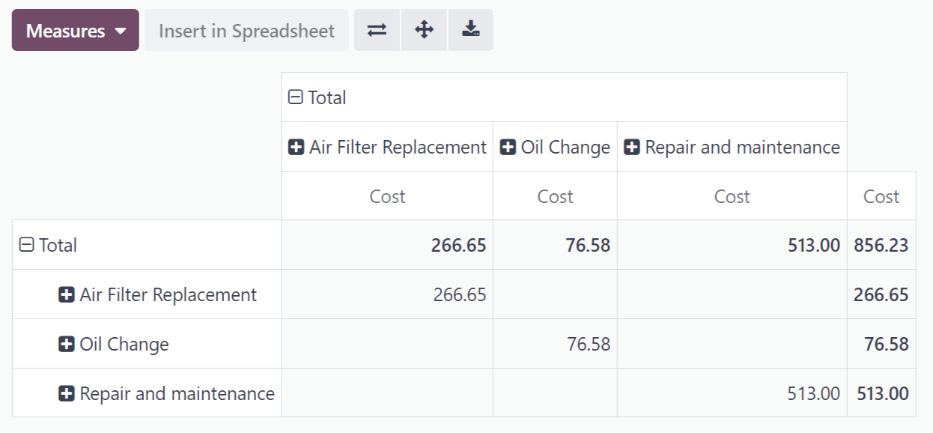
The table can either be inserted in a spreadsheet or downloaded, if desired.
To add the pivot table to a spreadsheet in Odoo, first, the appearance of the pivot table must change. The default pivot table view does not allow it to be inserted into a spreadsheet (the Insert in Spreadsheet button is grayed out).
First, click the ➖ (minus) icon to the left of Total at the top of the pivot table. This collapses the service types, leaving only a single Cost column visible.
Then, click the Insert in Spreadsheet button, which is no longer grayed out, and a Select a spreadsheet to insert your pivot pop-up window appears. Two tabs are visible in this pop-up window, a Spreadsheets tab and a Dashboards tab.
Click the desired tab to indicate where the spreadsheet should be placed, either in a Spreadsheet or on a Dashboard. After clicking the desired option, click Confirm. The spreadsheet then loads on the screen.
注解
Spreadsheets are stored in Odoo’s Documents application, while dashboards are stored in Odoo’s Dashboards application.
Click Services in the top-left corner to navigate back to the previous pivot table view.
To download the table in an xlsx format, click the download xlsx icon, represented by a ⬇️ (down arrow above a line) icon.
参见
For more detailed information regarding reporting, refer to the main reporting document.
Activity view
To view the scheduled activities for services or repairs, click the 🕗 (clock) activity icon in the top-right corner of the screen. This presents all activities, organized by vehicle and activity type.
The vertical columns are organized by activity type, and the horizontal lines are organized by vehicle.
The entries are color-coded according to the status of each activity. Green activities are scheduled in the future, yellow activities are due today, and red activities are overdue.
The user responsible for the activity appears in a photo in the lower-left corner of each activity entry.
The due date of each activity is written in the top-center of each activity entry.
A color-coded bar at the top of each activity column indicates the status of the activities within that column.
The number of activities for each activity type is written on the right side of the color-coded bar beneath the column name.

Schedule an activity
To add a service record from the activity view, click + Schedule an activity in the bottom-left corner of the list, and a Search: Services pop-up window loads. Click the service that the activity is being scheduled for, and a Schedule Activity form loads.
Enter all the information on the activity form.
When the form is complete, click the Schedule button. Then, both pop-up windows close, and the activity now appears on the activity view.