Authorize.Net
Authorize.Net is a United States-based online payment solution provider, allowing businesses to accept credit cards.

This Payment Acquirer offers additional options that are not available for other Payment Acquirers, such as the ability to process your customer’s payment after delivery.
Compte Authorize.Net
If not done yet, choose a plan and Sign Up for an Authorize.Net account.
Odoo a besoin de vos identifiants et clés API pour se connecter à votre compte Authorize.Net, qui comprend :
API Login ID
Transaction Key
Signature Key
To retrieve them, log into your Authorize.Net account, go to , and generate your Transaction Key and Signature Key.

Voir aussi
Payment Acquirer Configuration
To configure Authorize.Net as Payment Acquirer in Odoo, go to , open Authorize.Net, and change the State to Enabled. Don’t forget to click on Save once you’ve set everything up.
Note
Please refer to the Payment Acquirers documentation to read how to configure this payment acquirer.
Identifiants
Copy your credentials from your Authorize.Net account (API Login Id, API Transaction Key, and API Signature Key), paste them in the related fields under the Credentials tab, then click on Generate Client Key.
Note
The API Client Key is necessary only if you select Payment from Odoo option as Payment Flow.
Important
If you are trying Authorize.Net as a test, with a sandbox account, change the State to Test Mode. We recommend doing this on a test Odoo database, rather than on your main database.
If you set Test Mode on Odoo and use an authorize.net account instead of a sandbox.authorize.net account, it results in the following error: The merchant login ID or password is invalid or the account is inactive.
Flux de règlement
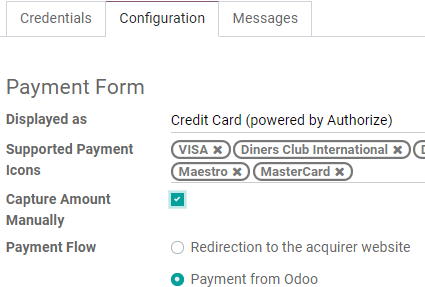
The Payment Flow lets you decide if to redirect the user to the payment acquirer’s portal to authenticate the payment, or if to stay on the current page and authenticate the payment from Odoo. This field is under the Configuration tab.
If you select Redirection to the acquirer website, make sure you add a Default Receipt URL and a Default Relay Response URL to your Authorize.net account.
To do so, log into your Authorize.Net account, go to , and set the default links:
- Default Receipt URL:https://[yourcompany.odoo.com]/payment/authorize/return
- Default Relay Response URL:https://[yourcompany.odoo.com]/shop/confirmation
Note
Déclenchez le paiement après la livraison
The Capture Amount Manually field is under the Configuration tab. If enabled, the funds are reserved for 30 days on the customer’s card, but not charged yet.
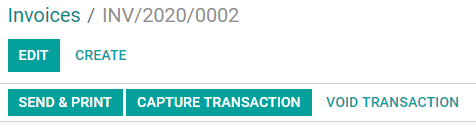
To capture the payment, go to the related Sales Order and click on Capture Transaction. If the order is canceled, you can click on Void Transaction to unlock the funds from the customer’s card.
Avertissement
Après 30 jours, la transaction est annulée automatiquement par Authorize.net.
Note
Avec d’autres intermédiaires de paiement, vous ne pouvez gérer le déclenchement du paiement qu’à partir de leurs propres interfaces, mais pas à partir d’Odoo.