Mexique
Note
This documentation is written assuming that you follow and know the official documentation regarding Invoicing, Sales and Accounting and that you have experience working with odoo on such areas, we are not intended to put here procedures that are already explained on those documents, just the information necessary to allow you use odoo in a Company with the country « Mexico » set.
Introduction
Le module de localisation mexicain est composé de 3 modules:
l10n_mx: All basic data to manage the accounting, taxes and the chart of account, this proposed chart of account installed is a intended copy of the list of group codes offered by the SAT.
l10n_mx_edi: All regarding to electronic transactions, CFDI 3.2 and 3.3, payment complement, invoice addendum.
l10n_mx_reports: Tous les rapports électroniques obligatoires pour la comptabilité électronique sont ici (application de comptabilité requise).
With the Mexican localization in Odoo you will be able not just to comply with the required features by law in México but to use it as your accounting and invoicing system due to all the set of normal requirements for this market, becoming your Odoo in the perfect solution to administer your company in Mexico.
Configuration
Astuce
Après la configuration, nous vous donnerons le processus pour tout tester, essayez de suivre pas à pas afin de ne pas perdre de temps sur la résolution de problèmes de débogage. Dans n’importe quelle étape, vous pouvez revenir en arrière et essayer à nouveau.
Installez la localisation de la comptabilité mexicaine
To install the module, go to , remove the Apps filter and search for « Mexico ». Then click on Install.

Astuce
Lorsque vous créez une base de données à partir de www.odoo.com, et que vous choisissez le Mexique comme pays lors de la création de votre compte, la localisation mexicaine sera automatiquement installée.
Factures électroniques (format CDFI 3.2 and 3.3)
To enable this requirement in Mexico go to configuration in accounting Go in and enable the option on the image with this you will be able to generate the signed invoice (CFDI 3.2 and 3.3) and generate the payment complement signed as well (3.3 only) all fully integrate with the normal invoicing flow in Odoo.

Set your legal information in the company
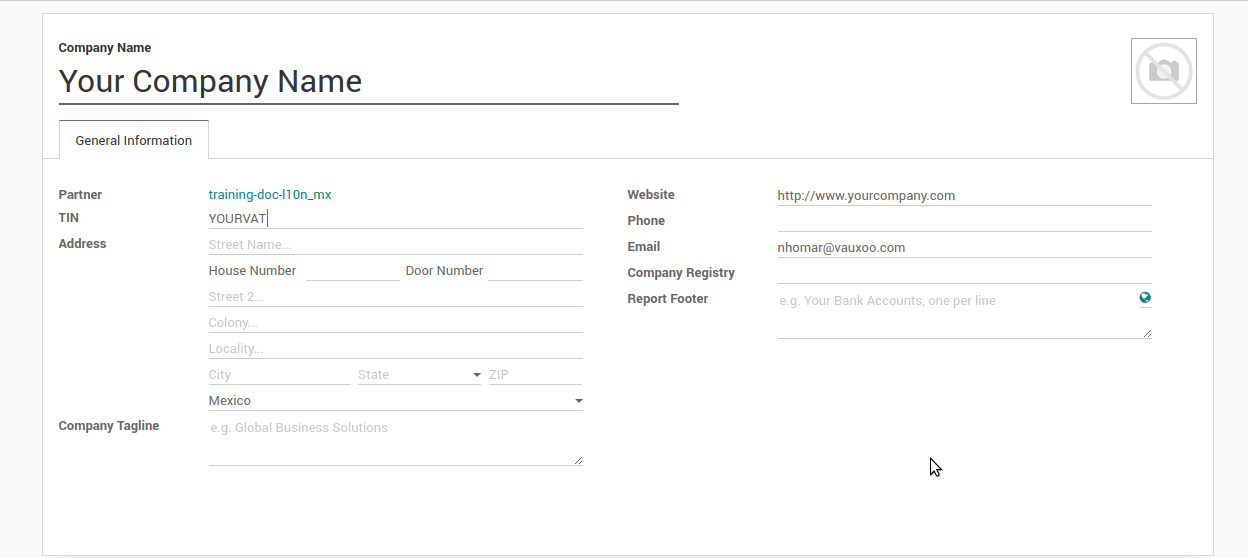
First, make sure that your company is configured with the correct data. Go in and enter a valid address and VAT for your company. Don’t forget to define a mexican fiscal position on your company’s contact.
Astuce
If you want use the Mexican localization on test mode, you can put any known address inside Mexico with all fields for the company address and set the vat to EKU9003173C9.
Avertissement
From a legal point of view, a Mexican company must use the local currency (MXN). Therefore, Odoo does not provide features to manage an alternative configuration. If you want to manage another currency, let MXN be the default currency and use price list instead.
Set the proper « Fiscal Position » on the partner that represent the company
Go In the same form where you are editing the company save the record in order to set this form as a readonly and on readonly view click on the partner link, then edit it and set in the Invoicing tab the proper Fiscal Information (for the Test Environment this must be 601 - General de Ley Personas Morales, just search it as a normal Odoo field if you can’t see the option).
Activez CFDI version 3.3
Avertissement
Ces étapes ne sont nécessaires que lorsque vous activez CFDI 3.3 (disponible uniquement à partir de la version 11.0). Si vous ne disposez pas de la version 11.0 ou supérieure sur votre instance SaaS, veuillez demander une mise à niveau et envoyer un ticket au support technique à l’adresse https://www.odoo.com/help.
Activate the developer mode.
Allez consulter le paramètre technique suivant, sur et configurez le paramètre l10n_mx_edi_cfdi_version sur 3.3 (Si l’entrée portant ce nom n’existe pas, créez-la).
Avertissement
The CFDI 3.2 will be legally possible until November 30th 2017 enable the 3.3 version will be a mandatory step to comply with the new SAT resolution in any new database created since v11.0 released CFDI 3.3 is the default behavior.

Important considerations when you enable the CFDI 3.3
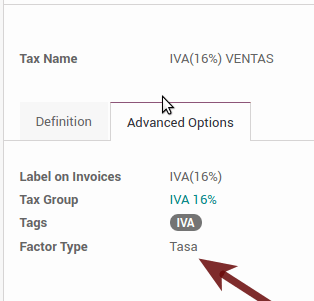
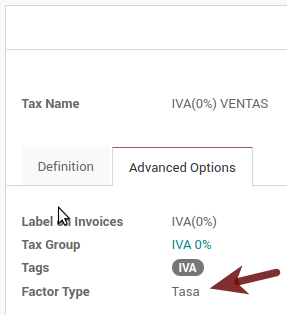
Your tax which represent the VAT 16% and 0% must have the « Factor Type » field set to « Tasa ».
You must go to the Fiscal Position configuration and set the proper code (it is the first 3 numbers in the name) for example for the test one you should set 601, it will look like the image.

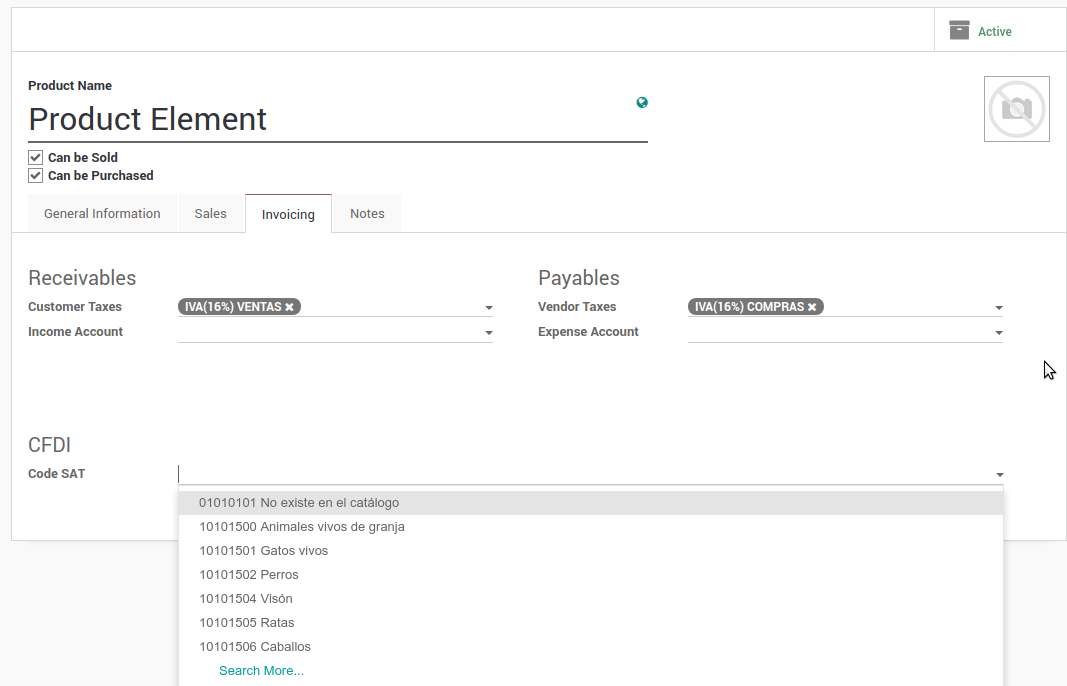
All products must have for CFDI 3.3 the « SAT code » and the field « Reference » properly set, you can export them and re import them to do it faster.
Configure the PAC in order to sign properly the invoices
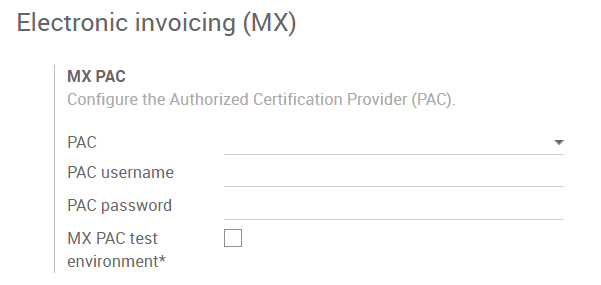
To configure the EDI with the PACs, you can go in . You can choose a PAC within the List of supported PACs on the PAC field and then enter your PAC username and PAC password.
Avertissement
Remember you must sign up in the refereed PAC before hand, that process can be done with the PAC itself on this case we will have two (2) availables Finkok and Solución Factible.
You must process your Private Key (CSD) with the SAT institution before follow this steps, if you do not have such information please try all the « Steps for Test » and come back to this process when you finish the process proposed for the SAT in order to set this information for your production environment with real transactions.
Astuce
If you ticked the box MX PAC test environment there is no need to enter a PAC username or password.

Astuce
Here is a SAT certificate you can use if you want to use the Test Environment for the Mexican Accounting Localization.
Password:
12345678a
Configure the tag in sales taxes
This tag is used to set the tax type code, transferred or withhold, applicable to the concept in the CFDI. So, if the tax is a sale tax the « Tag » field should be « IVA », « ISR » or « IEPS ».
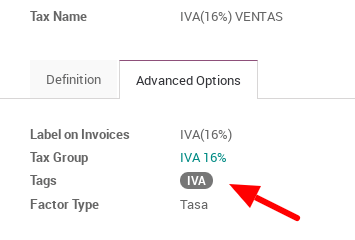
Note that the default taxes already has a tag assigned, but when you create a new tax you should choose a tag.
Utilisation et test
Facturation
Pour utiliser la facturation mexicaine, il vous suffit de faire une facture normale en respectant le comportement habituel d’Odoo.
Voici à quoi doit ressembler une facture correctement signée une fois que vous avez validé votre première facture :
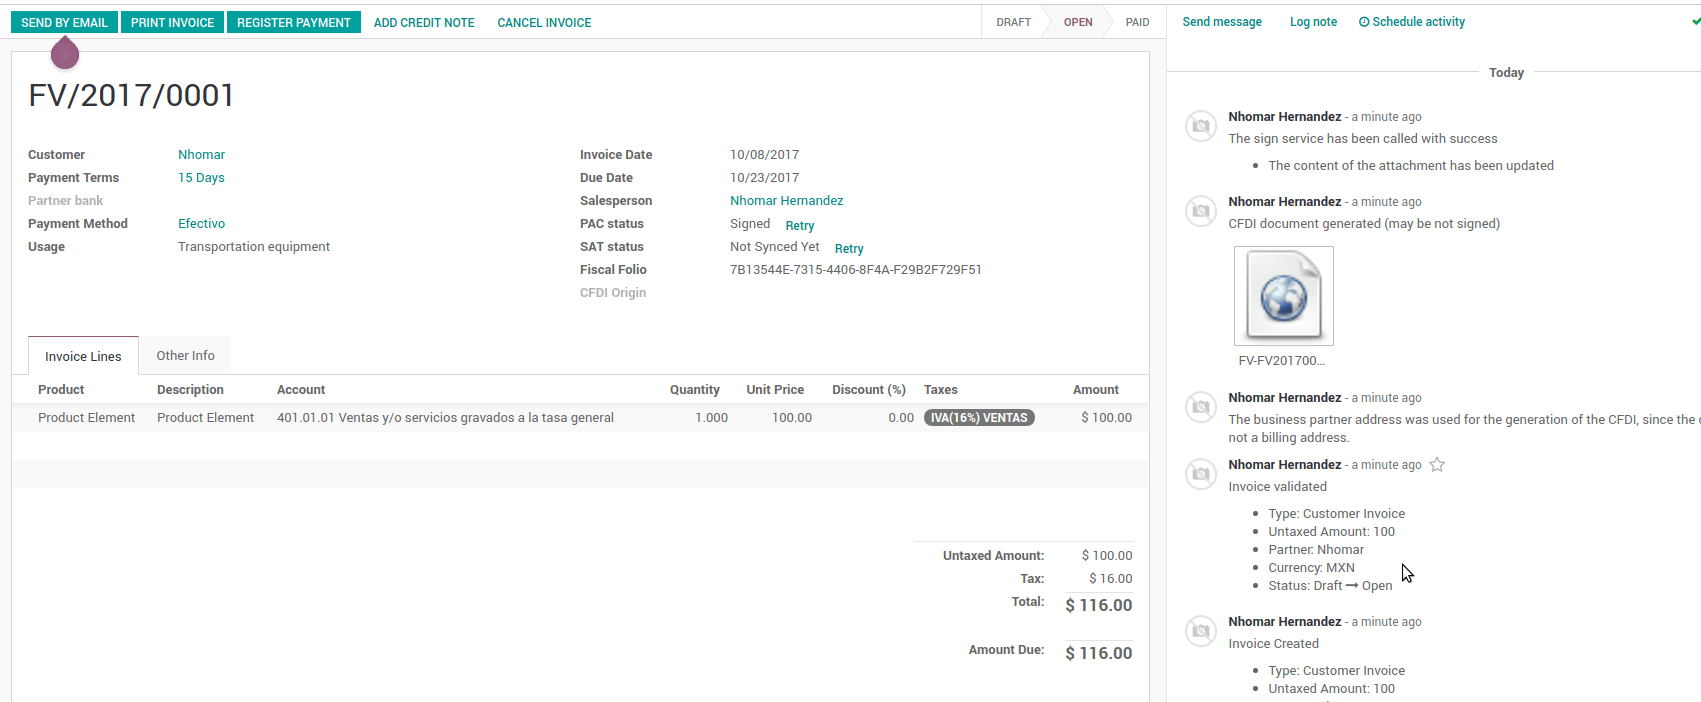
Vous pouvez générer le fichier PDF en cliquant simplement sur le bouton Imprimer de la facture ou en l’envoyant par courrier électronique en suivant la procédure normale dans odoo afin d’envoyer votre facture par courrier électronique.
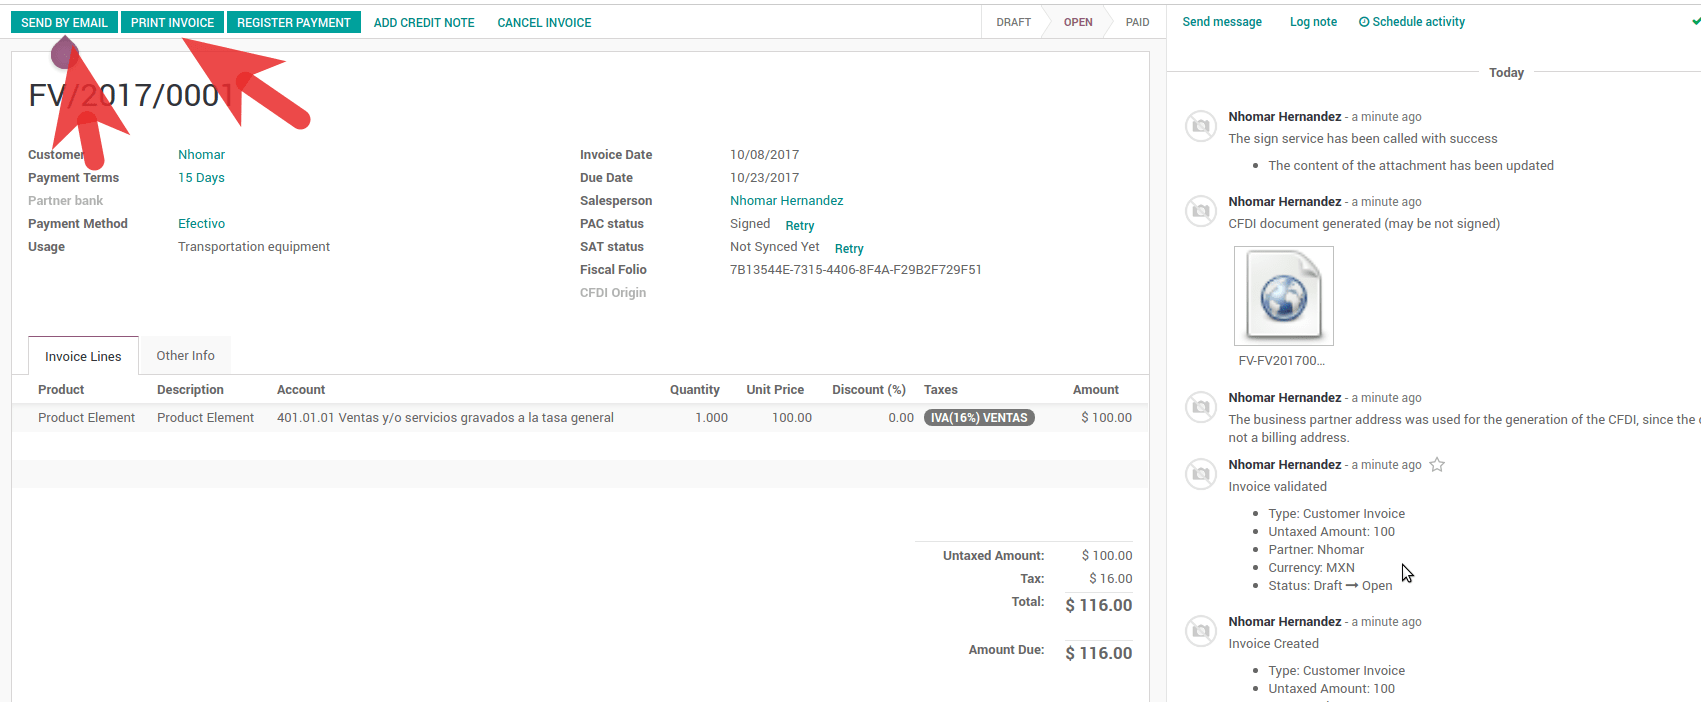
Voici à quoi doit ressembler la facture électronique une fois que vous l’avez envoyée par email.
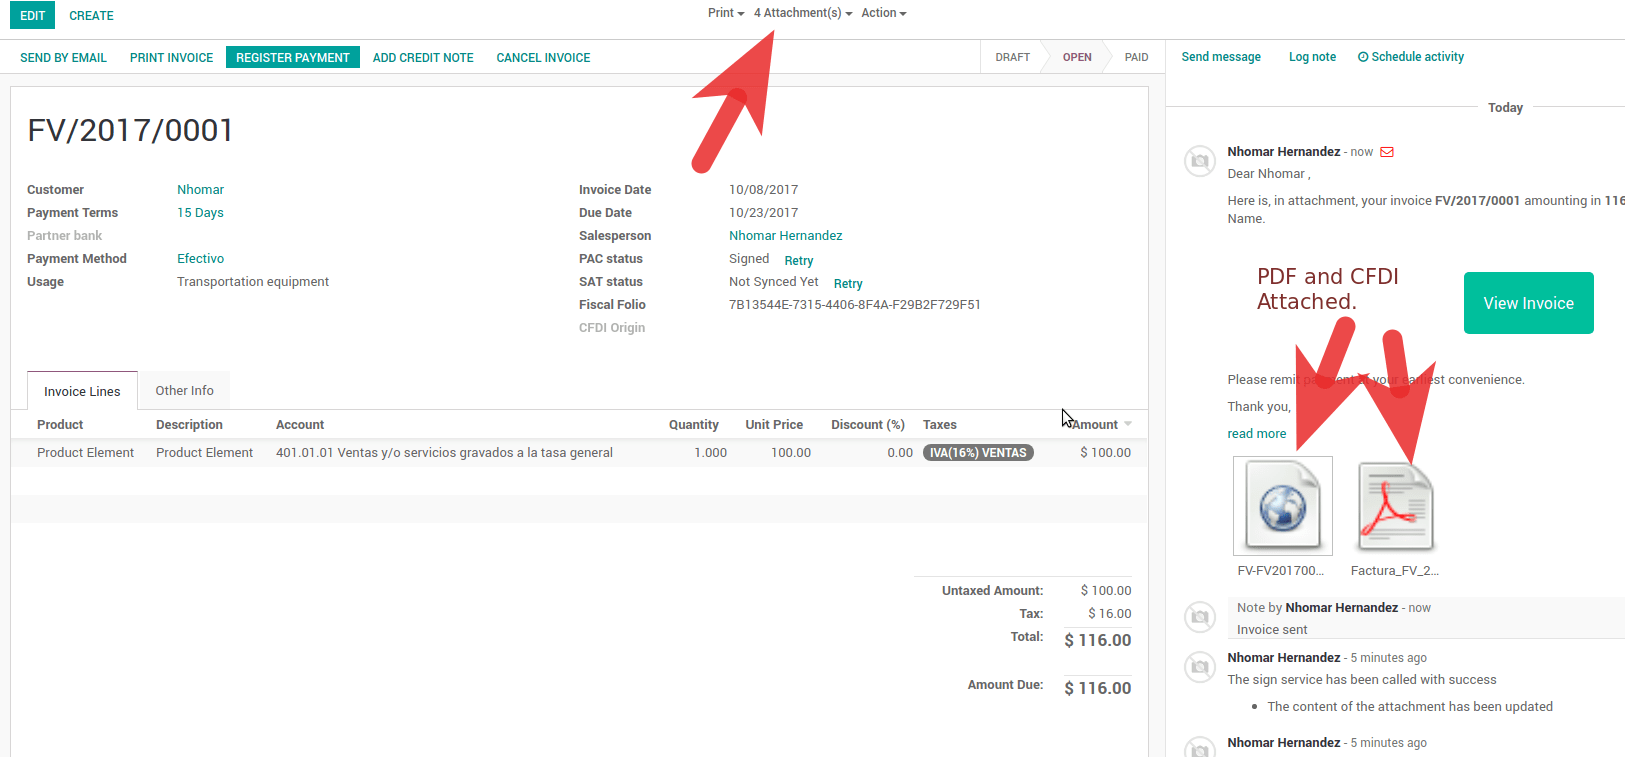
Annulation de factures
Le processus d’annulation est entièrement lié aux annulations régulières d’Odoo.
Si la facture n’est pas payé.
Go to to the customer invoice journal where the invoice belong to.


Cochez le champ « Autoriser l’annulation d’écritures ».

Go back to your invoice and click on the button « Cancel Invoice ».

For security reasons it is recommendable return the check on the to allow cancelling to false again, then go to the journal and un check such field.
Considérations Légales
A cancelled invoice will automatically cancelled on the SAT.
If you retry to use the same invoice after cancelled, you will have as much cancelled CFDI as you tried, then all those xml are important to maintain a good control of the cancellation reasons.
You must unlink all related payment done to an invoice on odoo before cancel such document, this payments must be cancelled to following the same approach but setting the « Allow Cancel Entries » in the payment itself.
Paiements (disponible uniquement pour CFDI 3.3)
Pour générer le complément de paiement, il vous suffit de suivre le processus de paiement normal dans Odoo. Ces considérations sont importantes pour comprendre le comportement.
To generate payment complement the payment term in the invoice must be PPD, because It is the expected behavior legally required for « Cash payment ».
1.1. How can I generate an invoice with payment term `PUE`?
According to the SAT documentation a payment is classified as
PUEif it was agreed that the invoice would be fully paid before the 1st of the next calendar month (the month after the one in the CFDI date); any other condition will generate aPPDinvoice.1.2. How is this done in Odoo?
The appropriate CFDI payment term (PPD or PUE) is determined by the dates and the
Payment Termsthat are selected in the invoice.If an invoice is generated without
Payment Termthe attributeMetodoPagowill always bePUE.If this is the first week of the month and an invoice is generated with
Payment Term15 Net Daysthe calculatedDue Datewill be before the 1st of the next month, which will result in the attributeMetodoPagobeingPUE.If this is not the first week of the month and an invoice is generated with
Payment Term30 Net Days, theDue Datewill be later higher than the 1st day of the next month and theMetodoPagowill bePPD.If the
Payment Termare defined with 2 or more lines (for example30% AdvanceandEnd of Following Month), this is an installments term, and the attributeMetodoPagowill always bePPD.
To test a normal signed payment just create an invoice with the payment term
30% Advance, End of Following Monthand register a payment to it.You must print the payment in order to retrieve the PDF properly.
Regarding « Payments in Advance » you must create a proper invoice with the advance payment itself as a product line setting the proper SAT code following the procedure in the official documentation given by the SAT in the section Apéndice 2 Procedimiento para la emisión de los CFDI en el caso de anticipos recibidos.
Related to topic 4, creating a Customer Payment without a proper invoice is not allowed.
Electronic Accounting
Accounting for Mexico in Odoo is composed of 3 reports:
Electronic Chart of Accounts (Called and displayed as COA).
Balance générale électronique.
Rapport DIOT
1. and 2. are considered electronic accounting, and DIOT is a report only available in the context of accounting.
You can find all of those reports in
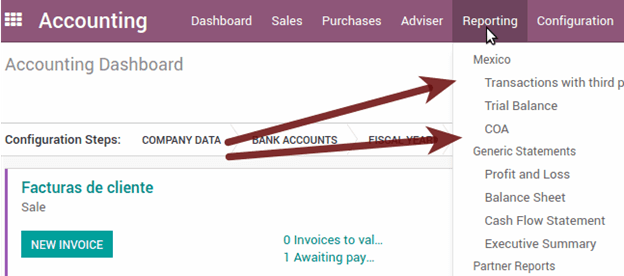
Electronic Chart of Accounts (Called and displayed as COA).
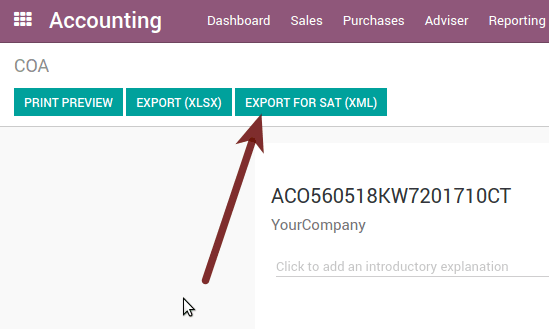
Electronic invoicing has never been so easy, just go to and click the button Export for SAT (XML).
Comment ajouter des nouveaux comptes?
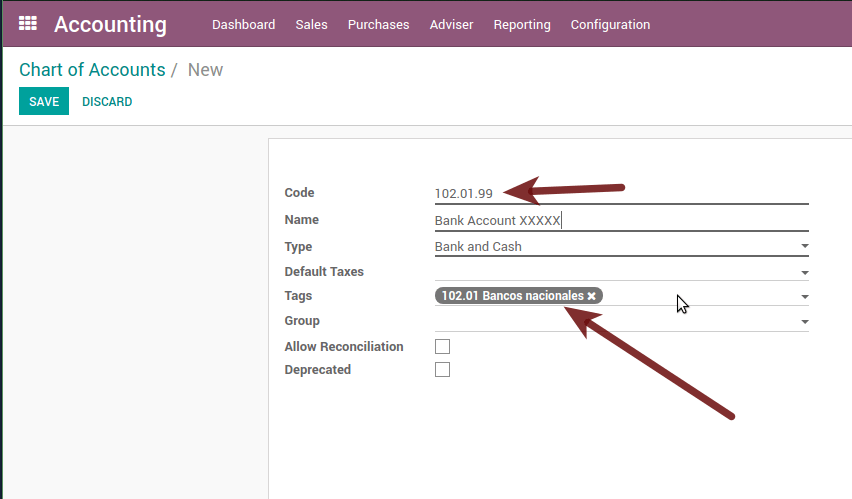
Si vous ajoutez un compte avec la convention de codage NNN.YY.ZZ où NNN.YY est un groupe de codage SAT, votre compte sera configuré automatiquement.
Example to add an Account for a new Bank account go to and then create a new account in the «Create» button and try to create an account with the number 102.01.99 once you change to establish the name you will see an automatically configured label, the configured labels are the ones chosen to be used in the COA in XML.
Balance générale
Exactly like the COA but with the credit and debit of the initial balance, once you have correctly configured your COA, you can go to this is automatically generated and can be exported to XML using the button on the top Export for SAT (XML) with the previous selection of the period you want to export.
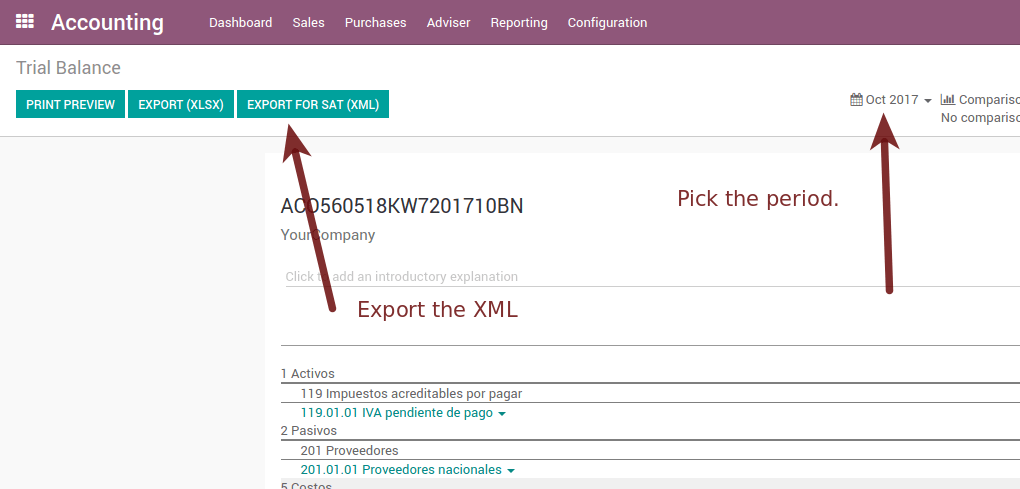
All normal analysis and listed functions are available here as well as any normal Odoo Report.
Rapport DIOT (application de comptabilité requise)
What is DIOT and the importance of presenting it SAT
When it comes to procedures with the SAT Administration Service, we know that we should not neglect what we present.
The DIOT is the Informative Declaration of Operations with Third Parties (DIOT), which is an additional obligation with VAT, where we must give the status of our operations to third parties, or what is considered the same, with our suppliers.
This applies to both individuals and Personas Morales, so if we have VAT to present to the SAT and also deal with suppliers it is necessary to send the DIOT.
When to file the DIOT and in what format ?
It is easy to present the DIOT, since, like all formats, you can obtain it on the SAT page, it is the electronic form A-29 that you can find on the SAT website.
Every month if you have operations with third parties, it is necessary to present the DIOT, as we do with VAT, so if in January we have deals with suppliers, by February we must present the information relevant to said data.
Where is DIOT presented?
You can present DIOT in different ways, it is up to you which one you will choose and which one will be more comfortable for you since you will present it every month or every time you have dealings with suppliers.
The A-29 form is electronic so you can present it on the SAT page, but this after having made up to 500 registrations.
Once these 500 records have been entered in the SAT, you must submit them to the Local Taxpayer Services Administration (ALSC) with correspondence to your tax address, these records can be submitted on a digital storage medium such as a CD or USB, which a Once validated, they will return you, so do not doubt that you will still have these discs and of course, your CD or USB.
One more thing to know: batch loading?
When reviewing the official SAT documents in DIOT, you will find the Batch load, and of course the first thing we think is what is that ?, and according to the SAT site it is:
The « batch load » is the conversion of databases from records of transactions with suppliers made by taxpayers in text files (.txt). These files have the necessary structure for their application and import into the Informative Declaration of Operations with third parties system, avoiding direct capture and consequently, optimizing the time invested in their integration for the presentation in time and form to the SAT.
You can use it to present the DIOT, since it is allowed, which will facilitate this operation, so that it does not exist to avoid being in line with the SAT in regards to the Informative Declaration of Operations with Third Parties.
Voir aussi
How to generate this report in Odoo?
Allez à .

A report view is displayed, select the last month to report the immediately preceding month or leave the current month if it suits you.

Click on Export (XLSX) or Print (TXT)
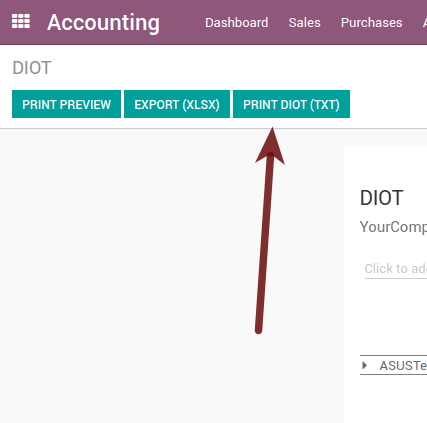
Save the downloaded file in a safe place, go to the SAT website and follow the necessary steps to declare it.
Important considerations about your supplier and invoice data for DIOT
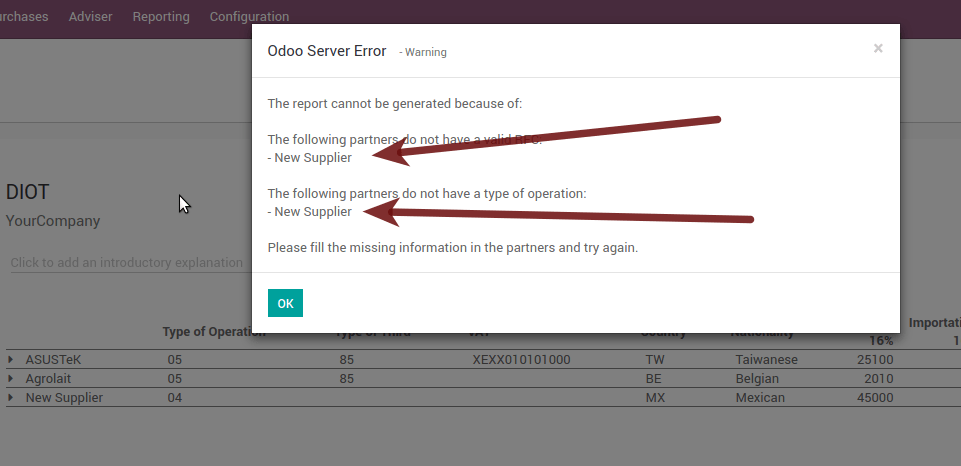
All suppliers must have the fields configured in the accounting tab called « DIOT Information », the L10N MX Nationality field is completed by simply selecting the appropriate country in the address, not You need to do nothing else there, but the l10n MX type of operation must be configured in all your providers.

There are 3 VAT options for this report, 16%, 0% and exempt, one invoice line in Odoo is considered exempt if there is no tax on it, the other 2 taxes are already configured correctly.
Remember that to pay an invoice that represents a prepayment, you must first request the invoice and then pay it and properly reconcile the payment following the standard Odoo procedure.
Vous n’avez pas besoin de renseigner toutes vos données partenaires pour tenter de générer la facture fournisseur, vous pouvez corriger ces informations lors de la génération du rapport.
N’oubliez pas que ce rapport n’affiche que les factures fournisseur effectivement payées.
If some of these considerations are not taken into account, a message like this will appear when you generate the DIOT in TXT with all the partners you need to verify this particular report, this is the reason why we recommend to use this report not only for exporting your legal information. obligation, but generate it before the end of the month and use it as your auditory process to see that all your partners are configured correctly.
Closing Fiscal Period in Odoo
Before proceeding to the close of the fiscal year, there are some steps that you should normally take to ensure that your accounting is correct, updated and accurate:
Make sure that you have fully reconciled your bank account (s) through the end of the year and confirm that the closing book balances match the balances on your bank statements.
Verify that all customer invoices have been entered and approved.
Confirm that you have entered and approved all vendor bills.
Validate all expenses, ensuring their accuracy.
Check that all payments received have been entered and recorded exactly.
Liste de vérification de fin d’année
Run a Tax Report, and verify that your tax information is correct.
Reconcile all accounts on your Balance Sheet
Compare your bank balances in Odoo against the current bank balances on your statements. Use the report Bank Reconciliation to help you with this.
Reconcile all cash and bank account transactions by running your Old Accounts Receivable and Old Accounts Payable reports
Auditez vos comptes, en vous assurant de bien comprendre les opérations qui les affectent et leur nature, en veillant à inclure les prêts et les immobilisations.
Run the optional function Payments Matching, under the More drop-down on the Journal options from the Accounting dashboard, validating any Vendor Bill and Customer Invoices with its payments. This step is optional, however it can assist the year-end process if all pending payments and invoices are reconciled, and it can lead to finding errors or mistakes in the system.
Your accountant will probably like to check your items in the balance sheet and do some Journal Entries for:
Manual year-end adjustments, using the Journal Audit report (For example, the Current Earnings for the Year and Retained Earnings reports).
Travail en cours.
Depreciation Journals.
Prêts.
Tax Adjustments.
If your accountant is on the year-end audit, they will want to have copies of the balance sheet items (such as loans, bank accounts, prepayments, sales tax reports, etc …) to compare against. your balances in Odoo.
Au cours de ce processus, il est recommandé de fixer la date de clôture pour les non-conseillers au dernier jour de l’exercice précédent, qui est défini dans les paramètres comptables. De cette façon, le comptable peut être sûr que personne d’autre ne modifie les transactions de l’année précédente lors de la vérification des livres.

Accounting Closing Process
In Odoo there is no need to make a specific year-end entry to close the reporting income accounts . The result of the exercise is automatically calculated in the account type (Current Year Earnings) and the difference between Income - Expenses will be accumulated to calculate it.
The reports are created in real-time, which means that the Income Report corresponds directly to the closing date of the year that you specify in Odoo. In addition, at any time that you generate the Income Report, the start date will correspond to the start date of the Fiscal Year and the account balances will all be 0.
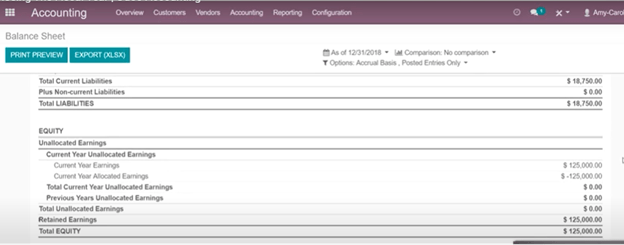
As of December 31, the Balance Sheet shows the earnings of the Current Year that do not have been recognized (Account type Total Current Year Unallocated Earnings in MX account 305.01.01 [“current year earnings” type])
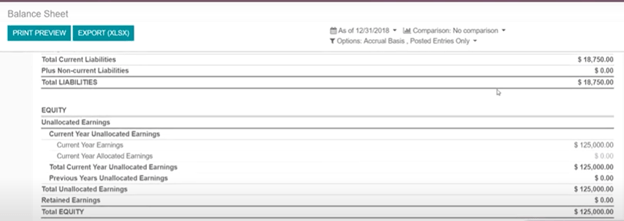
The accountant should create a Journal Entry to recognize the result of the year in Accumulated Earnings from previous years on the account « previous years results » account (304.01.01 in Mexico) - that is an equity account.
The simplified accounting entry would look like this:
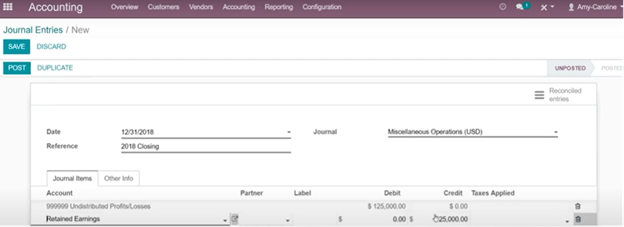
Once the accountant has created the journal entry to locate the Current Earnings for the Year, they must set the Closing Date to the last day of the fiscal year. Making sure that before doing this, whether or not the current gain of the year in the Balance Sheet is properly reporting a balance 0.
Extra Recommended features
Contacts App (Free)
If you want to properly manage your customers, suppliers and addresses, this module, even if it is not a technical need, it is highly recommended to install it.
Multi-currency (Requires Accounting application)
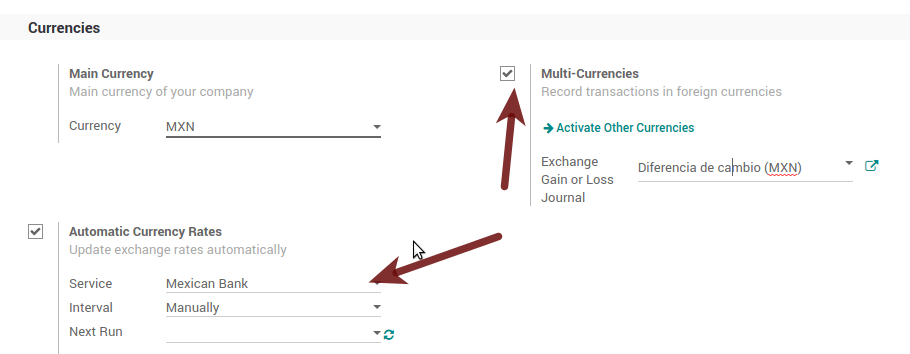
In Mexico, almost all companies send and receive payments in different currencies. If you want to do this you can enable the use of multi-currency. You should also enable synchronization with the Mexican Bank Service, as this would allow you to automatically have the exchange rate from the SAT without having to manually create this information every day in Odoo.
Accédez aux paramètres et activez la fonction multidevise.
Enabling Explicit errors on the CFDI using the XSD local validator (CFDI 3.3)
Frequently you want receive explicit errors from the fields incorrectly set on the xml, those errors are better informed to the user if the check is enable, to enable the Check with xsd feature follow the next steps (with the developer mode enabled).
Allez à
Reherchez l’Action « Télécharger le fichier XSD au format CFDI ».
Cliquez sur le bouton « Créer une action contextuelle »
Allez sur le formulaire de la société depuis
Ouvrez l’une de vos sociétés.
Cliquez sur « Action » puis sur « Télécharger le fichier XSD au format CFDI ».

Vous pouvez désormais créer une facture avec n’importe quelle erreur (par exemple un produit sans code, ce qui est assez courant) et une erreur explicite sera affichée à la place d’une erreur générique sans explication.
Note
Si vous voyez une erreur comme celle-ci :
The cfdi generated is not validattribute decl. 'TipoRelacion', attribute 'type': The QName value
'{http://www.sat.gob.mx/sitio_internet/cfd/catalogos}c_TipoRelacion' does
not resolve to a(n) simple type definition., line 36This can be caused by a database backup restored in another server, or when the XSD files are not correctly downloaded. Follow the same steps as above but:
Choisissez la société dans laquelle l’erreur s’est produite.
Click on Action and then on Download XSD file to CFDI.
Problèmes et erreurs courants
Messages d’erreur (applicable uniquement sur CFDI 3.3):
9:0:ERROR:SCHEMASV:SCHEMAV_CVC_MINLENGTH_VALID: Element
'{http://www.sat.gob.mx/cfd/3}Concepto', attribute 'NoIdentificacion':
[facet 'minLength'] The value '' has a length of '0'; this underruns
the allowed minimum length of '1'.
9:0:ERROR:SCHEMASV:SCHEMAV_CVC_PATTERN_VALID: Element '{http://www.sat.gob.mx/cfd/3}Concepto', attribute 'NoIdentificacion': [facet 'pattern'] The value '' is not accepted by the pattern '[^|]{1,100}'.
** Solution** : Vous avez oublié de définir le champ « Référence » approprié dans le produit. Veuillez vous reporter à la fiche du produit et définir correctement votre référence interne.
Messages d’erreur :
6:0:ERROR:SCHEMASV:SCHEMAV_CVC_COMPLEX_TYPE_4: Element
'{http://www.sat.gob.mx/cfd/3}RegimenFiscal': The attribute 'Regimen' is required but missing.
5:0:ERROR:SCHEMASV:SCHEMAV_CVC_COMPLEX_TYPE_4: Element '{http://www.sat.gob.mx/cfd/3}Emisor': The attribute 'RegimenFiscal' is required but missing.
Solution: You forgot to set the proper « Fiscal Position » on the partner of the company. Go to customers, remove the customer filter and look for the partner called as your company and set the proper fiscal position which is the kind of business your company does related to SAT list of possible values, another option can be that you forgot to follow the considerations about fiscal positions.
You need to go to Fiscal Position settings and set the proper code (it is the first 3 numbers of the name), for example, for the test, you need to set 601, it will look like the picture.

Astuce
For testing purposes this value must be set to
601 - General de Ley
Personas Morales
which is the one required for the VAT demo.Message d’erreur
2:0:ERROR:SCHEMASV:SCHEMAV_CVC_ENUMERATION_VALID: Element
'{http://www.sat.gob.mx/cfd/3}Comprobante', attribute 'FormaPago':
[facet 'enumeration'] The value '' is not an element of the set
{'01', '02', '03', '04', '05', '06', '08', '12', '13', '14', '15', '17',
'23', '24', '25', '26', '27', '28', '29', '30', '99'}
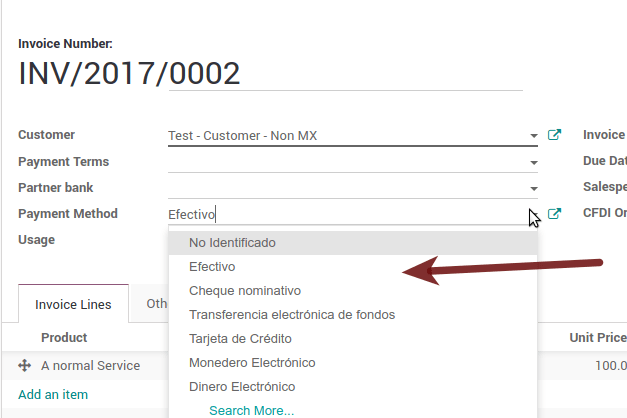
Solution: Le mode de paiement est requis sur la facture.
Messages d’erreur :
2:0:ERROR:SCHEMASV:SCHEMAV_CVC_ENUMERATION_VALID: Element
'{http://www.sat.gob.mx/cfd/3}Comprobante', attribute 'LugarExpedicion':
[facet 'enumeration'] The value '' is not an element of the set {'00
2:0:ERROR:SCHEMASV:SCHEMAV_CVC_DATATYPE_VALID_1_2_1: Element '{http://www.sat.gob.mx/cfd/3}Comprobante', attribute 'LugarExpedicion': '' is not a valid value of the atomic type '{http://www.sat.gob.mx/sitio_internet/cfd/catalogos}c_CodigoPostal'.5:0:ERROR:SCHEMASV:SCHEMAV_CVC_COMPLEX_TYPE_4: Element '{http://www.sat.gob.mx/cfd/3}Emisor': The attribute 'Rfc' is required but missing.
Solution: You must configure your company address correctly, this is a mandatory group of fields, you can go to your company configuration in and fill complete all the mandatory fields for your address by following the steps in this section: Set your legal information in the company.
Message d’erreur
2:0:ERROR:SCHEMASV:SCHEMAV_CVC_DATATYPE_VALID_1_2_1: Element
'{http://www.sat.gob.mx/cfd/3}Comprobante', attribute 'LugarExpedicion':
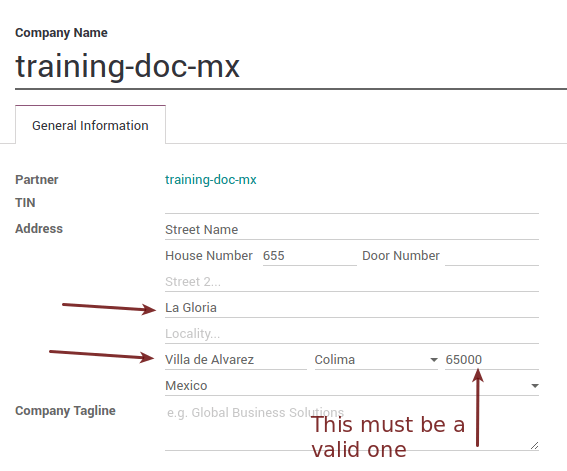
'' is not a valid value of the atomic type '{http://www.sat.gob.mx/sitio_internet/cfd/catalogos}c_CodigoPostal'.
Solution : Le code postal de l’adresse de votre entreprise n’est pas valide pour le Mexique, veuillez le corriger.
Messages d’erreur :
18:0:ERROR:SCHEMASV:SCHEMAV_CVC_COMPLEX_TYPE_4: Element
'{http://www.sat.gob.mx/cfd/3}Traslado': The attribute 'TipoFactor' is
required but missing.
34:0:ERROR:SCHEMASV:SCHEMAV_CVC_COMPLEX_TYPE_4: Element '{http://www.sat.gob.mx/cfd/3}Traslado': The attribute 'TipoFactor' is required but missing.", '')
Solution: Set the Mexican name for the 0% and 16% tax in your system and use it on the invoice. Your tax, which represents 16% VAT and 0%, must have the Factor Type field set to Tasa.


Messages d’erreur :
CCE159The XXXX attribute must be registered if the key of cce11: ComercioExterior: TipoOperacion registered is '1' or '2'.
Solution: It is necessary to specify the Incoterm.
Messages d’erreur :
CCE209The attribute cce11: Foreign Trade: Goods: Goods: Customs Unit must have the value specified in the catalog catCFDI: c_FraccionArancelaria column 'UMT' when the attribute cce11: Foreign Trade: Goods: Me
Solution: The Tariff Fraction must have the code of the unit of measure 01, corresponding to Kilograms.
Glossary
CFDI: Online Digital Tax Receipt
CSD: Digital Seal Certificate
PAC: Authorized Certification Provider
Stamp: Digital signature of the electronic invoice
Addenda: Complement of information that can be attached to an Internet Digital Tax Receipt (CFDI) normally required by certain companies in Mexico such as Walmart, Tiendas Sorianas, etc.
UUID: It is the acronym in English of the Universally Unique Identifier. The UUID is the equivalent of Folio Fiscal, it is composed of 32 hexadecimal digits, shown in 5 groups separated by hyphens.
LCO: List of Obliged Taxpayers (LCO) is a list issued by the SAT that accounts for all the taxpayers whom it authorizes the issuance of invoices and payroll receipts. This means that, to be able to electronically bill your clients, you must be in this database.