Мексика
Примітка
Ця документація написана з урахуванням того, що ви дотримуєтесь офіційних документів щодо рахунків-фактур, продажів і бухгалтерського обліку та знаєте, що у вас є досвід роботи з odoo у таких сферах, ми не маємо наміру поставити тут процедури, яка вже пояснюєьься на цих документах, просто інформацію щоб дозволити вам використовувати Odoo в компанії з країною «Мексика».
Вступ
Мексиканська локалізація - це група з 3 модулів:
l10n_mx: Усі основні дані для управління бухгалтерським обліком, податками та планом рахунків, цей запропонований встановлений план рахунків - призначена копія списку кодів групи, які пропонує SAT.
l10n_mx_edi: все, що стосується електронних транзакцій, CFDI 3.2 та 3.3, додаток до оплати, додавання рахунків-фактур.
l10n_mx_reports: всі обов’язкові електронні звіти для електронного бухгалтерського обліку тут (необхідний бухгалтерський додаток).
З мексиканською локалізацією в Odoo ви зможете не просто дотримуватися необхідних функцій за законом в Мексиці, але використовувати його як систему бухгалтерського обліку та рахунків-фактур завдяки цілому набору нормальних вимог для цього ринку, стаючи вашим Odoo в ідеальному рішенні керувати вашою компанією в Мексиці.
Налаштування
Порада
Після налаштування ми надамо вам процес для перевірки всього, спробуйте виконати крок за кроком, щоб дозволити вам не витрачати час на виправлення помилок. На будь-якому кроці ви можете нагадати крок і повторити спробу.
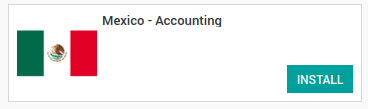
Install the Mexican Accounting Localization
To install the module, go to , remove the Apps filter and search for «Mexico». Then click on Install.
Порада
Створюючи базу даних з www.odoo.com, якщо під час створення бухобліку ви виберете Мексику як країну локалізації, вона буде автоматично встановлена.
Electronic Invoices (CDFI 3.2 and 3.3 format)
Щоб включити цю вимогу в Мексиці, перейдіть до налаштувань в бухобліку і ввімкніть опцію на зображенні за допомогою цього, ви зможете створити підписаний рахунок-фактуру (CFDI 3.2 та 3.3) і створити підписаний платіж (також 3.3) повністю інтегрується зі звичайним потоком рахунків-фактур в Odoo.

Set your legal information in the company
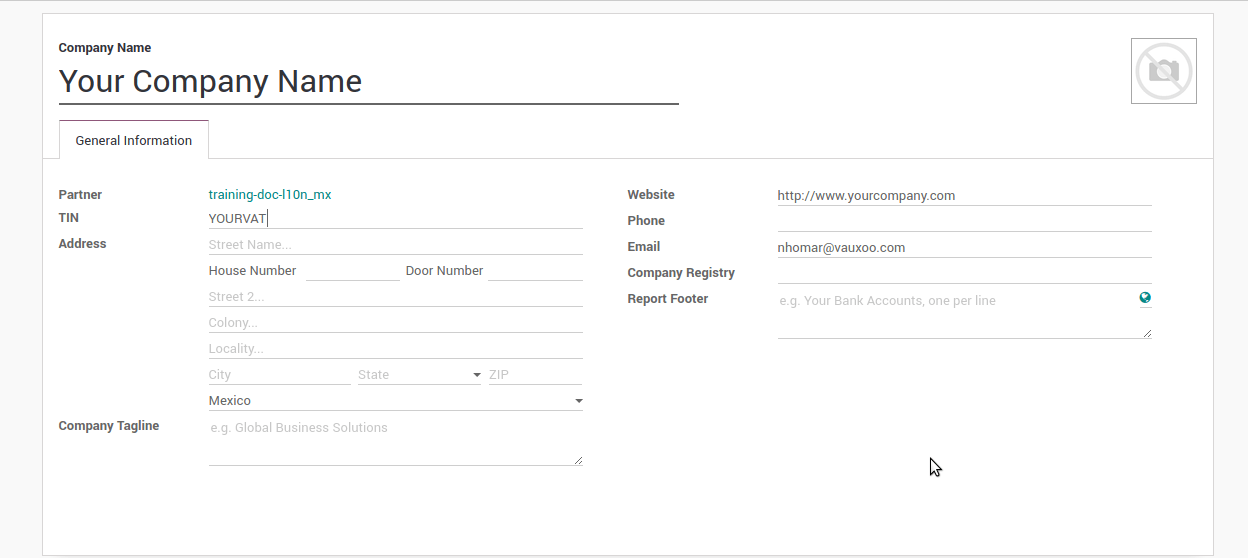
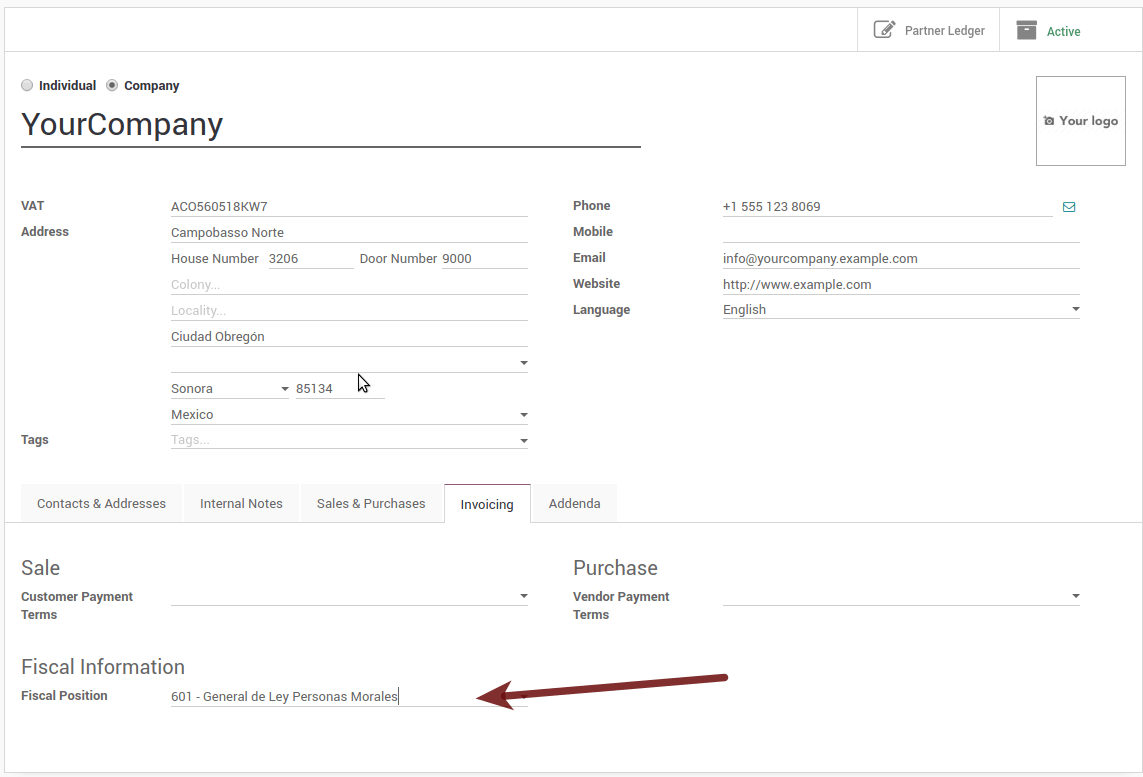
Спочатку переконайтеся, що ваша компанія налаштована з правильними даними. Перейдіть у і введіть дійсну адресу та ПДВ для вашої компанії. Не забудьте визначити мексиканську схему оподаткування у контакті з вашою компанією.
Порада
If you want use the Mexican localization on test mode, you can put any known address inside Mexico with all fields for the company address and set the vat to EKU9003173C9.
Попередження
From a legal point of view, a Mexican company must use the local currency (MXN). Therefore, Odoo does not provide features to manage an alternative configuration. If you want to manage another currency, let MXN be the default currency and use price list instead.
Set the proper «Fiscal Position» on the partner that represent the company
Перейдіть у тій самій формі, де ви редагуєте компанію, збережіть запис, щоб встановити цю форму тільки для прочитання, і просто перегляньте текст, натисніть посилання партнера, потім відредагуйте його та встановіть на вкладці Рахунки відповідну фіскальну інформацію (для Область тестування це повинно бути 601 - General de Ley Personas Morales, просто знайдіть його як звичайне поле Odoo, якщо ви не бачите варіант).
Enabling CFDI Version 3.3
Попередження
This steps are only necessary when you will enable the CFDI 3.3 (only available for V11.0 and above) if you do not have Version 11.0 or above on your SaaS instance please ask for an upgrade by submitting a ticket to support in https://www.odoo.com/help.
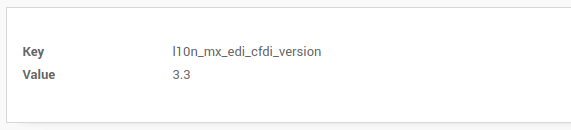
Activate the developer mode.
Перейдіть та перегляньте наступний технічний параметр в і встановіть параметр з назвою l10n_mx_edi_cfdi_version до 3.3 (Створіть його, якщо запис із цією назвою не існує).
Попередження
CFDI 3.2 буде юридично можливим до 30 листопада 2017 р., Включення версії 3.3 стане обов’язковим кроком для виконання нової SAT resolution в будь-якій новій базі даних, створеній після виходу випуску v11.0 CFDI 3.3 є поведінкою за умовчанням.
Important considerations when you enable the CFDI 3.3
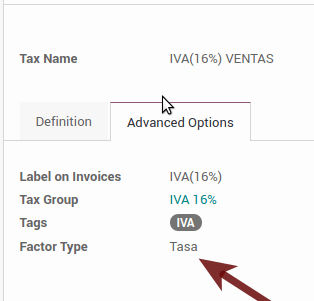
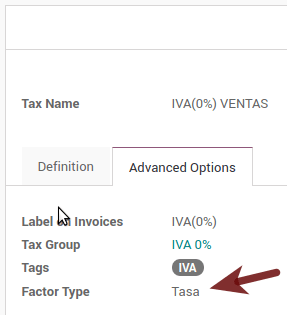
Ваш податок, який представляє ПДВ 16% та 0%, повинен мати поле «Тип фактора», встановлене для «Таsа».
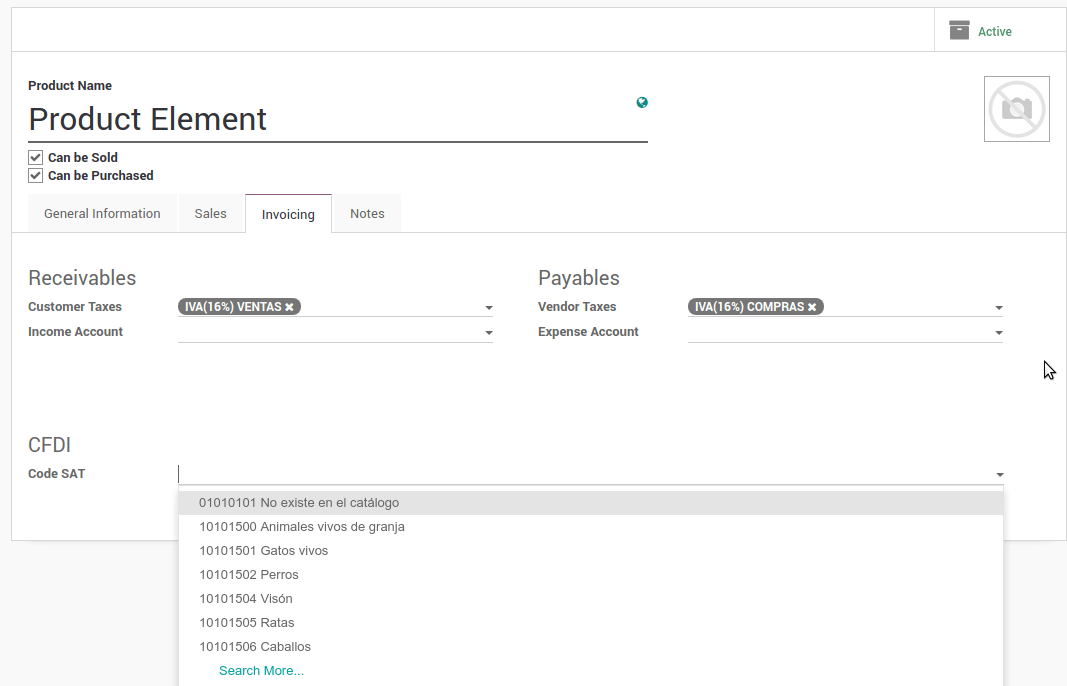
Ви повинні перейти до налаштування схеми оподаткування та встановити правильний код (це перші 3 номери в назві), наприклад, для тесту, який слід встановити на 601, він буде виглядати як зображення.

Усі товари повинні мати для CFDI 3.3 «SAT-код» і поле «Референс» правильно встановити, ви можете їх експортувати та імпортувати, щоб зробити це швидше.
Configure the PAC in order to sign properly the invoices
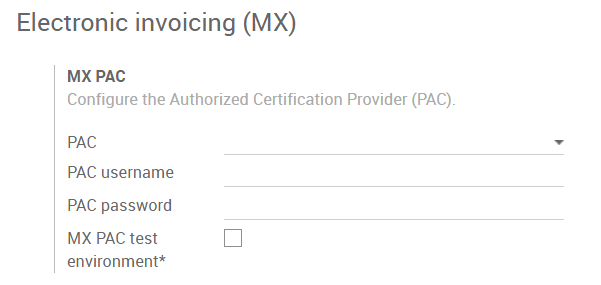
Щоб налаштувати EDI за допомогою PAC, ви можете зайти в меню . Ви можете вибрати PAC у списку підтримуваних PAC у полі PAC, а потім введіть ім’я користувача PAC та пароль PAC.
Попередження
Пам’ятайте, що ви повинні зареєструватися в рецензованому PAC перед ручним, цей процес можна зробити з самого PAC, у цьому випадку у нас буде два (2) наявності Finkok і` Solución Factible`_.
Ви повинні обробити свій Особовий ключ (CSD) із установою SAT, перш ніж виконувати ці кроки, якщо у вас немає такої інформації, будь ласка, спробуйте всі «кроки для тестування» і поверніться до цього процесу, коли ви завершите запропонований процес для SAT, щоб встановити цю інформацію для вашого виробничого середовища за допомогою реальних транзакцій.
Порада
Якщо ви позначили поле MX PAC тест середовища, вам не потрібно вводити ім’я користувача або пароль PAC.
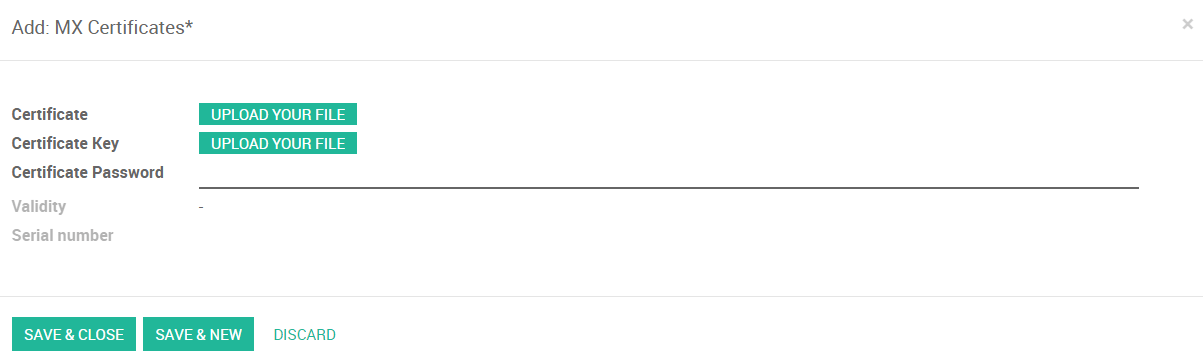
Порада
Ось сертифікат SAT, який ви можете використовувати, якщо ви хочете використовувати Тестування середовища для мексиканської локалізації бухобліку.
Password:
12345678a
Configure the tag in sales taxes
Цей тег використовується для встановлення коду типу податку, переданого чи призупинення, що застосовується до концепції CFDI. Отже, якщо податок є податком на продаж, поле «Тег» повинно бути «IVA», «ISR» або «IEPS».
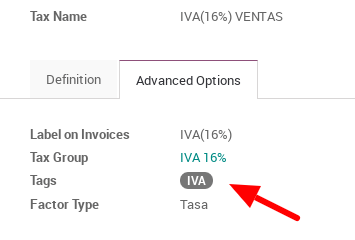
Зверніть увагу, що для податків за замовчуванням тег уже призначений, але при створенні нового податку слід вибрати тег.
Використання та тестування
Виставлення рахунків
Щоб скористатися мексиканським рахунком-фактурою, вам просто потрібно зробити звичайний рахунок-фактуру, слідуючи звичайній поведінці Odoo.
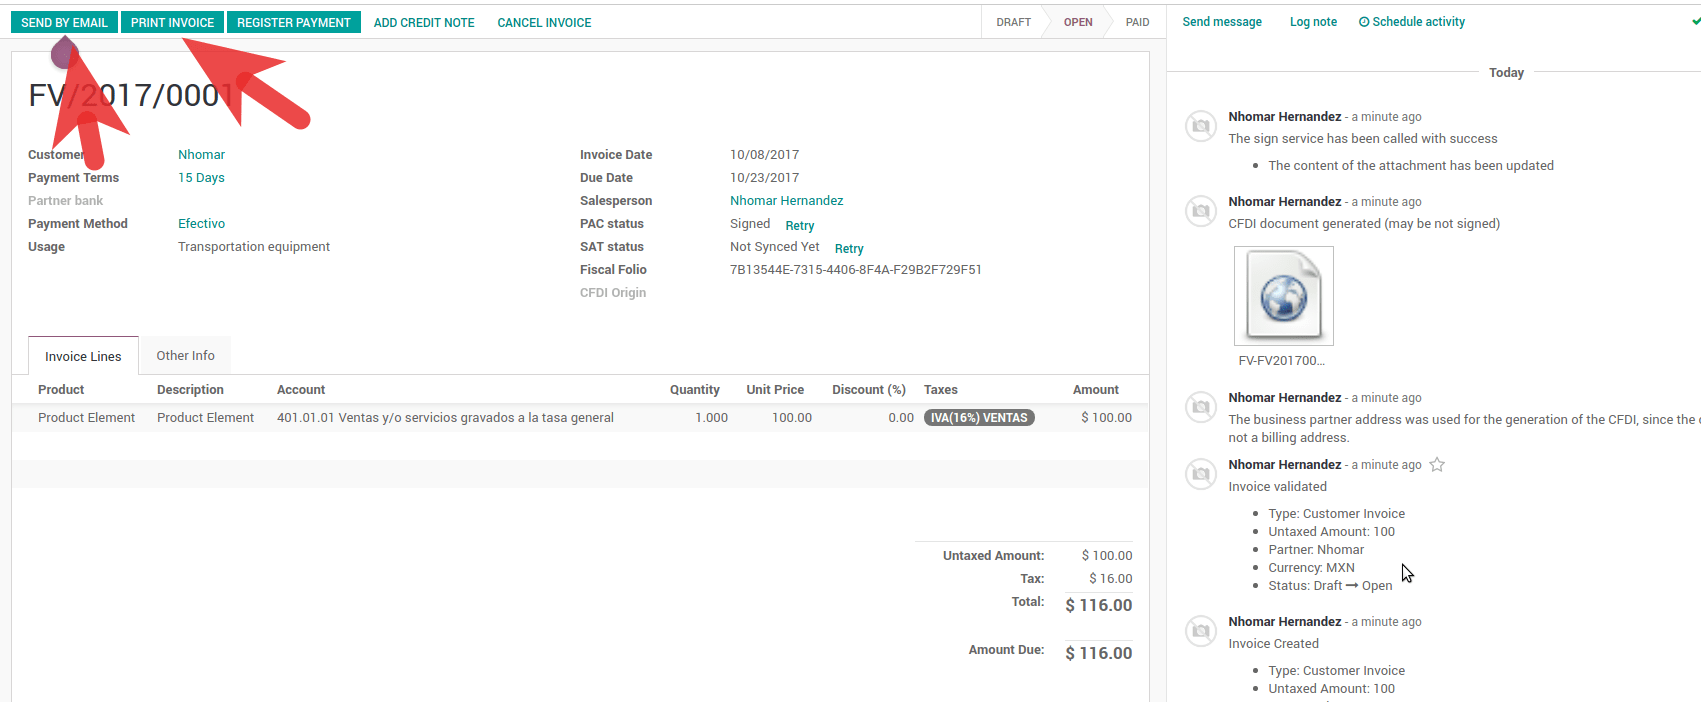
Після перевірки першого рахунку правильно підписаний рахунок-фактура повинен виглядати так:
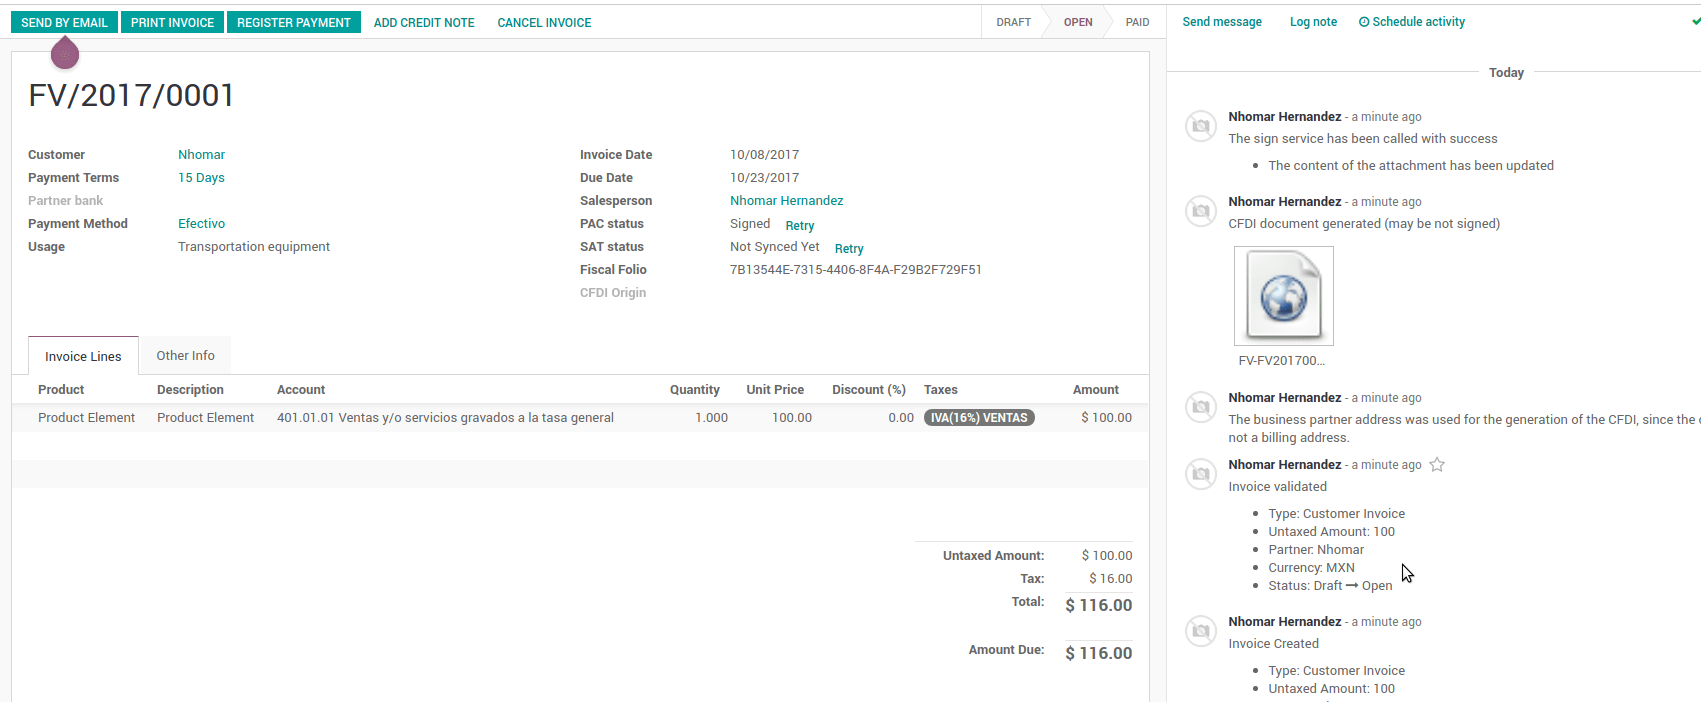
Ви можете генерувати PDF-файл, просто натиснувши кнопку «Друк» у рахунку-фактурі або відправивши його по електронній пошті після звичайного процесу, щоб надсилати рахунок-фактуру електронною поштою.
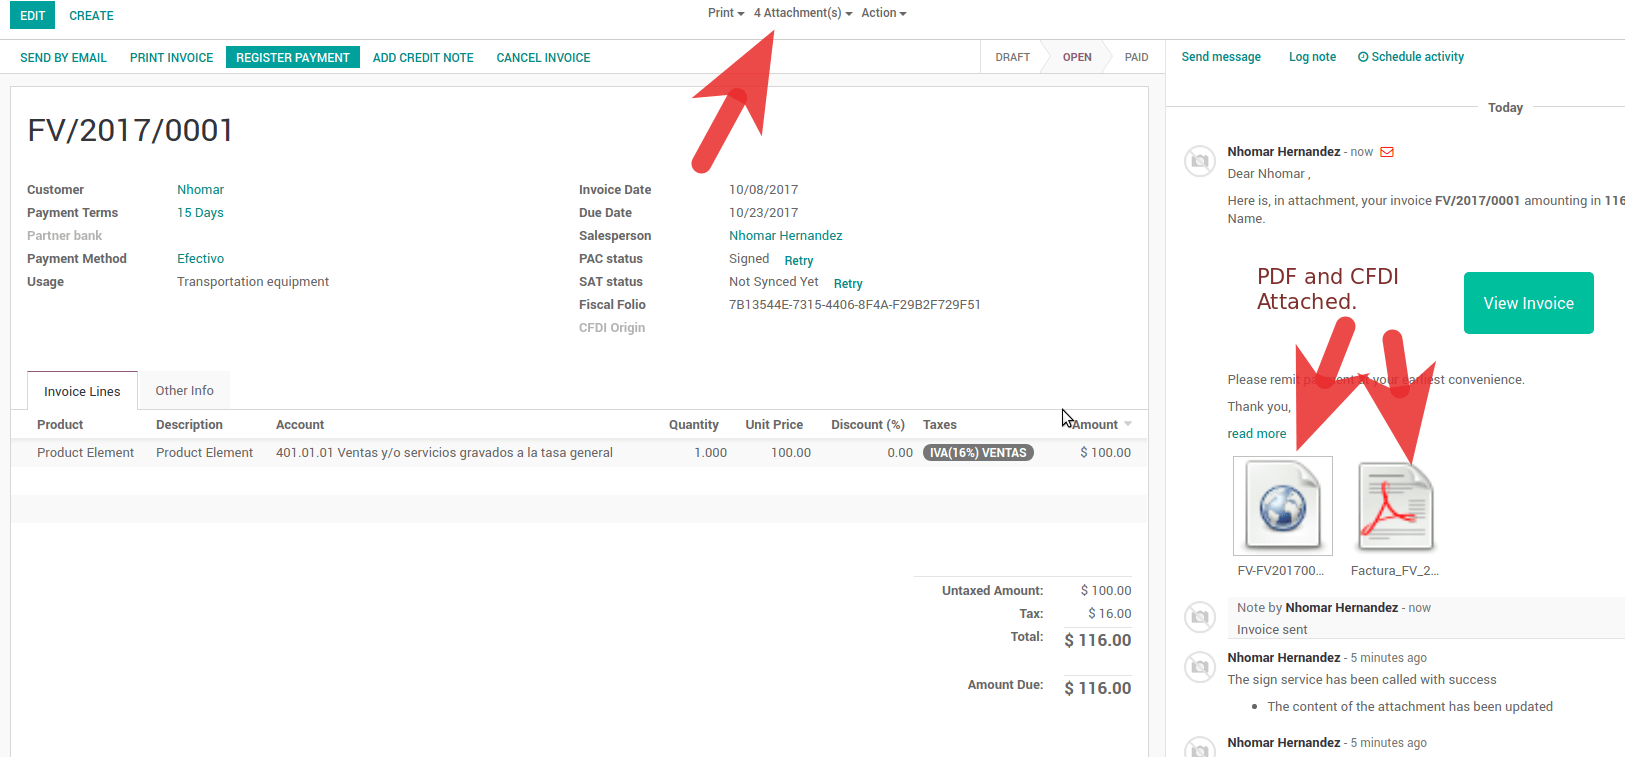
Як тільки ви надішлете електронний рахунок-фактуру електронною поштою, це так, як виглядає.
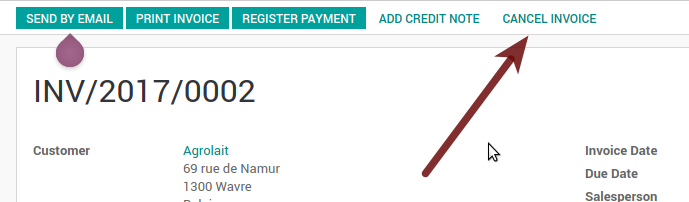
Скасування рахунків-фактур
Процес скасування повністю пов’язаний з нормальним скасуванням в Odoo.
Якщо рахунок-фактура не сплачується.
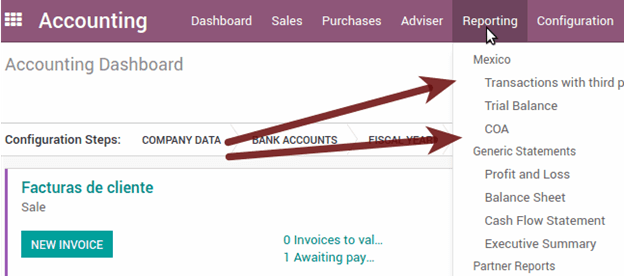
Go to to the customer invoice journal where the invoice belong to.

Check the «Allow cancelling entries» field.
Go back to your invoice and click on the button «Cancel Invoice».
З міркувань безпеки рекомендується повернути перевірку на те, щоб ще раз скасувати помилку, а потім перейти до журналу та перевірити це поле.
Юридичні міркування
Скасований рахунок-фактура буде автоматично скасований на SAT.
Якщо ви спробуєте використати той самий рахунок-фактуру після скасування, у вас буде стільки ж скасованих CFDI, скільки ви спробували, тоді всі ці xml є важливими, щоб забезпечити хороший контроль за причинами скасування.
Ви повинні від’єднати всі пов’язані платежі до рахунку-фактури на odoo перед тим, як скасувати такий документ, ці платежі потрібно скасувати, дотримуючись того самого підходу, але встановлюючи параметр «Дозволити записи відмов» у самому платежі.
Платежі (доступно лише для CFDI 3.3)
Щоб створити платіжний додаток, вам потрібно лише дотримуватися звичайного платіжного процесу в Odoo, ці умови, щоб зрозуміти поведінку, важливі.
Для створення доповнення платежу терміном платежу в рахунку-фактурі повинен бути PPD, оскільки це очікувана поведінка, яка законодавчо вимагається для «Готівкових платежів».
1.1. Як я можу створити рахунок з терміном оплати `PUE`?
According to the SAT documentation a payment is classified as
PUEif it was agreed that the invoice would be fully paid before the 1st of the next calendar month (the month after the one in the CFDI date); any other condition will generate aPPDinvoice.1.2. How is this done in Odoo?
The appropriate CFDI payment term (PPD or PUE) is determined by the dates and the
Payment Termsthat are selected in the invoice.If an invoice is generated without
Payment Termthe attributeMetodoPagowill always bePUE.If this is the first week of the month and an invoice is generated with
Payment Term15 Net Daysthe calculatedDue Datewill be before the 1st of the next month, which will result in the attributeMetodoPagobeingPUE.If this is not the first week of the month and an invoice is generated with
Payment Term30 Net Days, theDue Datewill be later higher than the 1st day of the next month and theMetodoPagowill bePPD.If the
Payment Termare defined with 2 or more lines (for example30% AdvanceandEnd of Following Month), this is an installments term, and the attributeMetodoPagowill always bePPD.
To test a normal signed payment just create an invoice with the payment term
30% Advance, End of Following Monthand register a payment to it.Ви повинні надрукувати платіж, щоб правильно завантажити PDF-файл.
Regarding «Payments in Advance» you must create a proper invoice with the advance payment itself as a product line setting the proper SAT code following the procedure in the official documentation given by the SAT in the section Apéndice 2 Procedimiento para la emisión de los CFDI en el caso de anticipos recibidos.
Related to topic 4, creating a Customer Payment without a proper invoice is not allowed.
Electronic Accounting
Accounting for Mexico in Odoo is composed of 3 reports:
Electronic Chart of Accounts (Called and displayed as COA).
Електронний пробний баланс.
Звіт DIOT.
1. and 2. are considered electronic accounting, and DIOT is a report only available in the context of accounting.
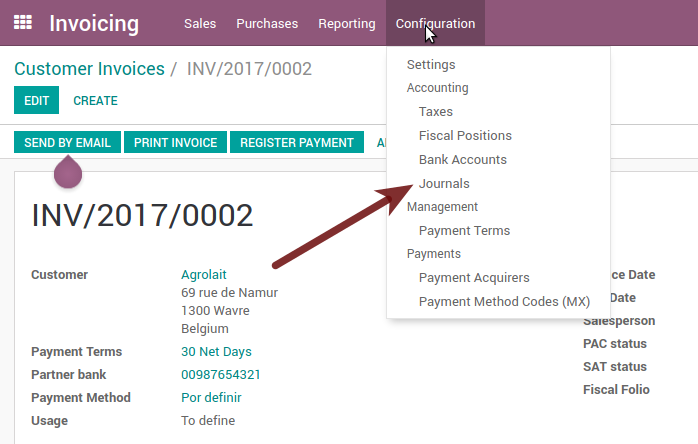
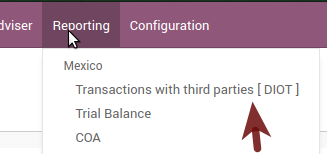
You can find all of those reports in
Electronic Chart of Accounts (Called and displayed as COA).
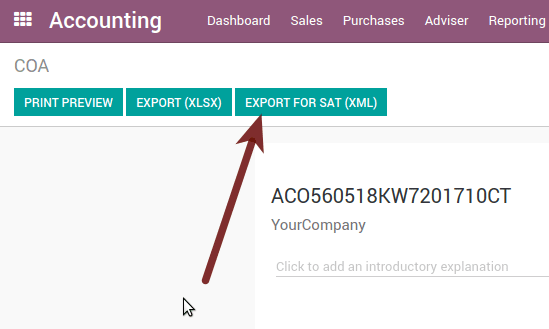
Electronic invoicing has never been so easy, just go to and click the button Export for SAT (XML).
How to add new accounts ?
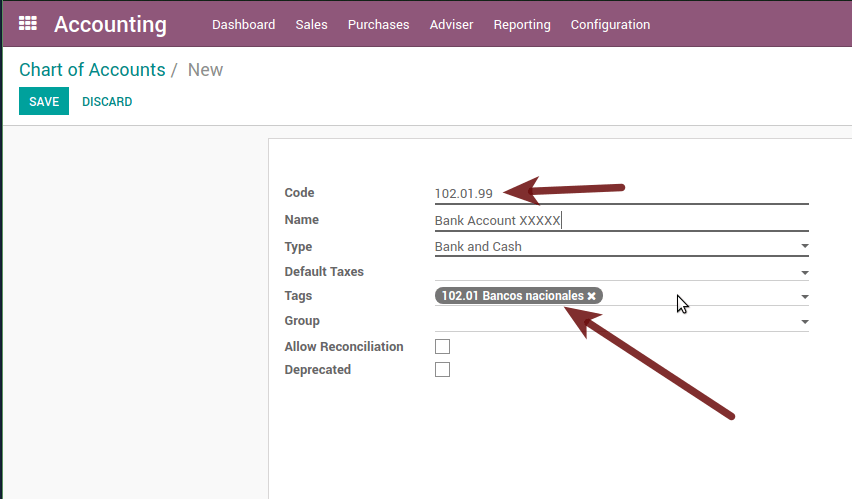
If you add an account with the NNN.YY.ZZ encoding convention where NNN.YY is a SAT encoding group, your account will be set up automatically.
Example to add an Account for a new Bank account go to and then create a new account in the «Create» button and try to create an account with the number 102.01.99 once you change to establish the name you will see an automatically configured label, the configured labels are the ones chosen to be used in the COA in XML.
Оборотно-сальдова відомість
Exactly like the COA but with the credit and debit of the initial balance, once you have correctly configured your COA, you can go to this is automatically generated and can be exported to XML using the button on the top Export for SAT (XML) with the previous selection of the period you want to export.

All normal analysis and listed functions are available here as well as any normal Odoo Report.
Звіт DIOT (вимагає застосування бухгалтерського обліку)
What is DIOT and the importance of presenting it SAT
When it comes to procedures with the SAT Administration Service, we know that we should not neglect what we present.
The DIOT is the Informative Declaration of Operations with Third Parties (DIOT), which is an additional obligation with VAT, where we must give the status of our operations to third parties, or what is considered the same, with our suppliers.
This applies to both individuals and Personas Morales, so if we have VAT to present to the SAT and also deal with suppliers it is necessary to send the DIOT.
When to file the DIOT and in what format ?
It is easy to present the DIOT, since, like all formats, you can obtain it on the SAT page, it is the electronic form A-29 that you can find on the SAT website.
Every month if you have operations with third parties, it is necessary to present the DIOT, as we do with VAT, so if in January we have deals with suppliers, by February we must present the information relevant to said data.
Where is DIOT presented?
You can present DIOT in different ways, it is up to you which one you will choose and which one will be more comfortable for you since you will present it every month or every time you have dealings with suppliers.
The A-29 form is electronic so you can present it on the SAT page, but this after having made up to 500 registrations.
Once these 500 records have been entered in the SAT, you must submit them to the Local Taxpayer Services Administration (ALSC) with correspondence to your tax address, these records can be submitted on a digital storage medium such as a CD or USB, which a Once validated, they will return you, so do not doubt that you will still have these discs and of course, your CD or USB.
One more thing to know: batch loading?
When reviewing the official SAT documents in DIOT, you will find the Batch load, and of course the first thing we think is what is that ?, and according to the SAT site it is:
The «batch load» is the conversion of databases from records of transactions with suppliers made by taxpayers in text files (.txt). These files have the necessary structure for their application and import into the Informative Declaration of Operations with third parties system, avoiding direct capture and consequently, optimizing the time invested in their integration for the presentation in time and form to the SAT.
You can use it to present the DIOT, since it is allowed, which will facilitate this operation, so that it does not exist to avoid being in line with the SAT in regards to the Informative Declaration of Operations with Third Parties.
Дивись також
How to generate this report in Odoo?
Go to .
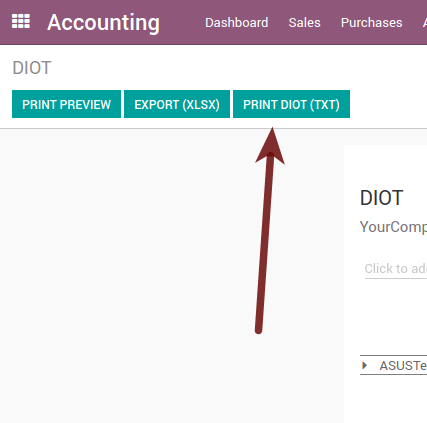
A report view is displayed, select the last month to report the immediately preceding month or leave the current month if it suits you.

Click on Export (XLSX) or Print (TXT)
Save the downloaded file in a safe place, go to the SAT website and follow the necessary steps to declare it.
Important considerations about your supplier and invoice data for DIOT
All suppliers must have the fields configured in the accounting tab called «DIOT Information», the L10N MX Nationality field is completed by simply selecting the appropriate country in the address, not You need to do nothing else there, but the l10n MX type of operation must be configured in all your providers.

There are 3 VAT options for this report, 16%, 0% and exempt, one invoice line in Odoo is considered exempt if there is no tax on it, the other 2 taxes are already configured correctly.
Remember that to pay an invoice that represents a prepayment, you must first request the invoice and then pay it and properly reconcile the payment following the standard Odoo procedure.
You do not need to fill in all your partner data to try to generate the supplier invoice, you can correct this information when you generate the report.
Remember that this report only shows vendor invoices that were actually paid.
If some of these considerations are not taken into account, a message like this will appear when you generate the DIOT in TXT with all the partners you need to verify this particular report, this is the reason why we recommend to use this report not only for exporting your legal information. obligation, but generate it before the end of the month and use it as your auditory process to see that all your partners are configured correctly.

Closing Fiscal Period in Odoo
Before proceeding to the close of the fiscal year, there are some steps that you should normally take to ensure that your accounting is correct, updated and accurate:
Make sure that you have fully reconciled your bank account (s) through the end of the year and confirm that the closing book balances match the balances on your bank statements.
Verify that all customer invoices have been entered and approved.
Confirm that you have entered and approved all vendor bills.
Validate all expenses, ensuring their accuracy.
Check that all payments received have been entered and recorded exactly.
Перелік перевірок на кінець року
Run a Tax Report, and verify that your tax information is correct.
Reconcile all accounts on your Balance Sheet
Compare your bank balances in Odoo against the current bank balances on your statements. Use the report Bank Reconciliation to help you with this.
Reconcile all cash and bank account transactions by running your Old Accounts Receivable and Old Accounts Payable reports
Audit your accounts, making sure you fully understand the transactions that affect them and the nature of the transactions, making sure to include loans and fixed assets.
Run the optional function Payments Matching, under the More drop-down on the Journal options from the Accounting dashboard, validating any Vendor Bill and Customer Invoices with its payments. This step is optional, however it can assist the year-end process if all pending payments and invoices are reconciled, and it can lead to finding errors or mistakes in the system.
Your accountant will probably like to check your items in the balance sheet and do some Journal Entries for:
Manual year-end adjustments, using the Journal Audit report (For example, the Current Earnings for the Year and Retained Earnings reports).
Робота в процесі.
Depreciation Journals.
Позики.
Tax Adjustments.
If your accountant is on the year-end audit, they will want to have copies of the balance sheet items (such as loans, bank accounts, prepayments, sales tax reports, etc …) to compare against. your balances in Odoo.
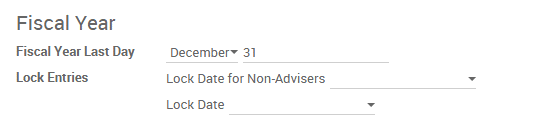
During this process, it is a good practice setting the Closing Date for Non-Advisers to the last day of the preceding financial year, which is set under the accounting settings. In this way, the accountant can trust that no one else is changing the previous year’s transactions while auditing the books.
Accounting Closing Process
In Odoo there is no need to make a specific year-end entry to close the reporting income accounts . The result of the exercise is automatically calculated in the account type (Current Year Earnings) and the difference between Income - Expenses will be accumulated to calculate it.
The reports are created in real-time, which means that the Income Report corresponds directly to the closing date of the year that you specify in Odoo. In addition, at any time that you generate the Income Report, the start date will correspond to the start date of the Fiscal Year and the account balances will all be 0.
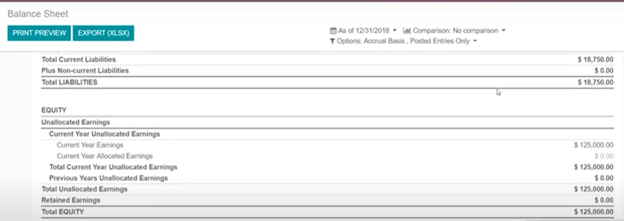
As of December 31, the Balance Sheet shows the earnings of the Current Year that do not have been recognized (Account type Total Current Year Unallocated Earnings in MX account 305.01.01 [„current year earnings“ type])
The accountant should create a Journal Entry to recognize the result of the year in Accumulated Earnings from previous years on the account «previous years results» account (304.01.01 in Mexico) - that is an equity account.
The simplified accounting entry would look like this:
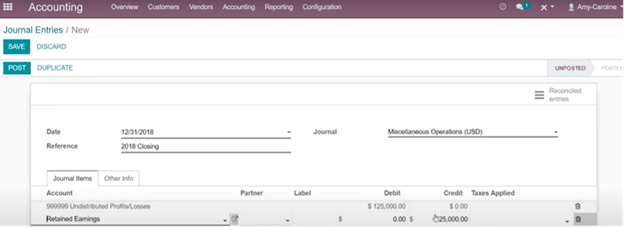
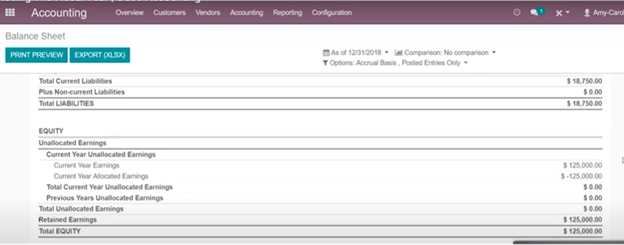
Once the accountant has created the journal entry to locate the Current Earnings for the Year, they must set the Closing Date to the last day of the fiscal year. Making sure that before doing this, whether or not the current gain of the year in the Balance Sheet is properly reporting a balance 0.
Додаткові рекомендовані функції
Contacts App (Free)
If you want to properly manage your customers, suppliers and addresses, this module, even if it is not a technical need, it is highly recommended to install it.
Multi-currency (Requires Accounting application)
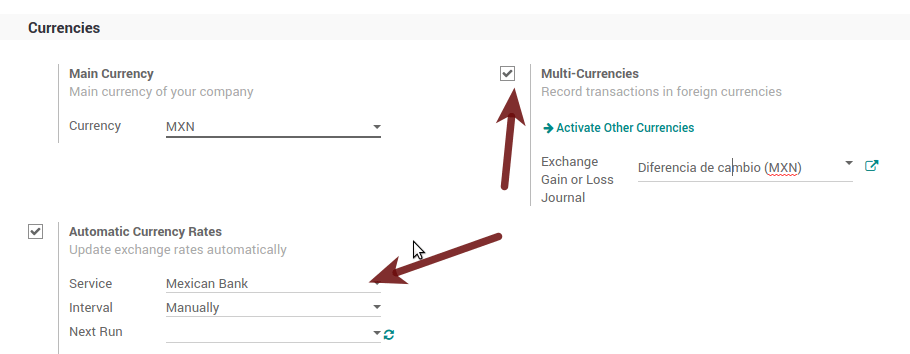
In Mexico, almost all companies send and receive payments in different currencies. If you want to do this you can enable the use of multi-currency. You should also enable synchronization with the Mexican Bank Service, as this would allow you to automatically have the exchange rate from the SAT without having to manually create this information every day in Odoo.
Go to settings and enable the multi-currency feature.
Увімкнення явних помилок на CFDI за допомогою локального валідатора XSD (CFDI 3.3).
Frequently you want receive explicit errors from the fields incorrectly set on the xml, those errors are better informed to the user if the check is enable, to enable the Check with xsd feature follow the next steps (with the developer mode enabled).
Перейдіть до
Шукайте дію під назвою «Завантажити файли XSD до CFDI»
Натисніть кнопку «Створити контекстну дію»
Перейдіть до форми компанії
Відкрийте будь-яку вашу компанію.
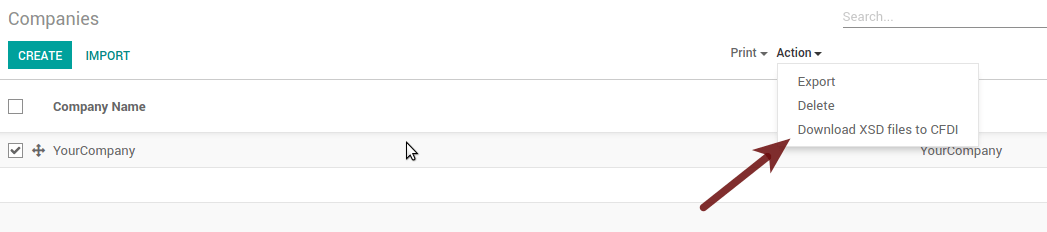
Натисніть «Дія», а потім «Завантажити файл XSD в CFDI».
Тепер ви можете створити рахунок-фактуру з будь-якою помилкою (наприклад, товар без коду, який є досить поширеним явищем), а замість загальної не вказано явну помилку.
Примітка
Якщо ви бачите помилку, подібну до цієї:
The cfdi generated is not validattribute decl. 'TipoRelacion', attribute 'type': The QName value
'{http://www.sat.gob.mx/sitio_internet/cfd/catalogos}c_TipoRelacion' does
not resolve to a(n) simple type definition., line 36This can be caused by a database backup restored in another server, or when the XSD files are not correctly downloaded. Follow the same steps as above but:
Перейдіть до компанії, в якій виникає помилка.
Click on Action and then on Download XSD file to CFDI.
Common problems and errors
Error messages (Only applicable on CFDI 3.3):
9:0:ERROR:SCHEMASV:SCHEMAV_CVC_MINLENGTH_VALID: Element
'{http://www.sat.gob.mx/cfd/3}Concepto', attribute 'NoIdentificacion':
[facet 'minLength'] The value '' has a length of '0'; this underruns
the allowed minimum length of '1'.
9:0:ERROR:SCHEMASV:SCHEMAV_CVC_PATTERN_VALID: Element '{http://www.sat.gob.mx/cfd/3}Concepto', attribute 'NoIdentificacion': [facet 'pattern'] The value '' is not accepted by the pattern '[^|]{1,100}'.
Solution: You forgot to set the proper «Reference» field in the product, please go to the product form and set your internal reference properly.
Error messages:
6:0:ERROR:SCHEMASV:SCHEMAV_CVC_COMPLEX_TYPE_4: Element
'{http://www.sat.gob.mx/cfd/3}RegimenFiscal': The attribute 'Regimen' is required but missing.
5:0:ERROR:SCHEMASV:SCHEMAV_CVC_COMPLEX_TYPE_4: Element '{http://www.sat.gob.mx/cfd/3}Emisor': The attribute 'RegimenFiscal' is required but missing.
Solution: You forgot to set the proper «Fiscal Position» on the partner of the company. Go to customers, remove the customer filter and look for the partner called as your company and set the proper fiscal position which is the kind of business your company does related to SAT list of possible values, another option can be that you forgot to follow the considerations about fiscal positions.
You need to go to Fiscal Position settings and set the proper code (it is the first 3 numbers of the name), for example, for the test, you need to set 601, it will look like the picture.
Порада
For testing purposes this value must be set to
601 - General de Ley
Personas Morales
which is the one required for the VAT demo.Повідомлення про помилку:
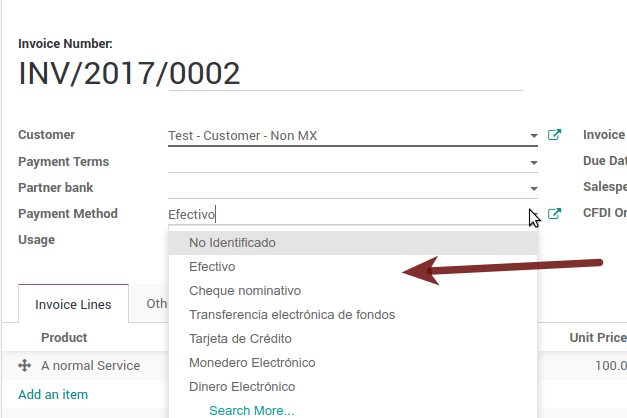
2:0:ERROR:SCHEMASV:SCHEMAV_CVC_ENUMERATION_VALID: Element
'{http://www.sat.gob.mx/cfd/3}Comprobante', attribute 'FormaPago':
[facet 'enumeration'] The value '' is not an element of the set
{'01', '02', '03', '04', '05', '06', '08', '12', '13', '14', '15', '17',
'23', '24', '25', '26', '27', '28', '29', '30', '99'}
Solution: The payment method is required on your invoice.
Error messages:
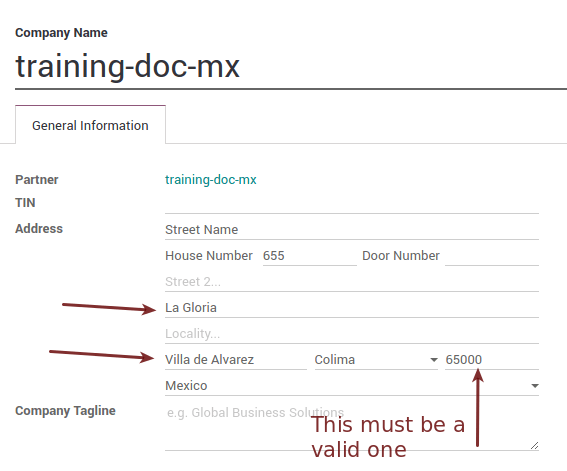
2:0:ERROR:SCHEMASV:SCHEMAV_CVC_ENUMERATION_VALID: Element
'{http://www.sat.gob.mx/cfd/3}Comprobante', attribute 'LugarExpedicion':
[facet 'enumeration'] The value '' is not an element of the set {'00
2:0:ERROR:SCHEMASV:SCHEMAV_CVC_DATATYPE_VALID_1_2_1: Element '{http://www.sat.gob.mx/cfd/3}Comprobante', attribute 'LugarExpedicion': '' is not a valid value of the atomic type '{http://www.sat.gob.mx/sitio_internet/cfd/catalogos}c_CodigoPostal'.5:0:ERROR:SCHEMASV:SCHEMAV_CVC_COMPLEX_TYPE_4: Element '{http://www.sat.gob.mx/cfd/3}Emisor': The attribute 'Rfc' is required but missing.
Solution: You must configure your company address correctly, this is a mandatory group of fields, you can go to your company configuration in and fill complete all the mandatory fields for your address by following the steps in this section: Set your legal information in the company.
Повідомлення про помилку:
2:0:ERROR:SCHEMASV:SCHEMAV_CVC_DATATYPE_VALID_1_2_1: Element
'{http://www.sat.gob.mx/cfd/3}Comprobante', attribute 'LugarExpedicion':
'' is not a valid value of the atomic type '{http://www.sat.gob.mx/sitio_internet/cfd/catalogos}c_CodigoPostal'.
Solution: The postal code of your company address is not valid for Mexico, please correct it.
Error messages:
18:0:ERROR:SCHEMASV:SCHEMAV_CVC_COMPLEX_TYPE_4: Element
'{http://www.sat.gob.mx/cfd/3}Traslado': The attribute 'TipoFactor' is
required but missing.
34:0:ERROR:SCHEMASV:SCHEMAV_CVC_COMPLEX_TYPE_4: Element '{http://www.sat.gob.mx/cfd/3}Traslado': The attribute 'TipoFactor' is required but missing.", '')
Solution: Set the Mexican name for the 0% and 16% tax in your system and use it on the invoice. Your tax, which represents 16% VAT and 0%, must have the Factor Type field set to Tasa.
Error messages:
CCE159The XXXX attribute must be registered if the key of cce11: ComercioExterior: TipoOperacion registered is '1' or '2'.
Solution: It is necessary to specify the Incoterm.
Error messages:
CCE209The attribute cce11: Foreign Trade: Goods: Goods: Customs Unit must have the value specified in the catalog catCFDI: c_FraccionArancelaria column 'UMT' when the attribute cce11: Foreign Trade: Goods: Me
Solution: The Tariff Fraction must have the code of the unit of measure 01, corresponding to Kilograms.
Glossary
CFDI: Online Digital Tax Receipt
CSD: Digital Seal Certificate
PAC: Authorized Certification Provider
Stamp: Digital signature of the electronic invoice
Addenda: Complement of information that can be attached to an Internet Digital Tax Receipt (CFDI) normally required by certain companies in Mexico such as Walmart, Tiendas Sorianas, etc.
UUID: It is the acronym in English of the Universally Unique Identifier. The UUID is the equivalent of Folio Fiscal, it is composed of 32 hexadecimal digits, shown in 5 groups separated by hyphens.
LCO: List of Obliged Taxpayers (LCO) is a list issued by the SAT that accounts for all the taxpayers whom it authorizes the issuance of invoices and payroll receipts. This means that, to be able to electronically bill your clients, you must be in this database.