Subcontratación básica
En la subcontratación básica, el producto de una empresa se produce completamente por un subcontratista. El producto se compra primero al subcontratista, quien adquiere sus propios componentes, fabrica el producto final y luego entrega el producto final al almacén de la empresa contratante.
La siguiente documentación cubre cómo configurar un producto subcontratado e iniciar el proceso de subcontratación.
Configuración
Para utilizar la subcontratación, los contratistas primero deben configurar productos con una lista de precios de proveedor así como un BoM de tipo subcontratación.
La lista de precios permite a la empresa contratante comprar el producto al proveedor (subcontratista) mediante una PO, mientras que la BoM permite que el producto sea fabricado externamente por el subcontratista.
Configurar proveedor del producto
Para configurar el proveedor de un producto para la subcontratación básica, ve a . Luego, selecciona un producto o crea uno nuevo.
En el formulario del producto, haz clic en la pestaña Compra y añade el subcontratista del producto como proveedor haciendo clic en Añadir una línea. Selecciona el subcontratista en el menú desplegable Proveedor.
Luego, introduce el precio del producto en el campo Precio.
Finalmente, establece un plazo de entrega para el producto en el campo Plazo de Entrega para especificar el número de días que el subcontratista necesita para producir y entregar el producto final.
Nota
Dado que los contratistas solo son responsables de comprar y recibir el producto final, no necesitan configurar adicionalmente plazos de fabricación en una BoM. En su lugar, proporciona únicamente un Plazo de Entrega en la lista de precios del proveedor que tenga en cuenta tanto el tiempo de fabricación como el de entrega del subcontratista.
Configurar listas de materiales
Después de especificar el proveedor, configura una BoM de tipo subcontratación para el producto. Haz clic en el botón inteligente Lista de Materiales en el formulario del producto. Luego, selecciona la BoM deseada o crea una nueva.
Truco
Como alternativa, vaya a y seleccione la lista de materiales para el producto subcontratado.
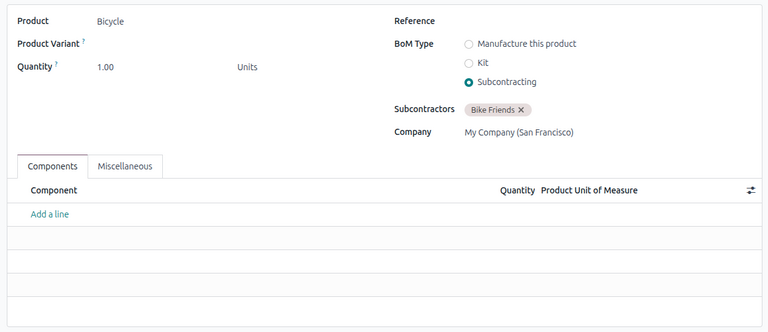
En el campo Tipo de LdM, selecciona Subcontratación. En el campo Subcontratistas resultante, añade uno o más subcontratistas.
Dado que tanto los componentes como la fabricación son gestionados por el subcontratista, no es necesario listar ningún componente en la pestaña Componentes de la BoM.
Flujo de subcontratación básica
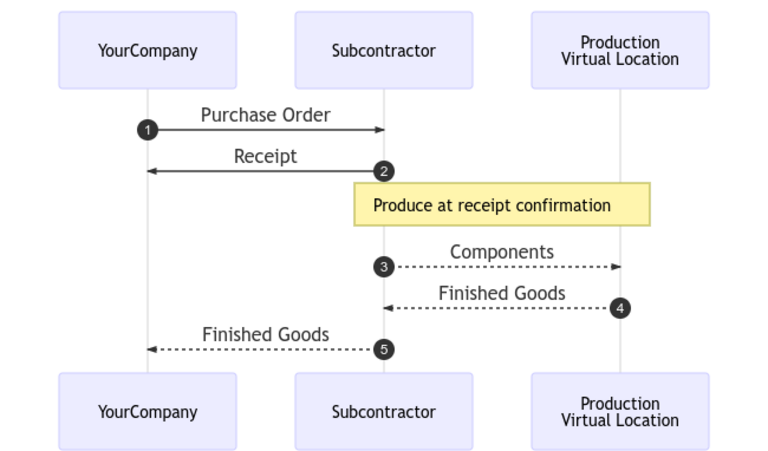
El flujo de trabajo básico de subcontratación comienza creando un PC para comprar el producto al subcontratista (1).
El contratista (TuEmpresa) luego confirma el PO, lo que crea una recepción para transferir el producto final (2). El subcontratista fabrica el producto y lo entrega de vuelta al contratista cuando está terminado.
Una vez que el producto ha sido producido y recibido, el contratista valida la recepción (5) para desencadenar movimientos de inventario desde el subcontratista al stock de la empresa (3, 4).
Crear y confirmar PC
Para crear un PO para el producto subcontratado, navega a , y haz clic en Nuevo.
Comienza a rellenar el PO seleccionando un subcontratista del menú desplegable Proveedor. En la pestaña Productos, haz clic en Añadir un producto para crear una nueva línea de producto. Selecciona el producto subcontratado en el campo Producto, e introduce la cantidad en el campo Cantidad.
Después de añadir el producto, el campo Llegada Esperada se actualiza con la fecha de entrega esperada del producto terminado, según se configuró anteriormente con el Plazo de Entrega del proveedor.
Finalmente, haz clic en Confirmar Pedido para confirmar el PO. Se crea automáticamente una recepción, y aparece un botón inteligente Recepción en la parte superior del formulario.
Procesar una recepción
Después de confirmar el pedido, el subcontratista fabrica el producto y entrega el bien terminado de vuelta a la empresa contratante.
Para recibir el producto terminado del subcontratista, haz clic en el botón Recibir Productos en el PO, o haz clic en el botón inteligente Recepción en la parte superior de la página. Luego, haz clic en Validar para introducir el envío entrante en el inventario.
Nota
Si los flujos de inventario de varios pasos están habilitados, deben validarse transferencias adicionales para introducir el producto entrante en el stock.
Rastrear movimientos de inventario
Después de validar una recepción, Odoo genera automáticamente movimientos de inventario para rastrear el movimiento de productos subcontratados entre ubicaciones. Para ver estos movimientos de inventario, navega a .
Para rastrear el movimiento de inventario en la subcontratación, Odoo envía cualquier componente del producto a una Ubicación de subcontratación dedicada. Una ubicación virtual llamada Producción luego consume los componentes y produce el producto terminado. Una vez producido, el producto vuelve a la Ubicación de subcontratación antes de finalmente entrar en el stock del contratista cuando se valida la recepción.

Nota
Debido a que no se envían componentes en la subcontratación básica, no hay movimiento desde la Ubicación de subcontratación a la ubicación de Producción.