Manage vendor bills
A vendor bill is an invoice received for products and/or services that a company purchases from a vendor. Vendor bills record payables as they arrive from vendors, and can include amounts owed for the goods and/or services purchased, sales taxes, freight and delivery charges, and more.
In Odoo, a vendor bill can be created at different points in the purchasing process, depending on the bill control policy chosen in the Purchase app settings.
Bill control policies
To view and edit the default bill control policy and make changes to it, go to , and scroll down to the Invoicing section.
Here, there are two Bill Control policy options: Ordered quantities and Received quantities. After a policy is selected, click Save to save changes.
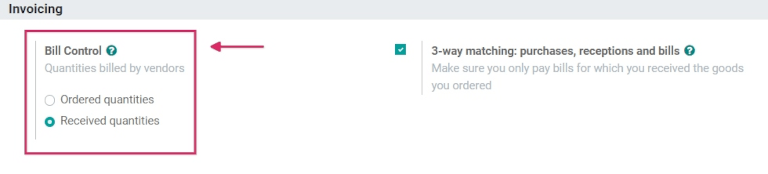
The policy selected will be the default for any new product created. The definition of each policy is as follows:
Ordered quantities: creates a vendor bill as soon as a purchase order is confirmed. The products and quantities in the purchase order are used to generate a draft bill.
Received quantities: a bill is only created after part of the total order has been received. The products and quantities received are used to generate a draft bill.
Tip
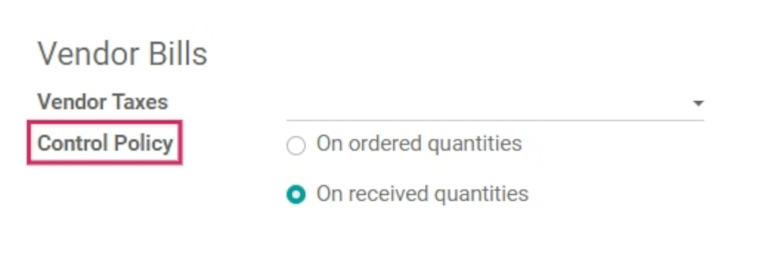
If a product needs a different control policy, the default bill control policy can be overridden by going to the Purchase tab in a product’s template, and modifying its Control Policy field.
3-weg controle
3-way matching ensures vendor bills are only paid once some (or all) of the products included in the purchase order have actually been received.
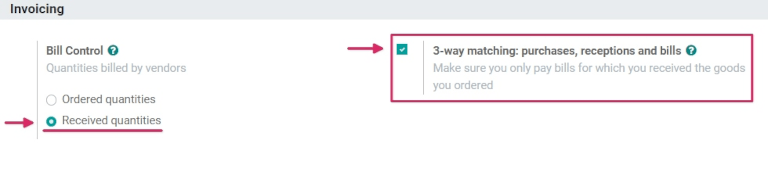
To activate it, go to , and scroll down to the Invoicing section. Then, check the box next to 3-way matching: purchases, receptions, and bills, and click Save to save changes.
Belangrijk
3-way matching is only intended to work with the Bill Control policy set to Received quantities.
Create and manage vendor bills on receipts
When products are received into a company’s warehouse, receipts are created. Once the company processes the received quantities, they can choose to create a vendor bill directly from the warehouse receipt form. Depending on the bill control policy chosen in the settings, vendor bill creation is completed at different steps of the procurement process.
With the bill control policy set to ordered quantities
To create and manage vendor bills on receipts using the ordered quantities bill control policy, first go to , scroll down to the Invoicing section, and select Ordered quantities under Bill Control. Then, click Save to save changes.
Next, go to the app, and click Create to create a new request for quotation (RFQ). Doing so reveals a blank RFQ detail form.
On the blank detail form, add a vendor to the RFQ in the Vendor field, and add products to the Product lines by clicking Add a line.
Then, confirm the RFQ by clicking the Confirm Order button above the detail form. Doing so turns the RFQ into a purchase order.
Then, click the Create Bill button to create a vendor bill for the purchase order.
Clicking the Create Bill button reveals the Draft Bill page for the purchase order.
On the Draft Bill, click the Edit button to modify the bill, and add a bill date in the Bill Date field. If needed, add additional products to the Product lines by clicking Add a line in the Invoice Lines tab.
Next, confirm the bill by clicking the Confirm button on the Draft Bill page.
Tip
Since the bill control policy is set to ordered quantities, the draft bill can be confirmed as soon as it is created, before any products have been received.
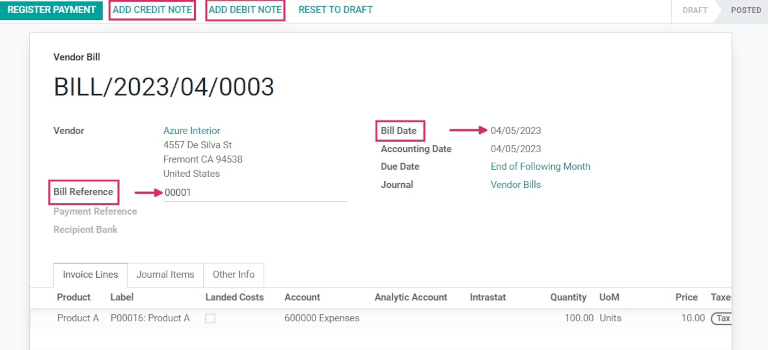
On the new Vendor Bill, add a Bill Reference number, which can be used to match the bill with additional documents (such as the PO). Then, click . Doing so causes a pop-up to appear, wherein a payment Journal can be chosen; a Payment Method selected; and a Recipient Bank Account can be selected from a drop-down menu.
Additionally, the bill Amount, Payment Date, and Memo (Reference Number) can be changed from this pop-up. Once ready, click Create Payment to finish creating the Vendor Bill. Doing so causes a green In Payment banner to display on the RFQ form.
Notitie
Each vendor bill provides the option to either Add Credit Note or Add Debit Note. A credit note is typically issued when a vendor or supplier of goods get some quantity of products back from the customer to whom they were sold, while debit notes are reserved for goods returned from the customer/buyer to the vendor or supplier.
With the bill control policy set to received quantities
Waarschuwing
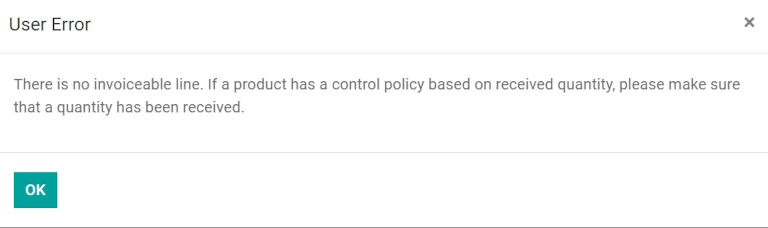
If the creation of a vendor bill is attempted without receiving any quantities of a product (while using the received quantities bill control policy), an error message appears, and settings must be changed before proceeding.
To create and manage vendor bills on receipts using the received quantities bill control policy, first go to , scroll down to the Invoicing section, and select Received quantities under Bill Control. Then, click Save to save changes.
Next, go to the app, and click Create to create a new RFQ. Doing so reveals a blank RFQ detail form.
On the blank detail form, add a vendor to the RFQ in the Vendor field, and add products to the Product lines by clicking Add a line.
Then, confirm the RFQ by clicking the Confirm Order button above the detail form. Doing so turns the RFQ into a purchase order.
Finally, click the Create Bill button to create a bill for the purchase order.
Notitie
Clicking Create Bill before any products have been received will cause a User Error pop-up to appear. The Purchase Order requires the receipt of at least partial quantity of the items included on the order to create a vendor bill.
Next, click the Receipt smart button to view the warehouse receipt form.
On the warehouse receipt form, click to mark the Done quantities. Then, navigate back to the (via the breadcrumbs), and click the Create Bill button on the purchase order form.
Doing so reveals the Draft Bill for the purchase order. On the Draft Bill, click the Edit button, and add a Bill Date. If needed, add additional products to the Product lines by clicking Add a line.
Next, click the Confirm button to confirm the Draft Bill.
Notitie
Since the bill control policy is set to received quantities, the draft bill can only be confirmed when at least some of the quantities are received.
On the new Vendor Bill, add a Bill Reference number, which can be used to match the bill with additional documents (such as the PO). Then, click . Doing so causes a pop-up to appear, wherein a payment Journal can be chosen; a Payment Method selected; and a Recipient Bank Account can be selected from a drop-down menu.
Additionally, the bill Amount, Payment Date, and Memo (Reference Number) can be changed from this pop-up. Once ready, click Create Payment to finish creating the vendor bill. Doing so causes a green In Payment banner to display on the RFQ form.
Create and manage vendor bills in Accounting
Vendor bills can also be created directly from the Accounting app, without having to create a purchase order first. To do this, go to , and click Create. Doing so reveals a blank vendor bill detail form.
On this blank vendor bill detail form, add a vendor in the Vendor field, and add products to the Product lines (under the Invoice Lines tab), by clicking Add a line. Then, add a bill date in the Bill Date field, and any other necessary information. Finally, click Confirm to confirm the bill.
From here, click the Journal Items tab to view (or change) the Account journals that were populated based on the configuration on the corresponding Vendor and Product forms.
Then, click Add Credit Note or Add Debit Note to add credit or debit notes to the bill. Or, add a Bill Reference number (while in Edit mode).
Then, when ready, click to complete the Vendor Bill.
Tip
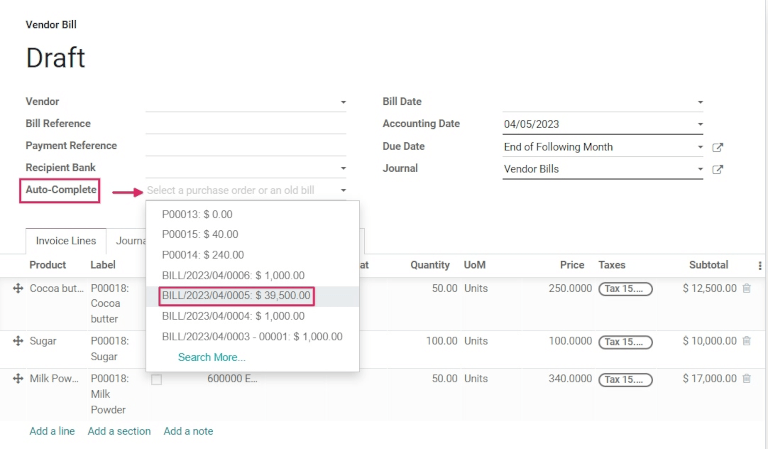
To tie the draft bill to an existing purchase order, click the drop-down menu next to Auto-Complete, and select a PO from the menu. The bill will auto-populate with the information from the PO.
Batch billing
Vendor bills can be processed and managed in batches in the Accounting app.
To do this, go to . Then, click the checkbox at the top left of the page, beside the Number column, under the Create button. This selects all existing vendor bills with a Posted or Draft Status.
From here, click the Action gear icon to export, delete, or send & print the bills; click the Print icon to print the invoices or bills; or click Register Payment to create and process payments for multiple vendor bills at once.
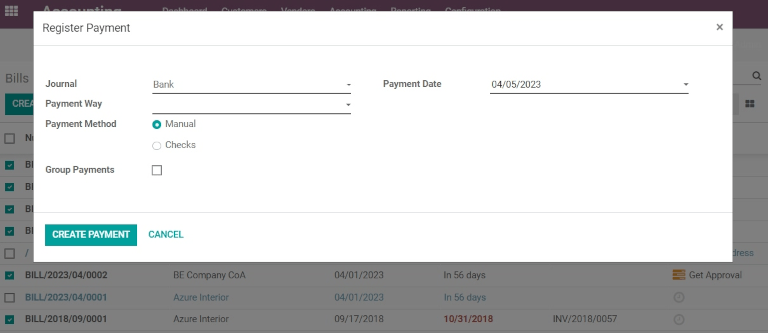
When Register Payment is selected, a pop-up appears. In this pop-up window, select the appropriate journal in the Journal field, choose a payment date in the Payment Date field, and choose a Payment Method. There is also the option to Group Payments on this pop-up, as well.
When ready, click the Create Payment button, which creates a list of journal entries on a separate page. This list of journal entries are all tied to their appropriate vendor bills.
Notitie
The Register Payment option for vendor bills in batches will only work for journal entries whose Status is set to Posted.
Zie ook