总生产计划
在 Odoo *制造*应用程序中,*主生产计划*(MPS)用于根据产品和组件的预测数量手动计划制造订单(MO)和采购订单(PO)。
通过考虑已确认的 MO 和 PO 以及人工调整的需求预测的影响,MPS 可用于管理长期产品补货。这可确保持续供应必要产品和组件。
由于 MPS 允许手动干预,因此在现有销售订单(SO)的需求**不能**反映未来可能需求的情况下,MPS 对补货非常有用。
Example
一家零售店在节日期间销售人造*圣诞树*。目前是 9 月份,该店已确认的 12 月份圣诞树数量不足 10 棵。
尽管已确认的 MO 数量很多,但采购经理知道,一旦节日季开始,12 月份对圣诞树的需求将大增。因此,他们在 MPS 中手动输入了更大的需求量,以便在客户需求增加时及时适当地补充产品。
重要
必须记住,MPS 是一个 人工 工具。将产品添加到 MPS 中并不会自动生产或采购该产品。MPS 只是建议应补货的产品数量,但需要用户输入信息来创建用于补充的 MO 或 PO。
因此,建议 MPS 不 与同一产品的重新排序规则同时使用。因为重新排序规则是一种自动工作流程,与 MPS 的手动补货方法相冲突。同时使用这两种方法会导致预测不准确,并产生不必要的补货订单。
启用并配置 MPS
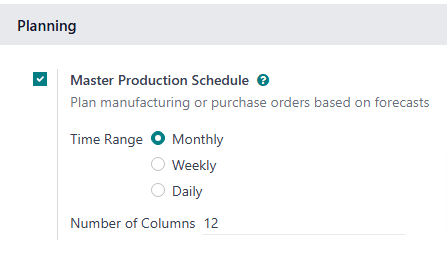
要使用 MPS 功能,请导航至 ,并在 计划 部分勾选 主生产计划 复选框。最后,点击 保存。
启用 主生产计划 功能后,设置 页面上将出现两个新字段:时间范围 和 列数。
时间范围 字段用于选择进行计划的时间段,有三个选项:每月、每周 和:guilabel:每日。例如,如果选择 每月,MPS 将按月计划产品和组件的生产需求。
列数 字段用于指定 MPS 页面上显示的所选 时间范围 单位的数量。例如,如果 时间范围 字段设置为 每月,并在 列数 字段中输入 12,MPS 将显示从当前月份开始的未来 12 个月的一列。
如果更改了 时间范围 或 列数 字段的值,请再次点击 保存,以保存更改。

MPS 仪表板
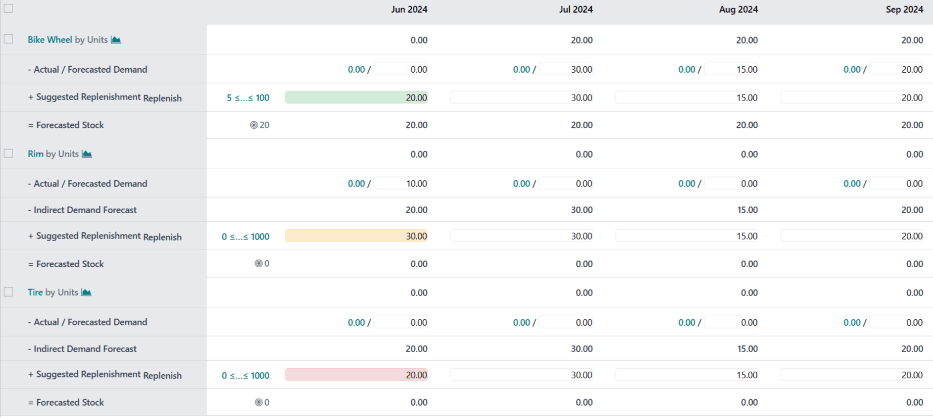
要打开 MPS,请导航至:menuselection:制造应用程序 --> 计划 --> 主生产计划。MPS 视图显示如下:

屏幕左侧的灰色列显示了添加到 MPS 的每个产品的部分,每个产品部分又分成较小的行。行中显示的信息取决于页面顶部 搜索… 栏下拉菜单中选择的筛选器。行中显示的默认类别是:
[产品] ,按 [单位] 计算 :每个时间段开始时的预测库存量。 :guilabel:`[产品]`和 :icon:`fa-area-chart`是可选按钮,可分别打开产品页面或产品的预测报告。
- 需求预测:手动输入的需求预测。这是对每个时间段内产品需求的估计。
-间接需求预测:虽然这是一个默认类别,但它 只 出现在作为其他产品组成部分的产品上。它代表现有 MO 对该组件的需求。
+建议补充:建议通过 MO 或 PO 补充的产品数量。类别标题右侧有一个 补货 按钮,用于根据建议补货的数量手动补充产品。

“+建议补货” 行上的“补货”按钮。
= 预测库存:假设建议的补货数量得到满足,预测每个时间段结束时的产品库存数量。
总计,这些默认类别构成了一个等式:
对于组件,间接需求预测 也会被考虑在内。
产品列右侧的 - 预测需求 和 + 建议补货`字段可针对任何时间段进行编辑。这样做会改变等式,并更新显示在 :guilabel:`预测库存 字段中的值。
更改 + 建议补货 字段中的值后,字段左侧会出现一个 (重置)`按钮。点击该字段旁边的 :icon:`fa-times:guilabel:`(重置) 按钮,将其值重置回由 |MPS|计算的值。
重要
虽然 MPS 可在只启用默认类别的情况下使用,但建议同时启用 实际需求 类别。方法是点击:guilabel:搜索...`栏右侧的:icon:`fa-caret-down (向下箭头),并启用:guilabel:行 标题下的:guilabel:实际需求 选项。
启用 实际需求 选项后,- 需求预测 类别将变为 - 实际/预测需求 类别。除了手动输入的预测需求外,该类别还显示产品的确认需求(基于确认的 SO)。
在 制造 应用程序的 设置 页面上,时间范围 字段选择的时间期限,产品列右侧的每一列都会列出该时间期限的一个单位(例如,月)。时间段列数与 列数 字段中输入的值一致。
第一时间段列表示当前时间段。例如,如果 MPS 配置为使用月,则第一列显示当前月份的数据。在这第一列中,+ 建议补货 字段显示为五种颜色之一:
绿色:必须生成补货订单,才能将库存保持在 安全库存目标。
灰色:已生成补货订单,将库存保持在 :guilabel:` 安全库存目标`。
黄色:已生成补货订单,但生成的数量不足以将库存保持在 安全库存目标。
红色:已生成补货订单,但其创建的数量使库存量超过 安全库存目标。
如果没有生成补货订单,且当前也没有必要生成补货订单,则 + 建议补货 字段显示为白色。
添加产品
要使用 MPS 管理产品补货,请导航至:menuselection:制造应用程序 --> 计划 --> 主生产计划。在 MPS 页面顶部,点击:guilabel:添加产品,打开:guilabel:添加产品 弹出窗口。
重要
必须 正确配置产品,才能通过 MPS 补充。
如果是制成品,则必须在产品表格的 库存 选项卡的 路线*部分选择 *制造 路线。
如果是购买的产品,则必须在产品表单的 库存 选项卡的 路线 部分选择 购买 路线。此外,还必须在 购买 选项卡上指定供应商及其产品售价。
在弹出窗口的 产品 下拉菜单中选择要添加的产品。如果产品通过制造补充,请在 物料清单 字段中选择产品的 BoM 。
注解
将产品添加到 MPS 时选择一个 BoM,也会添加该 BoM 上列出的任何组件。如果不需要通过 MPS 管理组件的补货,只需将 物料清单 字段留空。
如果数据库配置了多个仓库,则 添加产品 弹出窗口中会出现一个:guilabel:生产仓库 字段。使用此字段指定产品补货到哪个仓库。
在 安全库存目标 字段中,指定应始终为订单提供的产品最小数量。例如,如果始终有 20 个单位的产品可用于执行订单,则在 安全库存目标 字段中输入 20。
在 最少补货 字段中,输入为补货产品而创建的订单的最小产品数量。例如,如果在此字段中输入 5,则该产品的补货订单至少包括 5 个单位。
在 最大补货 字段中,输入为补货产品而创建的订单的最大产品数量。例如,如果在此字段中输入 100,则该产品的补货订单至多包括 100 个单位。
最后,点击 保存,将产品添加到 MPS。现在,每次打开 MPS 页面时,产品都会出现在页面上。如果在 添加产品 弹出窗口的:guilabel:物料清单 字段中选择了 BoM ,则 BoM 中列出的任何组件也会出现在页面上。

编辑产品
将产品添加到 MPS 后,可能需要更改在:guilabel:添加产品`弹出窗口中输入的补货值。要执行此操作,请点击产品名称下方:guilabel:`+ 建议补货 行中:guilabel:`# ≤…≤ #`按钮右侧的:guilabel:`补货`按钮。
注解
The first and second number displayed on the # ≤…≤ # button correspond to the values entered in the Minimum to Replenish and Maximum to Replenish fields when adding the product to the MPS.
例如,如果在 最少补货 字段中输入了 5,在 最大补货 字段中输入了 100,按钮显示为 5≤…≤100。
点击 # ≤…≤ # 按钮打开 编辑生产计划 弹出窗口。该弹出窗口与:guilabel:添加产品 弹出窗口相同,但 产品 和:guilabel:物料清单 字段不可编辑。
在 编辑生产计划 弹出窗口中,在:guilabel:安全库存目标、最小补货量 和:guilabel:最大补货量 字段中输入所需的值。然后,点击 保存,以保存更改。
移除产品
要从 MPS 中删除产品,请勾选产品名称左侧的复选框。然后,点击屏幕顶部的 操作 按钮,并从下拉菜单中选择 删除。最后,在弹出的 确认 窗口中点击 确认。
从 MPS 中删除产品会删除该产品及其所有数据。如果重新添加产品,则必须重新配置其补货值。
MPS 补货
可通过以下三种方式之一对 MPS 中的产品进行补充:
点击屏幕顶部的 补货 按钮,为当前月份低于 安全库存目标 的每种产品生成补货订单。
点击特定产品的 + 建议补货 行右侧的 补货 按钮,为该特定产品生成补货订单。
勾选一个或多个产品名称左侧的复选框。然后,点击屏幕顶部的 操作 按钮,并从下拉菜单中选择 补货。这样就会为每个选定的产品生成一个补货订单。
生成的补货单类型与产品表格的 库存 选项卡上选择的路径一致:
如果选择 购买 路线,则会生成 RfQ 以补充产品。可通过导航至 应用程序选择 RfQ。任何由 MPS 生成的 RfQ 都会在其 源文件 字段中列出 MPS。
如果选择*制造*路线,则会生成 MO 以补充产品。可以通过导航到 来选择 MO。任何由 MPS 生成的 MO 都会在其 源文件 字段中列出 MPS。