회원
The Members application is where all operations related to memberships can be configured and managed. The Members app integrates with the Sales and Accounting applications to sell and invoice memberships directly to customers.
회원권 상품
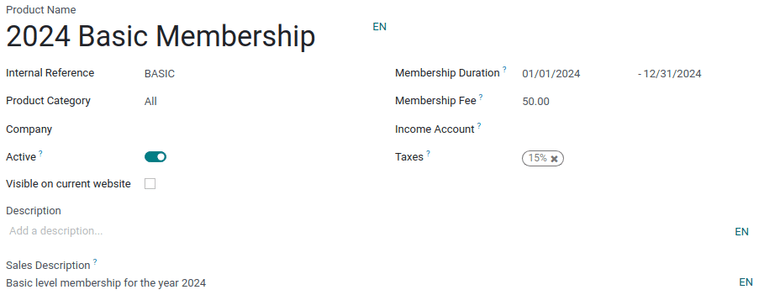
To create a new membership product, navigate to , and click New to open a blank product form.
On the new product form, enter a name for the product in the field under Product Name. Use the two blank fields to the right of Membership Duration to set a date from which the membership becomes active. Finally, use the Membership Fee field to set the price at which the product is sold to customers.
The following optional fields can also be configured for each product:
Internal Reference: Set an internal reference number for the product.
Product Category: Set a category for the product.
Company: Set the company inventory for the product to appear in.
Active: Hide a product without removing it from inventory.
Visible on current website: Make the product visible to customers on the current website.
Description: Set an internal product description.
Sales Description: Set a product description that is visible on quotations.
Income Account: Use a different value than the default from the product category.
Taxes: Set the default tax used when selling this product.
참고
멤버십 제품에는 시작일과 종료일이 있어야 하며, 이를 통해 멤버십 상태 가 결정됩니다. 멤버십 제품은 활성화가 시작되는 날짜 전에 판매됩니다.

멤버십 제품을 판매주문서에 추가하고 일반 제품이나 구독 형태로 청구할 수 있습니다.
멤버십 활성화하기
To activate a membership from the Contacts application, navigate to the , and click on a contact to open that specific contact form.
From the contact form, open the Membership tab, and click Buy Membership.
팁
To successfully buy a membership, both the Account Receivable and Account Payable lines must be configured for that contact. These can be found in the contact form’s Accounting tab, under the Accounting entries section.
On the Join Membership pop-up window that appears, select a Membership from the drop-down menu. Then, configure a Member Price.
Click Invoice Membership when both fields are filled in. Doing so reveals a Membership Invoices page, wherein invoices can be confirmed and completed.
또는 무료 멤버십을 제공하려면 연락처 양식에서 멤버십 탭에 있는 무료 회원 확인란에 표시합니다.
멤버십 상태
현재 멤버십 상태 는 연락처 레코드의 멤버십 탭에 표시되어 있습니다.
비회원: 멤버십을 신청하지 않은 파트너입니다.
탈퇴한 회원: 멤버십을 해지한 회원입니다.
구 회원: 멤버십 종료일이 지난 회원입니다.
Waiting Member: a member who has applied for membership, but whose invoice has not yet been created.
청구서를 발행한 회원: 청구서를 발행했으나 아직 결제를 하지 않은 회원입니다.
유료 회원: 멤버십 금액을 결제한 회원입니다.
멤버 디렉토리 게시하기
To publish a list of active members on the website, the Online Members Directory module must
first be installed. After installing the module, add the /members
page to the website’s menu by editing the website menu.

개별 멤버 게시하기
Navigate to , and click the Kanban card for a member. From the customer form that appears, click the Go to Website smart button at the top of the page to open the member’s webpage.
편집 버튼을 클릭하면 편집 도구 사이드바가 표시됩니다. 페이지에서 수정할 내용을 편집한 후, click 저장 합니다. 페이지 상단에 있는 게시되지 않음 토글을 활성화할 수 있도록 게시됨 위치로 슬라이드합니다.
원하는 모든 회원에 대해 이 단계를 반복합니다.