장치 및 통합
VoIP 를 컴퓨터, 태블릿, 휴대폰 등 다양한 장치에서 사용할 수 있습니다. 이를 통해 비용을 절감하고 광대역 인터넷에 연결되어 있는 한 직원들이 전 세계 어디에서나 근무를 할 수 있다는 점에서 유용합니다.
Odoo VoIP is SIP (Session Initiation Protocol) compatible, which means it can be used with any SIP compatible application.
이 문서에서는 다양한 장치 및 통합 상황에서 Odoo VoIP 를 설정하는 과정에 대해 다룹니다.
Odoo is fully-integrated with all Odoo apps, allowing users to click into any app, and schedule a call as an activity in the chatter.
Example
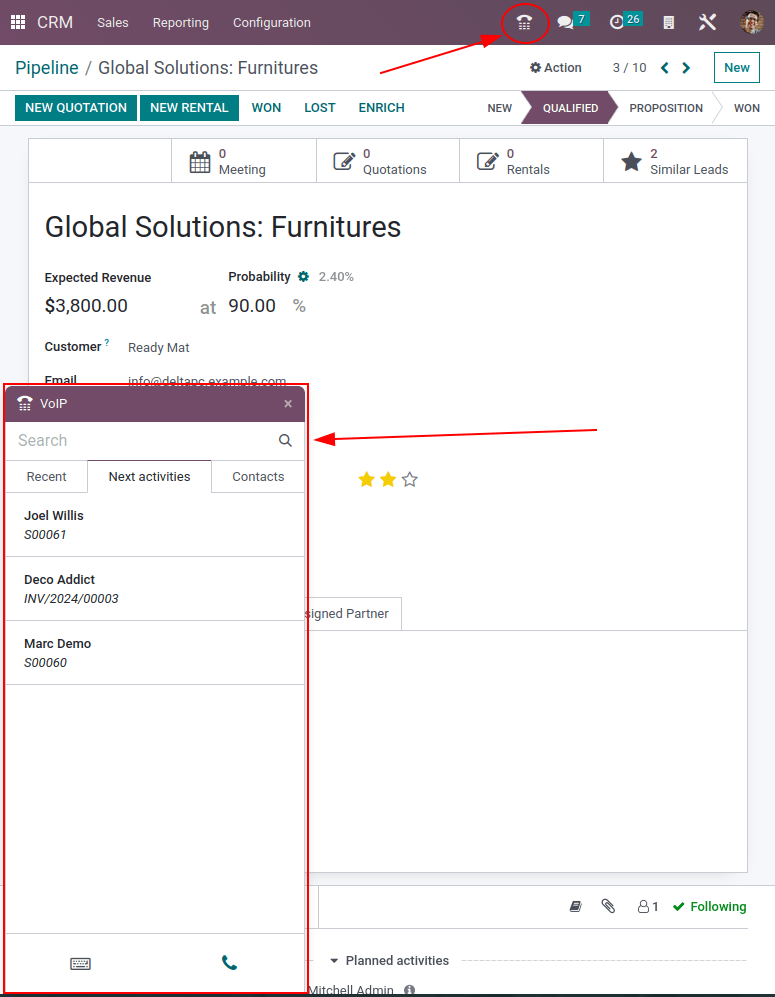
For example, in the CRM app, a user can click into an opportunity, and click on Activities in the chatter.
다음으로 통화 를 선택한 후 마감일 아래에 있는 날짜를 선택합니다.
저장 을 클릭하면 활동이 메시지창에 표시됩니다.
Should the Due Date be for today’s date, the activity shows up in the VoIP widget.
Odoo VoIP (노트북/데스트탑)
Odoo VoIP (인터넷 프로토콜을 통한 음성 통화) 모듈 및 위젯은 노트북이나 데스크톱 장치의 모든 브라우저에서 사용할 수 있습니다. 간단하게 Odoo 데이터베이스에서 오른쪽 상단에 있는 ☎️ (전화) 아이콘을 클릭하면 위젯이 나타납니다.
더 보기
To see how to use the VoIP widget on a desktop/laptop computer, check out this documentation: VoIP 위젯.
Odoo VoIP (태블릿/모바일 기기)
Odoo VoIP 앱은 Odoo Android 또는 Apple IOS 애플리케이션으로 태블릿과 휴대폰에서 사용할 수 있습니다. 또한 모바일 웹 브라우저로 데이터베이스에 액세스할 수 있습니다.
경고
Odoo Android 및 Apple IOS 애플리케이션은 Android 및 Apple 포털에서 Odoo가 더 이상 유지 보수를 진행하지 않습니다. 즉, Odoo에서는 Odoo Android 또는 Apple IOS 관련되어 제한된 범위로만 상담을 지원해 드리고 있습니다.
중요
모바일 장치에서 Odoo를 사용하여 발신 전화를 걸 수 있지만, Odoo는 VoIP 전용 애플리케이션이 아닙니다. 따라서, 수신 전화에 대해 수신음이 울리지 않습니다. 사용자가 모바일 장치에서 항상 연락이 가능한 상태여야 하는 경우에는 Zoiper와 같은 앱을 사용해야 합니다. 해당 앱은 백그라운드에서 항상 연결 상태를 유지하고 있습니다.
자세한 내용은 다음 문서를 참조하세요: Zoiper 라이트.
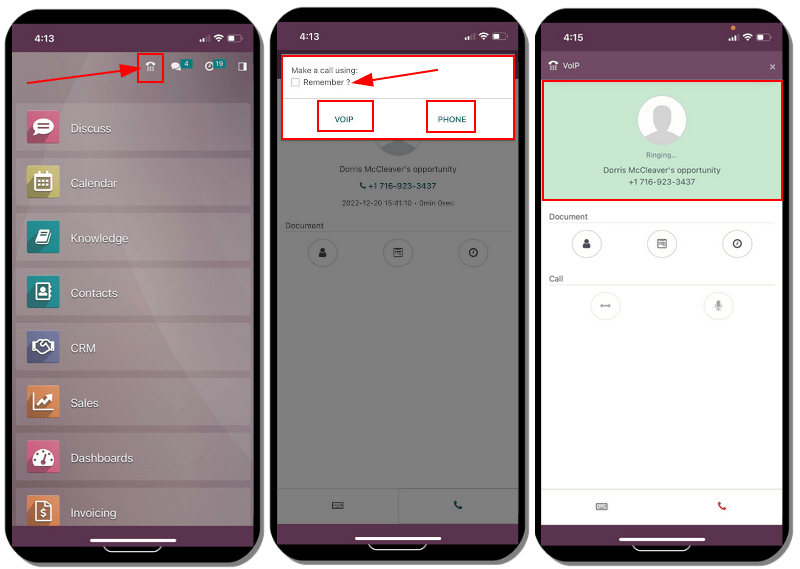
모바일 장치/태블릿에 있는 모바일 애플리케이션 오른쪽 상단의 ☎️ (전화) 아이콘을 탭하여 Odoo VoIP 위젯에 액세스합니다. 위젯이 왼쪽 하단에 나타납니다.
모바일 애플리케이션을 사용하여 태블릿에서 처음 전화를 걸 경우, 사용자에게 데이터베이스에서 마이크를 사용하도록 :guilabel:`허용`하라는 메시지가 표시됩니다. 마이크를 사용하여 통화를 계속할지 여부를 묻는 메시지가 나타나면 :guilabel:`허용`을 클릭합니다.
이 단계는 모바일 Odoo 애플리케이션 또는 웹 브라우저 양쪽에서 필수 단계입니다.

그 다음 Odoo에서 전화를 거는 방법을 선택합니다. VOIP 또는 Phone (태블릿에서 통화 기능이 활성화되어 있어야 함) 두 가지 중에서 선택할 수 있습니다. 정보를 저장할까요? 옆에 있는 확인란을 선택합하면 앞으로 해당 내용을 기본값으로 사용합니다.

다음은 Odoo VoIP 앱을 모바일 기기에서 구동할 때의 레이아웃입니다:
Zoiper 라이트
Zoiper Lite is a free VoIP SIP dialer with voice and video.
To start using the Zoiper app, download it to the device, via the Zoiper download page.
모바일 장치를 가장 일반적으로 설치하며 이 문서에서는 Zoiper IOS 애플리케이션에서 설정하는 방법을 다룹니다. 설정 조건에 따라 스크린샷 및 단계는 달라질 수 있습니다.
휴대폰에 Zoiper 애플리케이션을 설치한 후 앱을 열고 설정 을 클릭합니다. 으로 이동한 후 + (더하기) 아이콘을 클릭하여 계정을 추가합니다.
If the VoIP account is already set up, then click Yes. This means an account username and password has already been produced.

다음으로 제공업체 선택 을 클릭합니다. 화면이 표시되면 오른쪽 상단에 있는 국가 를 클릭하여 제공업체 범위를 특정 국가로 좁힙니다. 설정 중인 제공업체의 국가를 선택한 다음 제공업체 를 찾아 선택합니다.
Example
공급업체 환경설정이 Axivox 로 되어 있는 경우 벨기에 를 선택합니다. 그런 다음 공급업체로 Axivox 를 선택합니다.

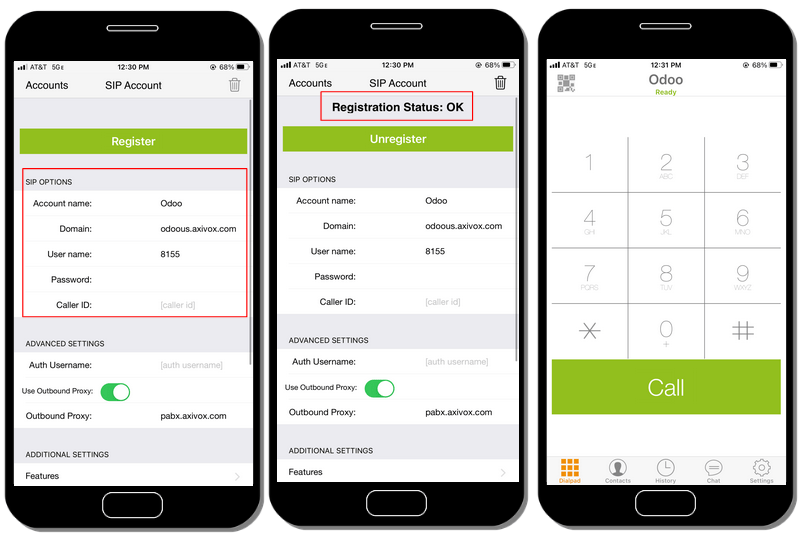
Under SIP options, enter the Account name, Domain, Username, and Password. All this information varies, based on the account.
팁
이 정보에 액세스하려면 Axivox 포털을 통해 으로 이동합니다. 이 탭에는 SIP 사용자 이름, 도메인, SIP 비밀번호 및 프록시 서버 주소 가 모두 있습니다.
Zoiper 필드 |
Axivox 필드 |
|---|---|
계정 이름 |
무엇이든 가능합니다 |
도메인 |
도메인 |
사용자 이름 |
SIP 사용자 이름 |
비밀번호 |
SIP 비밀번호 |
계정 정보를 입력한 후 화면 상단에 있는 초록색 등록 버튼을 클릭합니다. 등록 정보가 확인되면 Zoiper 에서 등록 상태: OK 라는 메시지가 표시됩니다.
At this point, Zoiper is now set up to make phone calls using the VoIP service.
유선 전화
Linphone 은 오픈소스 VoIP SIP 소프트폰으로, 음성, 영상, 메시징(그룹 및 개인) 및 화상 회의용으로 사용할 수 있습니다.
To start using the Linphone app, download it to the device, via the Linphone download page.
가장 많이 설치하는 장치는 모바일 장치이며, 이 문서에서는 유선전화 IOS 응용 프로그램을 설정하는 방법을 다룹니다. 스크린샷과 단계는 상황에 따라 다를 수 있습니다.
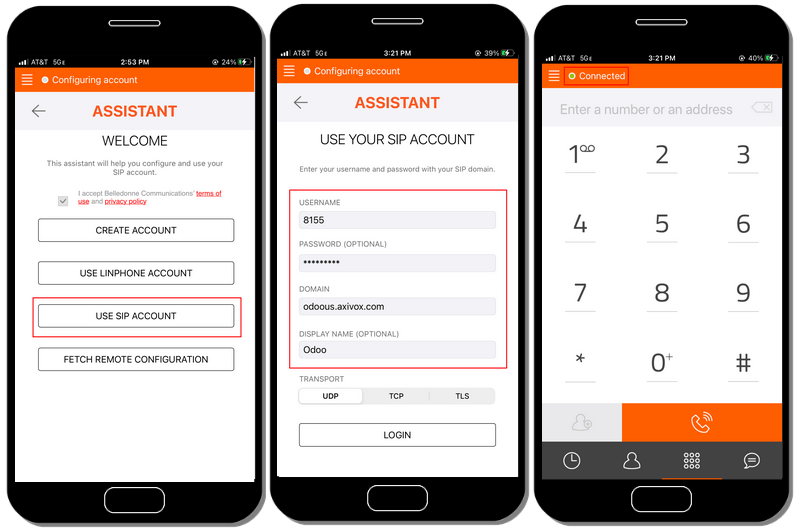
To begin configuring Linphone for use with a SIP provider, first open Linphone, and an assistant screen appears.
From this screen, select Use SIP Account. Then, on the following screen, enter the Username, Password, Domain, and Display Name. Once complete, press Login.
At this point, Linphone is ready to start making calls, once there is a green button at the top of the application screen that reads, Connected.
팁
Linphone 은 Windows, Linux, Apple 및 Android와 같은 운영 체제에서 모바일 및 데스크톱 장치용 다양한 애플리케이션을 생산합니다. Linphone 은 오픈 소스 프로젝트이기 때문에 정기적으로 많은 새 업데이트를 출시하고 있습니다.
Linphone 위키 문서 페이지 를 참조하세요.