견적서 서식
In Odoo Sales, salespeople have the ability to create reusable quotation templates for common products or services that the business offers.
By using these templates, quotations can be tailored and sent to customers at a much faster pace, without having to create new quotations from scratch every time a sales negotiation occurs.
구성
먼저 제목이 있는 곳까지 스크롤하여 이동합니다.
해당 섹션에서 견적서 서식 옆에 있는 확인란에 표시합니다. 이렇게 하면 새로운 기본 서식 필드가 표시되어 견적서 서식 기본값을 드롭다운 메뉴에서 선택할 수 있게 됩니다.
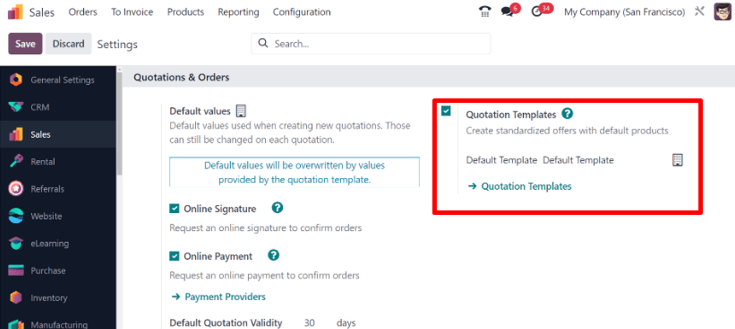
Also, upon activating the Quotation Template feature, an internal ➡️ Quotation Templates link appears beneath the Default Template field.
Clicking that link reveals the Quotation Templates page, from which templates can be created, viewed, and edited.
설정 페이지에서 나가기 전에 반드시 저장 버튼을 클릭하여 기능을 활성화시키고 변경 사항을 모두 저장할 수 있도록 합니다.
견적서 서식 생성하기
설정 페이지에서 견적서 서식 링크를 클릭하거나 또는 페이지로 이동합니다.
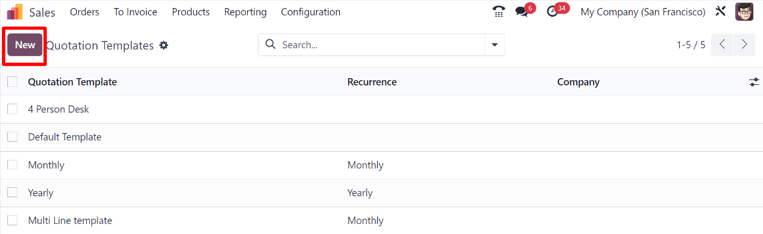
새로운 견적서 서식을 생성하려면, 왼쪽 상단에 있는 새로 만들기 버튼을 클릭합니다. 그러면 다양한 방식으로 커스터마이징할 수 있도록 내용이 비어있는 견적서 서식 양식이 표시됩니다.
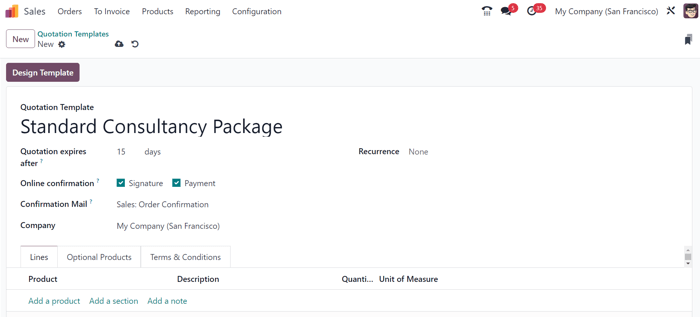
견적서 서식 필드에 서식 이름을 입력하는 것으로 시작합니다.
Then, in the Quotation expires after field, designate how many days the quotation
template will remain valid for, or leave the field on the default 0 to keep the template valid
indefinitely.
If the Online Signature and/or Online Payment features are activated in the Settings (), those options are available in the Online confirmation field.
In the Online confirmation field, check the box beside Signature to request an online signature from the customer to confirm an order. Check the box beside Payment to request an online payment from the customer to confirm an order.
Both options can be enabled simultaneously, in which case the customer must provide both a signature and a payment to confirm an order.
다음으로 확인 메일 필드에서 빈 필드를 클릭하여 드롭다운 메뉴를 표시합니다. 드롭다운 메뉴에서, 고객이 주문을 하면 전송할 수 있도록 미리 설정되어 있는 이메일 서식을 선택합니다.
팁
확인 메일 필드에서 직접이메일 서식을 새로 생성하려면, 해당 필드에 새 이메일 서식의 이름을 입력한 후 드롭다운 메뉴가 나타나면 만들기 또는 :guilabel:`만들기 및 편집…〉 중 하나를 선택합니다.
Selecting Create creates the email template, which can be edited later. Selecting Create and edit… creates the email template, and a Create Confirmation Mail pop-up window appears, in which the email template can be customized and configured right away.
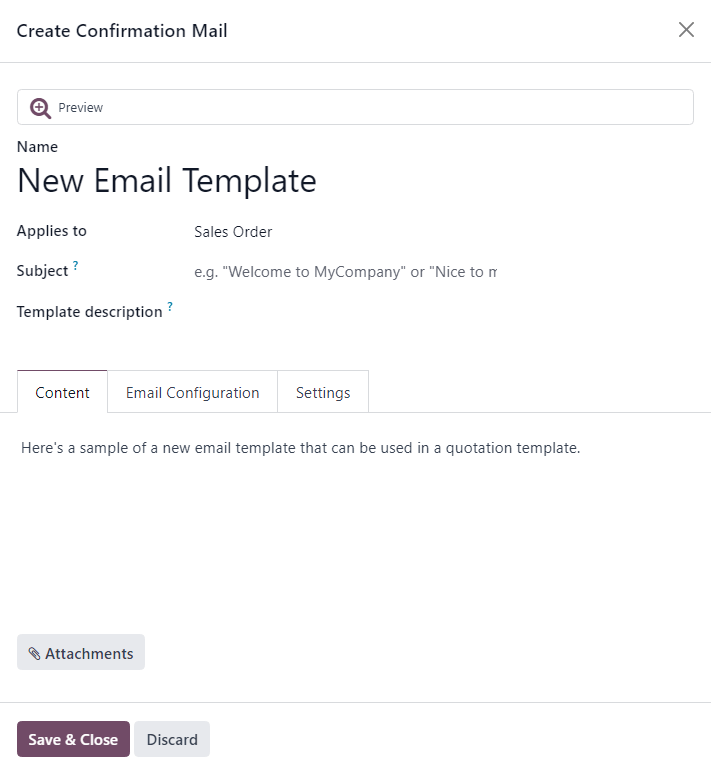
편집을 모두 완료했으면 :guilabel:`저장하고 닫기`를 클릭하여 이메일 서식을 저장하고 견적 양식으로 돌아갑니다.
여러 개의 회사가 있는 환경에서 작업하는 경우 회사 필드에서 이 견적서 서식을 적용할 회사를 지정합니다.
In the Recurrence field, choose from a variety of pre-configured amounts of time (e.g. Monthly, Quarterly) to designate how often this quotation template should occur.
참고
The Recurrence field only applies to subscription plans. For more information, check out the documentation on Subscription plans.
내역 탭
행 탭에서는 :guilabel:`품목 추가`를 클릭하면 견적서 서식에 품목을 추가할 수 있으며, :guilabel:`영역 추가`를 클릭하여 체계적으로 구성합니다 (영역 헤더를 끌어다 놓습니다). 또한 특정 정보 (보증 세부 사항이나 이용약관 등)를 추가로 기재하려면 :guilabel:`메모 추가`를 클릭하면 됩니다.
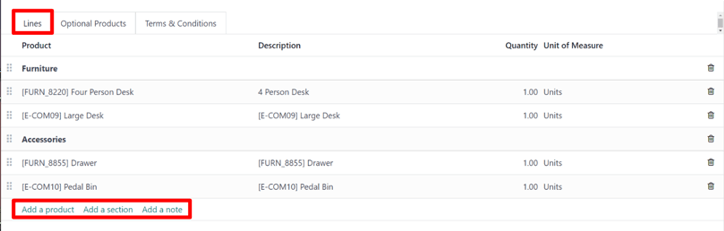
견적서 서식에 품목을 추가하려면 견적서 서식 양식의 내역 탭에서 품목 추가`를 클릭합니다. 그러면 :guilabel:`품목 열에 빈 필드가 나타납니다.
클릭하면 데이터베이스에 있는 기존 품목이 있는 드롭다운 메뉴가 나타납니다. 드롭다운 메뉴에서 원하는 품목을 선택하여 견적서 서식에 추가합니다.
팁
원하는 품목을 쉽게 찾을 수 없는 경우 품목 필드에 원하는 품목 이름을 입력하면 드롭다운 메뉴에 선택 사항이 나타납니다. 드롭다운 메뉴에서 :guilabel:`추가 검색…`을 클릭하여 품목을 검색할 수도 있습니다.
그런 다음 각 항목 왼쪽에 있는 6개의 사각형 아이콘을 통해 품목을 원하는 위치로 끌어다 놓습니다.
판매주문서의 내용을 체계화할 수 있는 제목 역할을 하도록 *섹션*을 추가하려면, 내역 탭에서 :guilabel:`섹션 추가`를 클릭합니다. 클릭하면 원하는 섹션 이름을 입력할 수 있는 빈 필드가 나타납니다. 이름을 입력한 후 클릭하여 섹션 이름을 확정합니다.
그런 다음 각 항목 왼쪽에 있는 6개의 사각형 아이콘을 통해 섹션 이름을 원하는 위치로 끌어다 놓습니다.
견적서에 고객을 위한 텍스트로 표시될 메모를 추가하려면, 내역 탭에서 :guilabel:`메모 추가`를 클릭합니다. 클릭하면 원하는 메모를 입력할 수 있는 빈 필드가 나타납니다. 메모를 입력한 후 외부 영역을 클릭하 메모를 저장합니다.
그런 다음 6개의 사각형 아이콘을 통해 메모을 원하는 위치로 끌어다 놓습니다.
내역 탭 (품목, 섹션 및/또는 메모)에서 내역에 있는 항목을 삭제하려면 내역 맨 오른쪽에 있는 🗑️ (휴지통) 아이콘을 클릭합니다.
추가 선택 품목 탭
*선택 품목*을 사용하는 것은 주력 품목과 함께 다른 제품들을 교차 판매하는 마케팅 전략입니다. 고객과 관련이 있는 유용한 품목을 제안하여 매출을 증대시키는 것을 목표로 합니다.
예를 들어, 자동차를 구매하려는 고객에게 마사지 시트를 같이 주문할지 아니면 제안을 수락하지 않고 그냥 자동차만 구입할지를 선택하도록 합니다. 선택 품목을 구매할 수 있도록 제안하여 고객 경험을 제고합니다.
Optional products appear as a section on the bottom of sales orders and eCommerce pages. Customers can immediately add them to their online sales orders themselves, if desired.
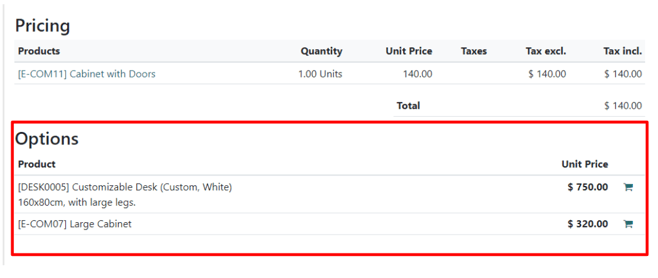
In the Optional Products tab, Add a line for each cross-selling product related to the original items in the Lines tab, if applicable. The products added here ideally complement the original offering as added value for the prospective buyer.

Clicking Add a line reveals a blank field in the Product column.
클릭하면 데이터베이스의 품목 드롭다운 메뉴로 표시됩니다. 드롭다운 메뉴에서 원하는 품목을 선택하여 견적서 서식에 선택 가능 품목으로 추가합니다.
선택 가능 품목 탭에 있는 항목을 삭제하려면 🗑️ (휴지통) 아이콘을 클릭합니다.
참고
Optional products are not required to create a quotation template.
Terms & Conditions tab
The Terms & Conditions tab provides the opportunity to add terms and conditions to the quotation template. To add terms and conditions, simply type (or copy/paste) the desired terms and conditions in this tab.

더 보기
참고
Terms and conditions are not required to create a quotation template.
견적서 서식 디자인
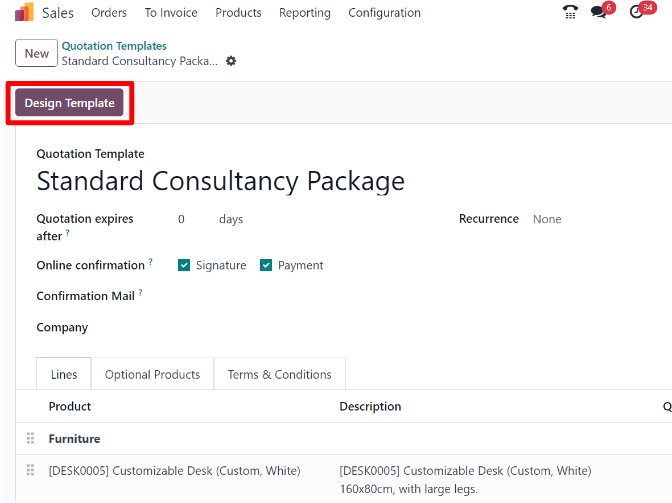
In the upper-left corner of the quotation template form, there’s a Design Template button.
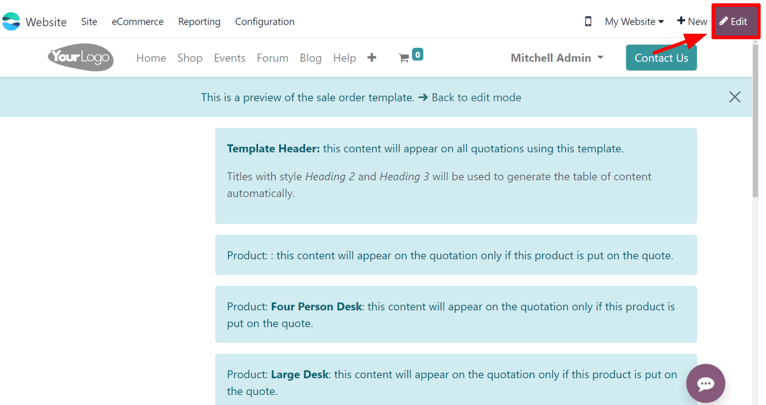
When clicked, Odoo reveals a preview of the quotation template, through the Odoo Website application, as it will appear on the front-end of the website to the customer.
참고
This feature is only available if the Website application is installed.
Odoo uses numerous blue placeholder blocks to signify where certain elements appear, and what they contain (e.g. Template Header, Product).
To edit the content, appearance, and overall design of the quotation template via the Website application, click the Edit button in the upper-right corner.
When Edit is clicked, Odoo reveals a sidebar filled with a variety of design elements and feature-rich building blocks. These building blocks can be dragged-and-dropped anywhere on the quotation template design.
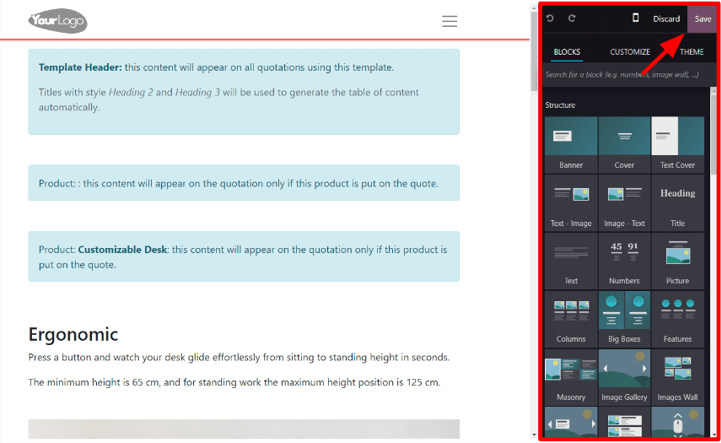
After a block has been dropped in the desired position, it can be customized and configured to fit any unique need, look, or style.
팁
Quotation template design uses the same methodology and functionality with design building blocks as a typical web page design with Odoo Website. Be sure to check out the 웹사이트 documentation to learn more.
When all blocks and customizations are complete, click the Save button to put those configurations into place.
There is also a blue banner at the top of the quotation template design with a link to quickly return Back to edit mode. When clicked, Odoo returns to the quotation template form in the back-end of the Sales application.
견적서 서식 사용하기
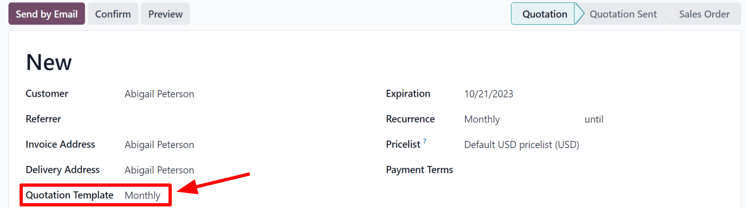
When creating a quotation (), choose a pre-configured template in the Quotation Template field.
To view what the customer will see, click the Preview button at the top of the page to see how the quotation template appears on the front-end of the website through Odoo’s customer portal.
