반품 및 환불
The Odoo Sales app provides two different ways to process returns. The method used depends on whether or not an invoice has been sent.
Before invoicing
Returns are completed using Reverse Transfers when a customer decides to return a product before an invoice has been sent or validated.
참고
In order to use Reverse Transfers, the Inventory app must be installed.
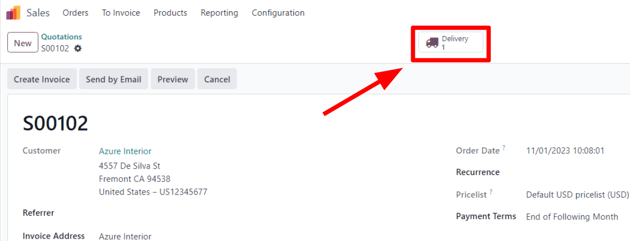
To start a return before invoicing, navigate to the app, select the desired sales order, and click on the Delivery smart button to open the associated delivery order.
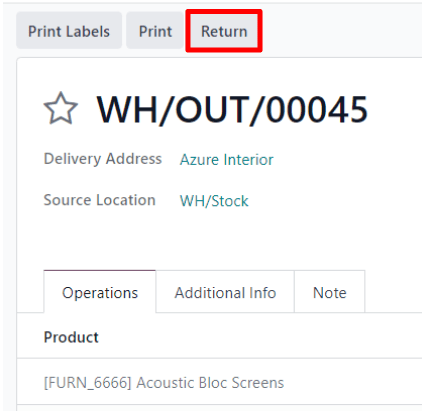
On the validated delivery order, click Return.
This opens a Reverse Transfer pop-up window.
By default, the Quantity matches the validated quantities from the delivery order. Update the quantities, if necessary. Click on the 🗑️ (trash) icon next to a line item to remove it from the return.
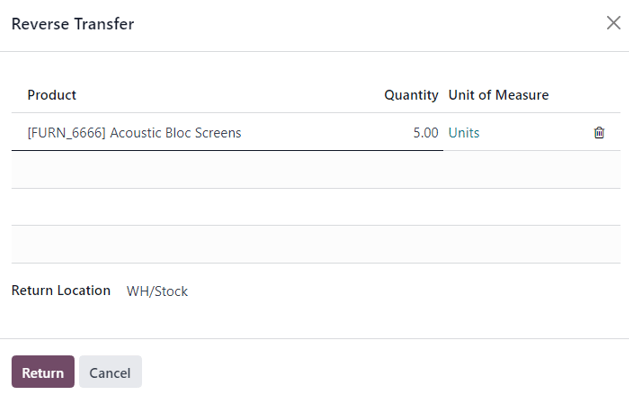
Next, click Return to confirm the return. This generates a new warehouse operation for the incoming returned product(s).
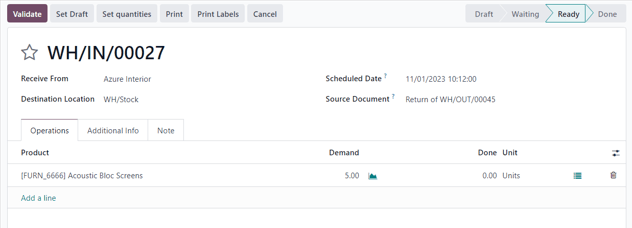
Upon receiving the return, the warehouse team validates the warehouse operation by clicking Validate. Then, on the original sales order, the Delivered quantity updates to reflect the difference between the initial validated quantities and the returned quantities.

When an invoice is created, the customer receives an invoice only for the products they are keeping, if any.
청구서 발행 후속 작업
고객이 청구서를 수령하거나 비용을 지불한 후 품목을 반품하는 경우가 있습니다. 이러한 경우 청구서를 확인하거나 발송할 경우에는 변경할 수 없으므로 *역분개 작업*만으로 반품 작업을 완료할 수 없습니다.
그러나 *역분개 작업*을 *대변전표*와 함께 진행할 경우 고객 반품 작업을 완료할 수 있습니다.
청구서 발행 후 반품을 시작하려면 앱에서 관련 판매 주문으로 이동합니다.
판매주문서에 결제 등록 항목이 있는 경우에는 세부 결제 정보가 메시지창에 표시되고 청구서 (청구서 스마트 버튼을 통해 액세스)에는 초록색 결제 중 배너가 표시됩니다.

판매주문서에서 배송 스마트 버튼을 클릭하면 확인된 배송주문서를 볼 수 있습니다. 그런 다음 반품`을 클릭하여 :guilabel:`역분개 작업 팝업 창을 엽니다.
그 다음, 반품에 필요한 품목 및/또는 :guilabel:`수량`를 편집합니다. 그런 다음 :guilabel:`반품`을 클릭합니다. 이렇게 하면 반품된 품목에 대한 새로운 창고 작업이 생성되며, 반품이 접수되면 창고 팀에서 :guilabel:`승인`을 클릭하여 이를 확인합니다.
그런 다음 판매주문서에서 배송 완료 수량을 업데이트하여 초기 승인된 수량과 반품 수량 간의 차이를 반영합니다.
To process a refund, navigate to the relevant invoice (from the sales order, click on the Invoices smart button). Then, click the Credit Note button at the top of the validated invoice.

Doing so reveals a Credit Note pop-up form.
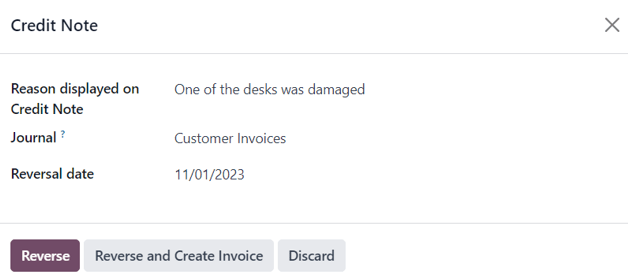
Start by entering a Reason displayed on Credit Note and a specific Journal to process the credit. Then, select a specific Reversal Date.
After the information is filled in, click Reverse or Reverse and Create Invoice. Then, edit the draft, if needed.
Lastly, click Confirm to confirm the credit note.
When complete, a blue banner reading: You have outstanding credits for this customer. You can allocate them to mark this invoice as paid. appears at the top of the page.
더 보기