Membros
The Members application is where all operations related to memberships can be configured and managed. The Members app integrates with the Sales and Accounting applications to sell and invoice memberships directly to customers.
Produtos de associação
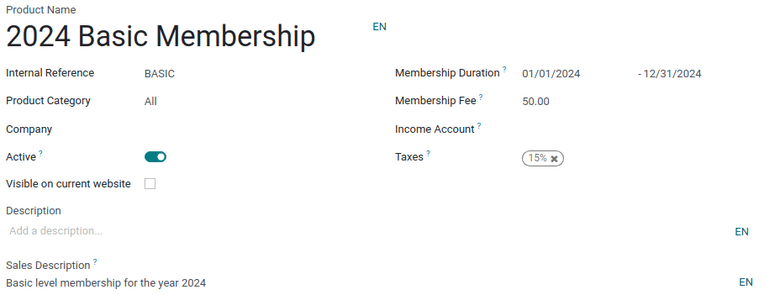
To create a new membership product, navigate to , and click New to open a blank product form.
On the new product form, enter a name for the product in the field under Product Name. Use the two blank fields to the right of Membership Duration to set a date from which the membership becomes active. Finally, use the Membership Fee field to set the price at which the product is sold to customers.
The following optional fields can also be configured for each product:
Internal Reference: Set an internal reference number for the product.
Product Category: Set a category for the product.
Company: Set the company inventory for the product to appear in.
Active: Hide a product without removing it from inventory.
Visible on current website: Make the product visible to customers on the current website.
Description: Set an internal product description.
Sales Description: Set a product description that is visible on quotations.
Income Account: Use a different value than the default from the product category.
Taxes: Set the default tax used when selling this product.
Nota
Os produtos de associação exigem uma data de início e de fim, uma vez que são utilizados para determinar o status da associação. Os produtos de associação podem ser vendidos antes da sua data de início ativa.

Os produtos de associação podem ser adicionados a uma pedidos de venda e faturados como produtos normais ou assinaturas.
Ativar uma associação
To activate a membership from the Contacts application, navigate to the , and click on a contact to open that specific contact form.
From the contact form, open the Membership tab, and click Buy Membership.
Dica
To successfully buy a membership, both the Account Receivable and Account Payable lines must be configured for that contact. These can be found in the contact form’s Accounting tab, under the Accounting entries section.
Na janela pop-up Associar-se que aparece, selecione uma Associação no menu suspenso. Em seguida, configure um Preço para membro.
Clique em Faturar associação quando ambos os campos estiverem preenchidos. Ao fazê-lo, aparece uma página Faturas de associação, onde as faturas podem ser confirmadas e concluídas.
Como alternativa, para oferecer uma associação gratuita, marque a caixa de seleção Membro gratuito na aba Associação de um formulário de contato.
Status da associação
O Status atual da associação é listado na aba Associação de cada registro de contato:
Não membro: um parceiro que não se inscreveu como membro.
Membro cancelado: um membro que cancelou a sua inscrição.
Membro antigo: um membro cuja data de término da associação já passou.
Membro em espera: um membro que solicitou a adesão, mas cuja fatura ainda não foi criada.
Membro faturado: um membro cuja fatura foi criada, mas não foi paga.
Membro pagante: membro que pagou a taxa de associação.
Publicar diretório de membros
To publish a list of active members on the website, the Online Members Directory module must
first be installed. After installing the module, add the /members
page to the website’s menu by editing the website menu.

Publicar membros individuais
Navigate to , and click the Kanban card for a member. From the customer form that appears, click the Go to Website smart button at the top of the page to open the member’s webpage.
Clique no botão Editar para revelar uma barra lateral de ferramentas de edição. Depois de fazer as alterações necessárias na página, clique em Salvar. No topo da página, deslize o botão Não publicado para a posição ativa, Publicado.
Repita essas etapas para todos os membros em questão.