Members
The Members application is where all operations related to memberships can be configured and managed. The Members app integrates with the Sales and Accounting applications to sell and invoice memberships directly to customers.
Membership products
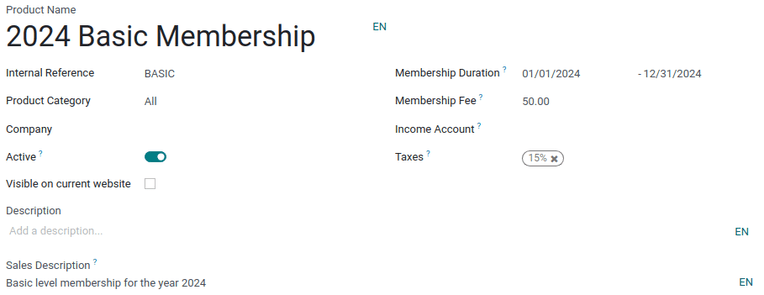
To create a new membership product, navigate to , and click New to open a blank product form.
On the new product form, enter a name for the product in the field under Product Name. Use the two blank fields to the right of Membership Duration to set a date from which the membership becomes active. Finally, use the Membership Fee field to set the price at which the product is sold to customers.
The following optional fields can also be configured for each product:
Internal Reference: Set an internal reference number for the product.
Product Category: Set a category for the product.
Company: Set the company inventory for the product to appear in.
Active: Hide a product without removing it from inventory.
Visible on current website: Make the product visible to customers on the current website.
Description: Set an internal product description.
Sales Description: Set a product description that is visible on quotations.
Income Account: Use a different value than the default from the product category.
Taxes: Set the default tax used when selling this product.
Note
Membership products require a start and end date, as they are used to determine membership status. Membership products can be sold before their active start date.

Membership products can be added to a sales order, and invoiced as regular products or subscriptions.
Activate a membership
To activate a membership from the Contacts application, navigate to the , and click on a contact to open that specific contact form.
From the contact form, open the Membership tab, and click Buy Membership.
Tip
To successfully buy a membership, both the Account Receivable and Account Payable lines must be configured for that contact. These can be found in the contact form’s Accounting tab, under the Accounting entries section.
On the Join Membership pop-up window that appears, select a Membership from the drop-down menu. Then, configure a Member Price.
Click Invoice Membership when both fields are filled in. Doing so reveals a Membership Invoices page, wherein invoices can be confirmed and completed.
Alternatively, to offer a free membership, tick the Free Member checkbox, in the Membership tab of a contact form.
Membership status
The Current Membership Status is listed on the Membership tab of each contact record:
Non Member: a partner who has not applied for membership.
Cancelled Member: a member who has cancelled their membership.
Old Member: a member whose membership end date has passed.
Waiting Member: a member who has applied for membership, but whose invoice has not yet been created.
Invoiced Member: a member whose invoice has been created, but has not been paid.
Paid Member: a member who has paid the membership fee.
Publish members directory
To publish a list of active members on the website, the Online Members Directory module must
first be installed. After installing the module, add the /members
page to the website’s menu by editing the website menu.

Publish individual members
Navigate to , and click the Kanban card for a member. From the customer form that appears, click the Go to Website smart button at the top of the page to open the member’s webpage.
Click the Edit button to reveal a sidebar of editing tools. After making any necessary changes to the page, click Save. At the top of the page, slide the Unpublished toggle to the active, Published position.
Repeat these steps for all desired members.