Automated actions (automations)
Automated actions are used to trigger automatic changes based on user actions (e.g., apply a modification when a field is set to a specific value) or on time conditions (e.g., archive a record 7 days after its last update).
To create an automated action with Studio, open Studio, then go to Automations and click New.
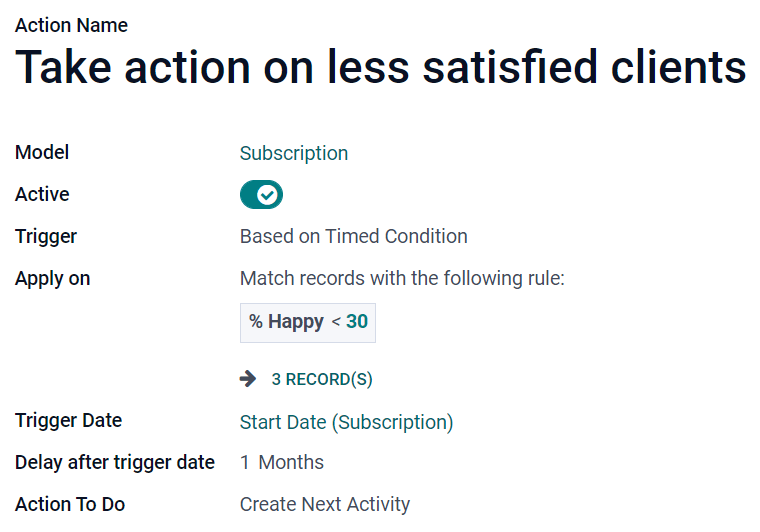
For every automated action you create, the following elements should be defined: the 모델, the 자동 실행, the 적용, and the 수행할 작업.
Example

모델
Select the model where the automated action should be applied.
참고
The model you are on when you click on Automations is pre-selected by default.
자동 실행
Define when the automated action should be applied. Six triggers are available.
생성할 때
The action is triggered when a record is created and then saved.
갱신할 때
The action is triggered when a previously saved record is edited and then saved.
Use Trigger Fields to specify which fields - and only those - trigger the action on their update.
To detect when a record changes from one state to another, define a Before Update Domain filter, which checks if the condition is satisfied before the record is updated. Then set an 적용 filter, which checks if the condition is met after the record is updated.
Example
If you want the automated action to happen when an email address is set on a contact, define the Before Update Domain to
Email is not set, and the Apply on domain toEmail is set.
생성 또는 갱신할 때
The action is triggered when a record is created and saved or edited afterward and saved.
삭제할 때
The action is triggered when a record is deleted.
참고
This trigger is rarely used, as archiving records is usually preferred to deletion.
양식 수정에 기반
레코드를 저장하기 전이더라도, :ref:`양식보기 <studio/views/general/form>`에서 필드 값이 변경될 경우에는 작업이 실행됩니다. 해당 작업 실행은 사용자가 수정하는 경우에 사용자의 인터페이스에서만 동작합니다. 필드값 변경이 다른 작업을 통해서 된 경우 및 해당 사용자가 하지 않은 경우에는 작업이 실행되지 않습니다.
참고
This trigger can only be used with the Execute Python Code action, so development is required.
시간 기반 조건
The action is triggered when a trigger field’s date or date & time value is reached.
To trigger the action after the Trigger Date, add a number of minutes, hours, days, or months under Delay after trigger date. To trigger the action before, add a negative number instead.
Example
If you want to send a reminder email 30 minutes before the start of a calendar event, select the Start (Calendar Event) under Trigger Date and set the Delay after trigger date to -30 Minutes.

참고
By default, the scheduler checks for trigger dates every 4 hours.
적용
Define on which records of the model the automated action should be applied. It works the same way as when you apply filters on a model.
수행할 작업
Determine what the automated action should do (server action). There are eight types of action to choose from.
파이썬 코드 실행
The action is used to execute Python code. The available variables are described on the Python Code tab, which is also used to write your code, or on the Help tab.
To allow the action to be run through the website, tick Available on the Website and add a Website Path.
새 레코드 만들기
The action is used to create a new record on any model.
참고
Selecting a Target Model is only required if you want to target another model than the one you are on.
To link the record that triggered the creation of the new record, select a field under Link Field. For example, you could create a contact automatically when a lead is turned into an opportunity.
Data to Write tab: the tab is used to specify the new record’s values. After selecting a Field, select its Evaluation Type:
Value: used to directly give the field’s raw value in the Value column.
Reference: used to select the record under the Record column and let Studio add the internal ID in the Value column.
Example
If an automated action creates a new task in a project, you can assign it to a specific user by setting the Field to Responsible User (Project), the Evaluation Type to Reference, and the Record to a specific user.

Python expression: used to dynamically define the newly created record’s value for a field using Python code in the Value column.
레코드 업데이트
The action is used to set value(s) for field(s) of any record on the current model.
참고
The process to fill in the Data to Write tab is the same as described under 새 레코드 만들기.
몇 가지 작업 실행
The action is used to trigger multiple actions at the same time. To do so, click on Add a line under the Actions tab. In the Child Actions pop-up, click on Create and configure the action.
이메일 전송
The action is used to send an email to a contact linked to a specific record. To do so, select or create an Email Template.
팔로워 추가하기
The action is used to subscribe existing contacts to the record.
다음 활동 만들기
작업은 기록에 연결된 새로운 활동을 예약하는 데 사용합니다. 활동 탭을 사용하여 평소대로 설정하되, 배정 대상 필드 대신 활동 사용자 유형`을 선택합니다. 활동이 항상 동일한 사용자에게 할당되어야 하는 경우에는 :guilabel:`특정 사용자`를 선택하고 :guilabel:`담당자 아래에 사용자를 추가합니다. 레코드에 연결된 사용자를 동적으로 타겟팅하려면 대신 :guilabel:`레코드의 일반 사용자`를 선택하고 필요한 경우 :guilabel:`사용자 필드 이름`을 변경합니다.
SMS 문자메시지 전송
The action is used to send an SMS to a contact linked to the record. To do so, select or create an SMS Template.
팁
If you want sent messages to be logged in the Chatter, tick Log as Note.
