구독
The Odoo Subscriptions app is designed to manage recurring revenue through subscription-based products or services. It supports automated invoicing, renewal management, and customer lifecycle tracking.
Subscriptions can be created manually or automatically through online sales, with varying options for recurring billing. The app integrates with other Odoo modules such as Invoicing, CRM, Sales, and Helpdesk to support end-to-end subscription workflows.
Subscription plans
Customize subscription plan templates tailored to various product offerings
Renew a subscription
Understand the core management activity for subscriptions
Upsell a subscription
Offer more value for current subscribers on the same sales order
Integrate subscriptions with eCommerce
Offer subscription products with an Odoo **eCommerce** app integration
더 보기
Set up recurrence periods
To get started with subscription products in Odoo, recurrence periods must first be configured.
Recurrence periods are the time windows in which subscriptions are active before they renew again. While a subscription is active, customers receive products or services, and may also have access to additional benefits such as support desk triage. In terms of payment, these recurrence periods designate how often the customer is charged in order to maintain the benefits of their subscription.
반복될 기간을 설정하려면 으로 이동합니다.
By default, the Subscriptions app includes a number of common recurrence periods already available, such as Monthly and Yearly.
Create new recurrence periods by clicking NEW on the Recurrence Periods dashboard, to reveal a blank form where the period Name, Duration and Unit values are specified.

중요
The unit Days cannot be used as a recurrence period for subscription products. The daily recurrence period in Odoo is designated for rentals, and cannot be added to subscription-based sales orders.
이와 같이 제한하는 이유는 판매주문서에서 일 기준으로 청구서가 생성되는 것을 방지하기 위한 것입니다.
품목 양식 환경설정
With recurrence periods set up, create a subscription product by navigating to , and either clicking an existing product to turn into a subscription, or by clicking NEW to open up a blank product form.
참고
기본값으로 반복 항목은 이미 활성화되어 있어서 Odoo에서 해당 항목을 구독 제품으로 인식하게 됩니다. 반복 및 판매 가능 항목은 활성화된 상태로 두어야 합니다.
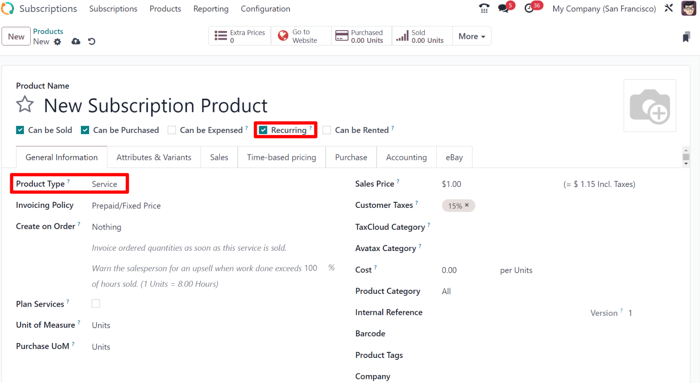
On the product form, configure the following items in the General Information tab so the subscription product will function correctly:
Recurring: check this box to turn the product into a subscription in Odoo.
Product type: this value is typically set to a Service, however other product types may be used (e.g., physical product box subscriptions, eLearning course, etc.).
Invoicing policy: set this value to when the customer should be charged for their subscription.
Unit of Measure: how the product should be counted in Odoo, for stock purposes. For most subscriptions, the UoM will be Units.
Sales Price: enter the recurring cost of the subscription that the customer will pay per recurrence period.
Optionally set up information on the Attributes & Variants tab if the subscription contains multiple choices for customers (i.e. food delivery, tailored fashion boxes, etc.).
In the Time-based pricing tab, clarify the pricing options for the subscription. For each option available, click Add a price to add a new row.
팁
Longer time Period options are typically incentivized with cost savings. Consider dropping the total Price values to offer customers a discount while supporting the business’s financial runway.
Last, if the subscription is meant to be purchased on the eCommerce website, click the smart button and in the product page header, click the gray slider from Unpublished to the green Published status.
Create a subscriptions quotation
Manually create a new customer subscription by navigating to either the or app dashboards, and then clicking NEW.
참고
Products that have been marked as Recurring on their product forms, and are also sold on the eCommerce website will automatically create and confirm subscription quotations in the backend of Odoo.
중요
Sales orders with a defined recurrence period automatically become subscriptions.
On the quotation form, fill in the necessary fields such as Customer and Recurrence, as well as the Order Lines tab.
Optionally, specify a:
Quotation Template, if one is readily available to help populate the form fields.
Expiration date, to indicate when the subscription offer is no longer valid.
팁
Expiration dates pair well with discounts to incentivize faster purchases, since the discount will expire with the quotation if it’s not turned into a sales order within the specified date range.
Pricelist, if one is available and appropriate to use (i.e., summer sale discount, VIP customer, etc.).
지급 조건 을 활용하여 구독료 결제 기간으로 설정할 기간대를 지정합니다. 지급 조건 기간을 견적서가 확정 되어 판매주문서로 전환되는 기간과 혼동하지 않도록 합니다. 판매주문서의 경우, 즉시 또는 특정 기간 내에 결제가 가능해며, 이 기간은 며칠, 몇 주, 몇 달까지도 가능합니다.

팁
고객 주소 기능을 활성화하면 다양한 청구서 및 배송 주소를 지정할 수 있습니다.
확인
Send the quotation to the customer for confirmation by clicking on SEND BY EMAIL, or confirm it immediately by clicking on CONFIRM.
팁
Click on Customer Preview to preview the customer portal where the customer can view their quotation, sign and pay it, and communicate with you.
If a signature or a payment is required to confirm the quotation, set either (or both) of these options in the Other Info tab, next to the Online confirmation field.