费用
Odoo Expenses streamlines the management of expenses. After an employee submits their expenses in Odoo, the expenses are reviewed by management and accounting teams. Once approved, payments can then be processed and disbursed back to the employee for reimbursement(s).
Set expense types
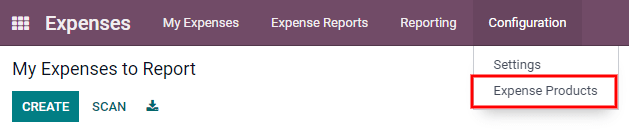
The first step to track expenses is to configure the different expense types for the company (managed as products in Odoo). Each “product” can be as specific or generalized as needed. Go to to view the current expensable products in a default kanban view.
To create a new expense product, click Create. A product form will appear. Only the Product Name and Unit of Measure fields are required to create a new expense product. Enter the Product Name in the field, and select the Unit of Measure from the drop-down menu (most products will be set to Units, which is the default selection).
小技巧
The Sales app is where specification on the units of measure are created and edited (e.g.
units, miles, nights, etc.). Go to and
ensure Units of Measure is enabled in the Product Catalog section. Click on the
Units of Measure internal link to view, create, and edit the units of measure. Refer
to this document to
learn more about units of measure and how to configure them.
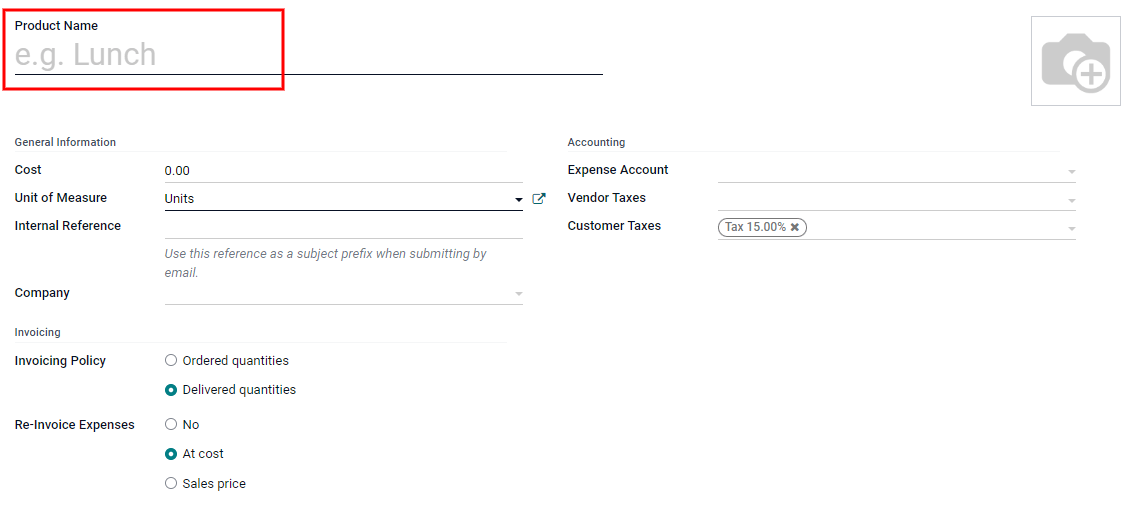
产品表单上的 成本 字段默认值为 0.00。如果应始终按特定价格报销特定费用,请在 成本 字段中输入该金额。否则,请将 成本 设置为 0.00,员工在提交费用报告时将报告实际费用。
Example
下面是一些示例,说明何时应在产品上设置特定的 成本 而不是将 成本 设置为 0.00:
餐饮:将 成本 设置为
0.00。当员工记录餐费时,他们会输入账单的实际金额,并按此金额报销。$95.23 美元的餐费相当于报销$95.23。Mileage: Set the Cost to
0.30. When an employee logs an expense for “mileage”, they enter the number of miles driven, and are reimbursed 0.30 per mile they entered. An expense for 100 miles would equal a reimbursement for $30.00.停车月费: 将 开销 设置为
75.00。当员工记录“每月停车”费用时,报销金额为 $75.00。费用:将 成本 设为`0.00`。当员工记录餐费、里程费或月停车费以外的开支时,会使用通用的 开支 产品。例如,购买一台价值为 $350.00 的笔记本电脑,费用将记录为 开支 产品,申请报销金额为 $350.00。
如果使用 Odoo 会计 应用程序,请选择 开支账户。建议与会计部门联系,以确定在此字段中引用的正确账户,因为该设置会影响财务报表。
Set a tax on each product in the Vendor Taxes and Customer Taxes fields if applicable. It is considered good practice to use a tax that is configured with Tax Included in Price. Taxes will be automatically configured if this is set.
记录费用
手动创建新费用
To record a new expense, begin in the main app dashboard, which presents the default My Expenses to Report view. This view can also be accessed from .
First, click Create, and then fill out the various fields on the form.
描述:请在 描述 字段中,输入费用的简短描述。描述应简短交代信息,例如
与客户共进午餐或会议酒店。Product: Select the product from the drop-down menu that most closely corresponds to the expense. For example, an airplane ticket would be appropriate for an expense Product named Air Travel.
总计:用两种方式之一,输入已支付的总费用:
If the expense is for one single item/expense with a variable price, enter the cost in the Total field. Odoo will not display the Quantity field for a product if it does not need to have the quantity specified (a product with a unit price of
0.00and a quantity of1.00).If the expense is for multiples of the same item/expense with a fixed price, the Unit Price is displayed. Enter the quantity in the Quantity field, and the Total is automatically updated with the correct total (the Quantity x the Unit Price = the Total).
Example
For example, in the case of mileage driven, the Unit Price would be set in the product form as the cost per mile. Simply set the Quantity to the number of miles driven, and the total for the expense is updated.
Bill Reference: If there is any reference text that should be included for the expense, enter it in this field. This field is not visible for expense products that require a Quantity to be entered.
开支日期:使用日历模块,输入开支发生的日期。使用 <(左)`和 :guilabel:>(右)`箭头,导航到正确的月份,然后点击特定日期,输入选择项。
账户:从下拉菜单中选择此支出应记录的开支账户。
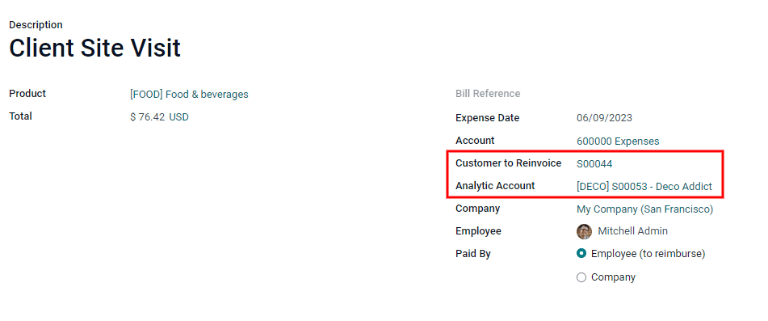
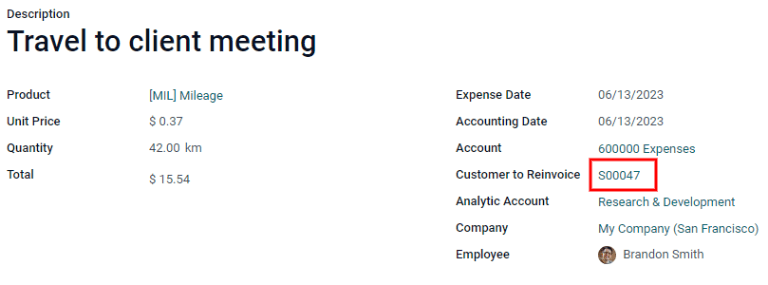
Customer to Reinvoice: If the expense is something that should be paid for by a customer, select the customer and related sales order that will be invoiced for this expense from the drop-down menu. For example, if a customer wishes to have a custom designed piece of furniture, and purchased design hours from our employee, that sales order listing the hours would be referenced as the Customer to Reinvoice. In the list view, there may be many different sales orders referencing the same company, so be sure the correct sales order is selected.
注解
The Customer to Reinvoice field is only visible if the expense product has either At cost or Sales price selected under the Re-Invoice Expenses section. If No is selected for the Re-Invoice Expenses section, the Customer to Reinvoice field is hidden.
Analytic Account: Select the account the expense should be written against from the drop-down menu.
Company: If multiple companies are set-up, select the company this expense should be filed for from the drop-down menu. If there is only one company, this field will be automatically populated.
员工:使用下拉式菜单,选择该开支适用的员工。
Paid By: Click the radio button to indicate who paid for the expense and should be reimbursed. If the employee paid for the expense (and should be reimbursed) select Employee (to reimburse). If the company paid directly instead (e.g. if the company credit card was used to pay for the expense) select Company.
备注:如果需要任何注释以澄清费用,请在注释字段中输入。
Once all the fields have been filled out, click Save.

附上收据
After the expense is saved, the next step is to attach a receipt. A new Attach Receipt button appears after the entry is saved, beneath the former Save button (which turns into an Edit button).

Click the new Attach Receipt button, and a file explorer appears. Navigate to the receipt to be attached, and click Open. The new receipt is recorded in the chatter, and the number of receipts will appear next to the 📎(paperclip) icon beneath the expense form. More than one receipt can be attached to an individual expense, as needed. The number of receipts attached to the expense will be noted on the paperclip icon.
根据扫描的收据创建新支出
Rather than manually inputting all of the information for an expense, expenses can be created automatically by scanning a PDF receipt.
First, in the main Expenses app dashboard view (this view can also be accessed from ), click Scan, and a file explorer pops up. Navigate to the receipt to be uploaded, click on it to select it, and then click Open.

The receipt is scanned, and a new entry is created with today’s date as the Expense Date, and any other fields it can populate based on the scanned data, such as the total. Click on the new entry to open the individual expense form, and click Edit to make changes. The receipt that was scanned in appears in the chatter. Make any edits to the form, then click Save when all the information is entered.
从电子邮件中自动创建新费用
无需在*费用*应用程序中单独创建每笔支出,只需向电子邮件别名发送一封电子邮件,即可自动创建费用。
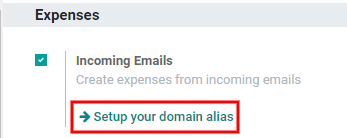
要执行此操作,首先需要配置电子邮件别名。进入 。确保启用 收到电子邮件。
注解
如果需要设置域名别名,设置域名别名`将出现在接收电子邮件复选框下方,而不是电子邮件地址字段。有关设置说明和更多信息,请参阅此文档: :doc:/applications/websites/website/configuration/domain_names`。配置域名别名后,电子邮件地址字段将在接收电子邮件部分下方显示。
Next, enter the email address to be used in the email field, then click Save. Now that the email address has been entered, emails can be sent to that alias to create new expenses without having to be in the Odoo database.
要通过电子邮件提交费用,请创建一封新电子邮件,并在电子邮件主题中输入产品的*内部参考*代码(如有)和费用金额。然后,在电子邮件中附上收据。Odoo 会根据电子邮件主题中的信息并结合收据创建费用。
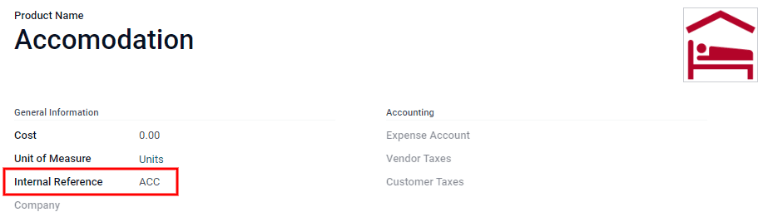
To check an expense product’s internal reference, go to . If an internal reference is listed on the product, it is visible in this view.

To add an internal reference on an expense product, click on the product, then click Edit. In edit mode, enter the Internal Reference in the field. Beneath the Internal Reference field, this sentence appears: Use this reference as a subject prefix when submitting by email..
注解
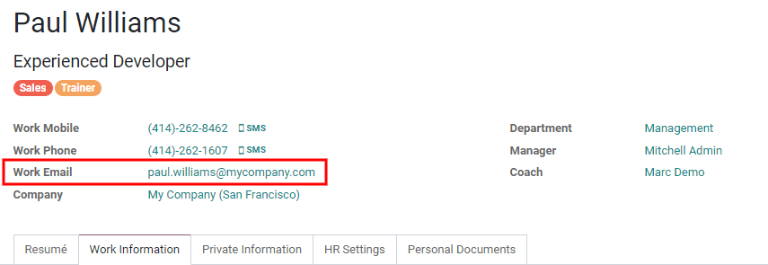
For security purposes, only authenticated employee emails are accepted by Odoo when creating an expense from an email. To confirm an authenticated employee email address, go to the employee card in the Employees app, and refer to the Work Email in the main field.
Example
If submitting an expense via email for a $25.00 meal during a work trip, the email subject would
be Ref005 Meal $25.00.
解释 :
The Internal Reference for the expense product
MealsisRef005开支的 成本 为
$25.00
创建开支报告
When expenses are ready to submit (such as at the end of a business trip, or once a month), an expense report needs to be created. Go to the main app dashboard, which displays a default My Expenses view, or go to .
First, each individual expense for the report must be selected by clicking the check box next to each entry, or quickly select all the expenses in the list by clicking the check box next to Expense Date.
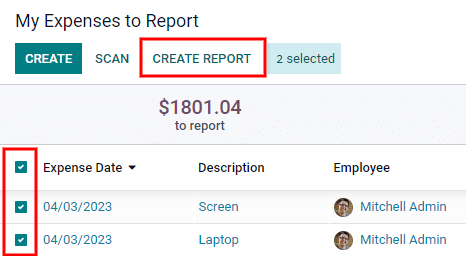
Once the expenses have been selected, click the Create Report button. The new report appears with all the expenses listed, and the Employee, Paid By, Expense Journal, and Company fields are automatically populated from the individual expenses in the report.
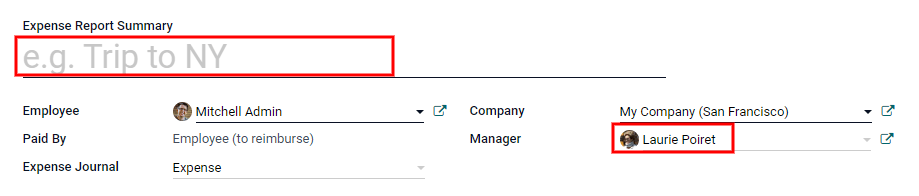
It is recommended to add a short summary for each report to help keep expenses organized. Enter a
short description for the expense report (such as Client Trip NYC, or Repairs for Company Car)
in the Expense Report Summary field.
注解
If all the expenses are listed for the same date, the Expense Report Summary field will be pre-populated with the date for the expenses.
Next, select a Manager from the drop-down menu to assign a manager to review the report.
If some expenses are not on the report that should be, they can still be added. Click Add a line at the bottom of the Expense tab. Click the check box next to each expense to add, then click Select. The items now appear on the report that was just created.

When all edits have been completed, click Save. Once the expense report is saved, an Expenses smart button appears in the top-right corner, listing the number of expenses on the report. Click the Expenses smart button to view the individual expenses for the report in a list.

提交费用报告
费用报告完成后,下一步是将报告提交给经理审批。报告必须单独提交,不能分批提交。从费用报告列表中打开特定报告(如果报告尚未打开)。要查看所有支出报告,请转到:menuselection:支出应用程序-->我的支出-->我的报告。
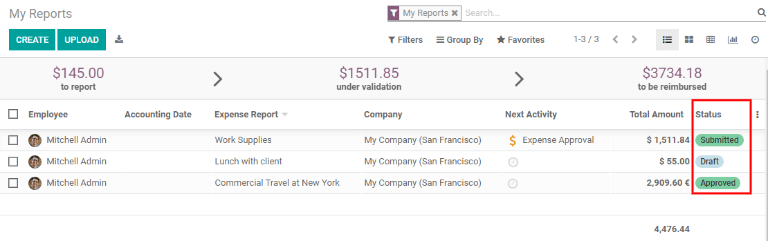
If the list is large, grouping the results by status may be helpful since only reports that are in a Draft mode need to be submitted, reports with an Approved or Submitted status do not.
注解
The status of each report is shown in the Status column on the far right. If the Status column is not visible, click the ⋮ (additional options) icon at the end of the row, and check the box next to Status.
点击报告打开它,然后点击 提交给经理。提交报告后,下一步是等待经理批准报告。
重要
批准报销、Post expenses in accounting,以及 向员工发还款项 章节,**仅供**拥有 必要权限 的使用者阅读。
批准报销
In Odoo, not just anyone can approve expense reports— only users with the necessary rights (or permissions) can. This means that a user must have at least Team Approver rights for the Expenses app. Employees with the necessary rights can review expense reports, and approve or reject them, as well as provide feedback thanks to the integrated communication tool.
要查看谁有权批准,请转到主 应用程序,然后单击 管理用户。
注解
If the Settings app is not available, then certain rights are not set on the account. In the Access Rights tab of a user’s card in the app, the Administration section is set to one of three options:
没有资料(空白):用户根本无法访问 设置 应用程序。
访问权限:用户只能查看*设置*应用程序中的 :guilabel:`用户和公司`部分。
设置:用户可以无限制地访问整个 设置 应用程序。
请参阅 本文档 了解有关管理用户及其访问权限的更多信息。
单击个人查看其卡片,在默认视图中显示 访问权限 选项卡。向下滚动到 人力资源 部分。在 开支 下有四个选项:
没有资料(空白):空白字段表示用户无权查看或批准费用报告,只能查看自己的开支报告。
团队审批人:用户只能查看和批准自己特定团队的开支报告。
全权审批人:用户可以查看和批准任何开支报告。
Administrator: The user can view and approve any expense report as well as access the reporting and configuration menus in the Expenses app.
Users who are able to approve expense reports (typically managers) can easily view all expense reports to validate. Go to . This view lists all the expense reports that have been submitted but not approved, as noted by the Submitted tag in the status column.
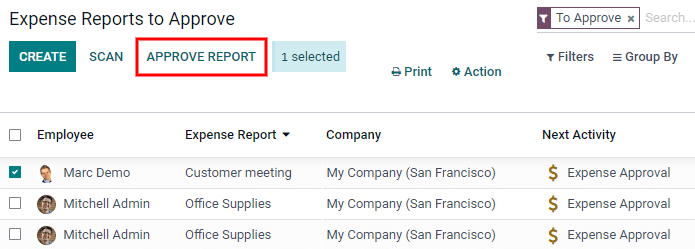
Reports can be approved in two ways (individually or several at once) and refused only one way. To approve multiple expense reports at once, remain in the list view. First, select the reports to approve by clicking the check box next to each report, or click the box next to Employee to select all reports in the list. Next, click the Approve Report button. The number of reports that are selected appear next to the Approve Report button, in an X Selected button, with X being the number of reports currently selected.
To approve an individual report, click on a report to go to a detailed view of that report. In this view, several options are presented: Approve, Refuse, or Reset to draft. Click Approve to approve the report.
If Refuse is clicked, a pop-up window appears. Enter a brief explanation for the refusal in the Reason to refuse Expense field, then click Refuse.

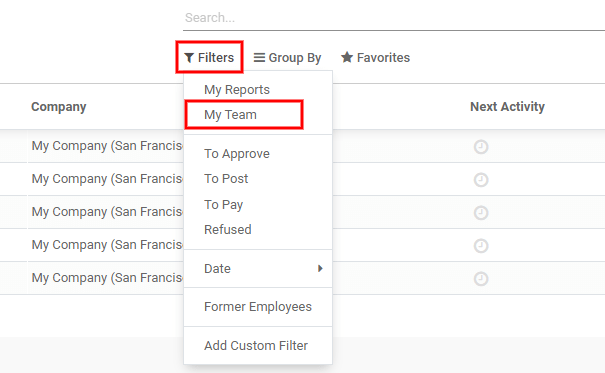
Team managers can easily view all the expense reports to approve for their team members. While in the Reports to Approve view, click on Filters, then click My Team. This presents all the reports to approve for the manager’s team. Manager’s can easily view all reports for their team by simply clicking on and removing the To Approve filter in the Search… bar, leaving only the My Team filter active.
小技巧
If more information is needed, such as a missing receipt, communication is easy from the chatter. In an individual report, simply click Send Message, then type in a message in the text box that appears, tagging the proper person (if needed), and post it to the chatter by clicking Send. The message is posted in the chatter, and the person tagged will be notified via email of the message, as well as anyone following.
Note that only followers can be tagged in a message. To tag someone who is not following, add them as a follower first. Click the 👤 (person) icon, then click Add Followers, then enter their name in the Recipients field, and finally, click Add Followers.

Post expenses in accounting
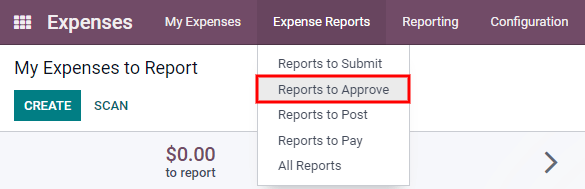
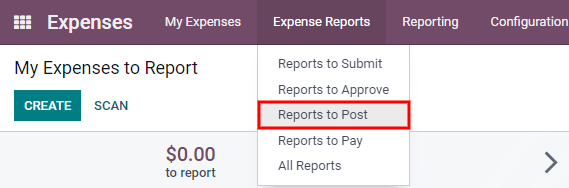
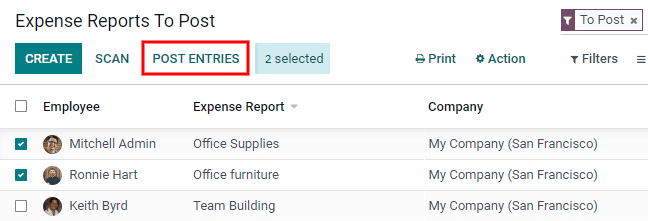
Once an expense report is approved, the next step is to post the report to the accounting journal. To view all expense reports to post, go to .
Just like approvals, expense reports can be posted in two ways (individually or several at once). To post multiple expense reports at once, remain in the list view. First, select the reports to post by clicking the check box next to each report, or click the box next to Employee to select all reports in the list. Next, click Post Entries.
要过账单个报告,请点击报告,转到该报告的详细视图。在该视图中,有几个选项:过账日记账分录、在下一期工资单中报告、拒绝`或 :guilabel:`重置为草稿。点击 过账日记账记项 将报告过账。
If Refuse is clicked, a pop-up window appears. Enter a brief explanation for the refusal in the Reason to refuse Expense field, then click Refuse. Refused reports can be viewed by going to . This list shows all reports, including the refused ones.
注解
要将费用报告过账至会计日记账,用户必须拥有以下访问权限:
会计:会计或顾问
报销费用:经理
向员工发还款项
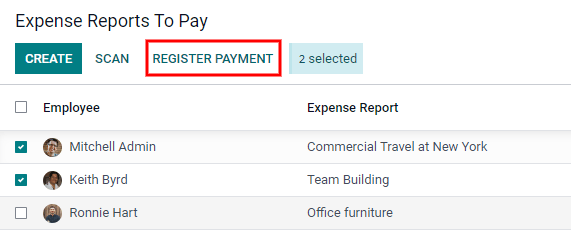
After an expense report is posted to an accounting journal, the next step is to reimburse the employee. To view all expense reports to pay, go to .

Just like approvals and posting, expense reports can be paid in two ways (individually or several at once). To pay multiple expense reports at once, remain in the list view. First, select the reports to pay by clicking the check box next to each report, or click the box next to Employee to select all reports in the list. Next, click Register Payment.
要向单个报告付款,请点击报告转到该报告的详细视图。点击 登记付款 向员工付款。
向客户重新开具费用开票
If an expense is to be reimbursed by a customer and not the company, the expense can be automatically charged to the customer. This is done by first referencing the SO the expense should be applied to when creating the expense.
The next steps are the same as if the expense is being reimbursed by the company instead of a customer. The expense or expenses are placed on an expense report, and then the expense report is submitted for approval. Next, managers approve the expense report, and the accounting department post the journal entry.
Finally, once the expense report is posted to a journal, the expense then appears on the SO that was referenced when the expense was first created.
The sales order can then be invoiced, thus invoicing the customer for the expense.
设置
First, specify the invoicing policy for each expense product. Go to . Click on the expense product to edit, then click Edit. Under the Invoicing section, select the Invoicing Policy and Re-Invoicing Policy by clicking the radio button next to the desired selection.
Invoicing Policy:
Ordered quantities: Expense product will only invoice expenses based on the ordered quantity.
Delivered quantities: Expense product will only invoice expenses based on the delivered quantity.
Re-Invoicing Policy:
No: Expense product will not be re-invoiced.
At cost: Expense product will invoice expenses at their real cost.
At sales price: Expense product will invoice the price set on the sale order.
Create an expense and expense report
First, when creating a new expense, the correct information needs to be entered in order to re-invoice a customer. Using the drop-down menu, select the sales order the expense will appear on in the Customer to Reinvoice section. Next, select the Analytic Account the expense will be posted to. After the expense(s) is created, the expense report needs to be created and submitted as usual.
重要
Selecting a Customer to Reinvoice when creating an expense is critical, since this field is unable to be modified once the expense is added to an expense report.
Validate and post expenses
Only employees with permissions (typically managers or supervisors) can approve expenses. Before approving an expense report, ensure the Analytic Account is set on every expense line of a report. If an Analytic Account is missing, click Edit and select the correct account from the drop-down menu, then click Approve or Refuse.
The accounting department is typically responsible for posting journal entries. Once an expense report is approved, it can then be posted. The SO is only updated after the journal entry is posted, and the expense(s) now appear on the referenced SO.
发票费用
Once the SO has been updated, it is time to invoice the customer. After the expense report has been approved and the journal entry has been posted, the SO can be opened and the expenses can be seen on it. Click anywhere on an expense line, and the details for that individual expense appears in a pop-up. Click on the SO that is listed next to Customer to Reinvoice.
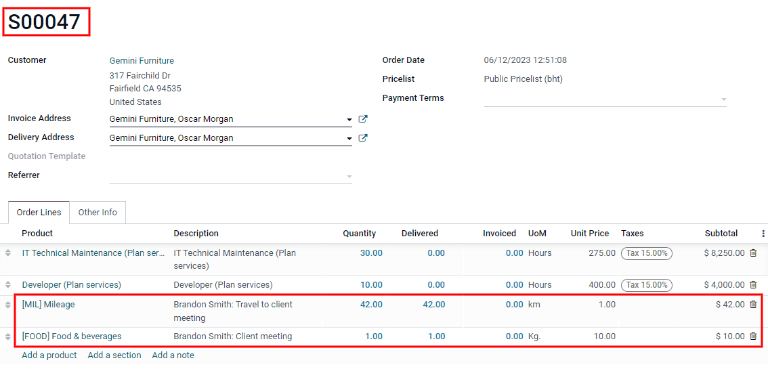
The SO appears, and now the expenses are listed in the Order Lines tab.
Next, click Create Invoice, and select if the invoice is for a Regular invoice, a Down payment (percentage), or a Down payment (fixed amount) by clicking the radio button next to it. Then, click Create Invoice. The customer has now been invoiced for the expenses.