语音邮件和音频信息
管理语音信箱是所有企业的重要组成部分。公司需要轻松访问留言,并及时处理任何未接来电。录制音频留言,例如感谢来电者的联系,或引导他们到正确的分机,也是个性化业务互动并与客户建立良好关系的绝佳方式。
本文档涵盖 Axivox 管理门户中语音邮件和音频信息的配置。
设置全球语言
要开始使用 Axivox 语音邮件和音频信息,应在 Axivox 管理门户中设置全球语言。要执行此操作,请访问 manage.axivox.com<axivox_admin_>。登录门户后,转到 。
在此处,设置语言为:法语, 英语, 西班牙语, 或 德语。
然后,点击 保存 键,再单击 常规设置 页面右上角的 应用更改 键,将更改应用到正式运行版中。
激活语音邮件
要让用户在 Axivox 中使用语音邮件,**必须**在 Axivox 管理门户中打开语音邮件功能。要开始对用户使用语音邮件,请导航到`manage.axivox.com<axivox_admin>`_。然后,使用相应的管理员凭据登录。
在 Axivox 管理面板的左侧菜单中,点击进入 用户。
然后,点击要激活语音邮件的特定用户。在标记为 语音邮件 的部分下,打开下拉菜单,点击 是。
最后,保存`更改,然后点击屏幕右上角的:guilabel:`应用更改。
语音邮件
下一步是在 Axivox 管理门户上设置各个语音信箱。要访问该门户,请访问 manage.axivox.com<axivox_admin_> 并登录。然后,导航至左侧菜单中的 。
如果使用 激活语音邮件 程序在用户配置文件中激活了语音信箱选项,则会在 语音信箱 页面自动创建语音邮件。
小技巧
需要注意的是,由于 Axivox 是一家比利时公司,因此一些管理门户的语言是法语。全球语言仍然设置为以下四个选项之一,如下所示::ref:voip/axivox/global_language。
手动创建语音邮件
要手动创建新的语音信箱,请点击 语音信箱 页面上的 添加语音信箱。或在 语音信箱 页面上点击现有语音信箱最右侧的 编辑,编辑现有语音信箱。
Example
假设销售或支持团队需要一个通用的语音信箱。需要手动创建语音信箱,并将其绑定到一个呼入号码上。
手动创建的新语音信箱应附加到一个来电号码上,以便接收信息。要执行此操作,请浏览左侧菜单中的 。然后,点击语音信箱应链接的特定号码最右侧的 编辑。
在 语音呼叫目的地类型 字段中,点击下拉菜单,选择 语音信箱。然后,打开下一行标有 语音信箱 的下拉菜单,选择手动创建的语音信箱。
重要
如果接收号码能够接收短信/文本信息,则会出现一个附加字段 接收短信的目标电子邮件地址。
要确定来电号码是否能接收短信,请点击左侧菜单中的 来电号码,然后检查来电号码的 :guilabel:`短信兼容`栏。
然后,如果适用,在标有:guilabel:`接收短信的目标电子邮件地址`的字段中输入一个电子邮件地址,接收发送到接收号码的接收短信。Axivox 中的某些来电号码(US+1)可以接收来自个人和自动号码的短信。
如果该字段为空,则会使用默认的目标地址(如之前在开始手动创建语音邮件时所设置)。
完成所有所需配置后,点击 保存,然后点击屏幕右上角的 应用更改,将更改应用到生产中。
通知
现在,只要在任何自动预配置或手动链接的语音信箱中收到语音邮件,就会向用户的电子邮件地址发送电子邮件,该地址列在 语音信箱 页面或用户的 Axivox 配置文件中。
可通过导航至左侧菜单中的 并点击特定用户旁边的 编辑 来访问此信息。
转到语音信箱
在 Axivox 中,用户还有许多转发设置。要访问这些转发设置,请访问 manage.axivox.com<axivox_admin_> 并登录。
接下来,导航至左侧菜单中的 。
从那里,点击要添加转发的特定用户。然后,打开 转发 选项卡。
如果用户正在忙于另一个通话,或不在电话旁,该选项卡中的 最后选择送到语音信箱 选项位于 无应答时转发 和 忙碌时转发 字段中。
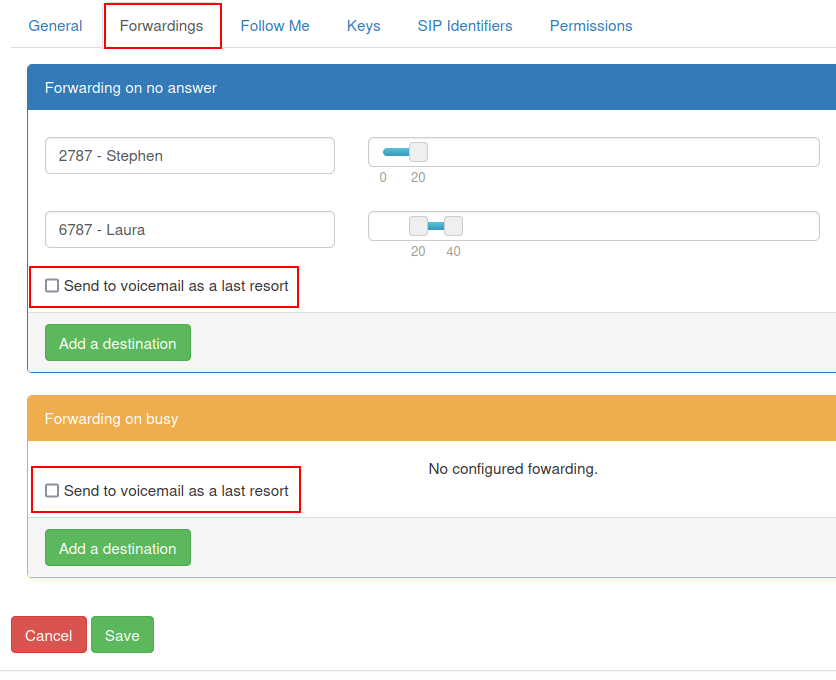
如果勾选:guilabel:`最后选择发送到语音信箱`复选框,当各部分所述的转接操作不成功时,来电将被转接到特定用户设置的语音信箱。
参见
有关转发和转移的更多信息,请访问 转发选项卡。
完成所有所需配置后,点击:guilabel:保存,然后点击屏幕右上角的 :guilabel:`应用更改`以执行更改。
语音信息
可以在接听客户电话*之前*添加音频信息,告知客户交货等待时间、产品供应情况或任何其他重要的促销信息。
要在 Axivox 中录制音频信息,请访问 manage.axivox.com<axivox_admin_> 并登录。
接下来,点击左侧菜单中的 音频信息。在 语音信息 页面,点击 添加信息。
输入 名称,并点击 保存。
点击 保存 后,浏览器将重定向到 语音信息 主页面,在该页面的列表中可以找到新创建的信息。
制作音频信息有两种不同的方法。用户可以通过电话录音,或者输入信息(文本),然后选择计算机生成的扬声器来朗读信息。
录制语音信息
要通过电话录制语音信息,请点击:guilabel:`语音信息`页面上要录制的信息列表右侧标有:guilabel:`录制/收听`的橙色按钮。
点击后,会弹出一个 录制/收听留言 窗口。然后通过与用户关联的分机之一录制信息。在 :guilabel:`用于信息管理的分机`字段下,点击下拉菜单,选择 Axivox 应调用以录制信息的分机。
然后,点击 确认 开始调用。
注解
用户**必须**在配置了 VoIP(网络电话)`的正式运行数据库中处于活动状态。要为用户配置 :abbr:`VoIP(网络电话),请参阅此文档:通过 Axivox 在 Odoo 中提供 VoIP 服务。
连接 Axivox 录音机管理线路后,法语接线员会提供以下选项:
按
1录制消息。按
2收听当前消息。
在录制新的音频信息之前,请根据系统中是否已经存在需要审核的特定音频信息,按 1 或 2。
按 1 开始录制新的音频消息,然后按 # 键结束录制。
法语接线员回到线路上,再次提出第一组问题:
按
1录制消息。按
2收听当前消息。
按 # 结束通话。
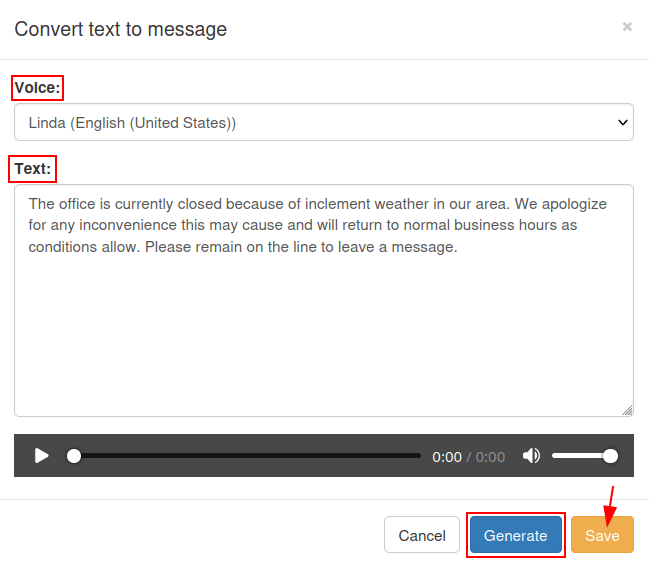
编写音频消息
要键入信息并选择电脑扬声器播放文本,请导航至左侧菜单中的 。
在 音频消息 页面,选择应附加信息的相应音频消息, 名称 旁边标有 文本消息 的蓝色按钮。
这样做会弹出一个 将文本转换为消息 窗口。
在弹出的 转换为文本消息 窗口中,点击标有 语音 字段旁边的下拉菜单,选择要读入的 文本 选项。
选择 语音 并将信息写入 文本 字段后,点击 生成 处理音频文件。
文本的读取语言与 文本 字段中所写的语言相同。如果 语音 字段中的语言不同,则计算机化的扬声器会使用相应的口音。
最后,完成这些步骤后,点击 保存 音频信息。
要执行更改,请点击屏幕右上角的 应用更改。
小技巧
要在拨号计划元素中设置问候语或音频信息,请双击该元素。这可以是一个 播放文件 元素,或一个 菜单 元素(呼叫者应在其中遇到紧急信息),或一个按号码拨号的目录。
有关拨号计划的更多信息,请参阅本文档: Dial plan basics 或 高级拨号计划 。
等候音乐
每当呼叫者等待接听电话时,Axivox 都可以为呼叫添加自定义等候音乐。要在 Axivox 管理门户添加等候音乐,请导航到 manage.axivox.com<axivox_admin_> 并登录。
然后,点击左侧菜单中的 等候音乐,弹出 更改等候音乐 窗口。
在弹出的 更改等候音乐 窗口中,点击 选择文件 按钮选择要上传的 MP3(MPEG 音频层 3)或 WAV(波形音频文件格式)文件。
注解
只能上传 MP3 或 WAV 文件到 Axivox 管理门户。
选择文件后,进展`栏会显示上传状态。活动完成后,点击 :guilabel:`关闭 即可关闭窗口。
完成所需更改后,单击屏幕右上角的 应用更改。