到期日期
在 Odoo 中,*有效期*可用于管理和追踪易腐产品从购买到销售的生命周期。通过使用到期日期,可以降低因为产品过期而造成的损失,并且有助于避免向客户提供过期产品的情况发生。
在 Odoo 中,只有使用*批次*和*序列号*追踪的产品才能分配过期信息。一旦分配了批号或序列号,就可以设置到期日期。这对经常或专门购买和销售易腐产品的公司(如食品制造商)特别有用。
参见
:doc:
/applications/inventory_and_mrp/inventory/management/lots_serial_numbers/lots:doc:
/applications/inventory_and_mrp/inventory/management/lots_serial_numbers/serial_numbers
启用有效期
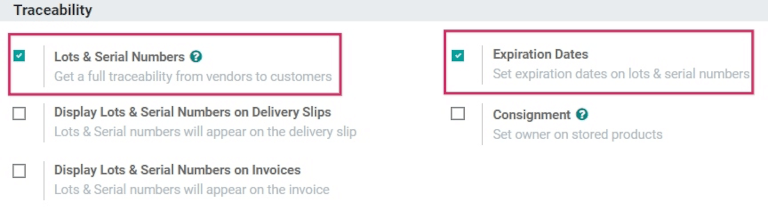
要启用*有效期*,请进入:menuselection:库存应用程序 --> 配置 --> 设置,然后向下滚动到:guilabel:可追溯性`部分。然后,点击复选框启用 :guilabel:`批次和序列号 功能。
激活该功能后,将出现一个启用 有效期`的新选项。点击复选框启用该功能,并确保 :guilabel:`保存 更改。
配置产品的有效期
在 库存 应用程序的设置中启用 批次和序列号 和 有效期 功能后,即可在单个产品上配置到期信息。
要执行此操作,请转至 ,然后选择要编辑的产品。选择产品后,将显示该特定项目的产品表单。进入产品表单后,点击左上角的 编辑 进行更改。
重要
要使用批次或序列号进行跟踪,或配置有效期信息,产品*必须*在 一般信息`选项卡下将其 :guilabel:`产品类型`设置为 :guilabel:`可储存产品。
然后,单击 库存 选项卡,向下滚动到 可追溯性 部分。在这里,确保选中 按照唯一序列号 或 按批次。
一旦启用,就会出现一个新的 有效期`复选框,也必须点击该复选框。两者都启用后,右侧会出现一个新的 :guilabel:`日期 字段。
注解
如果产品在激活批号或序列号追踪之前已有库存,则可能需要进行库存调整,以便为现有库存分配批号。
小技巧
对于处理大量收货或交货的产品,建议使用批次进行跟踪,以便在出现任何问题时可追溯到同一批次的多个产品。
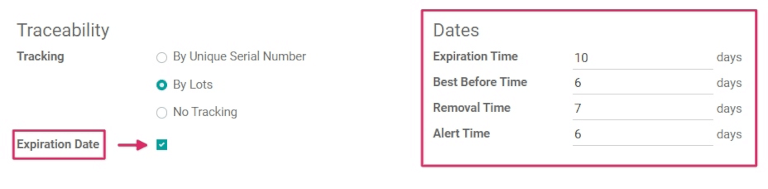
在 日期 字段下,可为产品配置四类到期信息:
有效期:收到产品(从供应商或生产后的库存)后的天数,在此天数内,货物可能变得危险,不应使用或消费。
最佳使用时间:货物到期前的天数,商品开始变质,**尚未**变得危险。
guilabel:
移除时间:到到期日之前的天数,商品应从库存中移除。提醒时间:指在到期日期之前的天数,在此期间应对特定批次或包含特定序列号的商品进行提醒。
注解
这些字段中输入的值会自动计算库存中商品的到期日期,无论是从供应商购买还是在内部生产。
配置好所有有效期信息后,点击 保存,保存所有更改。
小技巧
如果 日期 字段未填入任何过期信息值,则可在仓库收货和发货时手动分配日期(和批次)。即使分配了日期,也可以根据需要手动覆盖和更改。
在带有批次和序列号的收据上设置有效期
可直接从采购订单生成**入库**货物的有效期。要创建采购订单,请转到 应用程序,然后点击 创建,以创建新的询价单(RFQ)。
然后,通过添加 供应商 来填写信息,并通过点击 添加产品 在 产品 行添加产品。
更改 数量 列中的数字,选择所需的订购数量,然后点击 确认订单。这将把 RFQ(询价单) 转换为采购订单。
Click the Receipt smart button at the top of the purchase order to be taken to the warehouse receipt form.
注解
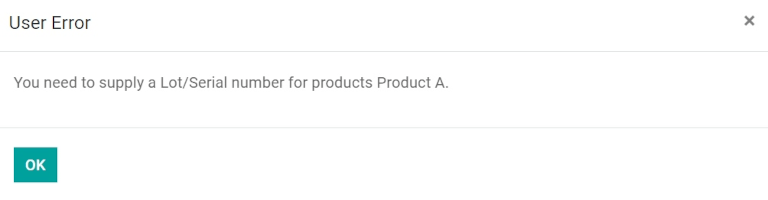
在为订购的产品数量分配序列号之前点击 验证 会弹出 用户错误 窗口。弹出窗口要求输入订购产品的批号或序列号。如果未指定批号或序列号,则无法验证 RFQ(询价单)。
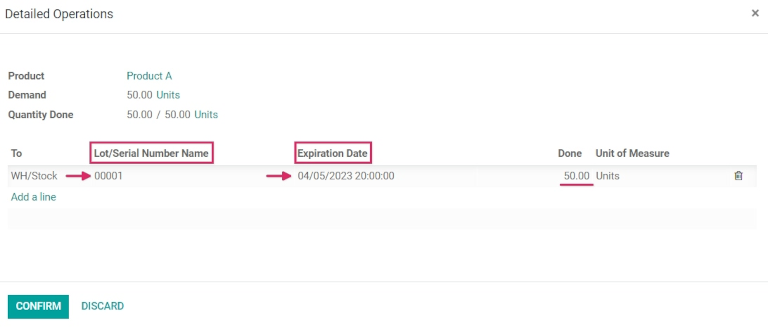
从此处,点击产品线最右侧的 附加选项 菜单(汉堡)图标。点击后,将出现 详细操作 弹出窗口。
在弹出窗口中,点击 添加行,并在:guilabel:批次/序列号名称 字段下指定批次或序列号。
根据产品表单上的配置(如果以前配置过),有效期会自动弹出。
小技巧
如果未配置产品表单上的 日期 字段,则可手动输入此日期。
确定有效期后,标记 已完成 数量,然后点击 确认 关闭弹出窗口。最后,点击 验证。
验证收据后将出现 可追溯性 智能按钮。点击 可追溯性 智能按钮可查看更新的 可追溯性报告,其中包括:参考资料 文档;正在追踪的:guilabel:产品;批次/序列号 # 等。
为制成品设定有效期
Expiration dates can also be generated for products manufactured in-house. To assign expiration dates to manufactured products, a manufacturing order (MO) needs to be completed.
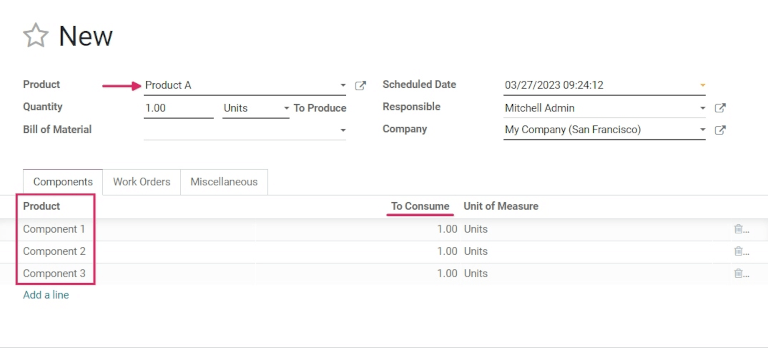
要创建一个 MO(制造订单),进入 ,然后点击 创建。从 产品 字段下拉菜单中选择要生产的产品,然后选择要生产的 数量。
注解
To manufacture a product, there must be materials to consume in the lines in the Product column. This can be achieved either by creating a Bill of Material for the Product, or manually adding materials to consume by clicking Add a line.
Once ready, click Confirm.
Next to Lot/Serial Number, either select an existing lot number from the drop-down menu, or click the green + sign to automatically assign a new lot number.
Then, select a number of units for the Quantity field, and click Mark as Done.
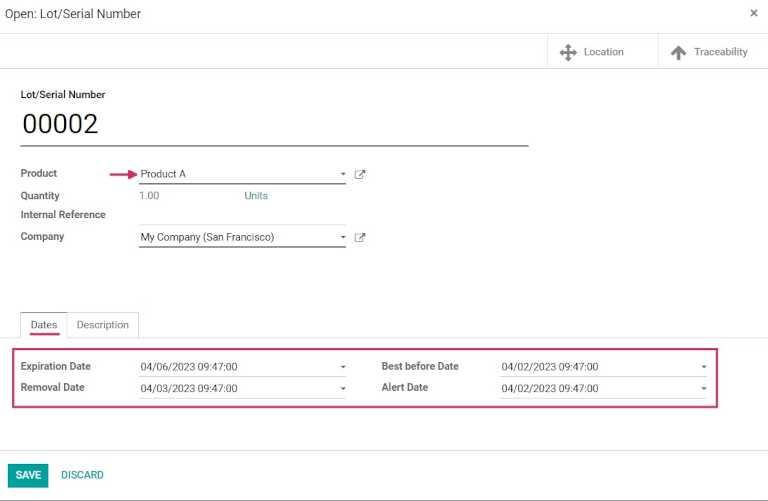
Click on the External Link icon in the assigned Lot/Serial Number field. A pop-up appears, revealing a detail form for that specific number.
On that pop-up, under the Dates tab, all expiration information that was previously configured for the product is displayed. That same information is also available on the detail form for that specific product, or by going to .
Sell products with expiration dates
Selling perishable products with expiration dates is done the same as any other type of product. The first step in selling perishable products is to create a sales order.
To do that, go to to create a new quotation, and fill out the information on the sales order form.
Add a Customer, click Add a product to add the desired products to the Product lines, and set a Quantity for the products.
Then, click the Other Info tab. Under the Delivery section, change the Delivery Date to a date after the expected date, and click the green checkmark icon to confirm the date. Finally, click Confirm to confirm the sales order.
Next, click the Delivery smart button at the top of the sales order to see the warehouse receipt form.
On the warehouse receipt form, click Validate, and then Apply in the accompanying pop-up window, to automatically process all Done quantities, and deliver the products to the customer.
If the products are delivered before the Alert Date set on the product form, then no alerts will be created.
重要
To sell perishable products with expiration dates, the Removal Strategy for the Location the products are stored in must be set to FEFO. If there is not enough stock of perishable products in one lot, Odoo will automatically take the remaining quantity required from a second lot with the next-soonest expiration date. Removal strategies can also be set on Product Categories.
View expiration dates for lots & serial numbers
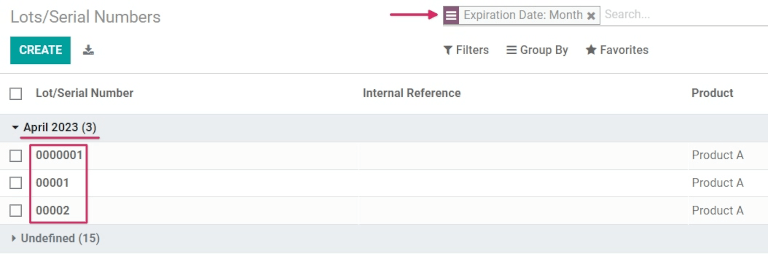
To view (and/or group) all products with expiration dates by lot number, go to .
Once there, remove any default search filters from the Search… bar. Then, click Group By, choose Add Custom Group, and select the Expiration Date parameter from the drop-down menu. Finally, click Apply to apply the filter.
Doing so breaks down all perishable products, their expiration dates, and the assigned lot number.
Expiration alerts
To see expiration alerts, go to .
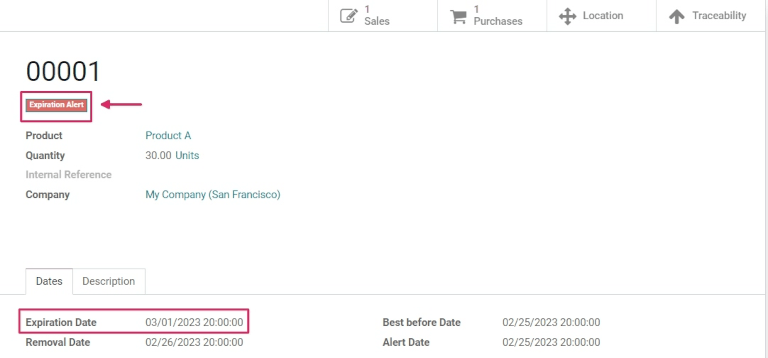
Then, click into a Lot/Serial Number with perishable products. Doing so reveals the serial number detail form. On the serial number detail form, click the Dates tab to see all expiration information related to the products.
To edit the form, click Edit in the upper-left corner of the form, then change the Expiration Date to today’s date (or earlier), and click Save to save changes.
After saving, the lot number form displays a red Expiration Alert at the top of the form to indicate that the products in this lot are either expired or expiring soon. From here, click back to the Lots/Serial Numbers page (via the breadcrumbs).
To see the new expiration alert, or any expiration alerts for products that are expired (or will expire soon), remove all of the search filters from the Search… bar on the Lots/Serial Numbers dashboard.
Then, click Filters, and choose Expiration Alerts.