Dial plan basics
当有人致电企业时,他们可能需要联系客户支持、销售团队,甚至是个人直线电话。呼叫者可能还在寻找有关企业的一些信息,例如营业时间。或者,他们可能希望留下语音邮件,以便公司可以回电。通过 Axivox 中的拨号计划,公司可以管理这类呼入电话。
通过拨号计划使用适当的呼叫架构,可以快速、高效地将呼叫者引导至正确的人员或正确的信息。
本文档涵盖 Axivox 中拨号计划的基本配置。
参见
有关高级拨号计划的更多信息,请访问 高级拨号计划 。
重要
使用浏览器插件拼写可能会妨碍在拨号计划中使用可视化编辑器。请勿在 Axivox 管理控制台中使用翻译器。
拨号计划
访问拨号计划,方法是导航到 Axivox 管理控制台,然后点击左侧菜单中的 拨号计划。
要在 拨号计划 页面添加新的拨号计划,请单击标有 添加新拨号计划 的绿色按钮。
注解
Axivox 不限制可创建拨号计划的数量。这些计划可以随时添加和改进。这样就可以创建具有多种不同配置的沙盒。
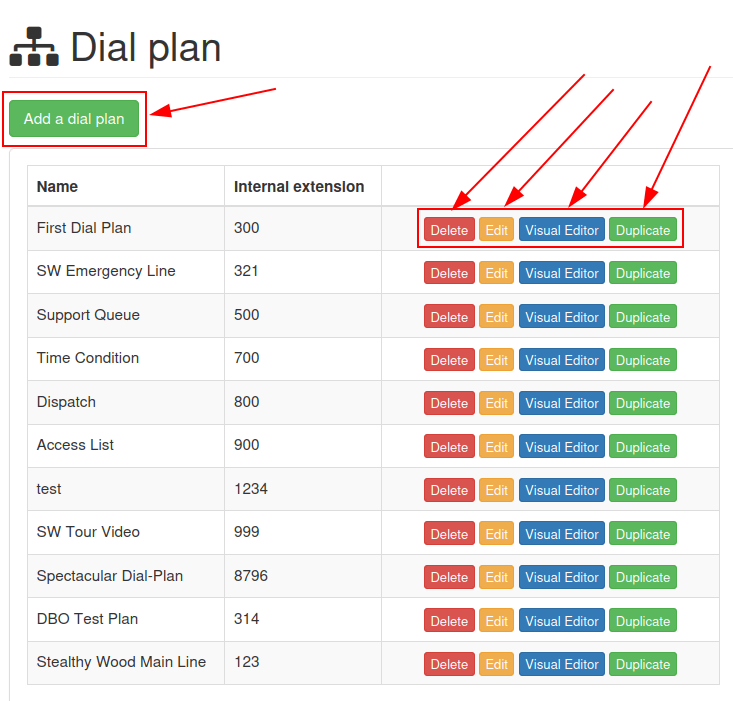
要编辑现有拨号计划,请在保存的拨号计划右侧选择以下选项之一:
删除:此操作将删除所附的拨号计划。
编辑:此操作允许用户编辑拨号计划。
可视化编辑器:此操作将打开一个可视化编辑器窗口,在该窗口中可以查看和编辑拨号计划结构。
复制:此操作将复制拨号计划,并将其放在列表底部,分机号码比原始分机号码大一个号码(+1)。
拨号计划编辑器(可视化编辑器)
点击 拨号计划 页面上拨号计划的 可视化编辑器 按钮后,会弹出 拨号计划编辑器 窗口。
该弹出窗口是配置拨号计划架构或结构的主要位置。在这个窗口中,会出现一个 GUI(图形用户界面),在这里可以配置各种拨号计划元素并将它们链接在一起。
重要
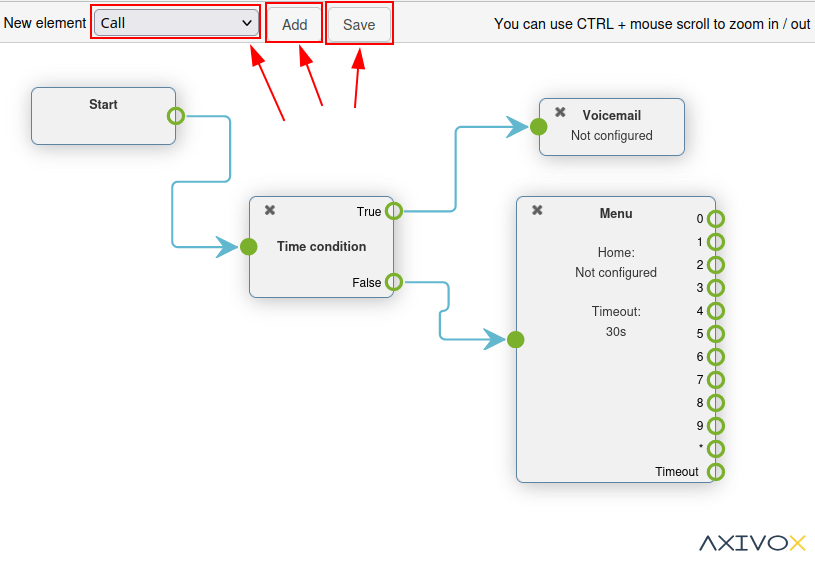
New dial plans come blank with New element options for the user to Add and Save.
The method for saving in the Dialplan Editor is different from saving any other edits in the Axivox management console because the Save button must be pressed before closing the .
Then, before these changes can take place on the Axivox platform, the user must click Apply changes in the upper-right corner of the Dial plan page.
From the Dialplan Editor pop-up window, users can add a new element to the dial plan. To do that, open the New element drop-down menu, and select the desired element. Then, click Add.
Doing so adds that element to the visual editor display of the dial plan being modified. This element can be moved where desired amongst the other elements present in the dial plan.
Connect elements in the dial plan by clicking and dragging outward from the (open circle) icon on the right side of the element. Doing so reveals an (arrow) icon. Proceed to drag this (arrow) icon to the desired element in the dial plan that it is meant to connect with.
Connect the (arrow) icon to the circle on the left side of the desired element.
Calls displayed in the dial plan flow from left-to-right in the element.
In order to further configure a New element, double-click on the element inside the dial plan, to reveal a subsequent pop-up window, wherein additional customizations can be entered.
双击每个元素都会弹出不同的配置窗口。
重要
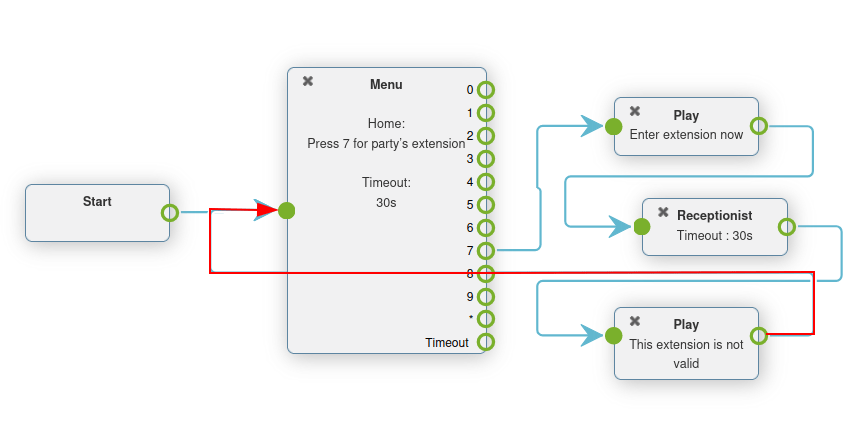
All elements must have a final destination in the dial plan in order to close a loop. This can be accomplished by implementing the Hang up element, or looping the element back to a Menu element or Digital Receptionist element elsewhere in the dial plan.
Once all desired dial plan elements and configurations are complete, remember to click Save before exiting the Dialplan Editor pop-up window. Then, click Apply changes on the Dial plans page to ensure they are implemented into Axivox production.
Dial plan elements
The following elements are available in the New element drop-down menu, while designing a dial plan in the Dialplan Editor pop-up window.
Basic elements
These are the basic elements that are used in simple dial plans in Axivox:
Call: call an extension or queue.
Play a file: play an audio file or voice greeting.
Voicemail: forward to a voicemail (terminal).
Hang up: hang up the call (terminal).
Queue: attach a call queue with a group of users to answer a call.
Conference: add a conference room for a caller to connect to.
基本路由元素
Routing elements change or route the path of a caller, these are some basic routing elements used in Axivox:
Menu: add a dial-by-number directory and configure downstream actions (not terminal).
Switch: attach a manual on/off control that can divert traffic based on whether it is opened (On) or closed (Off).
Digital Receptionist: attach a virtual dispatcher to listen for extensions to connect to.
高级路由元素
These are the more advanced elements that route calls in Axivox:
Dispatcher: create a call filter to route traffic based on the geo-location of the caller ID.
Access List: create a tailored access list with VIP customer preference.
时间条件:创建时间条件,以便在节假日或其他敏感时间段对进入的流量进行路由。
Multi-Switch: a mechanism to create paths, and turn them on and off, to divert incoming calls.
高级元素
The following are more advanced elements (not routing) in Axivox:
guilabel:
录音:已启用录音功能(需要更改计划,在 Axivox 设置中启用)。呼叫者 ID:用被叫号码或任意文本替换来电号码。
重要
Dial plan elements can be configured by double-clicking them, and linking different aspects of the Axivox console to them.
Attach to incoming number
要将现有拨号计划附加到一个来电号码,请访问 Axivox 管理控制台 ,然后单击:guilabel:来电号码。
然后,单击要附加拨号计划的号码旁边的 编辑。
这样就会显示一个单独的页面,在此可以修改该号码的拨号计划。为此,请从 语音呼叫目的地类型 字段下拉菜单中选择 拨号计划。然后,从出现的 拨号计划 字段中选择所需的拨号计划。
这样,当特定号码打入时,配置的拨号计划就会被激活,并通过提示正确路由呼叫者。
最后,保存`更改,并单击右上角的:guilabel:`应用更改。
基本拨号计划情景
下面展示的是用于呼叫路由的基本拨号计划方案,可以添加其他元素来扩展设置。此基本拨号计划方案包括以下链接元素:menuselection:开始-->播放文件-->菜单-->(挂断、通话、队列、会议)-->(语音信箱、挂断)。

参见
此设置**不**包括任何基本或高级呼叫路由。有关呼叫路由的更多信息,请参考此文档:高级拨号计划。