Sell stock from multiple warehouses using virtual locations
While keeping stock and selling inventory from one warehouse might work for smaller companies, bigger companies might need to keep stock in, or sell from, multiple warehouses in multiple locations.
In Odoo, sometimes products included in a single sales order might take stock from two (or more) warehouses. In Odoo, pulling products from multiple warehouses to satisfy sales demands can be done by using virtual locations.
注解
In order to create virtual locations in warehouses and proceed to the following steps, the Storage Locations and Multi-Step Routes features will need to be enabled in the app.
To do so, go to , scroll down to the Warehouse section, and click the checkboxes next to Storage Locations and Multi-Step Routes. Then, Save the changes to finish.
Create and configure a virtual parent location
Before creating any virtual stock locations, a new warehouse will need to be created. This new warehouse will act as a virtual warehouse, and will be the parent location of other physical warehouses.
Virtual warehouses are great for companies with multiple physical warehouses. This is because a situation might arise when one warehouse runs out of stock of a particular product, but another warehouse still has stock on-hand. In this case, stock from these two (or more) warehouses could be used to fulfill a single sales order.
The “virtual” warehouse acts as a single aggregator of all the inventory stored in a company’s physical warehouses, and is used (for traceability purposes) to create a hierarchy of locations in Odoo.
Create a new warehouse
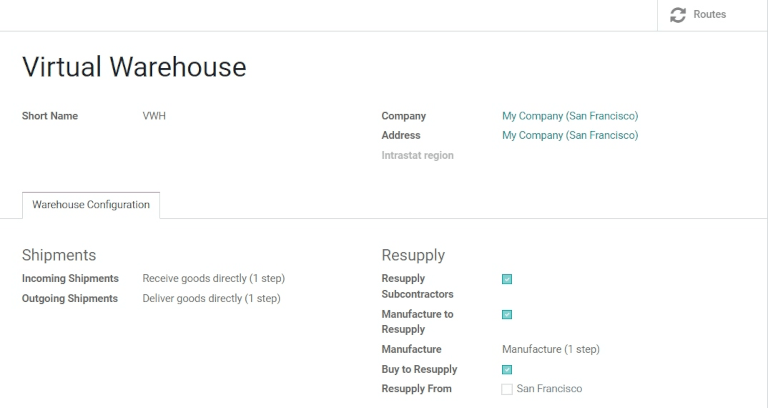
To create a new warehouse, go to , and click Create. From here, the warehouse Name and Short Name can be changed, and other warehouse details can be changed under the Warehouse Configuration tab.
Under the Shipments heading, set the number of steps used to process Incoming Shipments and Outgoing Shipments by selecting between the 1 step, 2 steps, and 3 steps radio buttons. The desired option for Incoming Shipments and Outgoing Shipments will depend on the warehouse’s procurement process, and might differ for individual products or product categories.
Under the Resupply heading, configure the method(s) for how the warehouse resupplies its inventory:
Resupply Subcontractors: resupply subcontractors with components from this warehouse.
Manufacture to Resupply: when products are manufactured, they can be manufactured in this warehouse.
Manufacture: to produce right away, move the components to the production location directly and start the manufacturing process; to pick first and then produce, unload the components from the stock to input location first, and then transfer it to the production location.
Buy to Resupply: when products are bought, they can be delivered to this warehouse.
Resupply From: automatically create routes to resupply this warehouse from another chosen warehouse
小技巧
Routes can be set and configured directly from the Warehouse form, by clicking on the Routes smart button. Once the warehouse is configured, virtual Locations can be created.
In order to apply this virtual warehouse as the parent location of two child location warehouses, there need to be two warehouses configured with physical stock locations.
Example
Virtual WarehouseVWHWarehouse A and Warehouse BWHA/Stock and WHB/StockCreate a virtual parent location
重要
In order to take stock from multiple warehouses to fulfill a sales order, there need to be at least two warehouses acting as child locations of the virtual parent location warehouse.
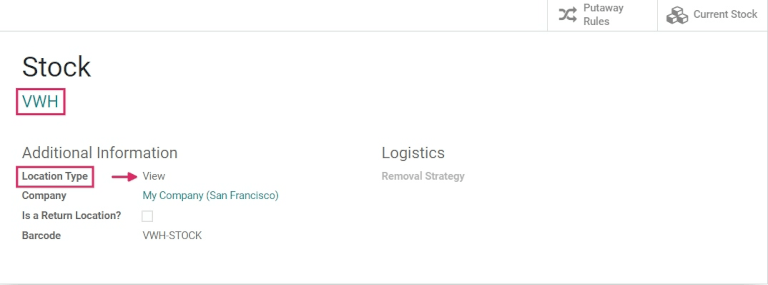
To create and edit Locations, go to . All Locations are listed here, including the Stock Location of the virtual warehouse that was created. Click into the Stock Location for the virtual warehouse that was previously created (Warehouse Name/Stock).
Then, under the Additional Information section, change the Location Type from Internal Location to View. Save the changes.
This identifies this Location as a virtual location, which is used to create a hierarchical structure for a warehouse and aggregate its child locations.
注解
Products can not be stored in a View Location Type.
Configure physical warehouse locations
Navigate back to the Locations overview (via the breadcrumbs), and remove any filters in the Search Bar. Then, click into the first physical warehouse Location that was previously created to be a child location, and click Edit.
Under Parent Location, select the virtual warehouse from the drop-down menu, and Save changes. Then, navigate back to the Locations overview, and repeat this step for the second physical warehouse stock location. Be sure to Save changes again.
Both locations are now child locations of the virtual warehouse parent location. This allows stock to be taken from multiple locations to fulfill a single sales order, if there is not enough stock in any one location (provided they are both tied to the same virtual warehouse parent location).
Example flow: Sell a product from a virtual warehouse
注解
To sell products from multiple warehouses using a virtual parent location in this flow, there must be at least two products and at least two warehouses configured - with at least one product with quantity on-hand in each warehouse, respectively.
To create a new request for quotation, or RFQ, navigate to the app, and click Create from the Quotations overview. Fill out the information on the new quotation by adding a Customer, and click Add a product to add the two products stored in the two warehouses.
Then, click the Other Info tab on the sales order form. Under the Delivery section, change the Warehouse field value listed to the virtual warehouse that was previously created. Once the warehouse has been changed, click Confirm to convert the quotation into a sales order.
Now that the quotation has been confirmed as a sales order, click the Delivery smart button. From the warehouse delivery form, confirm that the Source Location value matches the Warehouse field value from the sales order. Both should list the virtual warehouse location.
重要
The Source Location on the warehouse delivery form and the Warehouse under the Other Info tab on the sales order form must match in order for the products included in the sales order to be pulled from different warehouses.
If the virtual warehouse is not the value in the Source Location field on the warehouse delivery form, then click Edit, make the change, and click Save.
If the virtual warehouse is not the value in the Warehouse field on the sales order, then a new quotation may need to be generated.
If whe Warehouse field is missing on the sales order form, then the virtual warehouse (and its children warehouses) may not have been set up correctly, in which case, review the documentation above again to make sure all settings/configuration were done properly.
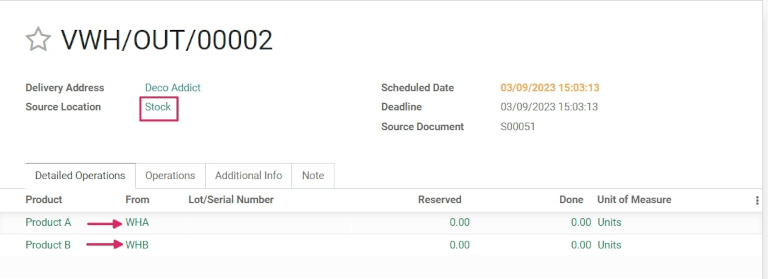
Finally, on the warehouse delivery form, under the Detailed Operations tab, confirm that the Locations values under the From column for each product matches to the child locations that are tied to the virtual parent location.
注解
To view which Locations the products are coming from on the drop-down menus, click the internal link (arrow) icon to expand the Location information. If needed, it can be changed from here (granted there is quantity on hand for the product in that location).
Once everything has been properly set, click Validate and then Apply to validate the delivery. Then, navigate back to the sales order form (via the breadcrumbs), and click Create Invoice to invoice for the sales order.
小技巧
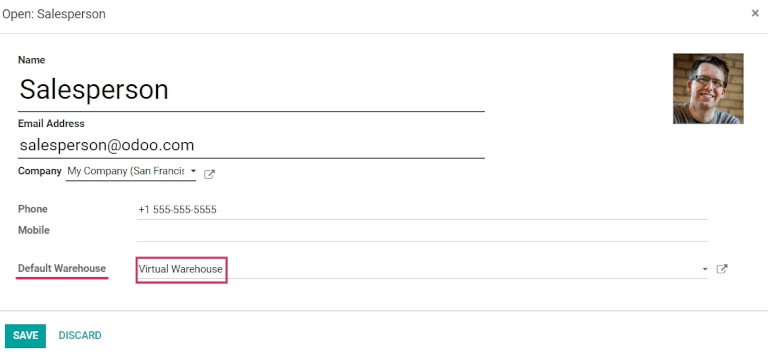
To use a virtual parent location as the default warehouse for sales orders, each salesperson can have the virtual warehouse assigned to them from the drop-down menu next to Default Warehouse on their employee form.